Revell Tony Schumacher "U.S. Army" Top Fuel DragsterDavid Carter | 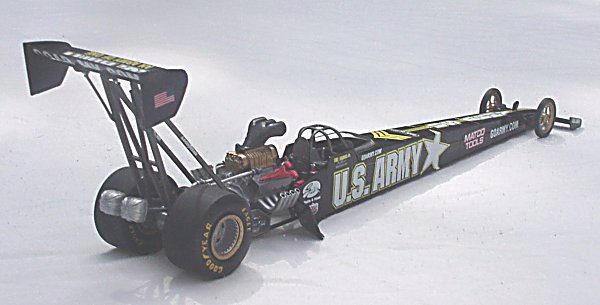 |
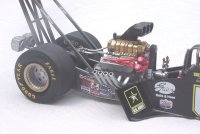
The "U.S. Army" dragster is one of the most successful and visible competitors on today's Top Fuel circuit. After a brief online search, I found the car's official website, many other related sites, and plenty of reference photos. Any working racecar is a work in progress, and as you might expect the kit differs slightly from the most current photos. 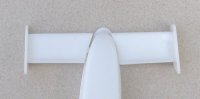 The biggest difference is that the car currently has a one-piece forward wing mounted above the front of the car, while the kit has a two-piece wing mounted on each side of the nose. I did find a few photos online with the two-piece wing, so the kit represents the car from a few seasons ago. Interestingly, the nice photo on the box top shows the one-piece wing. Other differences include differences in the markings, and the wheels.
The kit parts are molded in white plastic, with a clear windscreen and vinyl tires. A little unusual for a car model, no parts are chrome plated. That's really an advantage because few parts on most racecars are chromed. I tried out two new products on this model - Alclad II metal paints and Tamiya spray lacquer. The kit is rated skill level 3. While not for beginners, modelers who have good intermediate skills could handle it.
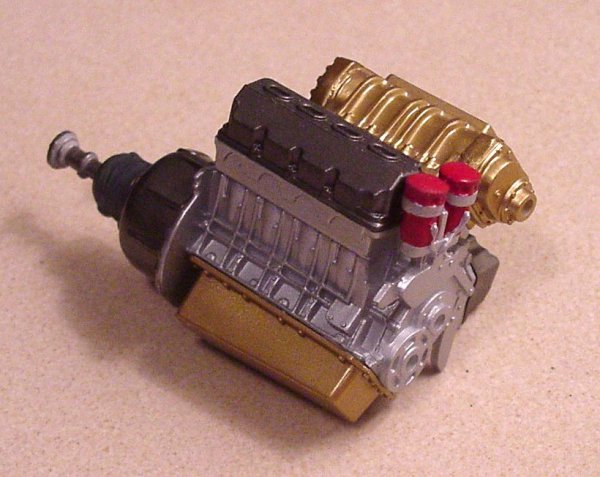
 The engine went together easily, and with good fit. The headers are molded with a recess for the exhaust, a nice touch. I drilled them out to make the opening deeper and more to scale. The air intake was molded without a bottom and this would be visible on the finished engine. This area was filled with plasticard, as was the bottom of the oil collector tank. The engine was painted with Alclad II. The block was done in aluminum. The kit directions call for the heads and the exhausts to be steel but Alclad steel looked too dark to me, so the heads were painted magnesium. Photos show the headers to be very shiny, so I painted them aluminum to match. The blower and the oil pan were done in pale gold. Even though Alclad's directions say that plastic should be primed with
  a barrier coat before using it, I used no primer coat since I found that by misting the paint on I could spray Alclad over bare plastic with no problems. Only in one place on the model did I put the paint on too wet, and the result was a bit rough, less shiny. I let it dry about 15 minutes, sanded the area with a very fine grit sanding stick, and then repainted. Alclad sands and featheredges well, and the problem was solved. Alclad dries so fast that I was able to mask over painted areas in less than 15 minutes. The parts painted with Alclad held up well to repeated handling with little if any affect to the finish. Alclad is not only one of the best-looking metalizer types of paint; it's one of the most durable too!
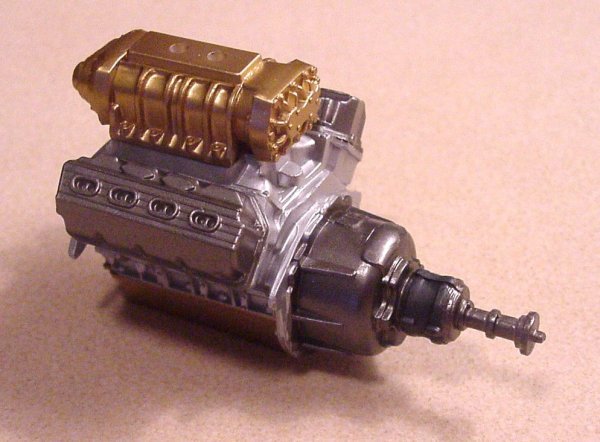
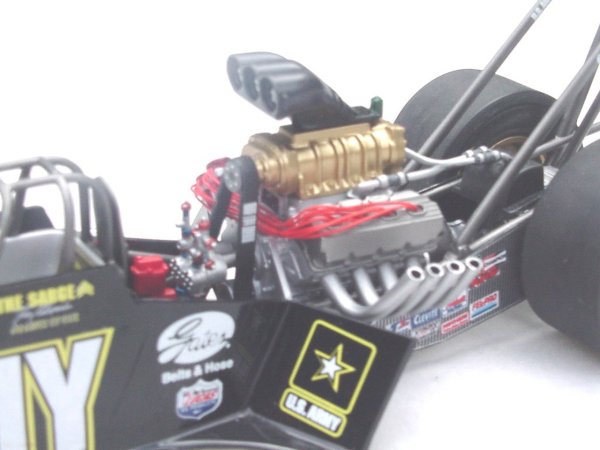
 A dragster looks bare without a wired engine. I thought that this would be the most difficult part of the model, but it turned out to be relatively easy. The car has twin magnetos, and photos showed that half the plug wires are routed to the front to go to the left head, and the other half go out the back to go to the right head. I simply drilled a few holes all the way through the magnetos and routed the wires from one head, through the mag and around to the other head. I used 30-gauge wire from Radio Shack, available in red.
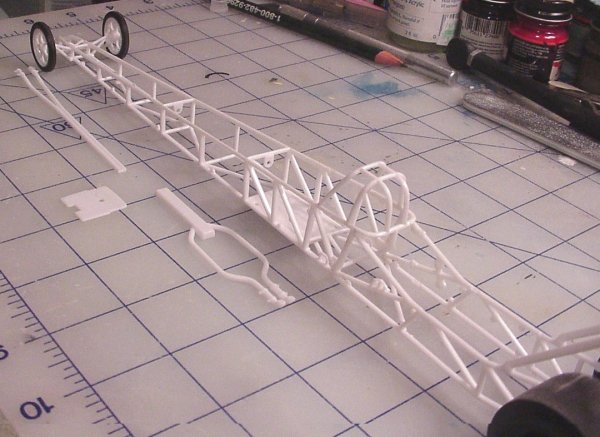
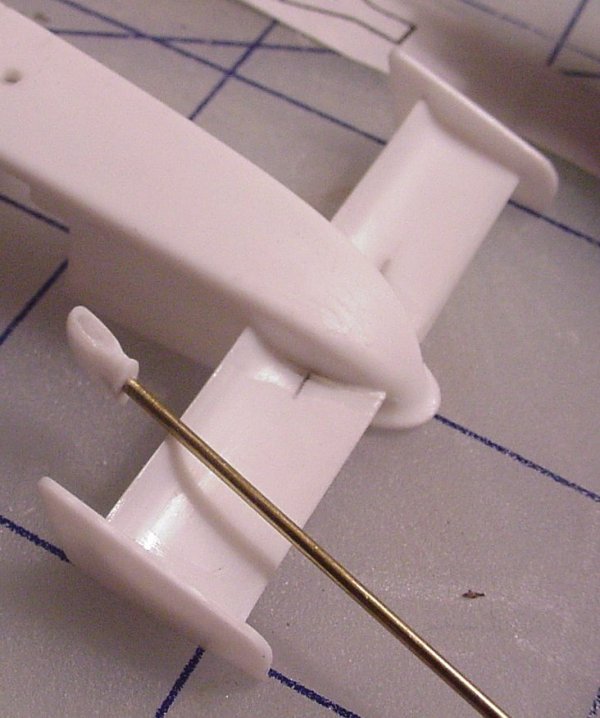
 The kit instructions would have you glue various parts to the frame, and then glue the frame together but I found after test fitting that I could glue most of the frame together and then add detail parts to it. This allowed me to have the best possible joints on the frame, and to sand and fill where needed. Also this eliminated the need to touch up the metal paints, which is important because Alclad doesn't hand brush well. The frame was to be painted gun metal, but was painted Alclad steel because that looked more like the photos. The forward part of the frame is a one piece molding the comprised the two sides and the bottom. This makes for easy assembly, but the tubes on this part are only round on the outside. Due to the limitations of mold making they are flat on the inside. This would be very difficult to fix. It would be very hard to sand them all down to a consistent round contour. If half round tubing were added to the inside then they would be wider than other parts of the frame that are molded round. Modelers able to replace this part with their own construction don't need to read reviews! As it is, the rear frame, which is visible with the body in place, is molded with round cross sections, and the
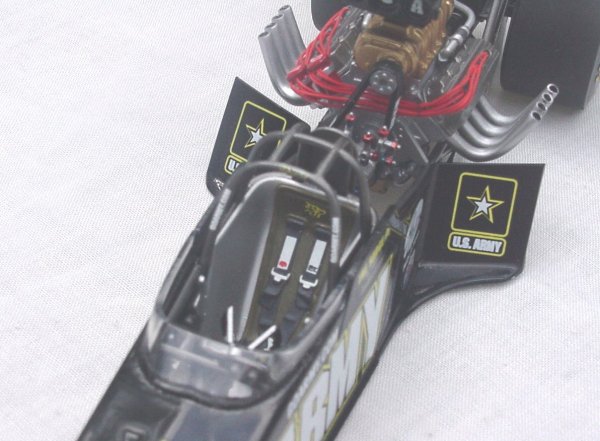
 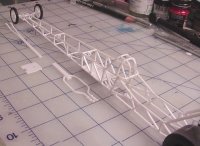 front only detracts if you let it bother you. I cut the fuel lines apart so that I could place them after the frame had been built and painted. The seat slipped into place on the assembled frame with some care. The seat has the harness molded into it and Revell provides decals, but unfortunately the decal does not match the molded harness making the decal unusable. I did cut out some of the detail from the decal and used it on the painted harness. I did not use the decals intended to represent the driver's gloves. The long and narrow frame has a lot of flex to it, and alignment was an ongoing issue during construction. Some careful bending of parts was used to line things up. The frame has a slight twist such that when held one of the front wheels drops more than the other but there is so much flex that the model gives enough to sit flat on its own weight. The only kit part I replaced was the steering column. The column was neither straight, round, nor consistent in diameter. Rather than make a career of sanding it, I replaced it with a small diameter aluminum rod.
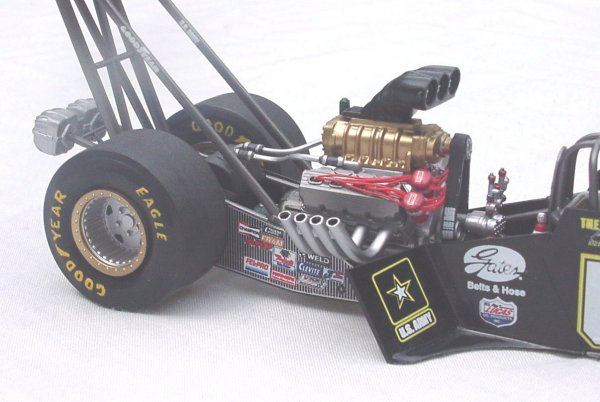
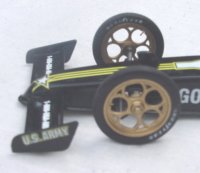 The Wheels were painted pale gold. The rear wheels were masked and the inner portion was painted aluminum. Decals are given for the white markings on the wheels. I was hesitant to try to make these decals conform to the raised lettering on the tires. Also, not all of the sidewall markings matched the raised areas on the front tires. All of the photos I saw showed the sidewall markings in yellow, not white as provided. So I decided to hand paint the tire markings. Decals are included for the markings around the circumference of the tire, a nice touch. However, photos of the car do not show these, I doubt they survive the first burnout. So I decided not to gloss coat the tire, decal, regloss coat, then flat coat the tire for these very temporary markings.

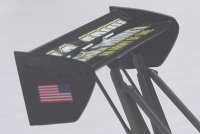
The body was painted with Tamiya gloss black lacquer from the spray can. This paint covered well, and dried to touch in a half hour! It's hard to see under all the decals, but it has a nice gloss. At one point a small drop of superglue dried on the body. I carefully sanded it smooth, and polished it out. Try that with any other gloss paint you've painted the same day! Two small body panels attach to the main body on only a very small area. I reinforced this joint with some very thin plastic card from behind. The front wings as provided do not line up straight with the body, nor are they consistent each other. I sanded and shimmed, and used brass pins to reinforce the joint. Filler was needed on the two main parts of the back wing.
 So far everything had been fun, using new paints, solving fit problems. Most modelers enjoy applying the decals more than any other part of kit. The decals in this kit promise to change all that. No they didn't fall apart as soon as they hit water, but they disappointed in just about every other way a decal can:
1) Printed out of register - some areas such as the white and yellow star with black outlines are visible on the dry sheet. Other areas - such as off set white extending beyond two of the four sides - did not become noticeable until the decal was placed on the model. Don't you love trimming wet decals?
2) Extensive white area not opaque. They look dirty white on the model. At least this is a common problem; Revell's not the only one with it. Still it would be nice to have decals that look as good as the graphics on diecast prebuilt models.
3) Chipped areas - I had to touch up both the yellow and white areas on the decals. Don't you love mixing up paint to try to match the dirty off white of translucent decals? While we're talking color the yellow on the decal sheet is too pale.
4) Decals would not conform to the surface of the model, and the instructions said they were not compatible with decal setting solutions. To make the decals to conform to the surface I had to dip a cloth in water as hot as I could stand it and then press as hard against the model as I could. And I had to do this everywhere a decal went over raised or recessed detail. Even so, the recessed lines under the white look whiter than the surrounding white. The decals that went over small simple curves, such as the decals on the roll cage, would not conform, but would stand out flat. In spite of the directions, I found that Microset would make them curve enough. Neither Microset nor Microsol would make them conform to the body. Decals are given for the red stripe on the lower edge of the body. They have a black stripe with them, I guess to make them wider and easier to handle. When put on the body the difference between the black on the decal and the body was too obvious. I tried cutting the black part away, but I was defeated because the decal simply could not be made to conform to the curved lip where it was to go. I tried to cut stripes from a generic red decal sheet by Microscale. I knew these would conform, but the red was translucent, deeper maroon on the black background. I had seen some of the photos of the car without the red stripe, and in frustration decided that my model would have to represent the version without the stripe. Really the only way to do it right would be to paint the stripe. Still, the kit decals should have been usable.
 5) At least one part is designed to be glued to a decal, a scoop on the top of the car near the front. The instructions tell you to apply the decals then glue this part on. Of course the slightest bump would knock this part off, along with who knows how much of the decal. I drilled holes and used a pin to locate and glue this part on.
6) Decals on the sheet that have no place to go on the model. Decals are supplied for each side of the car in front of the rear wheels and behind the headers. But the kit only has an open tube frame at these places. Photos show that the real car has a flat panel with markings like the ones on the decal sheet. I've seen a $99 prebuilt model that had this panel (and much better looking decals). And a close look at the picture of the model on the side of the box shows the decals mounted to some kid of panel. Yet no panel for these decals is provided, and nothing is mentioned in the directions as to a plastic part to represent a panel. The instructions do not say to cut out the decals to use the paper backing for support, which would be cheap. Nor do they tell you to make a panel from scrap, which shouldn't be done in models intended for the general public. Do they really expect you to put a decal over an empty space frame with no support? I scanned the decal sheet, printed it, glued the copy to sheet plastic, cut it out, painted it gloss black, and so made my own part.
7) And again the seat belt decals that don't match the kit plastic parts.
 Revell Monogram model kits have long had a reputation for the best value for the modeling dollar. This kit has enough detail to delight most hobbyists, and there's plenty of room left for the advanced modelers to add extra details. Even at a price just about anyone can afford the kit should include good quality decals that are easy to use and give results. I enjoyed building the kit, but not applying its decals.


![]()


