Wiciska, | 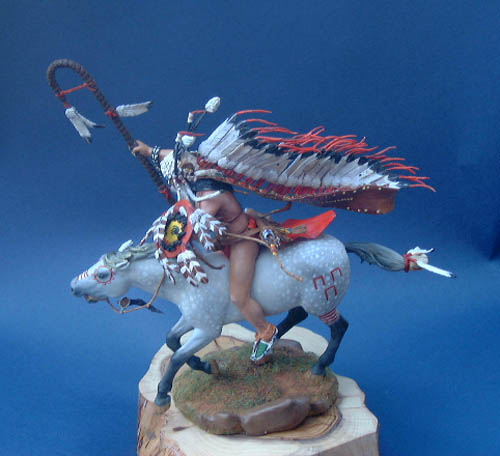 |
Introduction
As a keen collector of large scale Native American figures, any new kit coming on the market is a notable event, so when sculptor Emmanuel Valerio alerted me to the fact that Fort Duquesne were about to release a mounted Sioux warrior from his own master, I was excited to say the least.
As it is an expensive kit, I explored various ways to convince my wife that it was something she couldn't live without. However, earlier this year I took the decision to change career after 30 years, and as part of my retirement gift I received my "Wiciska" and no complaints from "Her indoors".
When I took delivery of this kit at the end of May, it took all my self-discipline not to clear the dining table and immediately make a start on it.
History
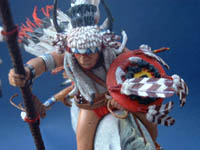
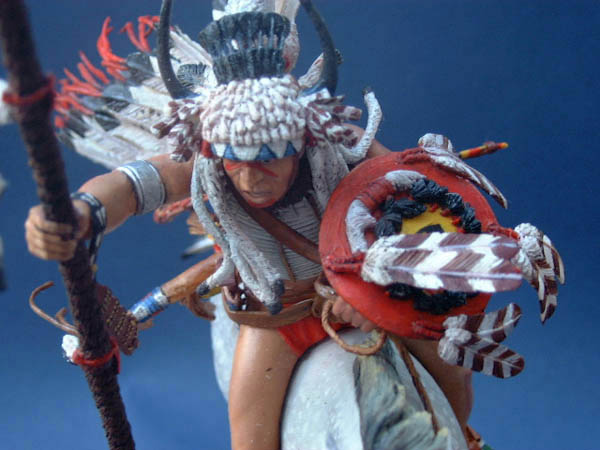
 The kit contains detailed background notes on the Wiciska Society, who were one of the oldest and most respected of the Sioux soldier societies. Wiciska means, "white marked" or "white owned" and refers to the headdress Society members wore, which was made from white ermine. The notes also refer to these warriors riding on white or light coloured horses, although Thomas E. Mails in his book "Dog Soldier Societies of the Plains" states that there was a separate Society of "white horse owners". It's not for me to say who is right, but I do know Emmanuel is dedicated to thoroughly researching his subject. The kit can be made to represent three alternatively armed warriors, I chose the" wapaha" or crooked lance bearer, the "wapaha" being carried by the two bravest men in the Society.
From the kit notes I learned that the great chief "Red Cloud" was a Wiciska. The warrior societies still survive within the Sioux nation today, although the Wiciska Society disappeared very early during the move to reservations in the late 19th century.
The Kit
From the moment you open the box, until the last of the 40 pieces (+ 2 alternative pieces) is attached, this kit oozes quality, the casting of even the finest details is faultless. Perfectly cast in cream resin with the finer parts in a harder and more damage resistant white resin, the only preparation required was the removal of a very small moulding plug under the horses head and some very faint moulding lines. As I said earlier the kit contains three alternative right hands - one carrying the crooked lance, one with a war club and one with a peace pipe war club (more recognisable as a tomahawk). The detailed instruction sheet warns you to take a lot of care and double checking with assembly and this is certainly a warning to be ignored at your peril. On a couple of occasions I got a bit carried away and rushed ahead only to realise why the construction is laid out in the order it is. Carefully assembling a few sources for reference to beadwork etc. is recommended prior to assembly.
Assembling and painting the horse
Construction begins with the beautifully modelled war pony. Assembly is straightforward and simple, the horse being in two halves with a separate head and tail. The detail is superb; the horse's teeth are individually modelled and the mane and tail flow very naturally. The parts go together perfectly, the only additional work necessary was a tiny smear of filler on the horse's rump and a light rub with fine wet & dry to remove join lines. The kit notes state the horse to be a white or light coloured, my other sources disagree; I hedged my bets and plumped for a grey.
 The entire horse was given a coat of Humbrol Matt Sea Grey and allowed to dry thoroughly. I paint virtually exclusively in oils and once ready to start on the horse I assembled my palette- Titanium White, Burnt Umber, Lamp Black, Sepia, Yellow Ochre and W&N Flesh tint. I would advise anyone seriously interested in painting horses to invest in a basic book on horses which contains good colour photographs. Having found a suitable picture of a grey, I began work.
Firstly I gave the horse's underbelly a coat of Titanium White, Flesh Tint and a very small amount of Lamp Black, the desired shade being a very pale greyish pink. This same colour was later used for an irregular pink patch on the fleshy area of the horse's muzzle. With the horse already being a dark grey, a thin transparent coat of Titanium white was brushed over the remaining body and head; the area around the muzzle and eyes and below the knees was left unpainted at this stage. A little Burnt Umber was added to Titanium White and a little Gold Ochre was similarly added to Titanium White and small amounts of these colours were blended into the neck fore quarters and rump areas. A very dark grey was mixed with a little Burnt Umber added and the legs and muzzle painted and blended into the paler areas. The mouth was painted with a mix of Flesh Tint and Burnt Umber and each tooth was picked out with Burnt Umber, Gold Ochre and Titanium White, each being carefully blended. The mane was painted a very dark grey near the roots becoming lighter along it's length with the last third being a grey/ochre mix with gives a blond look, deep shadows were picked out with Sepia.
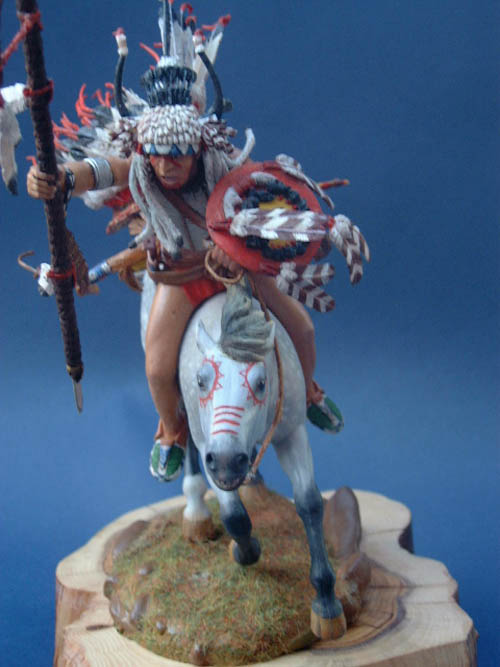
 When I was happy with the base coat, I allowed it to dry thoroughly before adding a white dapple on the hindquarters and chest/neck area. Once this was completely dry the entire upper body was given a glaze with Titanium White very thinly brushed out, to key all the shades together. Most modellers paint the hooves in a dark brown colour almost without exception, although even my basic research showed that light coloured horses commonly have "zebra" hooves, i.e. a pale ochre hoof with darker brown or black stripes. I found this a most attractive option and painted mine accordingly. The final touch was painting the detailed underside of the exposed hooves in a colour close to that I intended to use for the base and adding the war paint.
One point that I misread was that if the kit is to be shown, the supporting leg should be drilled out and a brass rod inserted, I somehow read this that the horse had a brass rod inserted in the supporting leg and it was only after I had attached it permanently to the base that I realised my mistake.


The Figure
The assembly of the figure must follow the order in the instructions for all the complicated sub assemblies to go together. The upper torso (including the right arm) and legs are assembled, undercoated in Humbrol Flesh with a little Light Red added, and then glazed with oils; my basic palette being Burnt Sienna, Gold Ochre, Titanium White, Flesh Tint and Burnt Umber. The quilled breastplate and eagle claw choker were painted and attached. Having painted and added the rear breechcloth and the quiver strap and knife, I began painting the bow case and quiver - even the bowstring is finely moulded and frankly replacing it with nylon thread or wire would not achieve any better result. The bow case painted, it was attached to the rear of the figure.
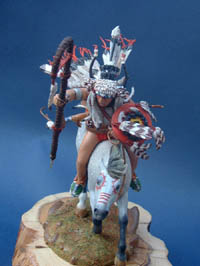
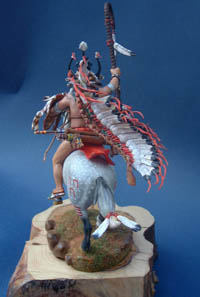 The real piece de resistance of this kit is the spectacular headdress, containing no less than 42 feathers. It is a kit in itself containing 20 parts or half the overall total. Paint all the component parts prior to assembly, as it will be impossible to get at them afterwards. Assembly is in two stages, the headdress and the trailer. The skullcap is moulded onto the figure; it was painted a pale ochre colour and each individual ermine tuft picked out in a very light blend of Titanium White, Prussian Blue and Burnt Sienna. Warning: Prussian Blue is a very powerful colour and only the very tiniest amount should be used. Once dry the ermine was highlighted with pure white. Ermine straps were painted and attached and the shaved buffalo horns and owl feathers were painted and similarly attached to the sides of the headdress. A "tiara" of cut Crow feathers and a single long serrated black feather were attached before work on the headdress halted pending the attachment of the trailer.
The left arm with shield straps is attached next carefully lining up the straps and then the shield is added.
Now for that trailer! Do not do what I did - feathers are grouped together in 3's, 4's, 5's and even a group of six and are attached in a precise order. Each group of feathers has a number and letter inscribed on the carrier resin. DO NOT CUT THIS OFF UNTIL YOU ARE GOING TO ATTACH THAT PARTICULAR GROUP. In my enthusiasm one of the first things I did was remove these carriers only to discover several days later that I didn't know my group 4a from my 5b although the illustration on the instruction sheet helped recover the situation. After painting the trailer itself with it's symbolic butterfly and circle design and after all feathers have been painted, attach them exactly as outlined.
I am never satisfied with the feathers I paint. I have viewed real headdresses and frankly, if you were to paint the feathers as they look in real life they would look false. While I have yet to find a satisfying solution, I tend to paint the tips in Sepia and base coat the white area with the very pale Titanium White/Prussian Blue/Burnt Sienna mix and then pick out highlights and leading edges in pure white. However it is one area where I know there must be a better way.
Once the trailer and its impressive array are completed the assembly fits very neatly into a groove on the back of the warriors' head.
 As I stated there are 3 right hands giving 3 alternative weapons, once your choice is made the hand attaches to the right arm passing through the strap of his quirt so that the join is hidden. Additional feathers are attached to the crooked lance and horses tail, the rider is permanently attached to the horse and the reins, made from braided wire are attached to the horse/rider.
The final thing I did was to paint the war paint on both rider and horse, I was tempted to omit this altogether, but he would have been more likely to go naked than to go without war paint, so I bowed to historical accuracy and added it.
The base included with the kit is small for such a large and dramatic figure, but it is adequate and does not detract from the figure.

Conclusion
At £130 this is no pocket money kit, therefore I have not dwelt on colour mixes etc. if you want to add this beautiful piece to your collection I assume you will not be a newcomer to the hobby and be long enough in the tooth to know which colours make good flesh tones etc. Also most of the colour/pattern information needed is contained in the construction sheet.
This is a quality item; it begs you to give it your best possible shot. Nothing has been overlooked or compromised in the production. It is certainly complicated to paint and assemble compared to most 120mm figures but your efforts are rewarded with a truly spectacular model. I cannot recommend it highly enough, simply brilliant. It was worth retiring if only to get this kit.
My thanks go to Emmanuel Valerio for his help and moral support.
Available from Historex Agents in UK, or direct from Fort Duquesne in the USA.

![]()


