Revell 1/48 PBY-5A CatalinaBy Dave Manter |
 |
History
 In
World War II the U.S. Navy used long-range flying boats to patrol the
vast expanses of ocean and look for the enemy. No other flying boat was
produced in greater numbers or for as long as time as the Consolidated
PBY. In production continuously for more than 10 years, the PBY was named
“Catalina” by the British in November 1940 shortly after the
first were delivered to the RAF. Used not only for search but also for
rescue, the PBY was a welcome sight for numerous downed airmen and sailors
from ships that had been sunk. The high regard in which the PBY was held
is reflected by the remark attributed to an Army pilot, “When I
see a PBY, I always stand up and salute it!” Another use of the
PBY was in the bomber and torpedo bomber rolls. The most famous of these
were the Black Cat night search and attack operations conducted in the
South Pacific by VP-12. VP-12 arrived on Guadalcanal with black painted
PBY-5As in December of 1942 and continued operations until March 1943.
Other Black Cat operations continued until the end of the war. With more
than 3,300 Catalina boats and amphibians produced, nearly 100 are still
flying today. The PBY continues to live up to her reputation as a go anywhere,
do anything workhorse.
In
World War II the U.S. Navy used long-range flying boats to patrol the
vast expanses of ocean and look for the enemy. No other flying boat was
produced in greater numbers or for as long as time as the Consolidated
PBY. In production continuously for more than 10 years, the PBY was named
“Catalina” by the British in November 1940 shortly after the
first were delivered to the RAF. Used not only for search but also for
rescue, the PBY was a welcome sight for numerous downed airmen and sailors
from ships that had been sunk. The high regard in which the PBY was held
is reflected by the remark attributed to an Army pilot, “When I
see a PBY, I always stand up and salute it!” Another use of the
PBY was in the bomber and torpedo bomber rolls. The most famous of these
were the Black Cat night search and attack operations conducted in the
South Pacific by VP-12. VP-12 arrived on Guadalcanal with black painted
PBY-5As in December of 1942 and continued operations until March 1943.
Other Black Cat operations continued until the end of the war. With more
than 3,300 Catalina boats and amphibians produced, nearly 100 are still
flying today. The PBY continues to live up to her reputation as a go anywhere,
do anything workhorse.
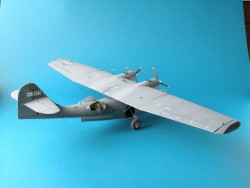
The Kit
 The
Revell Monogram kit has been issued before, once as a straight PBY-5 and
also as a PBY-5A in their Pro Modeler line. This time the kit has been
released in the regular line as the PBY-5A. The kit contains 160 parts
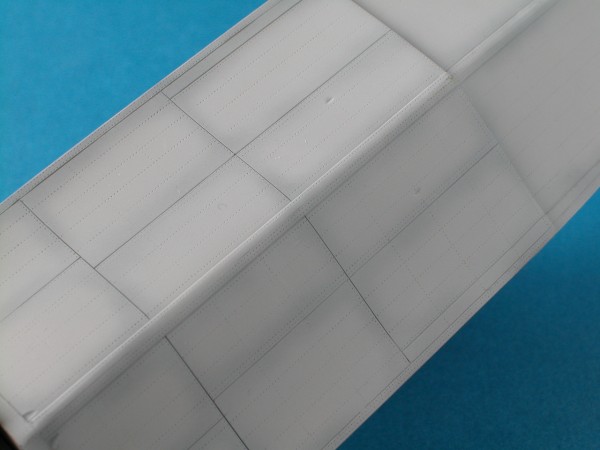
molded in a light gray and clear plastic. Detail is superb. The rivet
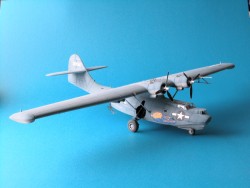
detail on the wings and fuselage is outstanding. The first thing that
you will notice is that this is a LARGE aircraft! The wingspan is more
than 26 inches! The kit can be built with the landing gear in the up or
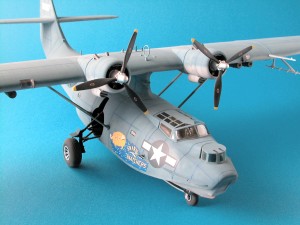
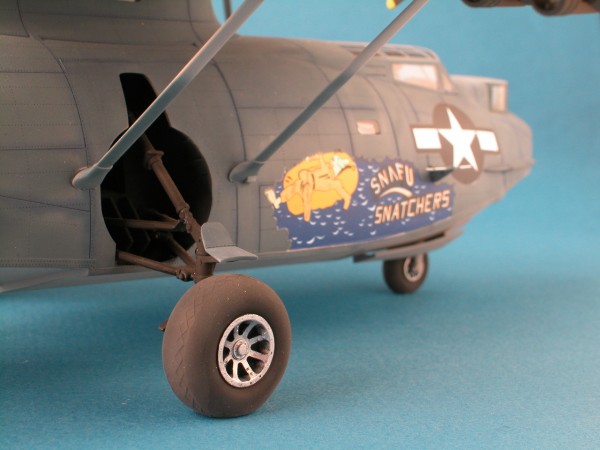
down positions. The kit comes with a beautiful decal sheet with markings
for 2 aircraft. The first is an intermediate blue over gray scheme from
the 2nd Emergency Rescue Squadron 1945. The second is a blue gray, red
and yellow scheme from the 4th Rescue Squadron, Hamilton AFB, 1950. The
decals are printed in perfect registration and feature very vivid colors.
The instruction book is well laid out and features 6 main assembly steps
broken down into several sub assembly steps. Painting is called out during
assembly. The kit also features 4 crew figures and they are some of the
nicest 1/48th scale figures that I have seen.
The
Revell Monogram kit has been issued before, once as a straight PBY-5 and
also as a PBY-5A in their Pro Modeler line. This time the kit has been
released in the regular line as the PBY-5A. The kit contains 160 parts
molded in a light gray and clear plastic. Detail is superb. The rivet
detail on the wings and fuselage is outstanding. The first thing that
you will notice is that this is a LARGE aircraft! The wingspan is more
than 26 inches! The kit can be built with the landing gear in the up or
down positions. The kit comes with a beautiful decal sheet with markings
for 2 aircraft. The first is an intermediate blue over gray scheme from
the 2nd Emergency Rescue Squadron 1945. The second is a blue gray, red
and yellow scheme from the 4th Rescue Squadron, Hamilton AFB, 1950. The
decals are printed in perfect registration and feature very vivid colors.
The instruction book is well laid out and features 6 main assembly steps
broken down into several sub assembly steps. Painting is called out during
assembly. The kit also features 4 crew figures and they are some of the
nicest 1/48th scale figures that I have seen.

Construction
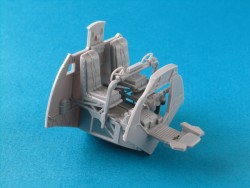 Step
one begins with the cockpit and it is pretty straightforward. You also
need to decide whether you are going to use the very nice figures or not
and if you will build the plane with retracted gear or not. After a little
clean up all of the parts fit well. I built the entire forward cockpit
before I painted. After the parts were dry I mixed up a 50/50 mix of flat
green and flat yellow and sprayed all of the interior parts, including
the inside of the fuselage halves. After this was done I applied a thin
wash of Van Dyke Brown and did all of the detail painting. The last step
was to use a silver artist pencil to add some paint chips.
Step
one begins with the cockpit and it is pretty straightforward. You also
need to decide whether you are going to use the very nice figures or not
and if you will build the plane with retracted gear or not. After a little
clean up all of the parts fit well. I built the entire forward cockpit
before I painted. After the parts were dry I mixed up a 50/50 mix of flat
green and flat yellow and sprayed all of the interior parts, including
the inside of the fuselage halves. After this was done I applied a thin
wash of Van Dyke Brown and did all of the detail painting. The last step
was to use a silver artist pencil to add some paint chips.

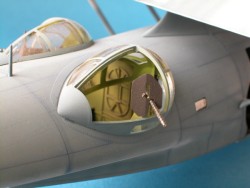
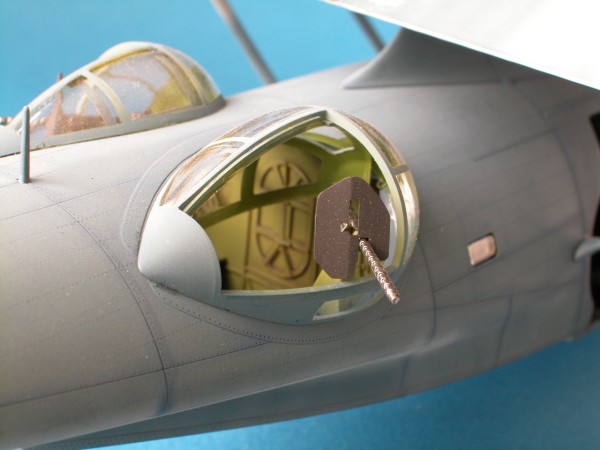
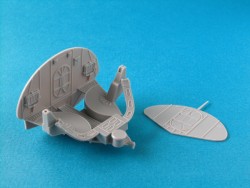 Step
two begins with the installation of the fuselage windows and there are
7 of these. As I had already sprayed the inside of the fuselage I put
the windows in with Microscale Kristal Klear. This white glue dries totally
clear and also fills in any small gaps that might be present. The main
landing gear was next and again after a little clean up all of the parts
fit well. It will definitely be easier to paint the gear bays before you
install them into the fuselage. I choose to paint these black as most
of my reference material showed them this way, but they could also be
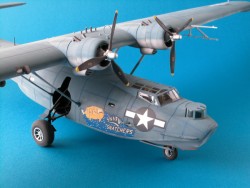
painted the underside color as well. The last thing to do was the rear
gunner’s compartment and it was built and painted the same way as
the main cockpit. Keep in mind that if you install the gun blisters in
the open position, virtually all of this area will be visible so a little
extra time fitting the parts will be worthwhile.
Step
two begins with the installation of the fuselage windows and there are
7 of these. As I had already sprayed the inside of the fuselage I put
the windows in with Microscale Kristal Klear. This white glue dries totally
clear and also fills in any small gaps that might be present. The main
landing gear was next and again after a little clean up all of the parts
fit well. It will definitely be easier to paint the gear bays before you
install them into the fuselage. I choose to paint these black as most
of my reference material showed them this way, but they could also be
painted the underside color as well. The last thing to do was the rear
gunner’s compartment and it was built and painted the same way as
the main cockpit. Keep in mind that if you install the gun blisters in
the open position, virtually all of this area will be visible so a little
extra time fitting the parts will be worthwhile.

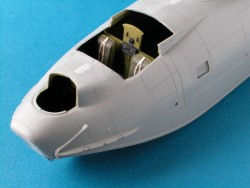 Step
three is the installation of the cockpit and rear gunner’s compartment
and the gluing up of the fuselage halves. Two important points here; the
area behind the main cockpit will be visible through the canopy and if
you are building the aircraft with the gear down, you must add a lot of
weight to the forward section to keep it from sitting on its tail. The
instructions do mention that you need to add weight. I added almost 6
oz. of lead weights right behind the cockpit. After I added this, I painted
this whole area flat black because it can be seen on the finished model.
Because of the length of the fuselage I used liquid cement to put the
two halves together. I used tape to hold the two pieces together as I
made my way around the fuselage. The fit here was nice and just a small
amount of filler was needed. The nose gear and main landing wheels are
added last in this step.
Step
three is the installation of the cockpit and rear gunner’s compartment
and the gluing up of the fuselage halves. Two important points here; the
area behind the main cockpit will be visible through the canopy and if
you are building the aircraft with the gear down, you must add a lot of
weight to the forward section to keep it from sitting on its tail. The
instructions do mention that you need to add weight. I added almost 6
oz. of lead weights right behind the cockpit. After I added this, I painted
this whole area flat black because it can be seen on the finished model.
Because of the length of the fuselage I used liquid cement to put the
two halves together. I used tape to hold the two pieces together as I
made my way around the fuselage. The fit here was nice and just a small
amount of filler was needed. The nose gear and main landing wheels are
added last in this step.

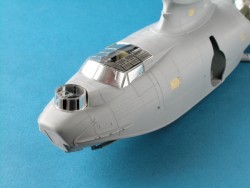 Step
four is the installation of the rear machine guns and all of the canopies.
Before I installed the clear canopies, I dipped each of them in Future
to give them more of a shine and also to help with the masking. After
letting the Future dry overnight, I masked all of the canopies with Bare
Metal Foil. I normally use Tamiya masking tape for this but the compound
curves on the gunner’s blisters made this difficult. The panels
were cut out with a fresh scalpel blade and no problems were encountered.
I left the machine guns out and then installed the canopy and the gun
blisters with Kristal Klear.
Step
four is the installation of the rear machine guns and all of the canopies.
Before I installed the clear canopies, I dipped each of them in Future
to give them more of a shine and also to help with the masking. After
letting the Future dry overnight, I masked all of the canopies with Bare
Metal Foil. I normally use Tamiya masking tape for this but the compound
curves on the gunner’s blisters made this difficult. The panels
were cut out with a fresh scalpel blade and no problems were encountered.
I left the machine guns out and then installed the canopy and the gun
blisters with Kristal Klear.

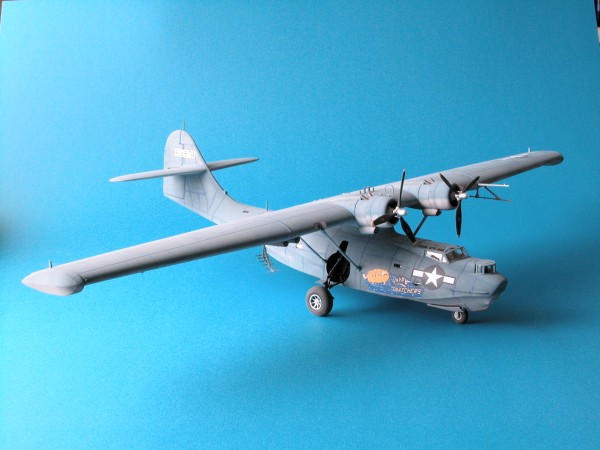
 Step
five is the assembly of the main wing, engine nacelles and stabilizers.
Man, is this wing big! I found out how much clutter had accumulated on
my workbench! I kept banging into paint bottles and such as I maneuvered
this wing around! After assembling the main wing I moved on to the wing
tip floats and the stabilizers. All parts again fit well. I did use a
fair amount of filler along the leading edge due to the large attachment
points on the parts trees. As these were drying I painted the engines
black and dry brushed the cylinder heads with silver. The crankcases were
done in dark gray. After the wing and the other parts dried overnight,
I installed the wingtip floats in the up position, but here again you
can install them in the up or down position. I installed the stabilizers
but left the main wing off to make the painting easier.
Step
five is the assembly of the main wing, engine nacelles and stabilizers.
Man, is this wing big! I found out how much clutter had accumulated on
my workbench! I kept banging into paint bottles and such as I maneuvered
this wing around! After assembling the main wing I moved on to the wing
tip floats and the stabilizers. All parts again fit well. I did use a
fair amount of filler along the leading edge due to the large attachment
points on the parts trees. As these were drying I painted the engines
black and dry brushed the cylinder heads with silver. The crankcases were
done in dark gray. After the wing and the other parts dried overnight,
I installed the wingtip floats in the up position, but here again you
can install them in the up or down position. I installed the stabilizers
but left the main wing off to make the painting easier.
Step six is installation of all of the small parts such as the radars, antennas and props. I left all of these off till after the base painting was done.
Painting
 I
began painting by preshading the bottom of the fuselage and the bottom
of the main wing with a dark gray. I spayed all of the panel lines on
the underside with this color. I then mixed up Tamiya Neutral Gray thinned
about 70% with thinner and filled in each panel one at a time. This sounds
very time consuming but it really goes fast. With the Tamiya paint thinned
this much you really have to lay it on quite heavy before it will cover
the darker color. After each panel was painted I pulled the airbrush back
to about 8” and lightly misted this mix over the entire bottom of
the aircraft. This evens out the gray color. With the bottom now done,
I mask out all of the small windows and painted the rear blisters and
the front turret with the yellow/green mix and did the main canopy with
flat black. These colors will show on the inside of the clear sections.
After this was done, I preshaded the upper surfaces with a dark blue color.
I applied this heavier around the engines.
I
began painting by preshading the bottom of the fuselage and the bottom
of the main wing with a dark gray. I spayed all of the panel lines on
the underside with this color. I then mixed up Tamiya Neutral Gray thinned
about 70% with thinner and filled in each panel one at a time. This sounds
very time consuming but it really goes fast. With the Tamiya paint thinned
this much you really have to lay it on quite heavy before it will cover
the darker color. After each panel was painted I pulled the airbrush back
to about 8” and lightly misted this mix over the entire bottom of
the aircraft. This evens out the gray color. With the bottom now done,
I mask out all of the small windows and painted the rear blisters and
the front turret with the yellow/green mix and did the main canopy with
flat black. These colors will show on the inside of the clear sections.
After this was done, I preshaded the upper surfaces with a dark blue color.
I applied this heavier around the engines.
 The
next step and most time consuming was the application of the intermediate
blue color. It was very time consuming due to the amount of area that
needed to be covered! This is a big aircraft! Once this was on (and it
took me 4 painting sessions over 2 days!) and dry I removed the canopies
and touched up the fuselage areas just inside if them. I also painted
the forward cockpit section with black. I removed all of the Bare Metal
Foil masking and reattached the clear parts. The next step in painting
was to do all of the little parts and the props. The next step was to
apply Future as a gloss coat where the decals were to be placed. After
this had set overnight I applied the kit decals and found them to be very,
very nice. They reacted well with Micro Sol setting solution.
The
next step and most time consuming was the application of the intermediate
blue color. It was very time consuming due to the amount of area that
needed to be covered! This is a big aircraft! Once this was on (and it
took me 4 painting sessions over 2 days!) and dry I removed the canopies
and touched up the fuselage areas just inside if them. I also painted
the forward cockpit section with black. I removed all of the Bare Metal
Foil masking and reattached the clear parts. The next step in painting
was to do all of the little parts and the props. The next step was to
apply Future as a gloss coat where the decals were to be placed. After
this had set overnight I applied the kit decals and found them to be very,
very nice. They reacted well with Micro Sol setting solution.
The next day the decals had settled into all of the panel lines and even down into the rivet detail. I then sprayed a flat coat over them to seal them in and to protect them from the weathering process. As the preshading had the effect of “popping” out the panel lines, the weathering process was most of the way done. I applied a very thin wash of Lamp Black oil paint over the entire airframe, streaking it in the direction of the airflow. The last step was to spray a lightened blue immediately behind the engines for a faded look. This mix was used in several areas on the main wing to add to that faded and weathered look and also to tone down the decals. The last step was to add faint black streaks behind the exhaust stacks. With the painting done all of the small parts were added and the model was completed.
Conclusion
 With
the Catalina PBY being one of my favorite aircraft, this kit was a real
joy for me. It was also the largest aircraft that I have done in a long
time. The kit fits together well and the detail is as nice as any other
kit on the market. With all of the high dollar kits and all of the aftermarket
stuff on the market, it is nice to know that a kit with this kind of detail
can be built right out of the box, and for a reasonable price. If you
like big kits that build quick, then this is definitely one for you to
add to your collection. Highly recommended! My thanks to Revell-Monogram
for this review sample!
With
the Catalina PBY being one of my favorite aircraft, this kit was a real
joy for me. It was also the largest aircraft that I have done in a long
time. The kit fits together well and the detail is as nice as any other
kit on the market. With all of the high dollar kits and all of the aftermarket
stuff on the market, it is nice to know that a kit with this kind of detail
can be built right out of the box, and for a reasonable price. If you
like big kits that build quick, then this is definitely one for you to
add to your collection. Highly recommended! My thanks to Revell-Monogram
for this review sample!


![]()


