REVELL Amigo Pack '94 Impala SS Lowrider with diecast
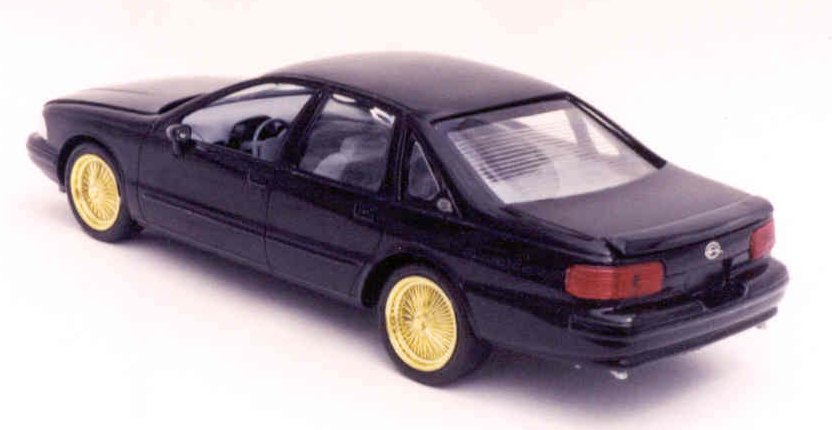
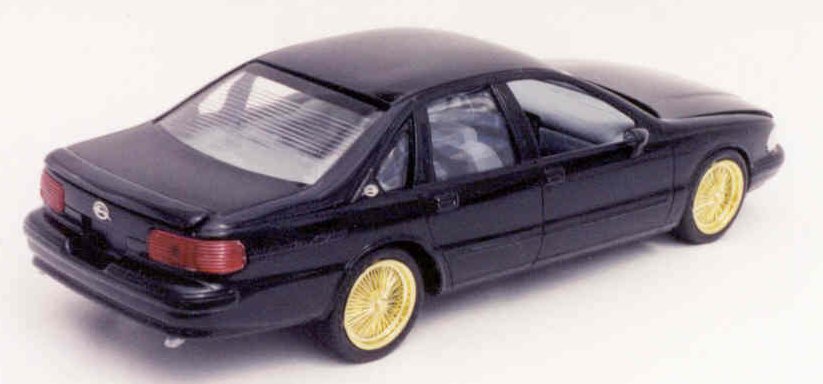
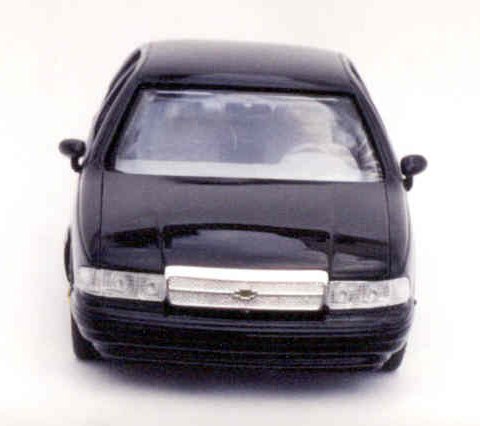
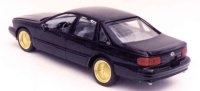
Kit no. 6686 | 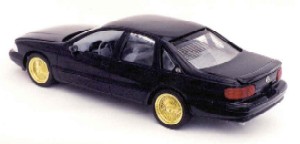 | Overview The Impala SS was an effort by Chevrolet to bring a younger crowd into the GM fold. The intention was to create a full-size rear-drive muscle car. Spearheaded by Jon Moss, head of GM Specialty Vehicles Division, the Impala SS was created by upgrading the Police Package Caprice with some suitable civilian Caprice luxuries and a few SS only items, such as the Special Ride and Handling Package, quick ratio power steering and P255/50ZR- 17 tires mounted on unique cast aluminum rims. All this hardware was required to transfer as much of the power to the ground as possible - power generated by a Corvette-derived 5.7 liter LT-1 260 horsepower V-8 that featured Sequential-Port Fuel Injection hooked up with an electronically controlled 4-speed automatic transmission. The Impala SS was capable of 0 to 60 times of 6.5 seconds, a 15.4 second quarter mile, and a top end (most likely electronically limited) of 142 mph. Not too shabby for a 4,218 lb. Six-passenger car previously ignored by the performance minded driver. Included as standard equipment on the SS were four-wheel disc brakes with ABS, custom leather bucket seat interior, monochromatic paint scheme, and a rear decklid spoiler. Unfortunately, GM didn't provide a floor console shifter and tachometer in the package until the final year of production, 1996. Taking a cue from Henry Ford, the 1994 Impala SS was available in any color you wanted, as long as it was Black. Gray was the sole interior color offered for the three years the Impala SS was available. Based upon my research of the many sources available on the Web (just enter "Impala SS" in your favorite search engine), the kit can also be built as a 1995 without modifications, and would allow a slightly broader range of color choices. 1995 Impala SS colors were expanded to include Dark Cherry and Dark Green-Gray metallic base-coat/clear-coat paint, which were continued into the final production year. In order to replicate the '96, you would have to fashion the console shifter and re-work the gauge cluster to include the analog gauges with tach. (Editor's note - the door mirrors were also shaped differently for '95 and '96 and need to be moved to the lower front corner of the windows). The Kit This represents a modified re-issue of the '94 Impala SS Snap-Tite kit and now includes special low rider suspension components, gold plated wire-spoke rims (nicely double-bagged, it's a shame REVELL chose not to bag the glass and chrome trees) and features decals with gold low-rider style graphics. All the low rider parts are packaged separately. The REVELL Amigo Pack series kits all include a matching 1:64 scale diecast. The kit seems to include all the pieces from the prior Impala SS releases except the stock tires. The parts are molded in white plastic, a welcome change from the black in the original kit. Since the first issue Impala SS kit was part of REVELL's Snap-Tite line and was derived from the Caprice police car snap kit, there are many things about the kit that are somewhat simplified. This means some areas are severely lacking detail when attaching parts, the worst example being the exterior mirrors. One odd deletion from the snap kit is the positive locating pins for the interior to chassis alignment. This is one point that would have been better left alone. Building the Model I chose to build my SS in basic black, without the benefit of the low-rider decals. I prepared the components to be painted the body color by removing mold lines and cleaning the parts of the mold release. While removing the mold lines and any minor flash, I'd suggest a light block sanding of the roof. The area over the front seat has two barely noticeable round marks, a holdover from the days when this body was used for the Snap-Tite Caprice Classic Police car with the working roof lights and siren. Also, there are two small ejector pin marks on the leading edge of the front bumper that require attention. Finally, there are two sink marks on the rear spoiler that can be removed by sanding. A little extra time in these areas will eliminate any nasty surprises later. 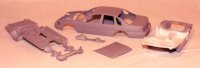 Take care to gather all parts to be painted the body color together. The chassis and engine compartment, as well as the underside of the center of the interior tub, are painted the body color. Once all the parts were primed, I sanded the surface smooth using 1500 grit sandpaper. After an inspection of the body and attention to areas previously missed, I sprayed the body and related parts using Tamiya TS-14 Black followed by TS-13 Clear. I accelerated the curing time for the paint by using a food dehydrator. Take care to gather all parts to be painted the body color together. The chassis and engine compartment, as well as the underside of the center of the interior tub, are painted the body color. Once all the parts were primed, I sanded the surface smooth using 1500 grit sandpaper. After an inspection of the body and attention to areas previously missed, I sprayed the body and related parts using Tamiya TS-14 Black followed by TS-13 Clear. I accelerated the curing time for the paint by using a food dehydrator. While the body parts were out the way, I began the painting and assembly of the drive train. Since the model has a somewhat simplified assembly I sprayed the majority of the components black, including the engine. 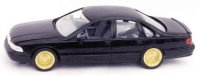 The interior is a "modified tub style" which means the front bucket seats are separate, along with side panel inserts. This makes it much easier to detail paint and is greatly appreciated. The bucket seats required some work on the seams after gluing the two parts together but turned out well. The additional engraving on the interior surfaces is well executed. The SS emblems on the headrest are an especially nice touch. The interior was sprayed Testors Gray (1238) gloss, then sealed with Dull Coat to provide leather look I wanted. The instructions nicely pick out door details to be painted and a little work here sets off the interior. The decals provided depict the instrument and center dash well but need some solvent to snuggle down over the raised areas. The interior is a "modified tub style" which means the front bucket seats are separate, along with side panel inserts. This makes it much easier to detail paint and is greatly appreciated. The bucket seats required some work on the seams after gluing the two parts together but turned out well. The additional engraving on the interior surfaces is well executed. The SS emblems on the headrest are an especially nice touch. The interior was sprayed Testors Gray (1238) gloss, then sealed with Dull Coat to provide leather look I wanted. The instructions nicely pick out door details to be painted and a little work here sets off the interior. The decals provided depict the instrument and center dash well but need some solvent to snuggle down over the raised areas.
 Assembly of the interior is straightforward. Once everything is in place make sure to touch up the underside of the interior with gloss black paint where the seats and sides snap in. These areas will show once the model is completed. A tip on assembling the interior: dry fit the two-part dashboard and then glue the two halves together in place to ensure proper alignment. A simple black wash was applied to the speaker grilles to make them stand out more. Assembly of the interior is straightforward. Once everything is in place make sure to touch up the underside of the interior with gloss black paint where the seats and sides snap in. These areas will show once the model is completed. A tip on assembling the interior: dry fit the two-part dashboard and then glue the two halves together in place to ensure proper alignment. A simple black wash was applied to the speaker grilles to make them stand out more.
The chassis utilizes the basic engine to locate the drive shaft. I used the low rider suspension parts, although the stock items are still in the kit. Initially, I assembled the chassis components without glue so I could confirm the car would sit on all four wheels and the ride height was what I wanted it to be. Then I attached the parts with glue. The separate dual exhausts were painted a steel color and the tips detailed with flat black. Because of its snap kit origins, the front suspension is very simplified and doesn't include spring detail. 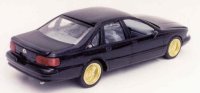 The gold plated low Rider rims mount on P255/35ZR20 Goodyear Eagle tires on the front and P270/30ZR21 on the rear. Care must be taken when assembling the rims and tires, as the front and rear rims and tires are different and the tires are directional as well. I suggest working with one wheel at a time to ensure proper fit and location. The gold plated low Rider rims mount on P255/35ZR20 Goodyear Eagle tires on the front and P270/30ZR21 on the rear. Care must be taken when assembling the rims and tires, as the front and rear rims and tires are different and the tires are directional as well. I suggest working with one wheel at a time to ensure proper fit and location.
The engine detail is well engraved, but you won't see much of it once all the components are attached. A nice touch is the four under hood decals that help add a little detail. Solvent will be required with these decals as well. 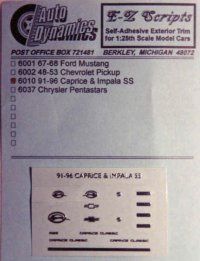 The kit window glass is separated into two pieces and requires detail painting raised areas black. I first outlined these areas using a permanent marker and then filled them in with black acrylic paint. This allowed me more control around the edges to be painted. Unfortunately, since the "glass" wasn't separately bagged by REVELL, the windshield had some deep scratches. Although designed to snap into place, I found it would be necessary to use glue to attach the windows tightly to the body. The rear window section particularly wants to float around the interior. With the black painted body cured, I polished the clear using a polishing cloth followed by pure carnauba wax. The kit window glass is separated into two pieces and requires detail painting raised areas black. I first outlined these areas using a permanent marker and then filled them in with black acrylic paint. This allowed me more control around the edges to be painted. Unfortunately, since the "glass" wasn't separately bagged by REVELL, the windshield had some deep scratches. Although designed to snap into place, I found it would be necessary to use glue to attach the windows tightly to the body. The rear window section particularly wants to float around the interior. With the black painted body cured, I polished the clear using a polishing cloth followed by pure carnauba wax.
Since I'm not too enamoured of the gold decals provided with the kit, I substituted the great chrome E-Z Scripts offered by Auto Dynamics for the '91-'96 Caprice and Impala (part no. 6010). These are self-adhesive metal emblems and really add that extra touch to the massive amount of shiny black paint. As stated earlier, I find the exterior mirrors to be the low point of the kit. That is one area I wish REVELL had reworked while updating the kit.  Final assembly of the major components went well with no surprises. Final assembly of the major components went well with no surprises.
Conclusion Overall, I quite pleased with the Impala SS, especially considering its humble beginnings as a snap kit. Some time taken with detail painting will really bring the kit to life and provide a model anyone would be proud to display. | 


|