"Imperial" Nieuport:
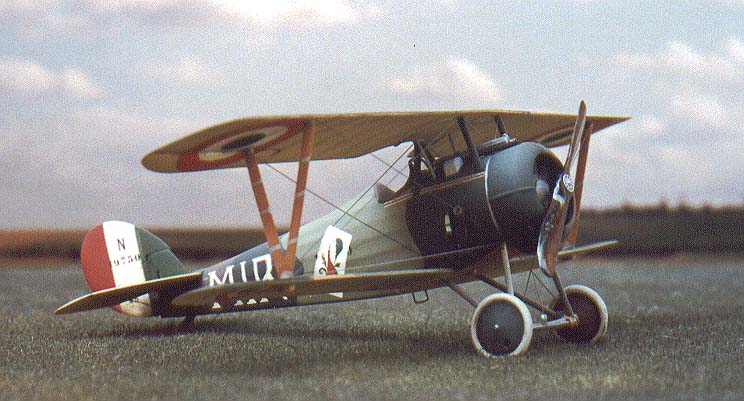
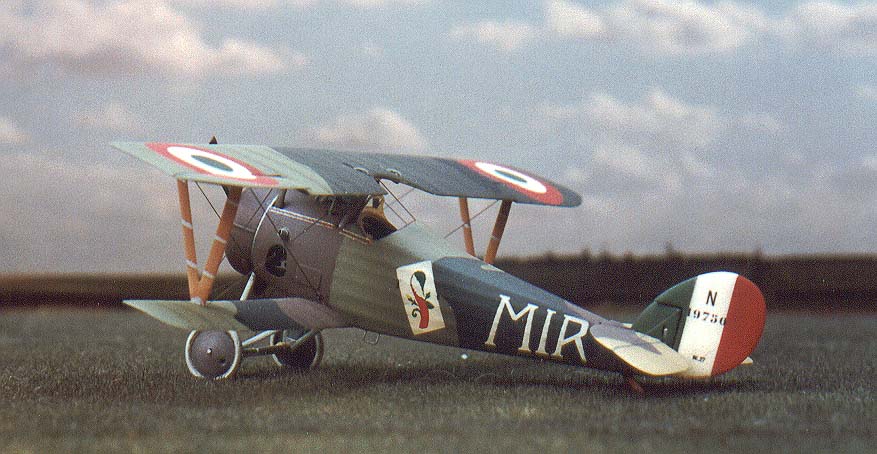
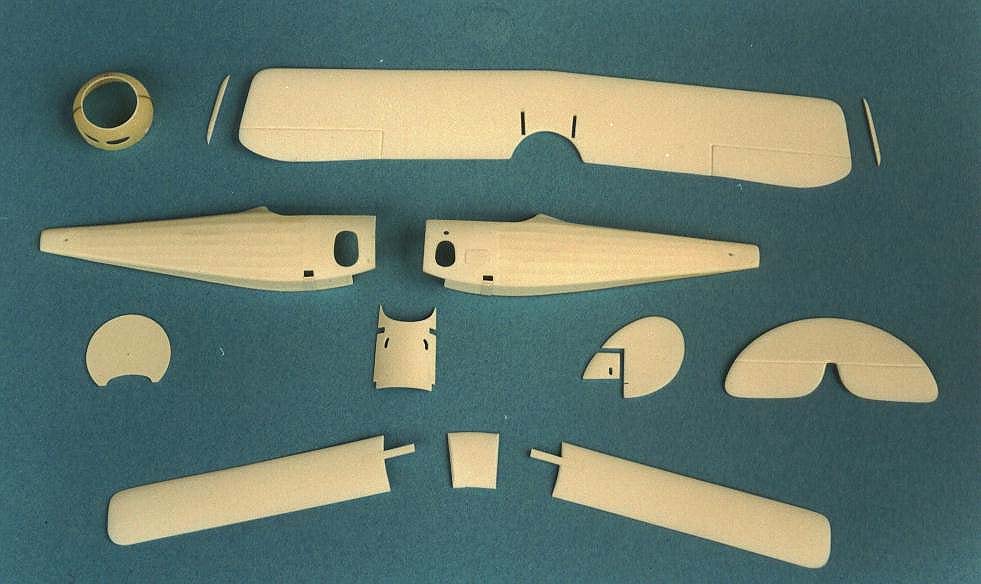
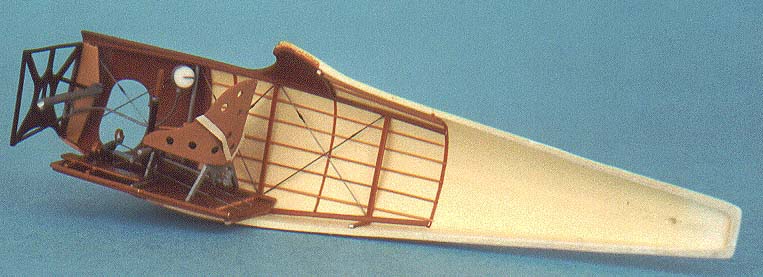
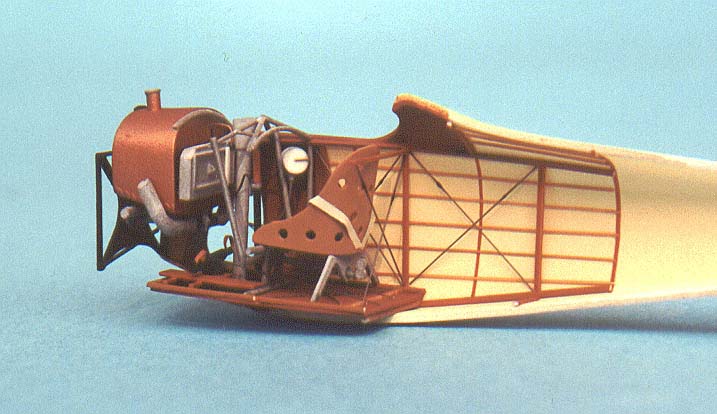
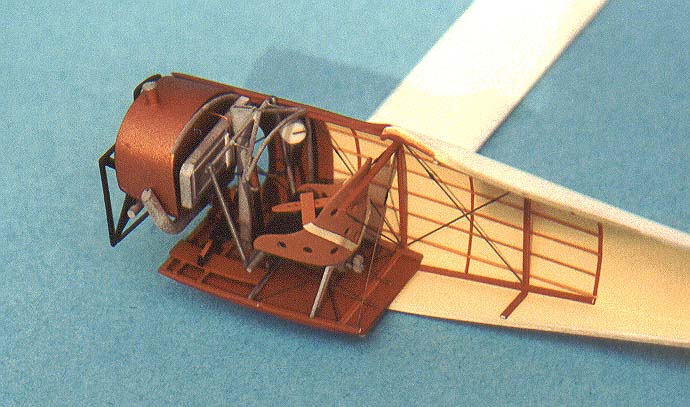
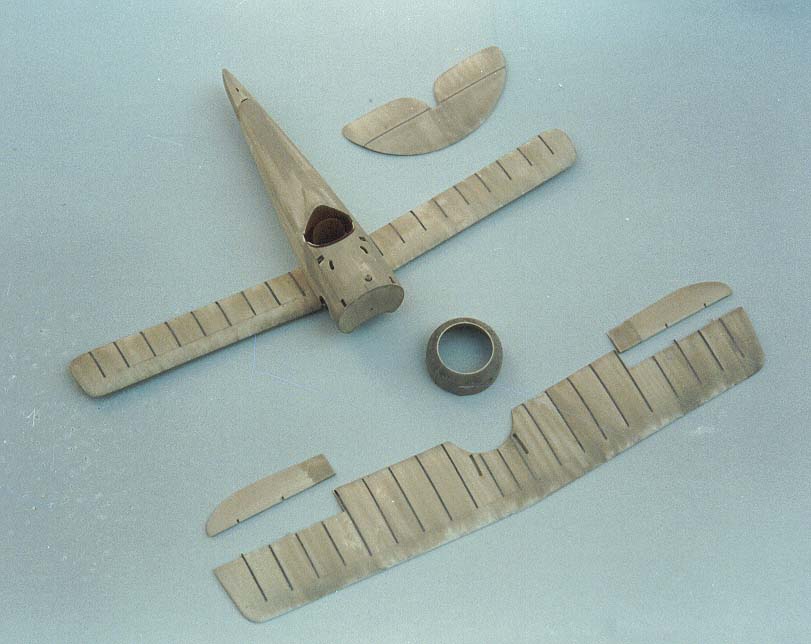
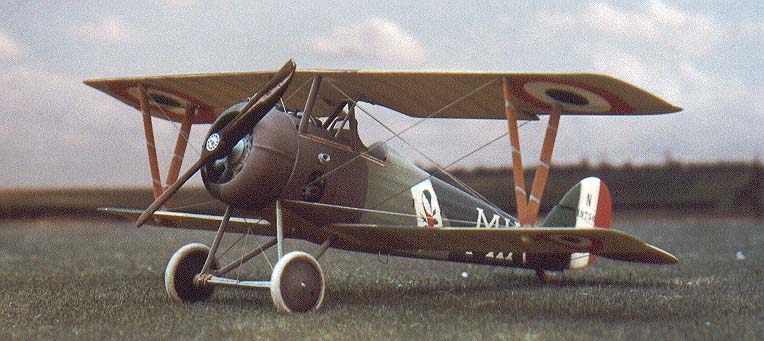
Superdetailing Joystick's 1/72nd scale vacuum-formed kit of the Ni.27 By Alberto Casirati | 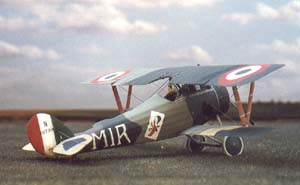 | One of my favourite ways to enjoy World War One aircraft modelling is working on vacuum-formed kits. In my view, they offer many advantages over injection moulded or short run kits, not to mention resin models. The vacs' thinner and softer plastic makes them more suitable for superdetailing and conversion work, although it also requires more attention and a light hand, especially in cutting, carving and glueing. But what a pleasure to detail a roomy cockpit and to open all those inspection panels without having to spend a lot of time in thinning down the plastic or resin walls! Although resin is getting more popular each day, good vacuum-formed kit producers are still around. Amongst them Roseplane, Joystick, and Sierra Scale Models. Being easier and cheaper to produce, vacs are usually devoted to lesser known subjects, which are not likely to enjoy large sales. Therefore, back in the 1980's, it was natural to see the number of WW1 aircraft vacuum-formed kits expanding and, thank heaven, several of them are still available. This article deals with building one of the best vacuum-formed kits I know: Joystick's Nieuport 24 / 27. At the time of writing, it was still available from Roll Models. 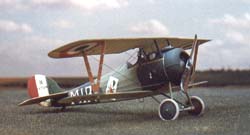 One of the most evident features of the later Nieuport sesquiplane fighters was the faired, rounded section fuselage. Doing good in that area is essential to produce a good kit and Les Cooper and Joe Chubbock did very well here. The same goes for the wing ribbing detail and for main shapes and dimensions, which compare favourably with the latest published scale plans. However, as it happens with almost all kits from any producers, there are a few shortcomings. The most serious one is the engine cowling, which, at best, can be considered acceptable for the Ni.25 only. The modeller is left with two choices: scratchbuilding or working on one from the spares box, for example from an old Revell or Esci Ni.17 kit. The upper wing sweepback is accurate, while its span should be reduced by about 0.5 mm per side. The centre section opening is a little too wide and deep, but this is hardly noticeable on the finished model. One of the most evident features of the later Nieuport sesquiplane fighters was the faired, rounded section fuselage. Doing good in that area is essential to produce a good kit and Les Cooper and Joe Chubbock did very well here. The same goes for the wing ribbing detail and for main shapes and dimensions, which compare favourably with the latest published scale plans. However, as it happens with almost all kits from any producers, there are a few shortcomings. The most serious one is the engine cowling, which, at best, can be considered acceptable for the Ni.25 only. The modeller is left with two choices: scratchbuilding or working on one from the spares box, for example from an old Revell or Esci Ni.17 kit. The upper wing sweepback is accurate, while its span should be reduced by about 0.5 mm per side. The centre section opening is a little too wide and deep, but this is hardly noticeable on the finished model. Decals are very nice. They deal with three colourful subjects: two Polish aircraft from the 1919 - 22 war and one Italian machine from the 73a Squadriglia, based in Macedonia in 1918. All decals are well printed but the nice large tricolour for the rear part of the fuselage of the Italian aircraft has its colour reversed: green should lead the trio of national colours, while this is done by red in the kit's decal. Metal parts are good and a very welcome addition to the package. 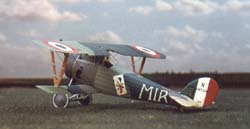 One of the best Nieuport 27 pilots of the whole war must have been Serg. Marziale Cerutti, of the 79a Squadriglia of the Italian Aviazione del Regio Esercito. A 3 Silver Medal holder, Cerutti survived the war with 17 confirmed victories to his credit, all scored while flying Ni.27s. His personal mount was graced on the fuselage with a white "MIR" inscriptions (meaning "Marziale Imperatore Romano" - Marziale Roman Emperor) and with an emblem made of a playcard with an elaborated ace of club. This is the aircraft I chose to model. Thanks to Tomasz Gronczewski, who produced an excellent decal set for me, I got the relevant transfers, thus avoiding the need of handpainting. One of the best Nieuport 27 pilots of the whole war must have been Serg. Marziale Cerutti, of the 79a Squadriglia of the Italian Aviazione del Regio Esercito. A 3 Silver Medal holder, Cerutti survived the war with 17 confirmed victories to his credit, all scored while flying Ni.27s. His personal mount was graced on the fuselage with a white "MIR" inscriptions (meaning "Marziale Imperatore Romano" - Marziale Roman Emperor) and with an emblem made of a playcard with an elaborated ace of club. This is the aircraft I chose to model. Thanks to Tomasz Gronczewski, who produced an excellent decal set for me, I got the relevant transfers, thus avoiding the need of handpainting.  Cleaning up of all major parts posed no particular problems but highlighted the fact that the port fuselage half is shorter than the other one, at the engine bulkhead level, by about 0.5 mm; a defect which can be easily fixed by means of the addition of a piece of plasticard. After that, fuselage halves were prepared cutting out all the relevant openings for control cables and inspection panels, which I planned to display opened. The forward fuselage decking was also replaced by a new item, which was simply obtained by heat moulding a 0.2 mm plasticard square over a balsa wood mould. This makes drilling out the relevant openings much easier and makes even more room for cockpit details. Cleaning up of all major parts posed no particular problems but highlighted the fact that the port fuselage half is shorter than the other one, at the engine bulkhead level, by about 0.5 mm; a defect which can be easily fixed by means of the addition of a piece of plasticard. After that, fuselage halves were prepared cutting out all the relevant openings for control cables and inspection panels, which I planned to display opened. The forward fuselage decking was also replaced by a new item, which was simply obtained by heat moulding a 0.2 mm plasticard square over a balsa wood mould. This makes drilling out the relevant openings much easier and makes even more room for cockpit details. 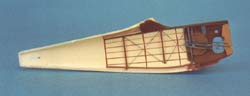 One of the most delicate and yet critic steps in building a multiplane model is major assembly, especially when it comes to glueing lower wing panels. It is even more delicate for vacuum-formed kits, which usually do not benefit from locating pegs or slots. Their thin plastic does not allow for a simple glue-on job, thus different solutions must be found. I cut one slot in each fuselage half, in line with the lower wings' longerons fastening points. New 1 mm plasticard "longerons" were inserted into the lower wing planes and all the ribbing detail was sanded off. Then fuselage halves were assembled by means of self-adhesive tape and the lower wing planes were glued, checking their alignment and dihedral carefully against scale drawings. To hide the new longerons, a false fuselage bottom was cut from 0.2 mm plasti-card and was glued to one of the fuselage halves only. When all had set, the fuselage halves interiors were painted, keeping in mind that the forward fuselage covering panels were of wood veener. One of the most delicate and yet critic steps in building a multiplane model is major assembly, especially when it comes to glueing lower wing panels. It is even more delicate for vacuum-formed kits, which usually do not benefit from locating pegs or slots. Their thin plastic does not allow for a simple glue-on job, thus different solutions must be found. I cut one slot in each fuselage half, in line with the lower wings' longerons fastening points. New 1 mm plasticard "longerons" were inserted into the lower wing planes and all the ribbing detail was sanded off. Then fuselage halves were assembled by means of self-adhesive tape and the lower wing planes were glued, checking their alignment and dihedral carefully against scale drawings. To hide the new longerons, a false fuselage bottom was cut from 0.2 mm plasti-card and was glued to one of the fuselage halves only. When all had set, the fuselage halves interiors were painted, keeping in mind that the forward fuselage covering panels were of wood veener. 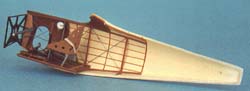 Then it came the turn of cockpit detailing. I decided to give up all those nice photoetched details already available on the market and to go for scratchbuilding instead. All interior details were therefore cut or carved from thin plasticard or heat-stretched sprue, painted and then glued in place by means of white glue thinned down with water. Some of the original forward fuselage structural members and the longitudinal stringers were rounded in section, so they were replicated by means of heat stretched sprue segments. The rest of the fuselage struts were cut from 0.3 mm plasticard sheet. Then it came the turn of cockpit detailing. I decided to give up all those nice photoetched details already available on the market and to go for scratchbuilding instead. All interior details were therefore cut or carved from thin plasticard or heat-stretched sprue, painted and then glued in place by means of white glue thinned down with water. Some of the original forward fuselage structural members and the longitudinal stringers were rounded in section, so they were replicated by means of heat stretched sprue segments. The rest of the fuselage struts were cut from 0.3 mm plasticard sheet.  Patience and work planning are essential in this area and will certainly pay dividends. Keeping all details' dimensions within scale limits is also very important, as well as checking distances between all main devices, such as rudder bar, control column, dashboard, seat and throttles. The seat is made of a 0.5 mm plasticard bottom and of a 0.2 mm plasti-card back, which was glued with cyanoacrylate glue and then carefully carved to shape with fine sandpaper. The typical lightening holes were marked with a sharp steel point and then drilled out by means of a hand drill. Patience and work planning are essential in this area and will certainly pay dividends. Keeping all details' dimensions within scale limits is also very important, as well as checking distances between all main devices, such as rudder bar, control column, dashboard, seat and throttles. The seat is made of a 0.5 mm plasticard bottom and of a 0.2 mm plasti-card back, which was glued with cyanoacrylate glue and then carefully carved to shape with fine sandpaper. The typical lightening holes were marked with a sharp steel point and then drilled out by means of a hand drill. Instruments were carved from 1 mm plasticard squares, which were superglued on a sprue axle. The latter was then inserted into a motor tool and the square was made round by means of sandpaper. The new instrument was then painted aluminium, leaving its face white, and a needle was added from steel wire. Simple and effective in this scale, at least in my view !  Once the cockpit bottom and sides were completed, fuselage halves were glued together an taped, to make the addition of cross details easier, thanks to the separate forward fuselage upper decking. The latter was later added, together with a new plasticard engine bulkhead. The engine exhaust channel was cut from 0.1 mm sheet styrene and glued in place. The whole complex then received the usual finishing up treatment. Later, the oil tank was added from balsa wood covered with 0.1 mm plasticard. Once the cockpit bottom and sides were completed, fuselage halves were glued together an taped, to make the addition of cross details easier, thanks to the separate forward fuselage upper decking. The latter was later added, together with a new plasticard engine bulkhead. The engine exhaust channel was cut from 0.1 mm sheet styrene and glued in place. The whole complex then received the usual finishing up treatment. Later, the oil tank was added from balsa wood covered with 0.1 mm plasticard. The engine cowling supplied by the kit was not suitable for a Ni. 27, so it was replaced by reworking an old cowling from a Revell Ni.17 kit. The front opening was reduced with a strip of 0.2 mm plasticard, while the cowling chord was increased by about 1 mm. Exterior details were then added from thin plasticard and heat stretched sprue. The upper wing was slightly modified, reducing its span and sanding the ribbing detail away. New openings for the aileron cranks were cut and the same was done for the struts locations points, whose true position was carefully determined on the base of scale drawings. To be sure that the struts would have fixed properly, they were scratchbuilt by heat stretching plastic extruded lengths and a few dry runs were sufficient to make the necessary adjustments. Then the strut's openings were made "blind" on the wing upper surface, by inserting one 0.1 mm plasticard square in each opening. Lower wings were left untouched, as they were to be dealt with later.  New ribbing was simulated by means of thin strips of blue decal film, cut with the aid of a steel ruler and of a very sharp blade. The dark colour not only helped alignment of each rib, but also showed a little through the coat of light yellow paint, to simulate the typical translucency of fabric covered wings. Decal strips were sealed by means of a coat of clear enamel and then they were finished off with very fine sandpaper. New ribbing was simulated by means of thin strips of blue decal film, cut with the aid of a steel ruler and of a very sharp blade. The dark colour not only helped alignment of each rib, but also showed a little through the coat of light yellow paint, to simulate the typical translucency of fabric covered wings. Decal strips were sealed by means of a coat of clear enamel and then they were finished off with very fine sandpaper. A light coat of light grey enamel helped finding defects in surface finish and after the latter were fixed the real painting stage began. I must confess that my favourite way to paint a model is by brush. It requires a little more patience and a steady hand, but I find it more rewarding and it also does not require masking, thus avoiding the relevant problems. This is a real advantage, especially on very thin wings, which are common to almost all 1/72nd scale vacs of WW1 aero-planes. The interesting camouflage scheme was painted applying almost all colours at the same time, with the exception of the horizontal tailplanes' chesnut brown and all black areas, which were painted separately. Two light coats of clear enamel followed and then it came the turn of decals. The latter are the splendid job of Tomasz Gronczewski and posed no real problems. A light coat of clear satin acrylic sealed the decals and allowed handling the model without spoiling its finish. 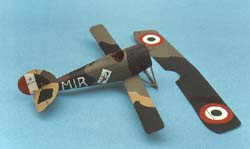 The undercarriage was next. It was scratchbuilt by means of heat stretched extruded plastic lengths, thus obtaining very thin elements, with the correct airfoil section. Each "V" was built first and then added to the fuselage. The axle was glued next and was followed by the typical shock absorber cords. The other external details were patiently added and included the windscreen, the gun and its chutes, the footstep, the tailskid, the filler caps, the engine cowling retaining strip, the cockpit coaming and all fuselage and wing struts, which were scratchbuilt just like the undercarriage legs. The undercarriage was next. It was scratchbuilt by means of heat stretched extruded plastic lengths, thus obtaining very thin elements, with the correct airfoil section. Each "V" was built first and then added to the fuselage. The axle was glued next and was followed by the typical shock absorber cords. The other external details were patiently added and included the windscreen, the gun and its chutes, the footstep, the tailskid, the filler caps, the engine cowling retaining strip, the cockpit coaming and all fuselage and wing struts, which were scratchbuilt just like the undercarriage legs. 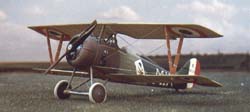 Adding the top wing was not a difficult task. The interplane struts came first. They were scratchbuilt and glued to the upper wing. The model was placed horizontally and lower wings were supported by two balsa blocks, to avoid distortion caused by their flexibility. The upper wing was then glued on, followed by the fuselage struts. Rigging is 0.006" stainless steel wire, fixed with white glue. The excellent real laminated wood Ratmanoff airscrew by Martin Digmayer completed the model. Adding the top wing was not a difficult task. The interplane struts came first. They were scratchbuilt and glued to the upper wing. The model was placed horizontally and lower wings were supported by two balsa blocks, to avoid distortion caused by their flexibility. The upper wing was then glued on, followed by the fuselage struts. Rigging is 0.006" stainless steel wire, fixed with white glue. The excellent real laminated wood Ratmanoff airscrew by Martin Digmayer completed the model. This was my second vacuum-formed kit and, all in all, a very enjoyable project. Now, if I only could get some interior pictures of that SAML S.2...... Acknowledgement I am indebted to many enthusiasts and modellers, who helped me considerably both in getting reliable references and in solving some little "mysteries" about some of the Ni.27's features. My most sincere thanks to (in alphabetical order): Michael Alvarado, Matt Bittner, Diego Fernetti, Liefferinckx Frederic, Ing. Maurizio Longoni, Roy Meyers, Etienne Reunis (of the Air & Space Department of the Brussels Aviation Museum) and Len Smith. Special thanks are due to Tomasz Gronkcewski, for his kind, generous and technically impeccable help. Alberto Casirati | 


|