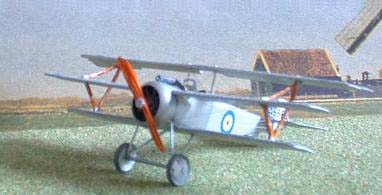
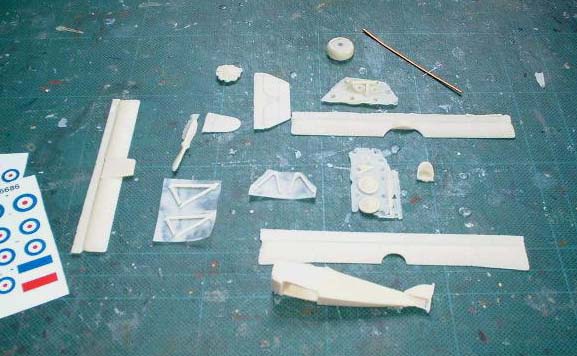
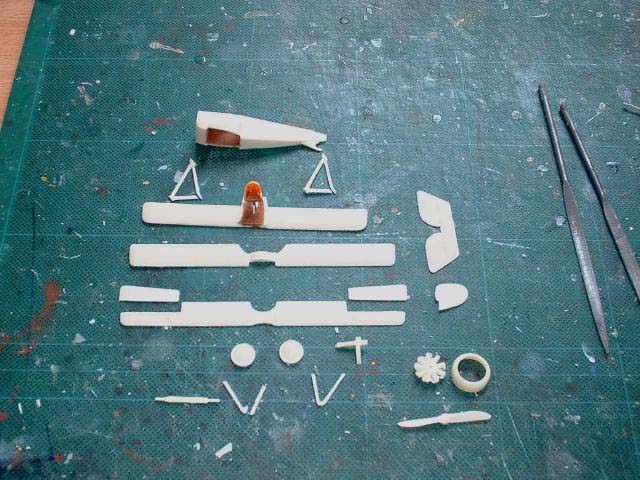
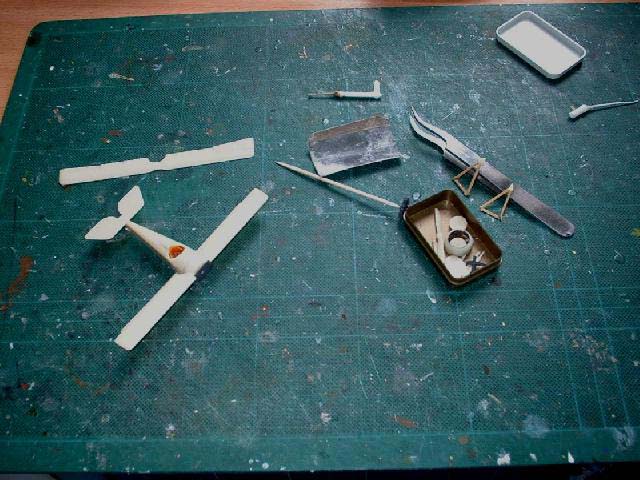
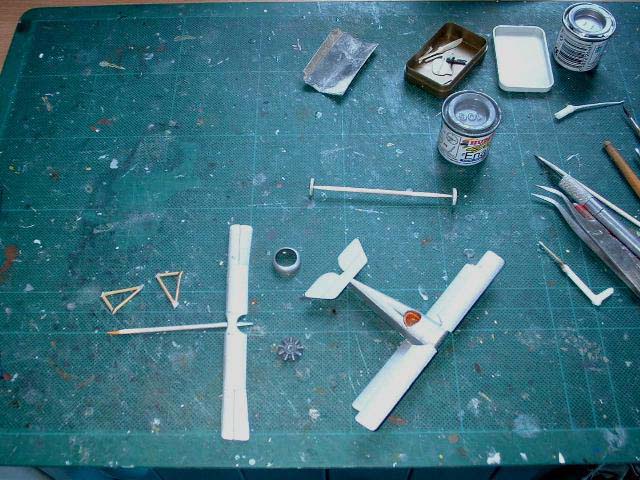
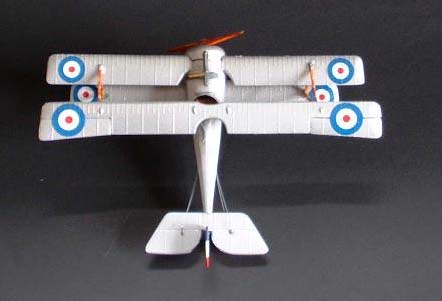
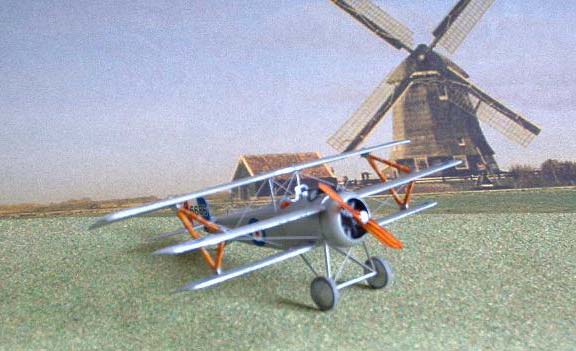
RVHP 1/72 Resin Nieuport Triplane RFC by Joel Christy |  | Introduction 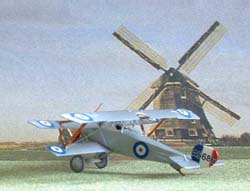 I suppose it was inevitable that I would build a Nieuport triplane as I have built all of the other triplane types that were produced by various manufacturers during the Great War. Sopwith was of course the first to come out with a practical design but it was the Fokker triplane that proved to be the most successful of them all. Others like Albatros, Roland, Pfalz and Nieuport all had a go. The latter can be said to have had the most radical design approach to the type. The Nieuport firm felt that the design promised a shortening of span and length without sacrificing lifting surface. They refused to accept , however, the hazard inherent in the design - that air flowing over the lower planes would force air against the upper, subjecting it to dangerous stress. Nieuport produced a triplane with staggered wings, eliminating the stress on the upper wing. Unfortunately the rigging of the three planes proved difficult and lateral stability was bad. It was also slow in the turns and hard to land. When the RFC obtained the Nieuport Triplane for testing, these weaknesses were made apparent to test pilots Vernon Brown and Captain G.N. Gathergood. None of the type went into production. I suppose it was inevitable that I would build a Nieuport triplane as I have built all of the other triplane types that were produced by various manufacturers during the Great War. Sopwith was of course the first to come out with a practical design but it was the Fokker triplane that proved to be the most successful of them all. Others like Albatros, Roland, Pfalz and Nieuport all had a go. The latter can be said to have had the most radical design approach to the type. The Nieuport firm felt that the design promised a shortening of span and length without sacrificing lifting surface. They refused to accept , however, the hazard inherent in the design - that air flowing over the lower planes would force air against the upper, subjecting it to dangerous stress. Nieuport produced a triplane with staggered wings, eliminating the stress on the upper wing. Unfortunately the rigging of the three planes proved difficult and lateral stability was bad. It was also slow in the turns and hard to land. When the RFC obtained the Nieuport Triplane for testing, these weaknesses were made apparent to test pilots Vernon Brown and Captain G.N. Gathergood. None of the type went into production. The Kit  RVHP have come out with a nice little resin kit of the Nieuport triplane based on the Nieuport 17 with markings for the RFC aircraft A6686. The parts have a sharp crisp look to them with good detail to the ribs and stringers. The fuselage is in one piece and all three wings are single planes. Cockpit details have been kept to a minimum but little can be seen once the seat is in place anyway. I started construction by cleaning up the parts and this proved quite easy. A few passes along the leading edges of the wings was all that was necessary to carry away the resin gates. The 'pancake' carrying the small parts cleaned up easily with a bit of wet 'n' dry. The only part needing more attention was the engine that has very fine breathing tubes that need to be reamed out with whatever needle files are at hand. Care was taken with the unusually shaped interplane struts because if these are damaged it would prove quite difficult to replace them. Be warned! I decided to replace the landing gear V struts with Strutz material as these seemed to be poorly moulded and liable to break. RVHP have come out with a nice little resin kit of the Nieuport triplane based on the Nieuport 17 with markings for the RFC aircraft A6686. The parts have a sharp crisp look to them with good detail to the ribs and stringers. The fuselage is in one piece and all three wings are single planes. Cockpit details have been kept to a minimum but little can be seen once the seat is in place anyway. I started construction by cleaning up the parts and this proved quite easy. A few passes along the leading edges of the wings was all that was necessary to carry away the resin gates. The 'pancake' carrying the small parts cleaned up easily with a bit of wet 'n' dry. The only part needing more attention was the engine that has very fine breathing tubes that need to be reamed out with whatever needle files are at hand. Care was taken with the unusually shaped interplane struts because if these are damaged it would prove quite difficult to replace them. Be warned! I decided to replace the landing gear V struts with Strutz material as these seemed to be poorly moulded and liable to break. 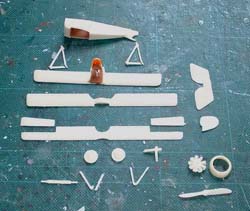 Once all the bits were cleaned up I commenced work on the office area. As I said, this has been kept to a minimum so I used the seat bottom and replaced the back with one fashioned from 5 thou plastic sheet and drilled out lightening holes as seen on most Nieuports. When finished I attached the seat to the bottom wing along with a control column made of hot stretched sprue. Once all the bits were cleaned up I commenced work on the office area. As I said, this has been kept to a minimum so I used the seat bottom and replaced the back with one fashioned from 5 thou plastic sheet and drilled out lightening holes as seen on most Nieuports. When finished I attached the seat to the bottom wing along with a control column made of hot stretched sprue. 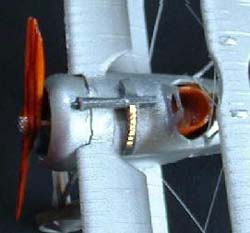 I painted the cockpit area with Humbrol number 186 brown as this appears to be the interior color usually found in Nieuports and the seat was given a coat of Tamiya clear orange to give it a varnished wood effect. The engine was painted with Humbrol 67 tank grey and highlighted by dry brushing it with number 11 silver. Lastly the inside of the cowling was given a coat of 67. I painted the cockpit area with Humbrol number 186 brown as this appears to be the interior color usually found in Nieuports and the seat was given a coat of Tamiya clear orange to give it a varnished wood effect. The engine was painted with Humbrol 67 tank grey and highlighted by dry brushing it with number 11 silver. Lastly the inside of the cowling was given a coat of 67. 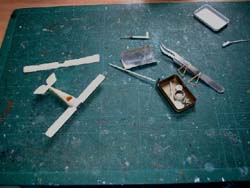 I now glued the lower and middle wings to the fuselage as well as the tailplane to get it ready for the overall silver finish. The upper wing was mounted to a toothpick with a bit of superglue. For several years now I have found the best finish for silver Nieuports to be Tamiya Bare Metal straight from the spray can. It gives the model (whatever the scale) a lovely smooth unblemished surface that can be handled without marring and it has no visible grain to the finish unlike most silver paints. I hold the parts being painted at arms length and give them a nice long fog of paint taking care that the paint doesn't build up. Only one or two light coats are necessary to give the model a nice clean finish. As I said, it can then be handled safely whilst completing the assembly. I have also found that decals adhere nicely to the semi gloss surface. For the cowling I used Tamiya Gloss Silver to give it a more metal like appearance. I now glued the lower and middle wings to the fuselage as well as the tailplane to get it ready for the overall silver finish. The upper wing was mounted to a toothpick with a bit of superglue. For several years now I have found the best finish for silver Nieuports to be Tamiya Bare Metal straight from the spray can. It gives the model (whatever the scale) a lovely smooth unblemished surface that can be handled without marring and it has no visible grain to the finish unlike most silver paints. I hold the parts being painted at arms length and give them a nice long fog of paint taking care that the paint doesn't build up. Only one or two light coats are necessary to give the model a nice clean finish. As I said, it can then be handled safely whilst completing the assembly. I have also found that decals adhere nicely to the semi gloss surface. For the cowling I used Tamiya Gloss Silver to give it a more metal like appearance. 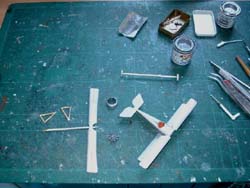 Once the basic paint scheme was complete I set about the final construction. I drilled out the hole in the firewall to receive the rotary engine. Likewise the engine was drilled out and shaft made of plastic rod glued to it. With the engine in place the cowling was attached to the fuselage. This assembly was dry fitted several times as I wanted the engine to rotate and some sanding down of the cylinder heads was necessary. Once the basic paint scheme was complete I set about the final construction. I drilled out the hole in the firewall to receive the rotary engine. Likewise the engine was drilled out and shaft made of plastic rod glued to it. With the engine in place the cowling was attached to the fuselage. This assembly was dry fitted several times as I wanted the engine to rotate and some sanding down of the cylinder heads was necessary. 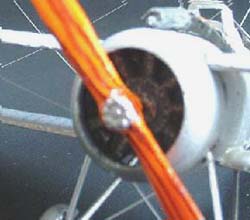 I treated the kit propeller in my normal fashion; I paint the piece with Humbrol number 94, yellow brown, then draw stripes on it with a brown felt tip pen and finally give it a coat of Tamiya Clear Orange. This gives the propeller a fine laminated varnished wood appearance. I treated the kit propeller in my normal fashion; I paint the piece with Humbrol number 94, yellow brown, then draw stripes on it with a brown felt tip pen and finally give it a coat of Tamiya Clear Orange. This gives the propeller a fine laminated varnished wood appearance. As I said earlier, I replaced the under carriage V struts with the orange size of brass Strutz material. For the axle I used three bits of plastic rod to replace the too brittle kit item. Since I was building the RFC machine I used the Vickers gun provided having first painted it tank grey and dry brushed with silver. I added a thin slice of brass colored foil with little indents to simulate a belt of cartridges for the gun. For the cabane struts I found two strips of 10 thou plastic sheet served nicely for these delicate parts. Next I attached the two odd shaped interplane struts after carefully marking off the location points on the two lower wings. A spot of superglue fixed these in place and then the top wing was attached. 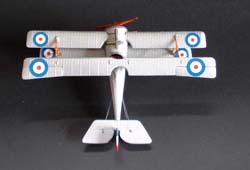 When the model was complete I applied the decals. Now I doubt if there is another aircraft of the Great War that has so many roundels as the RFC Nieuport triplane does! It almost makes one dizzy; 14 in all! But once on they make an attractive and unusual model. Before I glued on the rudder I applied the red white and blue decals and the serial number. I made control horns of 10 thou plastic sheet attaching them to the control surfaces with superglue. Lastly the model was rigged with what I normally use - heat stretched sprue. On such a tiny model I use an almost gossamer thickness as the less noticeable the rigging the better. It needs to be there but almost invisible. When the model was complete I applied the decals. Now I doubt if there is another aircraft of the Great War that has so many roundels as the RFC Nieuport triplane does! It almost makes one dizzy; 14 in all! But once on they make an attractive and unusual model. Before I glued on the rudder I applied the red white and blue decals and the serial number. I made control horns of 10 thou plastic sheet attaching them to the control surfaces with superglue. Lastly the model was rigged with what I normally use - heat stretched sprue. On such a tiny model I use an almost gossamer thickness as the less noticeable the rigging the better. It needs to be there but almost invisible. Conclusion 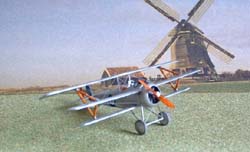 Well, that's about it. I now have most of the triplanes from the World War One era and one of the most unusual ones, the Nieuport Tripe! It may not have been a successful design but it certainly is eye catching. When I look down on the model from the top I am amazed at how much wing surface is visible and it seems like it should have worked - but we know it didn't!! If nothing else the Nieuport triplane makes an interesting example of the experimental nature of early aviation. Well, that's about it. I now have most of the triplanes from the World War One era and one of the most unusual ones, the Nieuport Tripe! It may not have been a successful design but it certainly is eye catching. When I look down on the model from the top I am amazed at how much wing surface is visible and it seems like it should have worked - but we know it didn't!! If nothing else the Nieuport triplane makes an interesting example of the experimental nature of early aviation. The RVHP Nieuport Triplane is available online from Hobbyshop.cz . | 


|