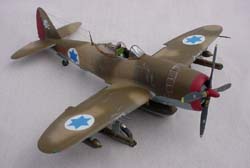
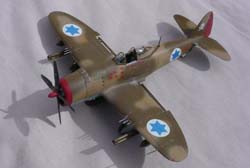
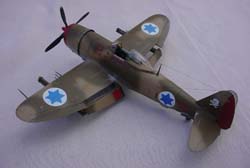
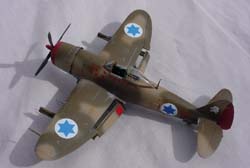
Revell 1/72 Israeli P-47M
|
 |
As new research unearths more information about Israeli P47s, I think
this subject will be fertile ground for after-market additions. Shamefully,
markings for Israeli Jugs are not currently available through ANY company
and there are many details that could be added to enhance any bubbletop
P47 to represent one in Israeli service. Rather than paraphrase the
outstanding P47 Thunderbolt article by Chaim Joshen, just read his article
about Jugs Over the Sinai; Israeli Thunderbolts.
The Revell kit:
 It's
outstanding. The level of molding is excellent (with some slight sink
marks on the upper wing – which may have been caused by my enthusiastic
use of Tenax), including adequate interior detail, very nice engine,
wheel well detail, separate supercharger gates, sturdy landing gear,
open cowl flaps ( !! ), etc. Of special note: this is the only P47 kit
in 1/72nd scale to get the machine guns correct! Most P47 kits are molded
so that the .50 Brownings are parallel to the leading edge of the wing
as is correct for most aircraft. This is incorrect for the P47; the
line of machine guns should be parallel to the ground, not the leading
edge. Good job to Revell for catching that! It's
outstanding. The level of molding is excellent (with some slight sink
marks on the upper wing – which may have been caused by my enthusiastic
use of Tenax), including adequate interior detail, very nice engine,
wheel well detail, separate supercharger gates, sturdy landing gear,
open cowl flaps ( !! ), etc. Of special note: this is the only P47 kit
in 1/72nd scale to get the machine guns correct! Most P47 kits are molded
so that the .50 Brownings are parallel to the leading edge of the wing
as is correct for most aircraft. This is incorrect for the P47; the
line of machine guns should be parallel to the ground, not the leading
edge. Good job to Revell for catching that!
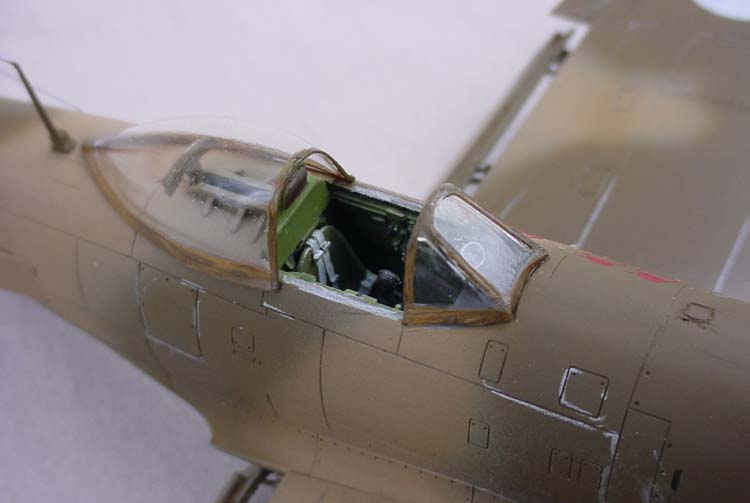
 Although
the interior of the Revell kit is okay, I had a True Details interior
given to me, so I used that instead. I first painted all the interior
Floquil Grimey Black, then shot Floquil Interior Green over that; the
places where the green had trouble going left a shadow. It's a good
effect and it's easy to do. Regarding green for the P47; most P47s would
have been a dark green interior - and that shade could vary widely.
Since I painted the Interior Green over Black, it darkened it up quite
a bit. It makes sense to me. After painting the green, I dry brushed
a lighter shade, then picked out things here and there with a detail
brush. Although
the interior of the Revell kit is okay, I had a True Details interior
given to me, so I used that instead. I first painted all the interior
Floquil Grimey Black, then shot Floquil Interior Green over that; the
places where the green had trouble going left a shadow. It's a good
effect and it's easy to do. Regarding green for the P47; most P47s would
have been a dark green interior - and that shade could vary widely.
Since I painted the Interior Green over Black, it darkened it up quite
a bit. It makes sense to me. After painting the green, I dry brushed
a lighter shade, then picked out things here and there with a detail
brush.
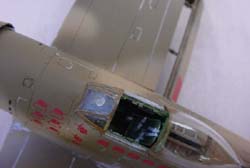 I
used a Fotocut PE instrument panel and found it totally a joy to work
with. Fotocut PE is quite different from any other I can think of; instead
of cutting the PE off a fret and cleaning that up, with Fotocut, you
just remove the perfect piece from a nylon backing. EASY. Fotocut instrument
panels are two piece affairs: the front with holes where the dials fit
behind, and the back having the dials pre-printed. There's no film to
glue on as we're used to doing. I realized a neat trick while doing
this project; to attach the back of the instrument panel, I used Future
Floor Polish. It dries clear and shiny (for the dials) but it also is
a very effective glue for non-load bearing stuff. I highly recommend
that. I
used a Fotocut PE instrument panel and found it totally a joy to work
with. Fotocut PE is quite different from any other I can think of; instead
of cutting the PE off a fret and cleaning that up, with Fotocut, you
just remove the perfect piece from a nylon backing. EASY. Fotocut instrument
panels are two piece affairs: the front with holes where the dials fit
behind, and the back having the dials pre-printed. There's no film to
glue on as we're used to doing. I realized a neat trick while doing
this project; to attach the back of the instrument panel, I used Future
Floor Polish. It dries clear and shiny (for the dials) but it also is
a very effective glue for non-load bearing stuff. I highly recommend
that.
Next I had to scrape away all the details from the kit so that I
could put the True Details interior in. Rather than building the tub
of resin bits and inserting it, I chose to glue on the fuselage sidewalls
then the instrument panel, and finally the floor (with seat etc). The
only real snag that I had was that the Fotocut instrument panel was
too wide for the cockpit; I recommend grinding more and doing lots and
lots of test fits before committing to a drop of glue.
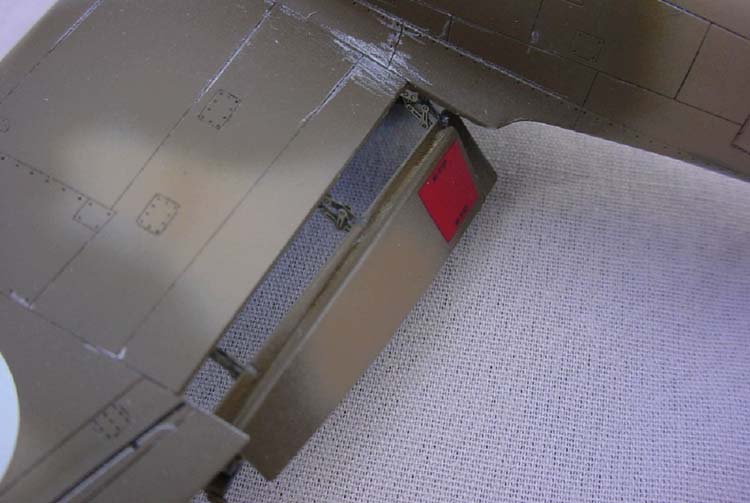
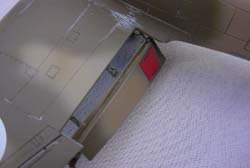 Before
gluing the wing halves together, I cut out the flaps with a razor saw.
In the Fotocut PE, you get some really nice looking flap actuators that
are very visible on any P47 with its flaps down. See the picture. Although
I took on this next step later, it could have been done any time along
the way. Since the PE is one sided, I thought that they might look a
little goofy. Instead, I used two sets, and sandwiched the actuators
together. That gives the PE two sides, plus it beefs them up quite a
bit. In addition to the actuators, you get these teeny tiny bits that
need to be attached as well. So there are six actuators in all, and
each one is made up of four tiny bits of PE. Primal scream therapy could
help. Before
gluing the wing halves together, I cut out the flaps with a razor saw.
In the Fotocut PE, you get some really nice looking flap actuators that
are very visible on any P47 with its flaps down. See the picture. Although
I took on this next step later, it could have been done any time along
the way. Since the PE is one sided, I thought that they might look a
little goofy. Instead, I used two sets, and sandwiched the actuators
together. That gives the PE two sides, plus it beefs them up quite a
bit. In addition to the actuators, you get these teeny tiny bits that
need to be attached as well. So there are six actuators in all, and
each one is made up of four tiny bits of PE. Primal scream therapy could
help.
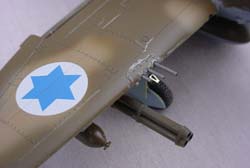
 An
additional modification that I made to the kit was moving the bomb shackles
outboard to attach rocket tubes where the shackles normally would be.
As it turns out, on looking at pictures, I realized that I goofed. In
the Brazilian and Israeli P47s, the rocket tubes were mounted directly
under the machine gun shell ejection chutes and the bomb shackles were
in their normal location. I discovered my error very late in the process,
so I just went ahead with the build. An
additional modification that I made to the kit was moving the bomb shackles
outboard to attach rocket tubes where the shackles normally would be.
As it turns out, on looking at pictures, I realized that I goofed. In
the Brazilian and Israeli P47s, the rocket tubes were mounted directly
under the machine gun shell ejection chutes and the bomb shackles were
in their normal location. I discovered my error very late in the process,
so I just went ahead with the build.
Construction after zipping up the fuselage was straight-forward.
I used a bit of CA here and there to fill, but no putty was needed at
all. I used the kit engine after comparing it to an aftermarket resin
one, and thought the kit one is just as good or better than the resin.
The other aftermarket stuff I used: True Details resin wheels (diamond
tread), and Fotcut PE oleo scissors, True Details vac canopy.
Painting:
 After
airbrushing the wheel well with Testor's Yellow Zinc Chromate, I masked
it off with Blue Tack. It's a sort of gum used to put up posters without
marring the surface of the wall. I have heard of Blue Tack leaving a
blue residue, so I put it on, shot Aeromaster Medium Gray, and immediately
removed the gum. It's a lot easier to push a wad of Blue Tack into a
wheel well and making sure that every you want is covered rather than
trying to fit a piece of masking tape to that area. Unfortunately, it
doesn't work as well with the cockpit where fiddly bits will break off
under the Blue Tack. I then masked and shot Testor's Model Master Insignia
Red on the nacelle, prop hub and the rudder. After
airbrushing the wheel well with Testor's Yellow Zinc Chromate, I masked
it off with Blue Tack. It's a sort of gum used to put up posters without
marring the surface of the wall. I have heard of Blue Tack leaving a
blue residue, so I put it on, shot Aeromaster Medium Gray, and immediately
removed the gum. It's a lot easier to push a wad of Blue Tack into a
wheel well and making sure that every you want is covered rather than
trying to fit a piece of masking tape to that area. Unfortunately, it
doesn't work as well with the cockpit where fiddly bits will break off
under the Blue Tack. I then masked and shot Testor's Model Master Insignia
Red on the nacelle, prop hub and the rudder.
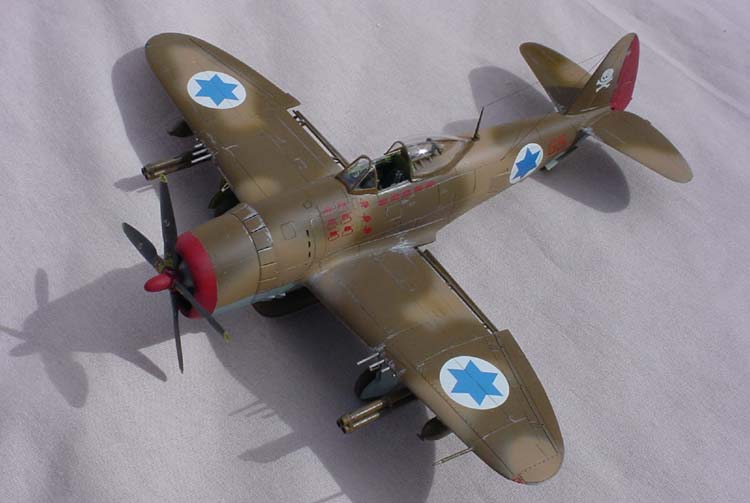
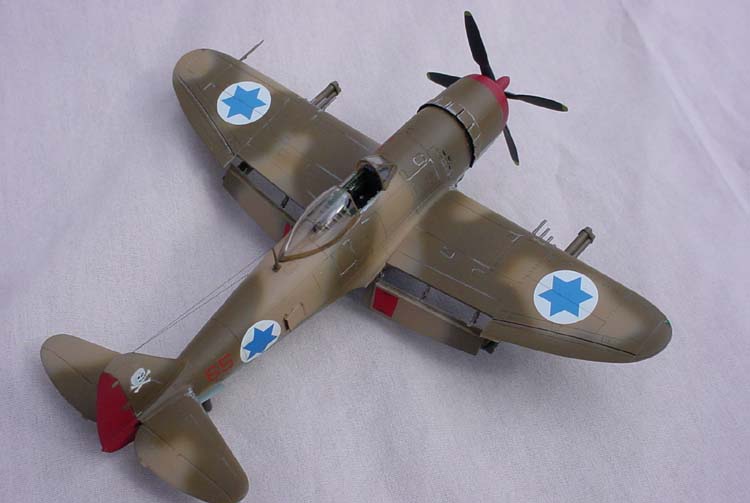
Next I applied a mask using Post-It notes and sprayed the model Floquil
USAAC Olive Drab. I removed all the masks except what was covering the
red, and shot Floquil Italian Sand haphazardly. According to my research,
on the Israeli P47s, there was no set pattern to be used. The only thing
that was common to them all was that the Brazilian Star and Bars on
the wing and on the fuselage were overpainted with some sort of sand
color at that time.
Markings:
 I
gloss coated the model to prepare for decalling. I used markings from
Isradecal for the insignias, from Superscale (tank & vehicle kill markings),
from Roden (squadron insignia on tail) and the kit (NO STEP on flaps,
various stencils). The aircraft that I chose to model would have been
flown mostly by Lt. Hurya B'Yessin in 1948. I
gloss coated the model to prepare for decalling. I used markings from
Isradecal for the insignias, from Superscale (tank & vehicle kill markings),
from Roden (squadron insignia on tail) and the kit (NO STEP on flaps,
various stencils). The aircraft that I chose to model would have been
flown mostly by Lt. Hurya B'Yessin in 1948.
I love Isradecals; they are very hearty decals but respond well to
Solvaset. They went down very nicely. The Superscale decals and Revell
decals went down easily as well. The Roden decals that I used didn't
really respond to Micro-Sol or Solvaset, so I went to Extra Strength
Micro-Sol. They only adhered to the surface after I used a lot of pressure
with a Q-tip soaked in solvent.
 I
next gloss coated that so that I could run dirty thinner through all
the panel lines. After that had dried a day, I used Novus 2 (for fine
scratches) to polish off the dirty thinner that wasn't in the panel
lines. The neat thing about doing it this way is that it's cumulative;
if you think they aren't dark enough, apply more dark and polish away
the next day. I like the effect that I got with it. Testor's Dull-Cote
over the top and that was that. I
next gloss coated that so that I could run dirty thinner through all
the panel lines. After that had dried a day, I used Novus 2 (for fine
scratches) to polish off the dirty thinner that wasn't in the panel
lines. The neat thing about doing it this way is that it's cumulative;
if you think they aren't dark enough, apply more dark and polish away
the next day. I like the effect that I got with it. Testor's Dull-Cote
over the top and that was that.
After that, it was just fiddly bits and a little bit of weathering
to call it good.
Conclusions:
I highly recommend the Revell kit; at about US$8 retail, it's a great
bargain. The decal sheet that came with it was huge and printed very
nicely. I'm sure I can use those decals on another model some time.
With the addition of some aftermarket details, this kit can be made
into an outstanding model.
| 


|