Building Mac's 1/72nd Scale Roland D.VIbBy Michael Kendix |
 |
Background
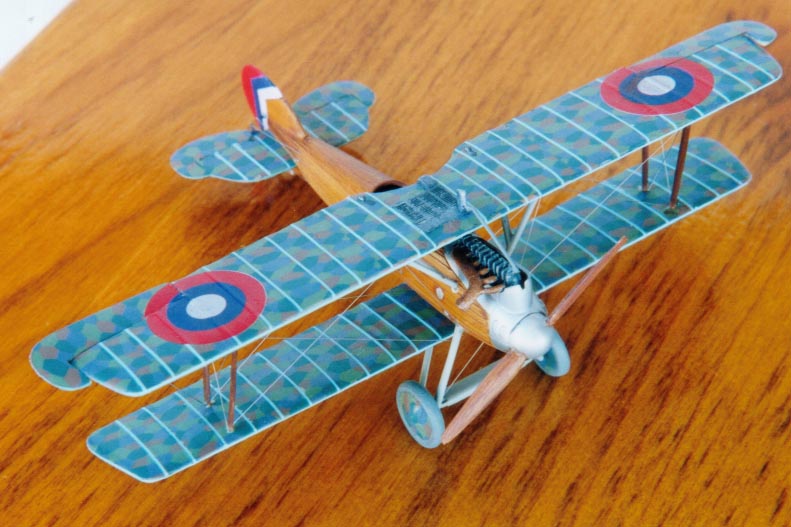
With its fuselage looking like a Viking ship, the Roland VI had an unusual appearance. The prototype was built in October 1917, and the fuselage, designed by Reinhold Richter, produced a lighter but stronger structure. The D.VIa was introduced into service in May 1918. Unfortunately, it was less than popular with pilots who preferred the new Fokker D.VII: the Roland D.VI being virtually obsolete by the time it reached the front. The Roland D.VI was used during the war as a trainer and served after the war: for example in the Czechoslovakian Air Force.
In the box
 The
box contains one sprue of well-moulded plastic parts: smooth without
any major blemishes, a small sheet of photoetch parts and a decal sheet
with markings for two German World War One schemes. A minor problem
is the slight over-thickness of the flying surfaces, which I opted to
do nothing about. The plastic sprue contains redundant pieces for the
Roland D.VIa version and the instructions show the parts that should
be used for the version in the box, although there appears to be an
error [see below].
The
box contains one sprue of well-moulded plastic parts: smooth without
any major blemishes, a small sheet of photoetch parts and a decal sheet
with markings for two German World War One schemes. A minor problem
is the slight over-thickness of the flying surfaces, which I opted to
do nothing about. The plastic sprue contains redundant pieces for the
Roland D.VIa version and the instructions show the parts that should
be used for the version in the box, although there appears to be an
error [see below].
Interior and engine
 I
began with the engine. Make sure you choose the correct engine because
the kit contains two engines. There is a discrepancy between the kitís
instructions: the schematic of the sprue crosses out parts 9 and 10
but part '1' of the instructions tells you to use those same parts.
I used parts 9 and 10, and left parts 3 and 4 on the sprue. I used Mr.
Surfacer to fill the engine seams and attached the engine to the base
provided in the kit. I painted the engine 'Engine grey' (What else?)
and dry-brushed it with aluminium and burnt aluminium. The aft part
of the base becomes the cockpit floor, so I painted it 'wood' using
my favoured recipe of 'Wood' acrylic paint, followed by gouache watercolour
burnt umber and burnt sienna paints applied by swiping them on with
a Q-tip, a coat of Tamiya Clear Yellow and then a coat of Future. I
repeated the same sequence to paint the inside of the fuselage in 'wood'.
I used the photoetch parts for the control stick and foot rudder and
painted the seat Leather Brown. I made my own instrument panel from
plastic card: the photoetch one bent as I tried to squeeze the fuselage
halves together.
I
began with the engine. Make sure you choose the correct engine because
the kit contains two engines. There is a discrepancy between the kitís
instructions: the schematic of the sprue crosses out parts 9 and 10
but part '1' of the instructions tells you to use those same parts.
I used parts 9 and 10, and left parts 3 and 4 on the sprue. I used Mr.
Surfacer to fill the engine seams and attached the engine to the base
provided in the kit. I painted the engine 'Engine grey' (What else?)
and dry-brushed it with aluminium and burnt aluminium. The aft part
of the base becomes the cockpit floor, so I painted it 'wood' using
my favoured recipe of 'Wood' acrylic paint, followed by gouache watercolour
burnt umber and burnt sienna paints applied by swiping them on with
a Q-tip, a coat of Tamiya Clear Yellow and then a coat of Future. I
repeated the same sequence to paint the inside of the fuselage in 'wood'.
I used the photoetch parts for the control stick and foot rudder and
painted the seat Leather Brown. I made my own instrument panel from
plastic card: the photoetch one bent as I tried to squeeze the fuselage
halves together.
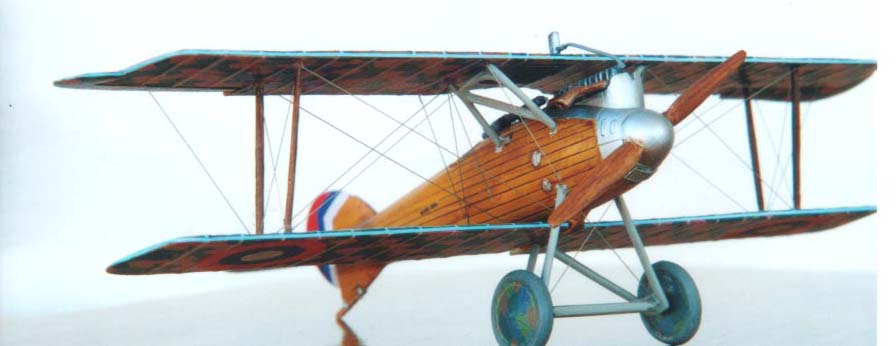
Fuselage
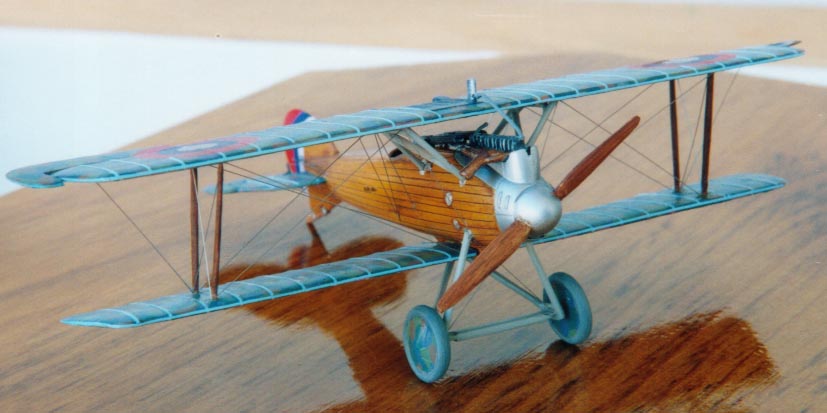
 The
clinker-built fuselage structure is one of the distinctive features
of this model and to my mind is what makes this model attractive. As
far as I can tell from the Datafile drawings, there should not be a
centre-line seam so you are supposed to fill the fuselage seam. This
has to be done without damaging the wonderful detail on the fuselage.
I glued the fuselage halves and attached the lower wing parts. After
several filling and sanding iterations, I sprayed Alclad II aluminium
onto the front part of the fuselage around the engine and nose area.
Then, I masked off the area using Parafilm and used the same recipe
as above to create the wood effect for the fuselage.
The
clinker-built fuselage structure is one of the distinctive features
of this model and to my mind is what makes this model attractive. As
far as I can tell from the Datafile drawings, there should not be a
centre-line seam so you are supposed to fill the fuselage seam. This
has to be done without damaging the wonderful detail on the fuselage.
I glued the fuselage halves and attached the lower wing parts. After
several filling and sanding iterations, I sprayed Alclad II aluminium
onto the front part of the fuselage around the engine and nose area.
Then, I masked off the area using Parafilm and used the same recipe
as above to create the wood effect for the fuselage.
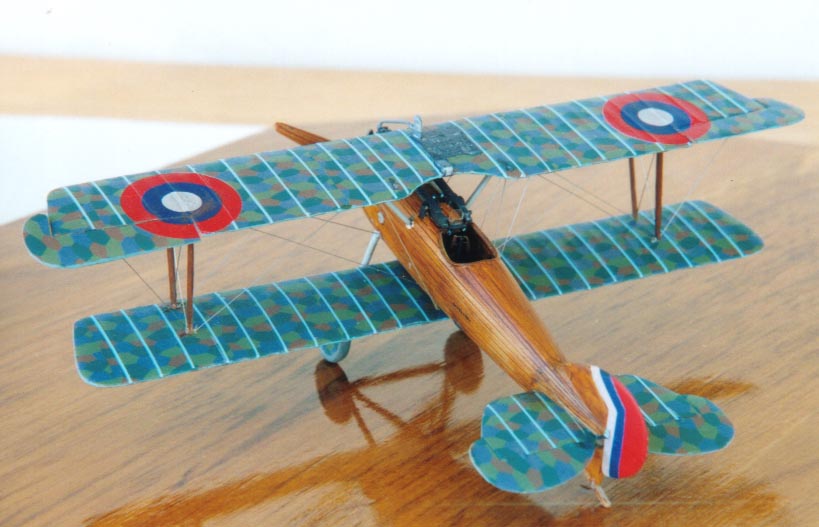
Flying surfaces and wheels
 First
I brushed Future onto the wings and then covered them with four-coloured
lozenge. The kit does not contain lozenge decals and some modellers
have been able to paint the irregular hexagonal pattern but I used Americal/Gryphon's
decals: different colours for the upper and the underside. The lozenge
on this aeroplane went on chord-wise, which is a fairly easy task. At
this point, I adhered the lozenge (upper colours) to the wheel covers
having first painted the tyres in light grey and given them a coat of
Future. Again I brushed on a coat of Future to seal the lozenge decals
and then added the rib tapes. Rather than cut my own rib tapes, I used
those from Aeromaster: pale blue for the upper surfaces and pink for
the underside. I did the same for the horizontal tail parts. For the
ailerons and the tail control surfaces I did not add rib tapes and I
applied the lozenge decal span-wise. At this point I also sprayed the
tail rudder red in preparation for the decals because I was planning
to use the APC decals for a post-World War One Czechoslovakian Air Force
machine, and the APC decals only supply the blue and white components
of the tail colours. Before adding the top wing I glued on the decking
for the guns and the guns themselves: the decking is also 'Wood'.
First
I brushed Future onto the wings and then covered them with four-coloured
lozenge. The kit does not contain lozenge decals and some modellers
have been able to paint the irregular hexagonal pattern but I used Americal/Gryphon's
decals: different colours for the upper and the underside. The lozenge
on this aeroplane went on chord-wise, which is a fairly easy task. At
this point, I adhered the lozenge (upper colours) to the wheel covers
having first painted the tyres in light grey and given them a coat of
Future. Again I brushed on a coat of Future to seal the lozenge decals
and then added the rib tapes. Rather than cut my own rib tapes, I used
those from Aeromaster: pale blue for the upper surfaces and pink for
the underside. I did the same for the horizontal tail parts. For the
ailerons and the tail control surfaces I did not add rib tapes and I
applied the lozenge decal span-wise. At this point I also sprayed the
tail rudder red in preparation for the decals because I was planning
to use the APC decals for a post-World War One Czechoslovakian Air Force
machine, and the APC decals only supply the blue and white components
of the tail colours. Before adding the top wing I glued on the decking
for the guns and the guns themselves: the decking is also 'Wood'.
 The
hardest task for me when building biplanes is gluing on the top wing.
Usually I jig things up using stacks of cassette tapes but this time
I thought I would try a different method. Thanks to Larry Marshall on
the World War One Modeling discussion forum, I got the idea to cut strips
of magnet purchased at my hardware store that attach to a metal base
to keep the lower wing and fuselage sub-assembly steady. I used the
top of a metal tin as a base. Having immobilized the lower wing-fuselage
piece, I stuck pieces of Play-Doh on each side of the lower wing. Then,
I used Testors orange-tube glue to adhere the struts to the top wing
and sat the top wing down on the Play-Doh. Pressing down gently on top
wing, I manouvered the piece into position. To my surprise, this worked
and once everything was in place, I used a Touch 'n' Flow applicator
to send Pro Weld onto the ends of each strut piece.
The
hardest task for me when building biplanes is gluing on the top wing.
Usually I jig things up using stacks of cassette tapes but this time
I thought I would try a different method. Thanks to Larry Marshall on
the World War One Modeling discussion forum, I got the idea to cut strips
of magnet purchased at my hardware store that attach to a metal base
to keep the lower wing and fuselage sub-assembly steady. I used the
top of a metal tin as a base. Having immobilized the lower wing-fuselage
piece, I stuck pieces of Play-Doh on each side of the lower wing. Then,
I used Testors orange-tube glue to adhere the struts to the top wing
and sat the top wing down on the Play-Doh. Pressing down gently on top
wing, I manouvered the piece into position. To my surprise, this worked
and once everything was in place, I used a Touch 'n' Flow applicator
to send Pro Weld onto the ends of each strut piece.

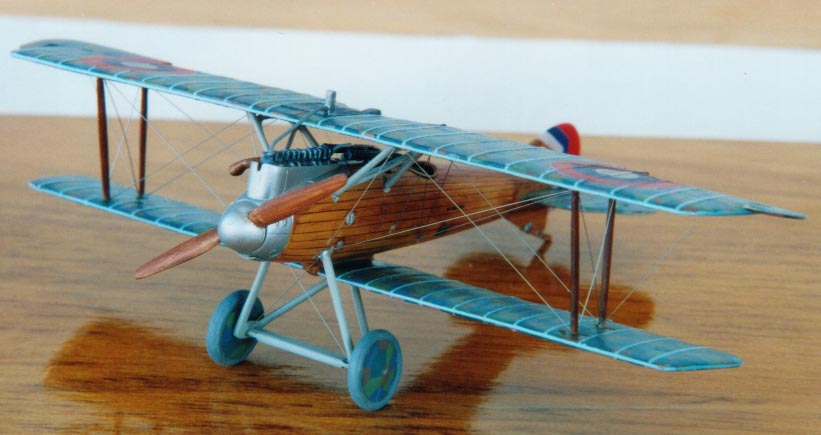
Landing gear and other details
 The
undercarriage was not difficult to attach and similarly for the tailskid.
I had a little problem lining things up and ensuring the aeroplane did
not lean over to one side. I added the filler caps and other metal bits
by brushing on enamel Silver Chrome, including the small photoetch piece
that goes on the underside of the nose area. I gave the entire 'Wood'
area a burnt umber oil wash that helped bring out the clinker-built
effect.
The
undercarriage was not difficult to attach and similarly for the tailskid.
I had a little problem lining things up and ensuring the aeroplane did
not lean over to one side. I added the filler caps and other metal bits
by brushing on enamel Silver Chrome, including the small photoetch piece
that goes on the underside of the nose area. I gave the entire 'Wood'
area a burnt umber oil wash that helped bring out the clinker-built
effect.

Rather than use the kit's decals, I used the APC decals for a Czechoslovakian aeroplane used after the First World War. Once all that was dry, I gave the entire assembly a coat of Future prior to the rigging process. For rigging I used lengths of 0.005-inch straight wire from Small Parts, Inc., adhered using Elmers white glue. At this point I added the engine exhaust and the pipe and radiator detail on top of the upper wing. Finally, I gave the entire model a light coat of Testors Clear Flat.
Conclusion
This is a first rate kit of one of the lesser-known World War One aeroplanes. The moulding is excellent, the parts fit well and it builds into a decent model. I highly recommend this kit, even as a first biplane model for anyone who has made a few monoplane kits.
References
-
Peter M. Grosz. 'Roland D.VI: Windsock Datafile 37.'' Albatros Productions, Ltd., Berkhamsted, Hertfordshire, United Kingdom. 1993.

![]()


