Make Your Own Inkjet Printer Decals
|
 |
Background
I don’t know about you, but I’ve been skeptical about the
concept of doing my own decals. If it were that easy, companies like Aeromaster
and Superscale would have been out of business long ago. In fact, we have
more quality decals coming from more sources around the world than any
time previously. You can find markings for just about any subject you
can think of. But the key words in that last sentence are ‘just
about.’
Every now and then, you find yourself with a project that either has
no decals (other than what’s perhaps provided in the box) or the
markings are not for the subject that you want to build. Consequently,
the project usually gets tabled until some future opportunity arises to
either obtain the markings you want or your interests have shifted toward
those markings that are available. This is where the SuperCal system from
Micro Format Inc. saves the day.
The Project
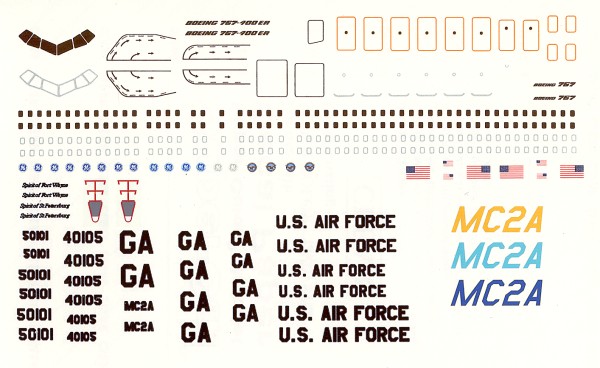
In my case, I wanted to create a desk model of the US Air Forces’
new E-10A, the so-called Multi-Sensor Command & Control Aircraft (MC2A).
The airframe is based on the new Boeing 767-400ER and sports a canoe (radome)
under the forward fuselage ala JSTARS.
Step One was to locate a 767-400 model. I briefly thought about stretching
one of the existing 767 kits but the –400 has a new wing as well
as the longer fuselage and that would require quite a bit of surgery,
so I declared this as Plan B. A search through eBay revealed a better
solution – Flight Miniatures had released a 1/200 scale 767-400
desk model and there was one on auction. Step One was complete –
I had an airframe and a scale to work from.
Step Two was to obtain the requisite markings and stenciling for a USAF
767-400 in 1/200 scale. Obviously there are no such decals on the market
though some of the existing decals available could be adapted.
This is a key point for any future project that you may have - if the
decals exist in another scale, you can scan and resize them to meet your
needs; or, if the decals do exist in the correct scale, but they’re
old and may disintegrate in water, you can keep the sheet as a master
and scan and re-print them as required. This is especially relevant as
many decal companies do not offer their full range of decals all of the
time. While some subjects may be periodically re-issued, most are one-time
productions and you must get them whilst you can. Lastly, you can scan
bits and pieces from a variety of existing decal sheets to obtain the
markings you need and minimizing any new artwork that might be required.
A quick search through Hannant’s website and I found what I was
looking for – Avigraphics 1/200 767 stencils. Of course these stencils
were not in the color I needed, but these became the start of the project.
Creating The Artwork
When they arrived, I scanned the decals into Paint Shop Pro at 600 dpi
(dots per inch) and realized the first challenge – I had to eliminate
the light blue background of the decal sheet. As you know, inkjet printers
will print blue, but not white – the background must be white for
this to work properly. Since the stencils do not use many colors, I decreased
the number of colors in the image from 16 million to 16. With some decal
artwork, you’ll need to maintain at least 256 colors or you will
lose too much of the original coloring. You’ll have to experiment
with this on a case-by-case basis.
Using the ‘Edit Palette’ option, I changed all of the background
colors (the decal backing) to white. After I touched up the ‘scan
noise’ in the image, I cut the doorway graphics out of the image
and into a new image. Once again I used the ‘Edit Palette’,
but this time I changed the grays into orange and achieved the desired
look for my doorways. Once completed, I returned the doorways excerpt
and the original image back to 16 million colors and pasted the excerpt
back into the original image. Now I had the stencils I needed.
The next challenge was to create a 1/200 air-refueling receptacle in
the desired colors. After rummaging through my stash, I happened upon
an F-16 receptacle in 1/48 scale. I scanned this in, performed the same
clean-up and re-coloring described above, and then resized the artwork
to be in scale with the rest of the graphics.
As I was accumulating a number of images, it was time to create a decal
master. I created a blank image with a white background that was about
twice as large as the 767 stencil sheet. Into this blank I pasted the
stencils, air refueling receptacles, and various other tid-bits that I
had scanned and altered. It was now time to create the ‘US Air Force’,
tail numbers and tailcode stencils. You can purchase the font that will
work with your computer to generate the correct Air Force lettering –
in this case it is called Amarillo USAF. This is a True Type font that
you merely copy into your /windows/font subdirectory and like magic, all
of your Windows applications can use this font (see the resources at the
end of this article for sources).
I used Paint Shop Pro’s text creator to create the ‘U.S.
AIR FORCE’ in a new image using the Amarillo font. I decided to
create several sizes, just in case. I repeated the process for the tail
numbers and tailcodes. While I was at it, I created some notional names
for the aircraft in a script font. Once these were all laid out, these
were pasted into the master decal image as well.
Printing
Now comes the interesting part – printing the correct size/scale.
As those of you know who’ve poked around computers a bit, there
are no standards in the PC world for size and color from your scanner
to your printer. While the Macs were able to achieve this in their system
standards, they managed to all but extinct themselves with other unfortunate
business/marketing decisions.
In my case, my HP scanner will image in several preset resolutions.
If I still had my HP printer, it would be more compatible with the scanner,
however I still prefer the Epson printers and I am presently using an
Epson Photo Stylus 870. Do you need a photo printer for printing decals?
Not at all, this process should work with any inkjet printer. It just
so happens that the Epson prints in resolution steps that are not at all
similar to the scanner. Here is where the magic starts.
 I
know from my scanning exercise how big the stencil sheet was (about 7.5
inches long). I scaled the new image to fit in roughly the same area using
the scaling settings in the printer control panel. After a few test prints
and size adjustments, I was able to get the stencils to print out at the
same size as the original artwork (about 13% of the original scan size).
I dropped in a sheet of clear SuperCal decal film into the inkjet printer
and out came a nice clear decal sheet. Wow! Do not touch the images until
the ink has had a few minutes to dry. The final step is to spray the decal
sheet with the clear sealant per the instructions. This was rather easy
after all! I
know from my scanning exercise how big the stencil sheet was (about 7.5
inches long). I scaled the new image to fit in roughly the same area using
the scaling settings in the printer control panel. After a few test prints
and size adjustments, I was able to get the stencils to print out at the
same size as the original artwork (about 13% of the original scan size).
I dropped in a sheet of clear SuperCal decal film into the inkjet printer
and out came a nice clear decal sheet. Wow! Do not touch the images until
the ink has had a few minutes to dry. The final step is to spray the decal
sheet with the clear sealant per the instructions. This was rather easy
after all!
Conculsions
Some points to consider before doing this yourself:
-
Don’t waste space on your blank decal sheet. Fill up the
sheet with as much artwork as possible so you’re not wasting
your resources. You can see in the final version I created that I
still had room to work with.
-
Be mindful of white/light-colored backgrounds. Unless you have
an Alps printer that can print white backgrounds, everything you create
here will be based on CYMK (cyan, yellow and magenta) as the basic
colors. The SuperCal decal film comes in clear and white backgrounds.
I used clear in this project, but you can use the white film as well.
The problem with the white background is that all backgrounds will
be white and the white will need to be trimmed away where not wanted.
-
I scanned the original images in at high (600 dpi) resolution.
This gave me some clear artwork to start with. By the time you’ve
manipulated the image and downsized it again, this may be a waste
of time and energy. You can experiment with various combinations of
resolution settings in your scanners and printers to see what works
best.
-
I did experiment with printing the decals at different resolutions.
Much to my surprise, the Epson printed the 360 dpi decals as clearly
as the 720 dpi and 1440 dpi settings.
While these techniques for creating your own decals will be useful
for those occasional project challenges, don’t use technique to
simply replicate and distribute decals that are currently available. You’ll
find that not only will this pose more problems with regards to the white
background issue, it is also stealing. All of the original artwork you’re
dealing with is someone else’s labor and is copyright protected.
Copyright laws do permit you to do what I’ve described above for
your own personal uses only.
The SuperCal system works nicely so far. Now that I have decal masters,
it is time to send the 767-400 into the paint shop and turn it into an
E-10A. Next month we’ll finish up the E-10A and address a new source
of aircraft conversions.
Resources
Here are some online sources to find just about anything you'll need
for virtually any unusual project (including this one):
You can obtain JASC's outstanding Paint Shop Pro from your local computer
store or directly from their website at www.jasc.com.
To obtain the USAF Amarillo and/or the USN Long Beach True Type fonts,
visit www.tlai.com.
|


|