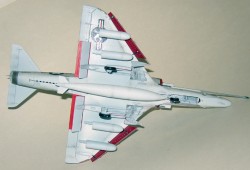
Pro-Modeler 1/48 A-4E/F Skyhawk
|
 |
Background
The A-4 Skyhawk, the smallest jet aircraft ever deployed on a carrier,
was the product of Ed Heinemann, Douglas' chief designer and engineer
who also designed the venerable AD (Able-Dog) Skyraider and the A3D Skywarrior
(morbidly referred to by its crews as "All-3-Dead" because of
lack of ejection seats - pilot, navigator, bombardier (all three) had
to crawl through the nose-wheel well to evacuate), also known as the "Whale."
Ironically for Heinemann, the biggest aircraft ever deployed on a carrier.
Used extensively in Vietnam by the Navy and Marines, the Skyhawk was
sometimes referred to as "Heinemann's Hot Rod " or "Scooter"
because of its petite size but powerful performance. The Skyhawk was so
small it did not require folding wings. Because of this, the lack of the
added weight the wing-fold mechanism would have supplied was more than
made up for in tremendous load carrying capability and maneuverability,
as exemplified by the Blue Angels who flew the aircraft from the 70s to
the mid 80s. It was also flown as adversary aircraft by flight instructors
in the Fighter Weapons School of NAS Miramar (Top Gun).
Foreign air forces that have flown the Skyhawk are Israel, Australia,
New Zealand, Argentina (missions were flown against the British during
the Falklands war), Kuwait, Singapore, Indonesia, Malaysia. These last
two countries have upgraded their Skyhawks with indigenous avionics and
engines, capable of flying several years beyond the lifespan of retired
Navy/Marine surplus aircraft that they were purchased from to begin with.
A fully loaded, static display hangs proudly in the lobby of the National
Museum of Naval Aviation in Pensacola, Florida. It is painted in the markings
of a well-known Skyhawk aviator - LTJG (now Senator) John McCain, who
was shot down in his Skyhawk over Vietnam, captured, and endured years
of imprisonment and torture by his hosts at the Hanoi Hilton.
The Kit
Pro-Modeler's A-4E/F Skyhawk release is not a reissue of their old (Monogram)
Skyhawk kit, but rather a re-boxed Hasegawa kit, as with the recent releases
of other Pro-Modeler kits of the P-38F/G/H and the Ju 87R Stuka. The box
art is an elegant painting of a Blue Angels aircraft. Decals portray markings
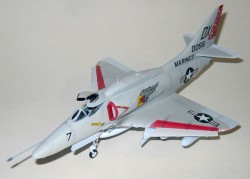
for aircrafts 1 through 4 for the Blue Angels mount (1978 season) and
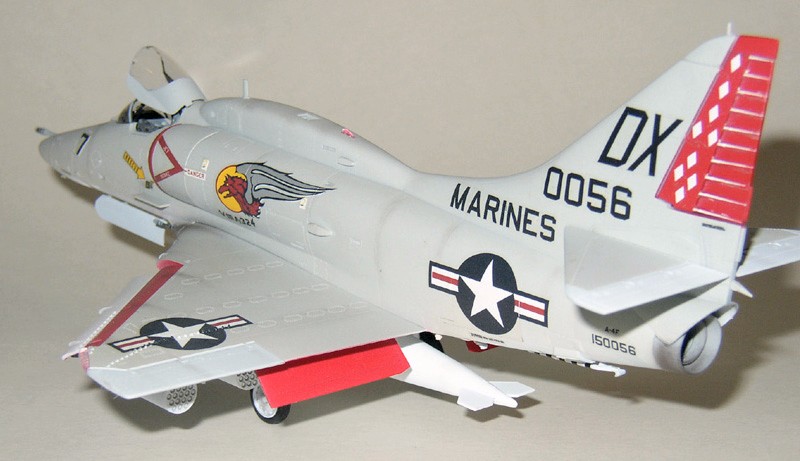
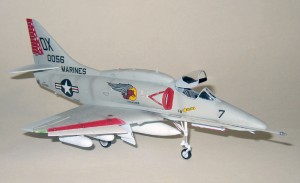
a colorful gray-over-white aircraft of Marine Attack squadron VMA-324
"Devildogs." The yellow decals for the Blue Angels aircraft
are slightly off-register. Aftermarket decals are recommended.
The instructions sheet is a well-laid out, 7-page, nine-step affair
written entirely in English. A brief history of the aircraft heads the
instructions sheet. All parts are pointed out by name, number and what
color to paint it (e.g. D15/cockpit floor/dark gull gray); an efficient
way of dealing with parts breakdown and painting as opposed to constantly
having to flip back and forth to refer to the paint chart on another page
- common with other manufacturers. Molded in light gray plastic with engraved
panel lines, there are 187 parts on 7 sprues with the clear parts separately
bagged.
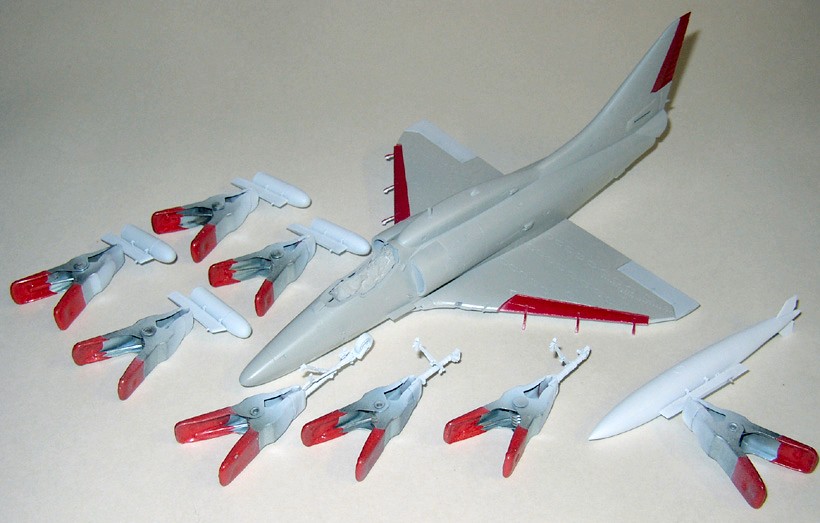
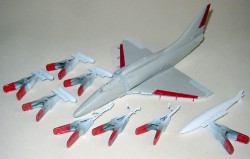
I decided early on that I wanted to build a Marine aircraft with underwing
weapons load and dive brakes closed. All photos I've seen of Skyhawks
on the ground only show flaps and slats deployed with the dive brakes
retracted. The kit does not come with any weapons, just external fuel
tanks. I dug up appropriate rocket launchers from the Tamiya Skyraider
kit and proceeded with construction.
The instructions point out along the way which parts to use for either
Blue Angels or Marine aircraft. Most notable differences are:
-
Marine: avionics humpback, chaff/flare dispensers, cannons, straight
refueling probe, weapons pylons, assorted avionics humps.
-
Blue Angels: no humpback, curved refueling probe, no cannons, no
pylons, smoke dispenser in place of chaff/flare dispenser. It also
points out that the slats and flaps on Blue Angels aircraft were never
left deployed and to remove the hinges and to fix the flaps and slats
in the up position.
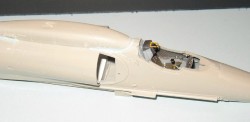 Construction
started with the cockpit. For a relatively new tooling, my sample had
quite a bit of flash on a lot of the smaller pieces. I painted the parts
as called out by the instruction sheet: olive drab seat cushions, dark
gull gray cockpit tub, ejection seat frames, black instrument panel and
side consoles which I dry-brushed with light gray to pick out the raised
parts and yellow and black striped ejection handles. The instructions
called for white seatbelts, but I painted mine a cream color - gray will
also work (keep in mind seatbelts are subjected to handling and are worn
and dirtied rather quickly). Once dried, gluing these parts together proved
to be troublesome. The ejection seat would not sit evenly on the cockpit
floor and as a result sits rather askew, even after truing the bottom
portions of the seat with multiple passes of file and sandpaper. I detailed
the gray sidewalls with pastels to give it a worn, dirty look. The molded-on,
relief fabric material on the sidewalls really stand out after this treatment. Construction
started with the cockpit. For a relatively new tooling, my sample had
quite a bit of flash on a lot of the smaller pieces. I painted the parts
as called out by the instruction sheet: olive drab seat cushions, dark
gull gray cockpit tub, ejection seat frames, black instrument panel and
side consoles which I dry-brushed with light gray to pick out the raised
parts and yellow and black striped ejection handles. The instructions
called for white seatbelts, but I painted mine a cream color - gray will
also work (keep in mind seatbelts are subjected to handling and are worn
and dirtied rather quickly). Once dried, gluing these parts together proved
to be troublesome. The ejection seat would not sit evenly on the cockpit
floor and as a result sits rather askew, even after truing the bottom
portions of the seat with multiple passes of file and sandpaper. I detailed
the gray sidewalls with pastels to give it a worn, dirty look. The molded-on,
relief fabric material on the sidewalls really stand out after this treatment.
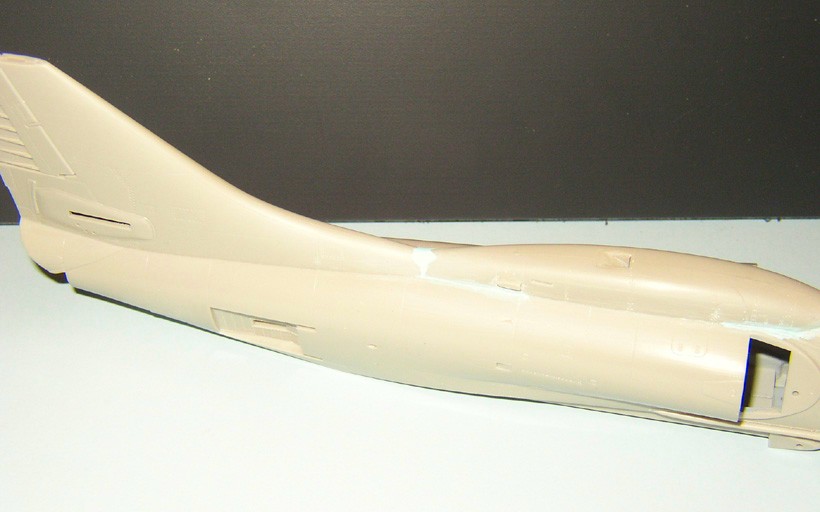
 Next
came the exhaust pipe and flame holder, which I painted a dirty, sooty
color (black/brown pastels over gray primer), to which I attached to the
right fuselage side, followed by the engine intake behind the cockpit
tub (gloss white with silver/steel fan blades). I left out the turbine
shaft (E27) - not much can be seen after the intake lips are glued in
place anyway. The instructions called for 10 grams of weight be placed
in the nose to balance the aircraft on its nose wheel. I don't know what
10 grams feels like, so I filled mine with 5 or 6 pieces of buckshot held
in place with Play-Doh. I lightly held the fuselage as far forward of
the CG as possible and as long as it drooped on its nose I figured that
was heavy enough. There's also an air intake/cooling vent (A11) that goes
on the fuselage spine, which in retrospect I probably could have left
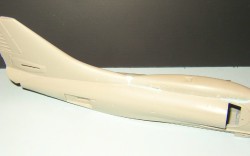
out since the avionics hump covers it. Once glued in place (cockpit tub,
engine intake/exhaust, nose-weight) it was time to glue the fuselage halves
together. Here's where I encountered some problems. No amount of cleanup,
filing, sanding would keep the fuselage sides even. I ended up having
to remove the locating pins to be able to line them up. Even then there
was a gap along the fuselage spine, which, fortunately, would be covered
up by the avionics hump. Next
came the exhaust pipe and flame holder, which I painted a dirty, sooty
color (black/brown pastels over gray primer), to which I attached to the
right fuselage side, followed by the engine intake behind the cockpit
tub (gloss white with silver/steel fan blades). I left out the turbine
shaft (E27) - not much can be seen after the intake lips are glued in
place anyway. The instructions called for 10 grams of weight be placed
in the nose to balance the aircraft on its nose wheel. I don't know what
10 grams feels like, so I filled mine with 5 or 6 pieces of buckshot held
in place with Play-Doh. I lightly held the fuselage as far forward of
the CG as possible and as long as it drooped on its nose I figured that
was heavy enough. There's also an air intake/cooling vent (A11) that goes
on the fuselage spine, which in retrospect I probably could have left
out since the avionics hump covers it. Once glued in place (cockpit tub,
engine intake/exhaust, nose-weight) it was time to glue the fuselage halves
together. Here's where I encountered some problems. No amount of cleanup,
filing, sanding would keep the fuselage sides even. I ended up having
to remove the locating pins to be able to line them up. Even then there
was a gap along the fuselage spine, which, fortunately, would be covered
up by the avionics hump.
 I've
built my previous 2 or 3 models extensively with super glue (CA) and this
project was no different. The use of super glue in this case helped tremendously
with the fit problems. I worked in small sections using accelerator along
the way, starting with the nose and working my way towards the bottom,
tail, up along the fuselage and ending just behind the cockpit. After
wiping off any excess accelerator it was time to file and sand the seams.
This whole process took about 10-15 minutes - compared to the more standard
technique of using liquid glue, squeezing the fuselage tightly for the
glue to ooze out and form a "welded" bead and wait 24 hours
before tackling the seam-cleaning process. Any flaws can be detected and
worked on immediately with super glue. I've
built my previous 2 or 3 models extensively with super glue (CA) and this
project was no different. The use of super glue in this case helped tremendously
with the fit problems. I worked in small sections using accelerator along
the way, starting with the nose and working my way towards the bottom,
tail, up along the fuselage and ending just behind the cockpit. After
wiping off any excess accelerator it was time to file and sand the seams.
This whole process took about 10-15 minutes - compared to the more standard
technique of using liquid glue, squeezing the fuselage tightly for the
glue to ooze out and form a "welded" bead and wait 24 hours
before tackling the seam-cleaning process. Any flaws can be detected and
worked on immediately with super glue.
Next came the avionics hump. For the most part it was a clean join atop
the fuselage but I ended up using putty to fill gaps on the forward and
rear joints. I also used a technique where I prepared a mixture of Tenax
liquid glue with some putty to come up with a semi-liquid concoction that
can be easily brushed on along narrow gaps. In this case I waited 24 hours
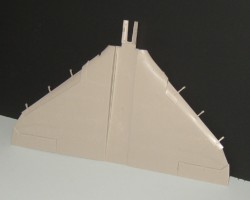
before sanding the putty smooth. I added the dive brakes in the closed
position. I little trimming is required to get a flush fit since they're
molded to be displayed in the open position.
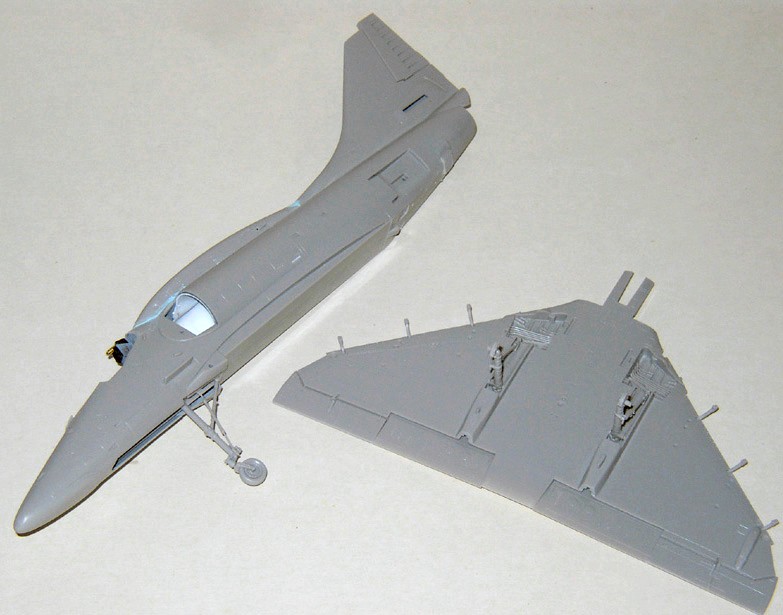
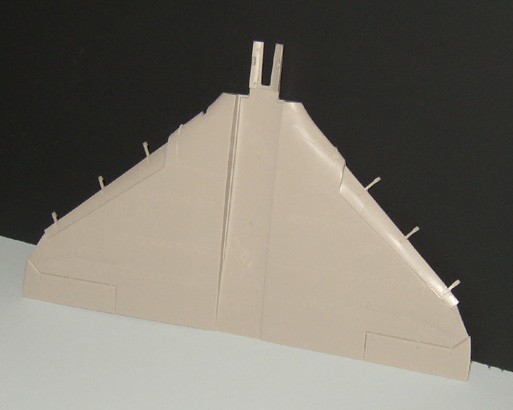
 Next
came the wings. This was a welcome break from the ill-fitting cockpit
and fuselage. The wings were a nice, tight fit. Again using CA, I glued
the top left/right halves onto the one-piece wing bottom portion and sanded
away any excess. I saved the flaps, slats and stabilizers until after
painting. Next I worked on the landing gears (a lot of flash in these
small parts), placing them in their locating holes in the wings and nose
wheel which I used as jigs to glue the braces in place so I could remove
and paint them as one piece later on. There was a piece of the nose gear
(D21) that I had trouble figuring out from the instructions sheet how
to place. I ended up referring to Bert Kinzey's "A-4 Skyhawk in Detail
and Scale" for close-up shots of the nose gear before I figured where
it went. Next
came the wings. This was a welcome break from the ill-fitting cockpit
and fuselage. The wings were a nice, tight fit. Again using CA, I glued
the top left/right halves onto the one-piece wing bottom portion and sanded
away any excess. I saved the flaps, slats and stabilizers until after
painting. Next I worked on the landing gears (a lot of flash in these
small parts), placing them in their locating holes in the wings and nose
wheel which I used as jigs to glue the braces in place so I could remove
and paint them as one piece later on. There was a piece of the nose gear
(D21) that I had trouble figuring out from the instructions sheet how
to place. I ended up referring to Bert Kinzey's "A-4 Skyhawk in Detail
and Scale" for close-up shots of the nose gear before I figured where
it went.
 The
rest of the construction went rather smoothly: the wing to fuselage portion
was a nice fit, although I used a small amount of gap-filling super glue
on the forward panels where the bottom portion meets up alongside the
nose wheel well. Then came the cannon fairings, assorted avionics bumps
along the fuselage before prepping the wheels, flaps, slats, windshield/canopy
and miscellaneous parts for painting. The
rest of the construction went rather smoothly: the wing to fuselage portion
was a nice fit, although I used a small amount of gap-filling super glue
on the forward panels where the bottom portion meets up alongside the
nose wheel well. Then came the cannon fairings, assorted avionics bumps
along the fuselage before prepping the wheels, flaps, slats, windshield/canopy
and miscellaneous parts for painting.
Painting & Markings
 I
primed the model using Polly Scale "Gravel Grey," a versatile
and smooth flowing acrylic paint that can act as primer or as a final
gray color. Then I airbrushed several thin coats of Polly Scale "Reefer
White" on the underbelly and top/bottom control surfaces. I waited
24 hours before I masked off the portions that were to remain white then
airbrushed Polly Scale "SP Lettering Grey," which is a close
match to Gull Grey. Next day I masked and painted the red portions (interiors
of slats, flaps, rudder) using Testors Acryl "Guards Red." Once
satisfied with the finish, I lightly sanded the entire model to remove
excess paint build-up and to prep it for a coat of Future floor wax, which
I let dry another 24 hours before applying the decals. I
primed the model using Polly Scale "Gravel Grey," a versatile
and smooth flowing acrylic paint that can act as primer or as a final
gray color. Then I airbrushed several thin coats of Polly Scale "Reefer
White" on the underbelly and top/bottom control surfaces. I waited
24 hours before I masked off the portions that were to remain white then
airbrushed Polly Scale "SP Lettering Grey," which is a close
match to Gull Grey. Next day I masked and painted the red portions (interiors
of slats, flaps, rudder) using Testors Acryl "Guards Red." Once
satisfied with the finish, I lightly sanded the entire model to remove
excess paint build-up and to prep it for a coat of Future floor wax, which
I let dry another 24 hours before applying the decals.
 The
decals laid down nicely with Micro Sol/Set solutions. I had to prod the
national insignia along the wings where molded-on boundary layer fences
are located to get them to settle down. The ejection seat warning labels
are nothing more than solid red triangles - they should contain warning
text throughout. I left these off. Once the decals were dry I airbrushed
Testors Acryl Flat to blend everything and achieve a smooth finish. The
decals laid down nicely with Micro Sol/Set solutions. I had to prod the
national insignia along the wings where molded-on boundary layer fences
are located to get them to settle down. The ejection seat warning labels
are nothing more than solid red triangles - they should contain warning
text throughout. I left these off. Once the decals were dry I airbrushed
Testors Acryl Flat to blend everything and achieve a smooth finish.
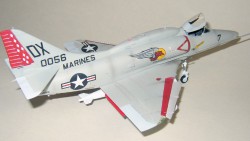 Final
touches included the attachments of the landing gears, stabilizers, flaps,
slats, canopy, windshield, external wing loadings, wingtip and assorted
navigation lights, etc. I painted the slat railings a dirty, metallic
color to reflect wear and tear before gluing the slats in place. I followed
up with some pastels along panel lines to accentuate them a little rather
than using a wash. The engraved panel lines are especially helpful when
using this treatment. Final
touches included the attachments of the landing gears, stabilizers, flaps,
slats, canopy, windshield, external wing loadings, wingtip and assorted
navigation lights, etc. I painted the slat railings a dirty, metallic
color to reflect wear and tear before gluing the slats in place. I followed
up with some pastels along panel lines to accentuate them a little rather
than using a wash. The engraved panel lines are especially helpful when
using this treatment.
Conclusions
 Overall
this wasn't a bad kit. It took me about 24 hours over the span of three
weekends to complete. I didn't measure it; I don't particularly care for
that sort of nit picking. If it looks like a Skyhawk, then it's a Skyhawk.
I was disappointed with the ill-fitting cockpit and fuselage and the flash
that was present, especially on the smaller pieces, as well as the decal
sheet that included some off-registered markings (the yellow Blue Angels
markings, "Rescue" arrows, solid red triangles for ejection
seat warning labels). Overall
this wasn't a bad kit. It took me about 24 hours over the span of three
weekends to complete. I didn't measure it; I don't particularly care for
that sort of nit picking. If it looks like a Skyhawk, then it's a Skyhawk.
I was disappointed with the ill-fitting cockpit and fuselage and the flash
that was present, especially on the smaller pieces, as well as the decal
sheet that included some off-registered markings (the yellow Blue Angels
markings, "Rescue" arrows, solid red triangles for ejection
seat warning labels).
I'd hate to think, too, that Pro-Modeler has become nothing more than
parts distributor for Hasegawa, instead of releasing newly tooled kits
that merit the brand "Pro-Modeler." They had such potential
with their releases of the B-17G (Cheyenne tail version), A/B-26 Invader,
SB2C Helldiver, P-47N Thunderbolt, etc.
I'd recommend this kit only to intermediate modelers and especially
to naval aviation modelers wanting to add a Scooter to their collection.
|


|