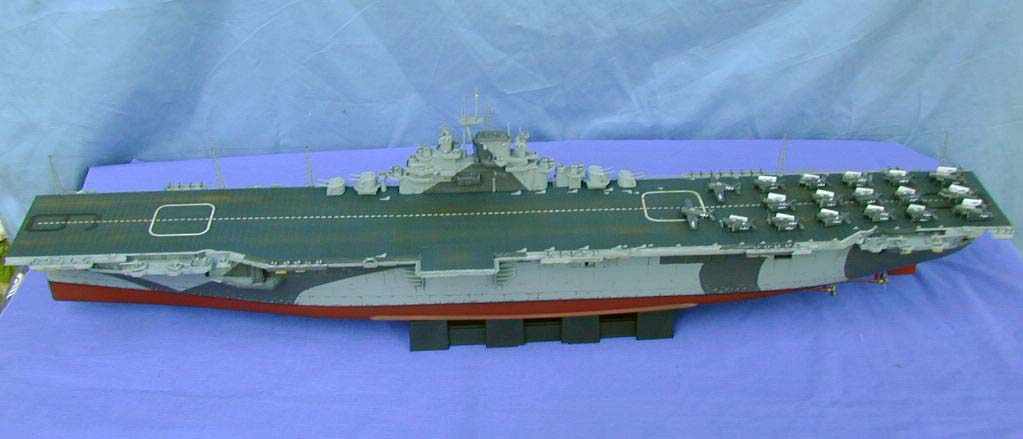
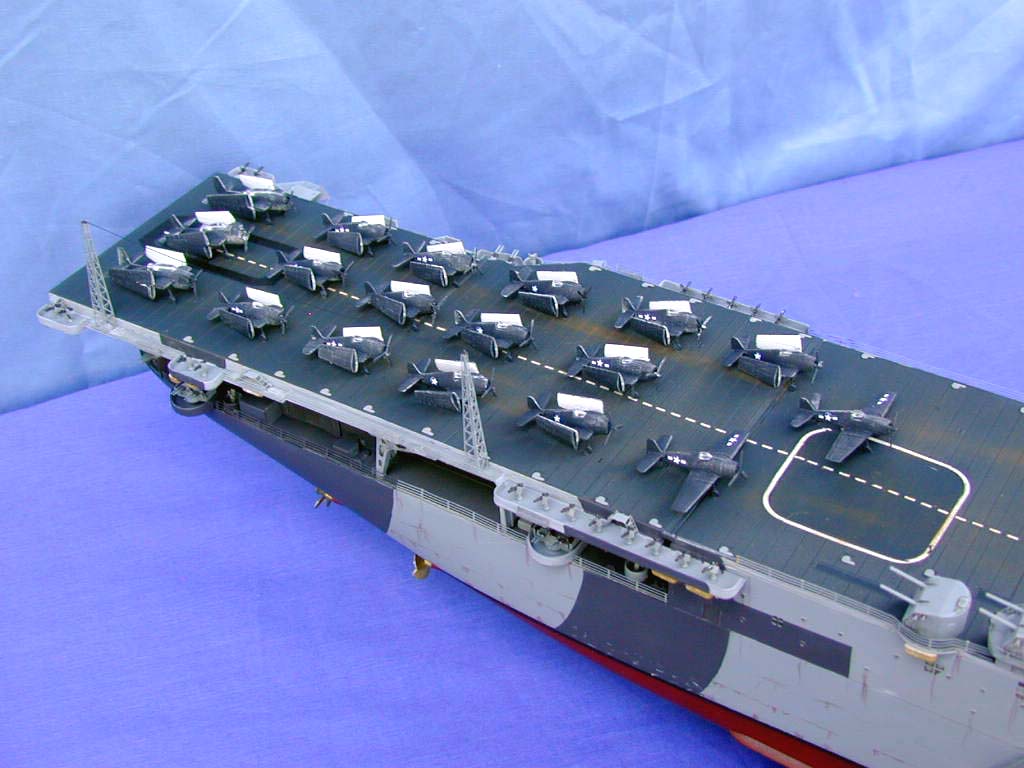
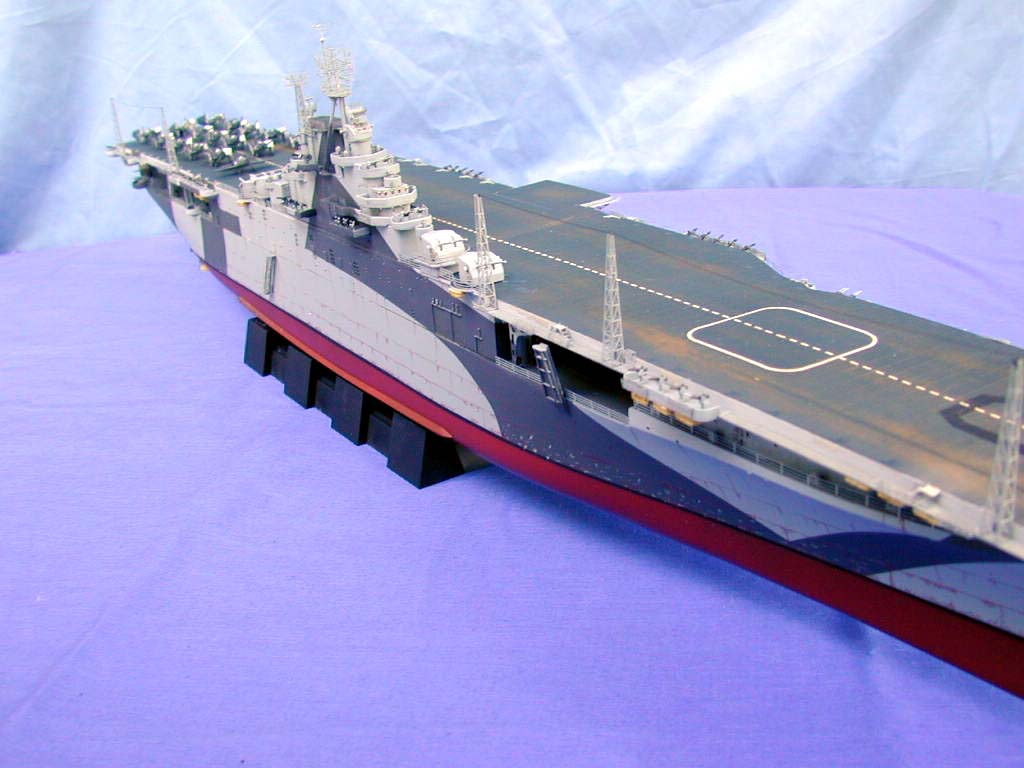
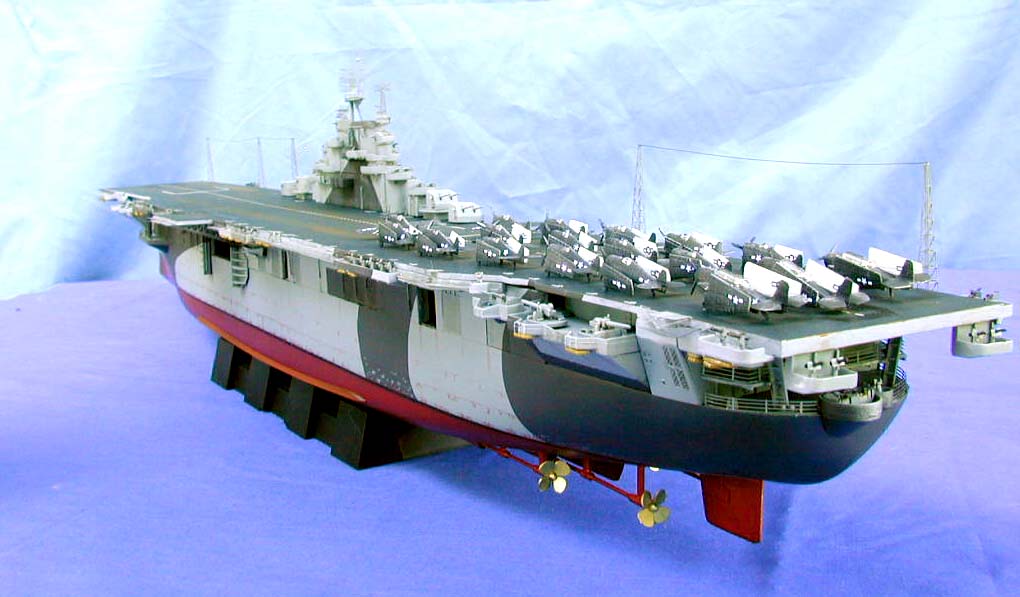
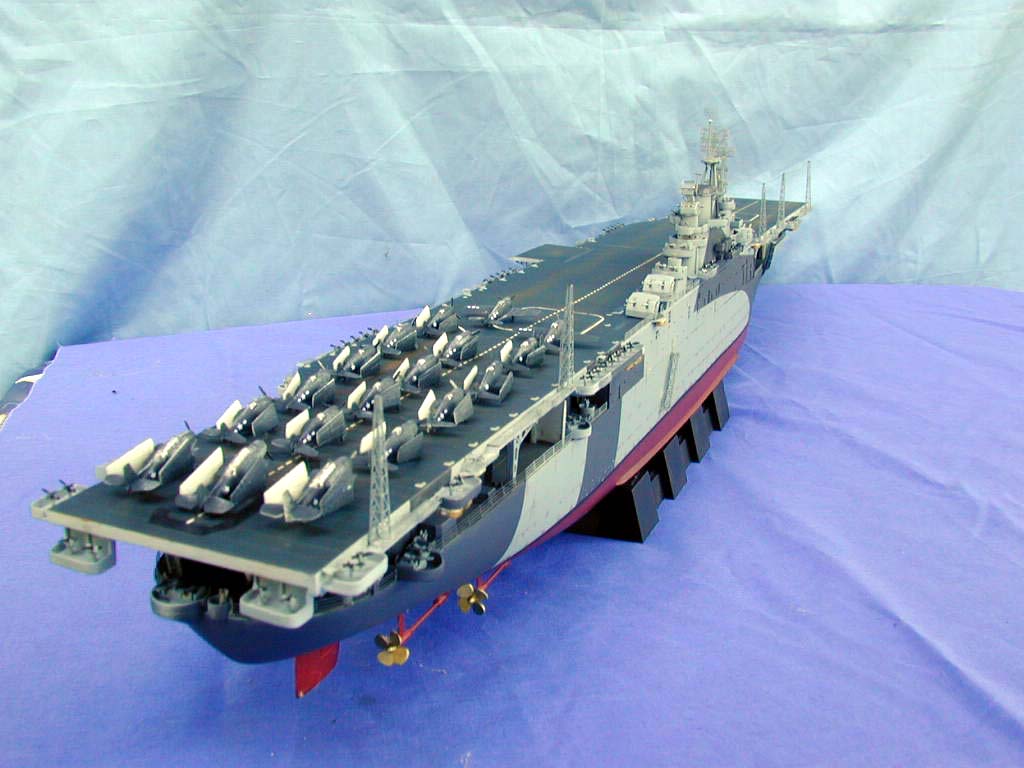
Building the Trumpeter 1/350 USS Essex with Tom's Modelworks Fittings |  | Introduction I know a lot of modelers around the world were excited when Trumpeter released a large 1/350 kit of the CV9 Essex. I reviewed this kit and Tom's Modelworks excellent Essex/Carrier detail set in the March 2003 issue of Internet Modeler. I was chomping at the bit at the bit to get after this beast and wasted no time in starting. Read on. Building Essex  I planned to employ several basic techniques to add details to the model. I tend to build large projects in subassemblies so I examined both the kit and Tom's details instructions to form a plan. I would deal with the flight deck first, then the hull, island, ship's boats and so on in stages to break up a large build into smaller chunks. This method can also simplify painting as you go through the build. Here we go. I planned to employ several basic techniques to add details to the model. I tend to build large projects in subassemblies so I examined both the kit and Tom's details instructions to form a plan. I would deal with the flight deck first, then the hull, island, ship's boats and so on in stages to break up a large build into smaller chunks. This method can also simplify painting as you go through the build. Here we go. The Main Decks and Hull I went over the instructions. They have nicely done exploded views with all parts identified. I quickly realized that the three-part flight and hanger decks were the first hurdles to overcome. This alone precludes following the direction steps as presented. Fortunately fit was good on both decks and only required filling and judicious sanding until the huge flight deck looked uniform from bow to stern. I then shimmed and placed the elevators flush with the flight deck. Whew! I masked off the flight deck around the seams to save that great inlaid detail. I then assembled, painted, and added the flight deck under components to finish this stage. The extensive flight deck edge walkways have huge ejector marks on the top surface so I did away with them, planning to add Tom's perforated carrier catwalks set later.  I was planning a Measure 6/10 camo scheme for the ship representing the ship in a 1944 configuration. This was a destroyer scheme of dull black over light gray that looked pretty cool as depicted in a color profile in Essex Class Carriers In Action. At this point I shot the flight deck surface with Poly Scale deck blue. I then shot the deck with clear gloss to prepare things for the kit decals. I applied the large numbers and white elevator warning stripes. I then carefully laid out the white centerline decals in about 10 pieces down the middle of the deck. I used Solvaset to get things to snuggle down. I wanted to add depth to the acres of flight deck so I did an oil wash followed up with light dry brushing with brown to simulate wear. I shot the hanger deck with dark nonskid gray. I was planning a Measure 6/10 camo scheme for the ship representing the ship in a 1944 configuration. This was a destroyer scheme of dull black over light gray that looked pretty cool as depicted in a color profile in Essex Class Carriers In Action. At this point I shot the flight deck surface with Poly Scale deck blue. I then shot the deck with clear gloss to prepare things for the kit decals. I applied the large numbers and white elevator warning stripes. I then carefully laid out the white centerline decals in about 10 pieces down the middle of the deck. I used Solvaset to get things to snuggle down. I wanted to add depth to the acres of flight deck so I did an oil wash followed up with light dry brushing with brown to simulate wear. I shot the hanger deck with dark nonskid gray. 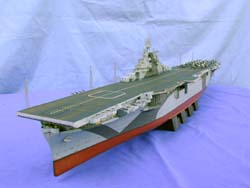 I wanted to do the kit full-hull so I joined the massive upper and lower hull pieces with tape and adjusted fit until things lined up. I matched the pieces at the bow and then work my way after using the capillary method of applying glue. I filled the long seams with putty and sanded until I was happy with the look. I wanted to do the kit full-hull so I joined the massive upper and lower hull pieces with tape and adjusted fit until things lined up. I matched the pieces at the bow and then work my way after using the capillary method of applying glue. I filled the long seams with putty and sanded until I was happy with the look. Of course the proof is in the painting so I shot the hull with Tamiya haze gray. I then masked the hull and sprayed on a flat black waterline. I then assembled the ship's rudder and drive shafts as called for in step 19. After masking one more time I then shot the lower hull with Tamiya dark red and let things dry. The Hanger Deck and Bulkheads 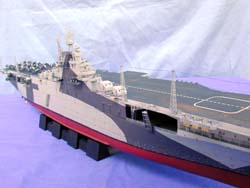 I laid the pre-painted flight deck, fore, and aft decks into the hull. Fortunately fit was very good. Once things dried I filled in the areas that ere most visible and touched up the paint. I then added the various pre-painted deck details pointed out in step 2. I used a cheap thin necklace material for the anchor chain. I sprayed the chain flat black and CAed them in place. Man, this model is huge! I laid the pre-painted flight deck, fore, and aft decks into the hull. Fortunately fit was very good. Once things dried I filled in the areas that ere most visible and touched up the paint. I then added the various pre-painted deck details pointed out in step 2. I used a cheap thin necklace material for the anchor chain. I sprayed the chain flat black and CAed them in place. Man, this model is huge! I went through steps 3 through 9 and assembled the various walkways and such to the hanger bulkheads while they were still on the sprue. You will be impressed with the level of detail inside the hanger deck! I then chose various doors to open up the model a little and razor sawed them out. I then shot everything with haze gray. I then assembled the hangar bulkheads to the deck following steps 3 through 9. Here I found some fill issues with seams but nothing to whine about. I had zero touchup between bulkheads and deck using this method. Steps 11 and 12 have you mount the various gun positions to their sponsons. Here unfortunately I ran into fit problems. There were gaps between the gun decks and bulkheads. Choosing my battle I mounted the gun decks flush with the sponsons and filled the gap to the bulkhead. I left off the ships guns and boats at this point.  I then carefully dry fit the humongo flight deck to the hanger bulkheads. Not bad in most areas but careful filling and sanding is required to remove the seams. I then touched up with haze gray. I then carefully dry fit the humongo flight deck to the hanger bulkheads. Not bad in most areas but careful filling and sanding is required to remove the seams. I then touched up with haze gray. At this point I was ready to apply the second camo color to the upper hull. I masked the hull at the water line and eyeballed the masking on the hull sides using the In Action profile as a guide. I then applied Polly Scale scale black with an airbrush. Ship's Guns 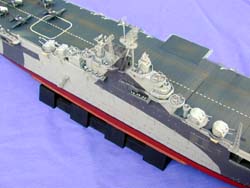 I assembled the ship's guns separately and then shot them with haze gray. The quad 40mms (10 of them) are particularly nice. I used Tom's PE splinter shields on the mounts and then lay in the guns. I touched up the 40's with scale black where appropriate. The twin fine-inch turrets fit nicely with only minor seams to deal with. I positioned the guns in their tubs around the hull. I left the 20mm single mounts alone at this point. I assembled the ship's guns separately and then shot them with haze gray. The quad 40mms (10 of them) are particularly nice. I used Tom's PE splinter shields on the mounts and then lay in the guns. I touched up the 40's with scale black where appropriate. The twin fine-inch turrets fit nicely with only minor seams to deal with. I positioned the guns in their tubs around the hull. I left the 20mm single mounts alone at this point. The Island I assembled the ship's Island and deck structures following steps 16 through 18, cleaned up seams, and shot everything with haze gray. I then masked and applied the scale black camo scheme to the island with an airbrush. At this point I went to Tom's details instruction sheet. I had pre-painted the PE haze gray. I added extensive details to the island following Tom's instructions. I basically crossed off the assembly steps as I went through the rest of the build. I then assembled the ships masts following step 16. Use care with the main mast assembly, as there are some alignment issues when you place it on the island. 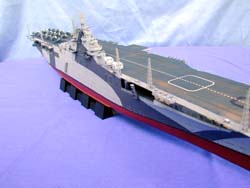 I then assembled Tom's radar antennae and added them to the island. I went with the impressive SK array representative of a mid war fitting! The SC2 array and mount went on the funnel. I replaced kit parts with Tom's MK4 arrays on the five-inch directors. Things are looking good! I then assembled Tom's radar antennae and added them to the island. I went with the impressive SK array representative of a mid war fitting! The SC2 array and mount went on the funnel. I replaced kit parts with Tom's MK4 arrays on the five-inch directors. Things are looking good! Details, Details At this point I just let Tom's Details assembly steps drive the rest of the build. I will just hit the highlights here. I scratchbuilt the ship's PA speakers using spares and Tom's PE faceplates. I added the various PE antennae and direction finders. I just went down Tom's directions until I had all the components added and checked off. The ship's 20mm guns are so-so but I used them for the build. You will enjoy putting on a gazillion PE gun shields on these babies! (And then putting them back on as you knock them off!) Of course don't forget the gun sights! Final Assembly  I wrapped things up by installing the Island and other deck detail on the flight deck. Fit was perfect so again no touch up between bulkheads and deck. I laid down the numerous PE arrestor deck plate covers following Tom's guide. I left these haze gray so they would show up. I wrapped things up by installing the Island and other deck detail on the flight deck. Fit was perfect so again no touch up between bulkheads and deck. I laid down the numerous PE arrestor deck plate covers following Tom's guide. I left these haze gray so they would show up. With everything pretty well built I added the deck railings working from the inside out. Thankfully there are few complex bends to deal with. Once the hull was done I put in Tom's perforated carrier catwalks around the flight deck. This PE is very fine and just looks fantastic! I then bent up a bunch of Tom's carrier baskets and applied them to various point of the railings in pairs. Assembly complete! Weathering I pin washed various surfaces with dark oil to give some depth to the paint and then dry brushed with light gray to pop out details. I then added rust to the slab sides of the hull to break things up a tad using colored pencils. I first drew in panel lines with brown using an In Action cover painting as a guide. I then went over the brown with red-orange. I used a number 11 point to scrape at the scale black to simulate flaking. Once I was happy I shot the entire model with clear flat to bring things together. The Air Department  I wanted to pose the ship prepping for a fighter sweep so I purchased some additional Trumpeter aircraft. I chose to build the F6F Hellcats and the kit supplied TBF Avengers for this mission. Each aircraft has very finely scribed details even to the point of representing the fabric control surfaces. These are some of the best in scale birds I have seen. Aircraft decals are nicely done and went on without a hitch. I touched the completed birds wheels in a CA puddle and dropped then into place. I wanted to pose the ship prepping for a fighter sweep so I purchased some additional Trumpeter aircraft. I chose to build the F6F Hellcats and the kit supplied TBF Avengers for this mission. Each aircraft has very finely scribed details even to the point of representing the fabric control surfaces. These are some of the best in scale birds I have seen. Aircraft decals are nicely done and went on without a hitch. I touched the completed birds wheels in a CA puddle and dropped then into place. Conclusion It is so great to have a large scale Essex class that is relatively economical! Despite the minor warts, I recommend this kit to most ship lovers. Average level ship builders would have a lot of fun building right out of the box. It builds up to an impressive representation of this historic ship. You might want to get an easier PE job under your belt if you are planning to use Tom's PE details. They are first rate and easy to work with but there is a ton of PE to build into this ship. We thank Stevens International and Tom's Modelworks for supplying review product for this article. | 


|