Revell Cutty Sark
|
 |
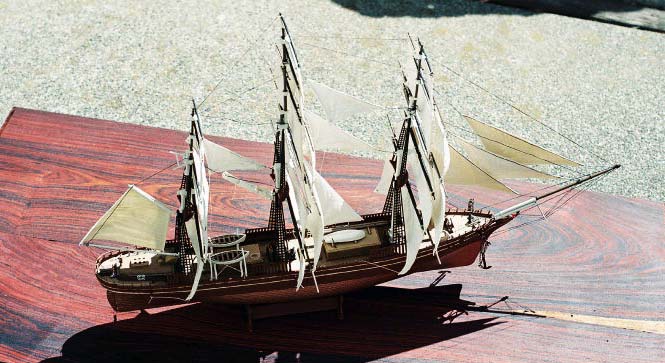
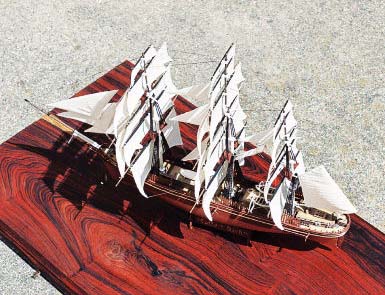
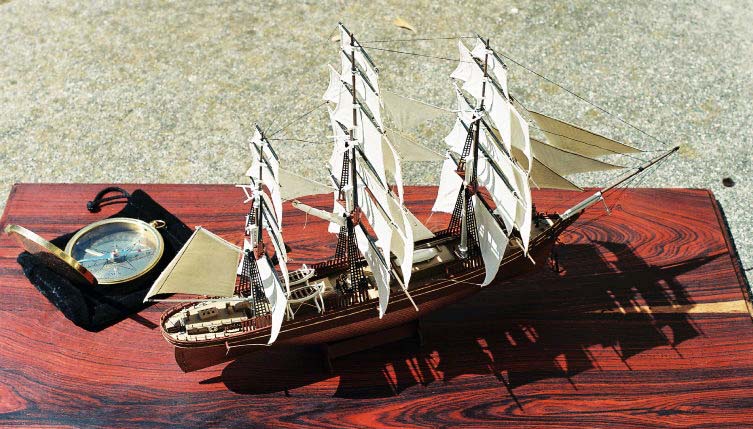
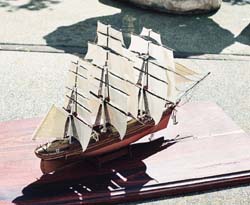
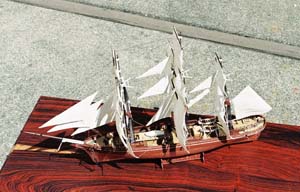
The Cutty Sark is a full hull model coming with all the masts, spars
and sails required to make it look as if it's underway on the high seas.
This project began innocently enough as a gift, and I might never have
finished it but for the fact that it was literally a labor of love. If
I'd known at the outset how much work I was in for, I might have turned
in my Xacto blade. I've done military modeling since the 1970s, and the
closest thing I got to a true sailing vessel was Revell's PT-109. The
Cutty Sark required me to kick up my skill level and patience a few notches,
so that I ended up creating a multi-media kit.
More than most, the Revell Cutty Sark is a very time-intensive kit
if you want to do a proper job of displaying the sails. The box doesn't
identify a scale, but my guess is it exceeds 1/350. Molded in black, with
about the usual amount of flash that can be expected from older Revell
kits, it offers a fine representation of one of the world's most famous
sailing vessels. The sails are vinyl, molded in bone white, and I have
to give Revell kudos for throwing in high-quality, durable waxed thread
in two different colors, khaki and black. Unfortunately, the anchor chain
was a poor quality silver thread that easily came unraveled. I replaced
it with a small 1/35 scale Verlinden towing chain that was surprisingly
to scale for my purposes.
 A
word to anyone contemplating building this kit: Patience. This is essential
to overcome both the kit's deficiencies and the inevitable frustrations
of building a fully rigged sailing vessel. Parts of the model are flimsy
and break easily. I spent a fair amount of time repairing or replacing
the railing posts. There is only a minimal painting guide, and there is
nothing in the way of instructions for the various knots you will need
to master if you intend to display the ship under sail. Luckily, I had
also bought Monogram's much larger and more detailed Cutty Sark kit (1/120
scale), and quickly learned to use its instructions in tandem with the
ones provided by Revell. Monogram's how-to diagrams on tying knots absolutely
saved the day (the Monogram Cutty Sark is a 1977 kit which pre-dates the
Revell-Monogram merger). A
word to anyone contemplating building this kit: Patience. This is essential
to overcome both the kit's deficiencies and the inevitable frustrations
of building a fully rigged sailing vessel. Parts of the model are flimsy
and break easily. I spent a fair amount of time repairing or replacing
the railing posts. There is only a minimal painting guide, and there is
nothing in the way of instructions for the various knots you will need
to master if you intend to display the ship under sail. Luckily, I had
also bought Monogram's much larger and more detailed Cutty Sark kit (1/120
scale), and quickly learned to use its instructions in tandem with the
ones provided by Revell. Monogram's how-to diagrams on tying knots absolutely
saved the day (the Monogram Cutty Sark is a 1977 kit which pre-dates the
Revell-Monogram merger).
Painting
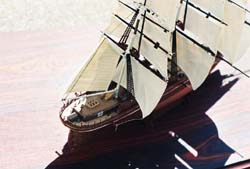
For the hull, I laid down a coat of primer and let it dry for several
days. The original Cutty Sark had copper plates nailed to its lower hull
(hence the term 'copper-bottom investment', possibly a reference to the
Cutty Sark's lucrative record as a Far East trader), so I did a little
research and settled on Humbrol copper, applied with a sable brush. The
Humbrol went on beautifully, and did not give me the problems some other
metallics have when brush-painting. The upper hull of the Cutty Sark has
been represented as both black and a deep chestnut brown. Opting for the
chestnut color, I used Model Master Rust, which set off the gold trim
nicely. Like the Humbrol, the Model Master went on smooth and even.
For the masts I followed the painting guide on the box and the Monogram
instructions, and alternated between Polly Scale chestnut brown, and Model
Master Flat Header White. The inner yard arms were chestnut brown, the
outer ones black. For the deck I used Polly Scale Deck Tan.
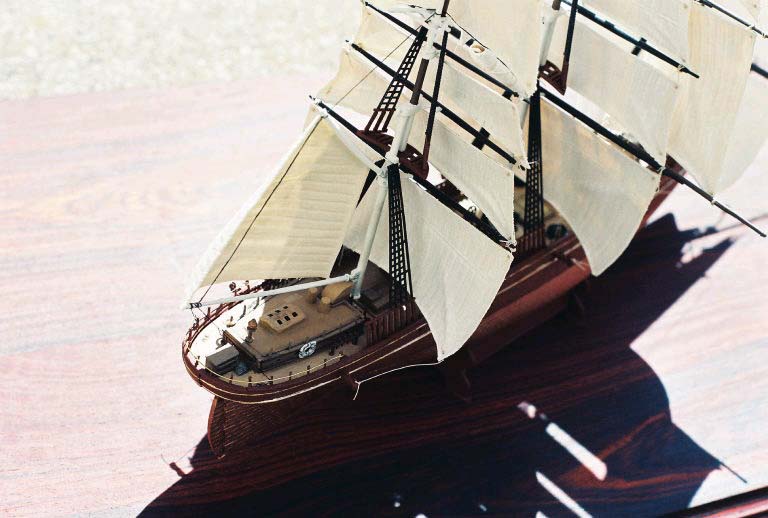
Construction
 You
begin by gluing in railing along the interior of the gunwales (upper edge
of a ship's sides), then move on to the deck and its various fittings,
many of which have a fair amount of flash that must be carefully trimmed
and sanded, since the pieces are mostly small and delicate. You
begin by gluing in railing along the interior of the gunwales (upper edge
of a ship's sides), then move on to the deck and its various fittings,
many of which have a fair amount of flash that must be carefully trimmed
and sanded, since the pieces are mostly small and delicate.
The Cutty Sark must have weights placed in its hull before the deck
is glued on, otherwise it will easily tip over and get smashed once you
get the sails on. Before gluing the deck in, I filled the hull with blue
Permaplast modeling putty for added weight. Permaplast is perfect for
adding weight and stability. It's relatively heavy, hard but malleable,
and will not dry out or most importantly, damage the plastic.
 The
Cutty Sark has three small boats, two of which are located toward the
afterdeck. The supports for the two rear boats are remarkably thin and
flimsy, yet much be joined by thread lashed between the curved supports
to form an 'X' that, on the actual vessel, helped the boats slip down
into the water rather than crash straight down to the deck once they were
released from the supports. Care must be taken at this stage not to break
the supports in lashing them together, which must be done after they are
cemented to the deck. Working with thread at this stage is the first hint
of the patience required in later steps. Fine tweezers and sometimes a
magnifying glass are needed to tie the knots. The
Cutty Sark has three small boats, two of which are located toward the
afterdeck. The supports for the two rear boats are remarkably thin and
flimsy, yet much be joined by thread lashed between the curved supports
to form an 'X' that, on the actual vessel, helped the boats slip down
into the water rather than crash straight down to the deck once they were
released from the supports. Care must be taken at this stage not to break
the supports in lashing them together, which must be done after they are
cemented to the deck. Working with thread at this stage is the first hint
of the patience required in later steps. Fine tweezers and sometimes a
magnifying glass are needed to tie the knots.
 Generally
the assembly instructions, as far as they go, are self-explanatory and
not too complicated. The anchor chain is slipped through a hole in the
bow and can be attached to the two anchors with thread which is then cut
back and painted if necessary. I often put a dab of Elmer's glue over
a completed knot as insurance. Done correctly, it's invisible once it
dries. Next come the masts. There are only three of them, but each one
is ten individual pieces and they will look alike once assembled although
they are each of slightly different dimensions and not interchangeable
on the deck. I tagged each mast according to its position on deck after
painting and before assembly. Generally
the assembly instructions, as far as they go, are self-explanatory and
not too complicated. The anchor chain is slipped through a hole in the
bow and can be attached to the two anchors with thread which is then cut
back and painted if necessary. I often put a dab of Elmer's glue over
a completed knot as insurance. Done correctly, it's invisible once it
dries. Next come the masts. There are only three of them, but each one
is ten individual pieces and they will look alike once assembled although
they are each of slightly different dimensions and not interchangeable
on the deck. I tagged each mast according to its position on deck after
painting and before assembly.
 If
you follow the instructions to the letter, you will tie on a fair number
of rigging lines before you attach even one sail. In my opinion, this
is a mistake. You'll have to use your own judgment as to whether a given
rigging line will get in the way of your trying to attach a particular
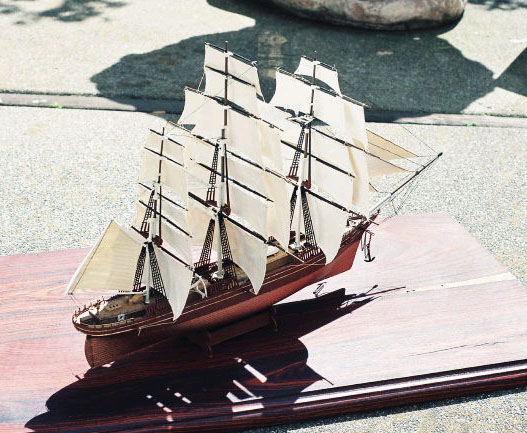
sail in a particular place. There are 32 sails in all, at least four of
which are not attached directly to the masts, but to rigging lines only.
I alternated between attaching rigging lines and mounting sails, as I
thought appropriate. I mounted the sails to the masts using needle and
thread, literally sewing them on and then tying off individual knots to
keep them where I wanted them. If
you follow the instructions to the letter, you will tie on a fair number
of rigging lines before you attach even one sail. In my opinion, this
is a mistake. You'll have to use your own judgment as to whether a given
rigging line will get in the way of your trying to attach a particular
sail in a particular place. There are 32 sails in all, at least four of
which are not attached directly to the masts, but to rigging lines only.
I alternated between attaching rigging lines and mounting sails, as I
thought appropriate. I mounted the sails to the masts using needle and
thread, literally sewing them on and then tying off individual knots to
keep them where I wanted them.
Another thing the instructions don't reveal is that as you attach more
rigging lines, it places additional stress on both the masts and previously
rigged lines, causing some to develop slack. Slack in a line can ruin
the look of a model of this type. A few times it was necessary to cut
off a line and tie it again, because a subsequently tied line elsewhere
had created too much slack in it.
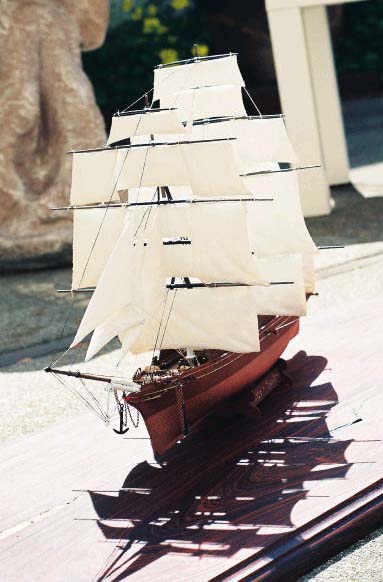
The Sails
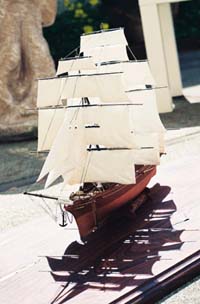 I
have to admit, the idea of rigging the sails was pretty intimidating.
The vinyl sails didn't look right and I decided to replace them with muslin
fabric. I made a paste of hot water and Elmer's glue and laid the vinyl
sail sheet down on a large piece of thick cardboard. Next I covered the
sail sheet with the muslin, and with a large artist's brush, 'painted'
the paste onto the muslin until it was saturated. I applied enough pressure
to the brush to be sure that the wet muslin conformed to the pattern of
the sails and would dry with their imprint. Once it dried the muslin alone
was not stiff enough to be handled and still retain the shape and pattern
of the vinyl sail molds, so I carefully cut the muslin, still sticking
to the sail molds, to get the 32 individual sails, using Elmer's glue
where they appeared to be lifting up from the vinyl mold around the edges.
Given the sheer number of sails, these had to be carefully labeled to
keep them organized. Once they dried, the muslin still didn't look quite
right, so I painted the sails, fabric and vinyl side both, Model Master
Flat Header White. The paint gave the muslin the desired realistic look,
preserving its fabric appearance, and had the unexpected benefit of stiffening
the vinyl, making it easier to handle when I sewed the sails on. I
have to admit, the idea of rigging the sails was pretty intimidating.
The vinyl sails didn't look right and I decided to replace them with muslin
fabric. I made a paste of hot water and Elmer's glue and laid the vinyl
sail sheet down on a large piece of thick cardboard. Next I covered the
sail sheet with the muslin, and with a large artist's brush, 'painted'
the paste onto the muslin until it was saturated. I applied enough pressure
to the brush to be sure that the wet muslin conformed to the pattern of
the sails and would dry with their imprint. Once it dried the muslin alone
was not stiff enough to be handled and still retain the shape and pattern
of the vinyl sail molds, so I carefully cut the muslin, still sticking
to the sail molds, to get the 32 individual sails, using Elmer's glue
where they appeared to be lifting up from the vinyl mold around the edges.
Given the sheer number of sails, these had to be carefully labeled to
keep them organized. Once they dried, the muslin still didn't look quite
right, so I painted the sails, fabric and vinyl side both, Model Master
Flat Header White. The paint gave the muslin the desired realistic look,
preserving its fabric appearance, and had the unexpected benefit of stiffening
the vinyl, making it easier to handle when I sewed the sails on.
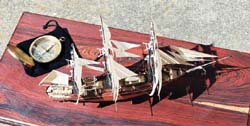
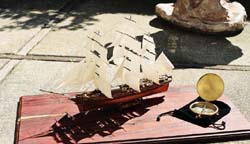
 For
a finishing touch, I used Royal Model .30mm brass wire for the rail fore
and aft. The base for the ship was handmade by a woodcrafter and consists
entirely of cocobolo wood from Central America. This is a dark, naturally
oily wood that does not require polishing, merely occasional dusting,
and offers a very dramatic base for any model. For
a finishing touch, I used Royal Model .30mm brass wire for the rail fore
and aft. The base for the ship was handmade by a woodcrafter and consists
entirely of cocobolo wood from Central America. This is a dark, naturally
oily wood that does not require polishing, merely occasional dusting,
and offers a very dramatic base for any model.
Conclusion
This was a challenging kit that forced me to push the envelope of my
capabilities as a modeler. Sailing vessels are unfamiliar territory for
me, so it was very rewarding to be able to rise to the challenge. 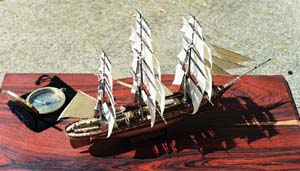 If
you can persevere with it, you'll be rewarded with a beautiful kit for
your hard work. I was determined to display the sails, which required
a lot more effort, but the kit can easily be built without the sails deployed
for a fraction of the effort. Overall, Revell's quality in this kit is
excellent, despite minor flaws. I first toyed with the idea of building
a sailing ship almost 20 years ago. I'm glad I waited. It was a job for
an experienced modeler. If
you can persevere with it, you'll be rewarded with a beautiful kit for
your hard work. I was determined to display the sails, which required
a lot more effort, but the kit can easily be built without the sails deployed
for a fraction of the effort. Overall, Revell's quality in this kit is
excellent, despite minor flaws. I first toyed with the idea of building
a sailing ship almost 20 years ago. I'm glad I waited. It was a job for
an experienced modeler.
| 


|