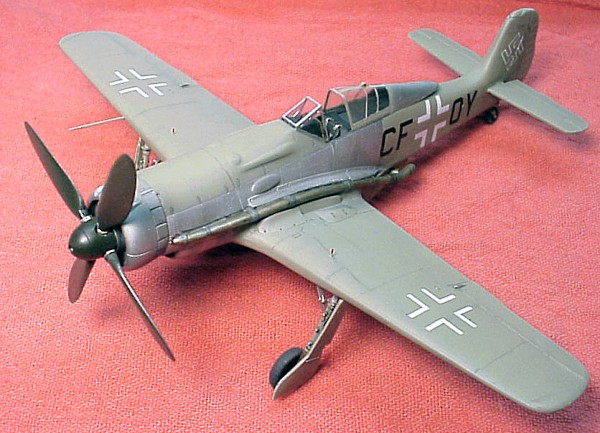
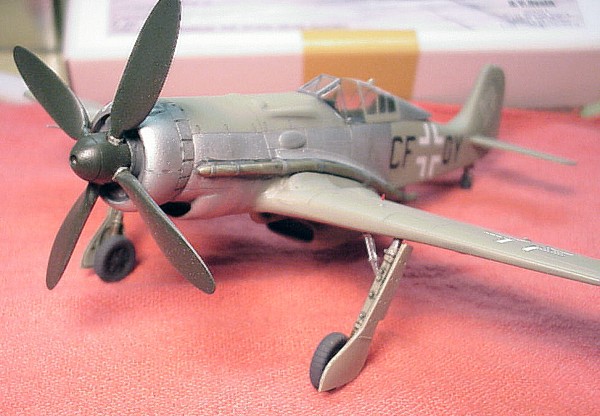
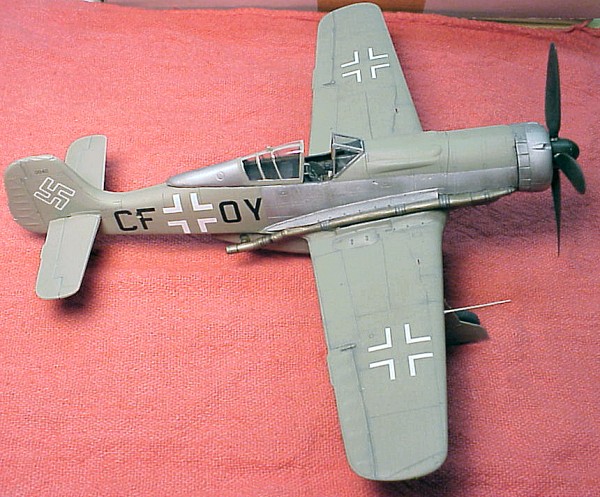
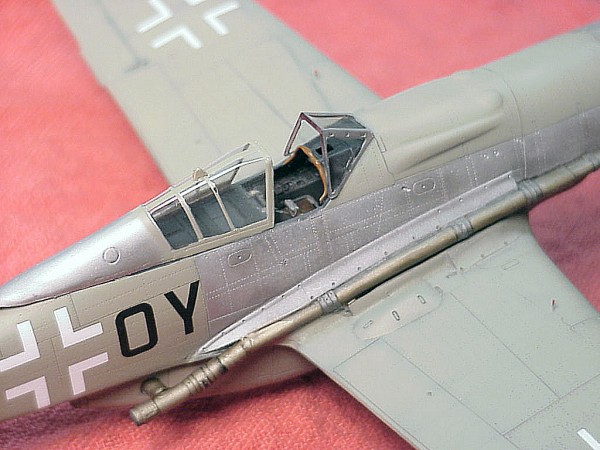
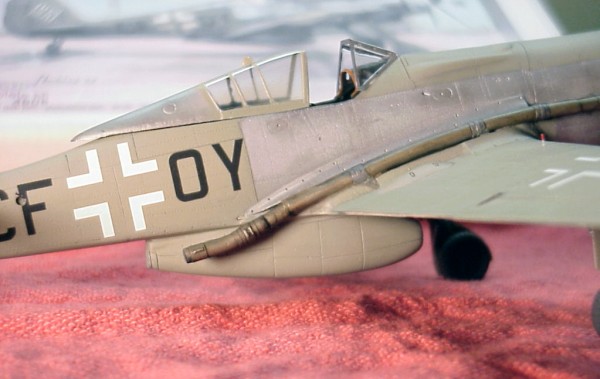
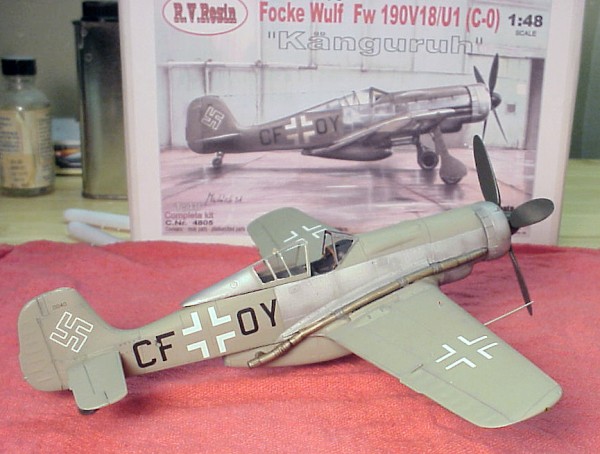
| R.V. Resins 1/48 Focke Wulf Fw 190V18/U1 |  | The History In 1942-43, many German officials believed the Allies would introduce high altitude bombers such as the B-29, something the Third Reich could not defend against effectively. The Me 109 had limitations as did the early Fw 190’s, so both companies started development programs for the Hoehenjager fighter contract. Many older Fw 190 airframes were modified again and again to find the right combination of wings, turbo chargers, tail surfaces and the like to fill this requirement. In the end, the Ta 152 won out as the overall winner, but the road to the final product is sown and littered with unusual aircraft, this V18 is one of them. The standard airframe was given a Daimler Benz 601 engine, and slung below the fuselage was a supercharger. Tubes and pipes ran hot air back to the engine for improved high altitude performance giving the airplane an unfinished appearance. Problems with metals used in the supercharger put an end to the eventual development of this particular project. The Kit  This is great, a kit of one of the coolest experimental aircraft the Germans ever made, and it's made by whom? RV resins you fools, you know, the guy out in the Czech Republic with the magnifying glass spectacles. I swear the surface detail on the wings and fuselages is perfect and exactly like the original airframe. Every rivet and panel is superbly reproduced in scale, better than anything I've ever seen. Now mind you, this is coming from the guy who has made some really weird stuff out of some mighty dicey kits. This is great, a kit of one of the coolest experimental aircraft the Germans ever made, and it's made by whom? RV resins you fools, you know, the guy out in the Czech Republic with the magnifying glass spectacles. I swear the surface detail on the wings and fuselages is perfect and exactly like the original airframe. Every rivet and panel is superbly reproduced in scale, better than anything I've ever seen. Now mind you, this is coming from the guy who has made some really weird stuff out of some mighty dicey kits. The kit is packaged in a sturdy grey cardboard two piece box with nice artwork, all parts are heat sealed in their own little pouch-o-plastic bubble and none of the parts are twisted, broken or warped. A single exploded view assemble sheet with paint guide is the only form of reference for you, but if you've built one Fw 190, you've built them all. Well, don't get your Hanes in a bundle 'cause in most cases that's true, let's face it. The kit also includes decals, metal gear and a clear vac canopy.  Little sanding is need in prepping the fuselage halves, lightly sand each half just to make sure any burrs are removed. But to tell you the truth, you won't need much, only a few pour blocks are present, and then on some lesser parts. I did have one particular question after the two halves were glued, mine has an abnormally wide tail cross-section. Seems to me the tail fin and rudder are thinner than other 190’s I've done. I have an aftermarket set for the Tamiya 190, rudder and elevators, which are definitely thinner than the rudder on the kit. Perhaps some more rubbing on the tail area next time, cause I know my cockpit tub fits perfect already so no need to sand the front half. It just looks thick and not very sleek for a fighter. Little sanding is need in prepping the fuselage halves, lightly sand each half just to make sure any burrs are removed. But to tell you the truth, you won't need much, only a few pour blocks are present, and then on some lesser parts. I did have one particular question after the two halves were glued, mine has an abnormally wide tail cross-section. Seems to me the tail fin and rudder are thinner than other 190’s I've done. I have an aftermarket set for the Tamiya 190, rudder and elevators, which are definitely thinner than the rudder on the kit. Perhaps some more rubbing on the tail area next time, cause I know my cockpit tub fits perfect already so no need to sand the front half. It just looks thick and not very sleek for a fighter. As mentioned, the cockpit tub inserts through the wing cavity and lines up with placement lines scribed in the fuselage. With the resin control panel in place, I might suggest it coming up about 1 or 2 mm as it seems to sit low. It's a simple affair, detail is great but many might like to spruce it up with an after market detail set. But since I've planned to make this an Out of Box kit, I left it alone.  Now comes the wing, 3 pieces thin as paper, trailing edge sharp enough to cut bread, very nice. The ailerons are well defined, almost can see through the separation line, won't take much to remove them with one swipe of a number 11 exacto blade. Now that's casting! The wheel wells go in and line up with scribed lines, as the tops fit equally well on the lower wing. Not a lot of problems until the wing fit to the fuselage. I may be the culprit and have sanded my fuselage pieces a hair too much, because the gaps on the wing roots are a bit much. Another quest is the general lack of Dihedral; it's going to take some quick super gluing to fit this one. But I managed to get some semblance of dihedral as well as bridging the gaps at both roots. The seams will be less noticeable as they end up under the exhaust pipes running to the back of the plane. But it looks as though a bit more dihedral is needed. Now comes the wing, 3 pieces thin as paper, trailing edge sharp enough to cut bread, very nice. The ailerons are well defined, almost can see through the separation line, won't take much to remove them with one swipe of a number 11 exacto blade. Now that's casting! The wheel wells go in and line up with scribed lines, as the tops fit equally well on the lower wing. Not a lot of problems until the wing fit to the fuselage. I may be the culprit and have sanded my fuselage pieces a hair too much, because the gaps on the wing roots are a bit much. Another quest is the general lack of Dihedral; it's going to take some quick super gluing to fit this one. But I managed to get some semblance of dihedral as well as bridging the gaps at both roots. The seams will be less noticeable as they end up under the exhaust pipes running to the back of the plane. But it looks as though a bit more dihedral is needed.  Another issue came up with the two rear stabilizers, and it looks like a very amateur mistake on RV Resins part. After I sanded the stabilizers from their mold blocks, both were offered up to their respective locations, and what do I see? One sits higher on the empennage that the other when viewed from the front. Also the elevator actuating rods which normally run into the tail are very much missing. It's just as well as the holes for them are well misplaced. This is probably the one thing people will notice the most if this kit sits next to another Tamigawa 190. Some fudging and putty cured the location error, but the holes are still in the wrong spot leaving that area a bit lacking for detail. Compound the wide cross section tail and mis-located stabilizers, it will require much work when I build another one of these kits. Another issue came up with the two rear stabilizers, and it looks like a very amateur mistake on RV Resins part. After I sanded the stabilizers from their mold blocks, both were offered up to their respective locations, and what do I see? One sits higher on the empennage that the other when viewed from the front. Also the elevator actuating rods which normally run into the tail are very much missing. It's just as well as the holes for them are well misplaced. This is probably the one thing people will notice the most if this kit sits next to another Tamigawa 190. Some fudging and putty cured the location error, but the holes are still in the wrong spot leaving that area a bit lacking for detail. Compound the wide cross section tail and mis-located stabilizers, it will require much work when I build another one of these kits.  On to the cowling. A very different looking cowling by Fw 190 standards - almost looks as though it is short shot when cast. The casting looks incomplete, missing a good edge on the back of the cowl flaps. This area in turn mates to the fuselage. No sanding was done here as I needed all cowl I could get and it actually looks O.K. There is a bit of photo-etch that goes into the front of the cowl to replicate the radiator grills along with a bit that the spinner eventually glues to, it's important to place this resin piece properly. On to the cowling. A very different looking cowling by Fw 190 standards - almost looks as though it is short shot when cast. The casting looks incomplete, missing a good edge on the back of the cowl flaps. This area in turn mates to the fuselage. No sanding was done here as I needed all cowl I could get and it actually looks O.K. There is a bit of photo-etch that goes into the front of the cowl to replicate the radiator grills along with a bit that the spinner eventually glues to, it's important to place this resin piece properly. 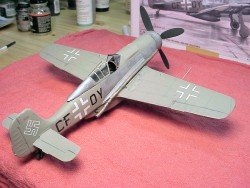 Well, now comes that RLM 02 and aluminum paint finish the original plane had. Seeing that only one color option is available for this kit, it might limit the overall appeal. I on the other hand couldn't wait to give my representation a shot. The aluminum was sprayed first, Testors metaliser, and then masked with Testors RLM 02 Grey sprayed next. Simple and neat. After all was painted and prepped for the decals did I notice I had reference material on the prototype Fw 190. According to those references, the paint scheme in the directions is a bit off, but close enough for Government work. You should have some pictures and such before going into this or any other kit just in case, or you might get stopped by the dreaded modeling police at your next show or meeting. Well, now comes that RLM 02 and aluminum paint finish the original plane had. Seeing that only one color option is available for this kit, it might limit the overall appeal. I on the other hand couldn't wait to give my representation a shot. The aluminum was sprayed first, Testors metaliser, and then masked with Testors RLM 02 Grey sprayed next. Simple and neat. After all was painted and prepped for the decals did I notice I had reference material on the prototype Fw 190. According to those references, the paint scheme in the directions is a bit off, but close enough for Government work. You should have some pictures and such before going into this or any other kit just in case, or you might get stopped by the dreaded modeling police at your next show or meeting. Decals are some of the best-made, thin, strong and very glossy. There are no complaints about them from me, didn't even have to use setting solutions.  Conclusions Conclusions
There we have it, an Fw 190V18, and a darn good one it is. A few glitches that we might normally associate with resin kits, but this one is far and away one of the easiest to get together. With that in mind the Fun-O-Meter lists at a 9, with a Cool factor almost pegged out at 9.5. Generally speaking anyone who has made a few plastic kits with resin bits could have a good time with this one.
| 


|