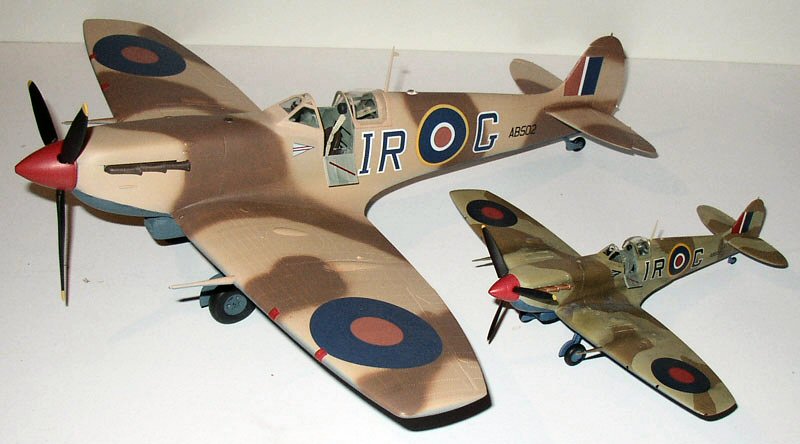
Trumpeter 1/24 Supermarine Spitfire Mk.V | 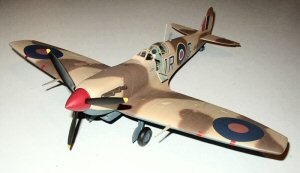 | Background Not much can be said about the Spitfire other than what has already been published in various books, profiles, magazines, documentaries, etc. Suffice to say that the Spitfire ranks up there with one of the greatest aircraft ever produced along with the P-51 Mustang and Me/Bf-109 in terms of success in combat, numbers produced and variants used, not to mention popularity with plastic kit manufacturers. More importantly, nothing comes close to the Spitfire when it comes to its legendary status. The British regard the Spitfire (as well as the Hawker Hurricane) as their ace in the hole in the dark days of the of the summer of 1940; when only the Royal Air Force stood a chance of beating the Nazis from possible invasion in the Battle of Britain. To this day, British schoolchildren are taught about the Spitfire in their history class when the topic of WWII is brought up. When the threat of invasion waned, and, towards the end of 1940, the Mk V was introduced into combat. Realizing the need for heavier armament than the eight-gunned "a" wing that the Mks I & II provided, the "b" wing, two 20mm cannons and four .303 Browning machine-guns the Mk Vs carried gave the punch that the RAF was looking for. "Rhubarb," "Circus," "Rodeo" and "Ramrod" missions were flown (a combination of fighter and bomber sweeps) designed to lure the Luftwaffe into fighting on a more equal footing out over the English Channel. Variants of the Mk V were sent to North Africa and the Pacific fitted with tropicalized filters. The ugly Vokes filter gave the Spitfire a rather ungainly look, whereas the more streamlined Aboukir filter retained the Spitfire's clean, aerodynamic lines. Clipped wings were also introduced in the Mk V which resulted in tighter turns and ease of handling at low level flights. The Kit Upon opening the box, the big 1/24th scale Trumpeter kit looks to be an impressive kit. Molded in light blue/gray plastic, the kit has engraved panel lines, separately bagged clear parts, a set containing black, rubberized-plastic material for the engine wiring and hoses, as well as the tires. Clear parts are provided as an option to display the engine. The instructions sheet is a simplified, generic layout, written in Chinese and English with painting references to the Gunze Sangyo line. Unfortunately, the kit only contains parts for an early "b" wing Spit with the exterior-armored windshield, and, decals for one aircraft, that of a green/gray aircraft of 303 (Polish) Squadron (RF-K), RAF, Spring, 1942. Only one set of propeller blades are offered, the Rotol, metal variety, and the shallow, rounded spinner. Unlike Hasegawa's 32nd scale or Airfix's Mk Vb 24th scale offering, this kit has no provisions for clipped wings, the later streamlined windshield, tropical filters, Jablo-style propeller blades or the later, bullet-nosed prop-spinner. As of this writing, and, other than decal sheets, aftermarket parts for a 24th scale Spit are non-existent. I wanted to build 244 Wing Commander Ian R. Gleed's North African based Spit. To do so meant that I'd have to scrounge parts from the Airfix Mk Vb kit, which also contains decals for his aircraft. Many readers might wonder why I would even attempt a conversion and sacrifice the Airfix kit. Firstly, I consider the Trumpeter kit a superior model, with its engraved panels and crisp details. Secondly, the price of aftermarket conversion kits would probably equal what I paid for the Airfix kit. Lastly, Airfix did not retool their Spitfire molds; they simply included separate sprues to include the tropical filters, bullet-nose spinner, Jablo propeller blades and assorted parts - all needed - to build the tropical version. Essentially I can still build a Mk I out of the leftover parts and not miss any of the parts used for this conversion. I highly recommend the Modelers Datafile Series "Supermarine Spitfire Pt 1 - Merlin Powered Spitfires" published by SAM Publications when building this, or any Spitfire model (Pt. 2 of the series covers Griffon-engined Spits). Aimed specifically for modelers, it has a wealth of photographs, drawings and plan-view profiles of the inner-workings of Spits as well as model reviews of every kit ever produced (as of 2001) and conversion kits and tips to help the modeler kit-bash and convert all versions. Construction 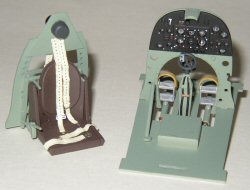 Construction started with the cockpit. The seat alone comprises 13 pieces and has a flat bottom seat. I painted this dark brown. My references show the bottom to be concave-shaped to allow room for the pilot's parachute pack. I left it alone. Construction started with the cockpit. The seat alone comprises 13 pieces and has a flat bottom seat. I painted this dark brown. My references show the bottom to be concave-shaped to allow room for the pilot's parachute pack. I left it alone.
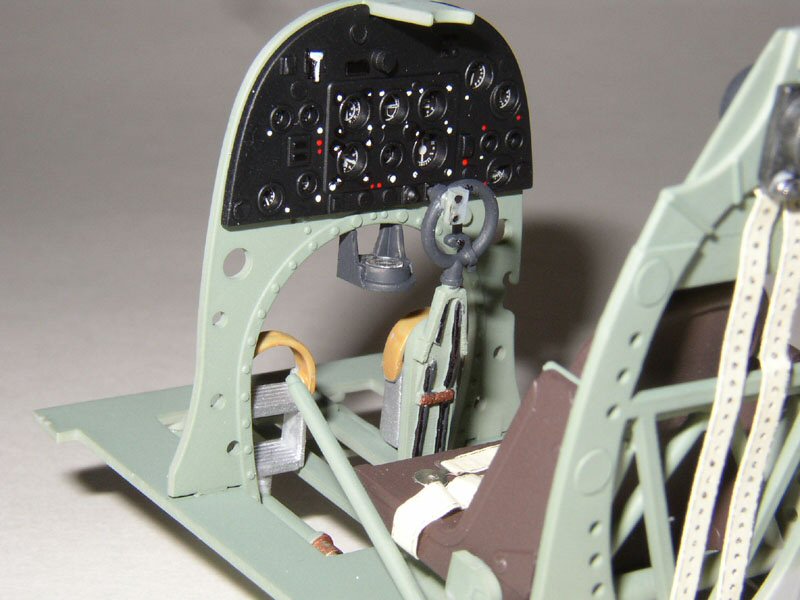
For the seat belts, I drew dashed-lines on my computer using Adobe Illustrator to simulate the stitching, and, evenly spaced dots to represent the holes peculiar to Sutton harnesses. I printed several sized strips on tan-colored copier paper and cut appropriate lengths. I poked holes using the dots as guides with a pin and used Detail Master buckles (used by car modelers) on the seat belts. I crumpled the paper to give it a worn look then glued them on the seat with white glue to retain its shape. 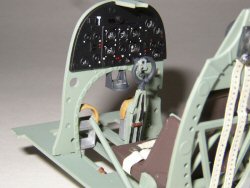 The instrument panel was next. The kit provides a clear acetate sheet for the instrument panel cluster which is sandwiched between the panel bulkhead and a clear (painted black) portion with holes to which the instruments will show through. I painted the back of the acetate white to show up more prominently against the green background of the instrument panel bulkhead. I picked out buttons and switches with white and red paint. Using a Waldron punch set, I punched out a compass dial out of a printed sheet and laid that on the compass mount that sticks out of the instrument panel. I also punched out a clear piece to lay on top of the compass to serve as the glass casing. The instrument panel was next. The kit provides a clear acetate sheet for the instrument panel cluster which is sandwiched between the panel bulkhead and a clear (painted black) portion with holes to which the instruments will show through. I painted the back of the acetate white to show up more prominently against the green background of the instrument panel bulkhead. I picked out buttons and switches with white and red paint. Using a Waldron punch set, I punched out a compass dial out of a printed sheet and laid that on the compass mount that sticks out of the instrument panel. I also punched out a clear piece to lay on top of the compass to serve as the glass casing.
 To simulate wires and cables in the cockpit I used wire, stretched sprue, etc., as well as labels I printed from my computer to represent the various warning labels and indicators found throughout the cockpit. It may not all be there but it's a pretty close facsimile to the real thing. The kit-supplied control stick has the single firing button on the handle; correct for earlier, eight-gun-equipped "a" wing Spits, but not accurate for later cannon-armed Spits. I cut off the single switch and replaced it with a piece of styrene strip to represent the guns/cannon switch selector. I probably should have shaved off the molded-on cables attached to the stick and replaced them with sprue or wire. I also cut off about 1/8 inch off the bottom of the control stick before gluing it in place. If left uncut, the "spade handle" portion of the control stick would sit level with the instrument hood, and if a scale pilot were to sit in the cockpit, it would be level with his neck and he'd hold on to the stick as if he were driving a car (chest level) and not the more traditional level that's closer to his lap. To simulate wires and cables in the cockpit I used wire, stretched sprue, etc., as well as labels I printed from my computer to represent the various warning labels and indicators found throughout the cockpit. It may not all be there but it's a pretty close facsimile to the real thing. The kit-supplied control stick has the single firing button on the handle; correct for earlier, eight-gun-equipped "a" wing Spits, but not accurate for later cannon-armed Spits. I cut off the single switch and replaced it with a piece of styrene strip to represent the guns/cannon switch selector. I probably should have shaved off the molded-on cables attached to the stick and replaced them with sprue or wire. I also cut off about 1/8 inch off the bottom of the control stick before gluing it in place. If left uncut, the "spade handle" portion of the control stick would sit level with the instrument hood, and if a scale pilot were to sit in the cockpit, it would be level with his neck and he'd hold on to the stick as if he were driving a car (chest level) and not the more traditional level that's closer to his lap.
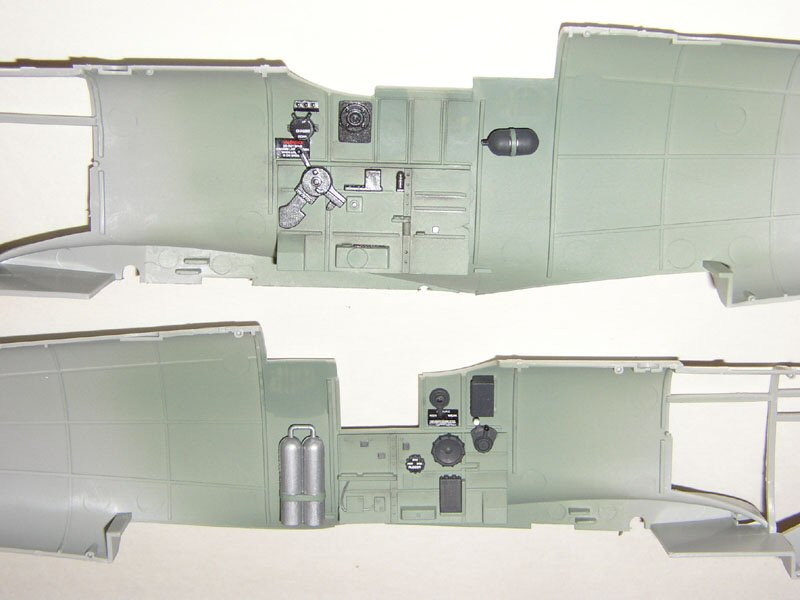
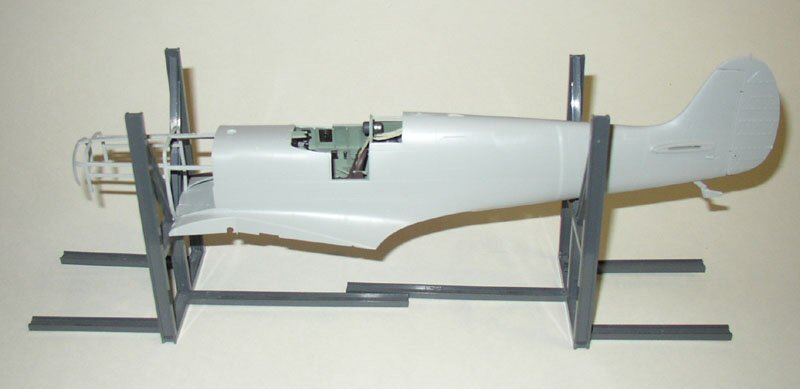
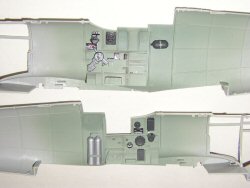
 Once the cockpit was complete, I was ready to assemble the fuselage halves. Prior to this I assembled the rudder halves, attached to metal wires which allows the rudder to move freely. The kit provides a nicely detailed Merlin engine which can be displayed with open panels or visible through the clear panels. I'm not a big fan of open panels on my models and chose to close all gun/cannon and engine panels. I attached the spinner mount from the engine unit so I'd have something to hang the propeller from. I also did not want moving parts on my model after assembling the rudder unit. I wanted to depict my aircraft as one that was ready for flight, awaiting its pilot. I also saved a lot of time and frustration not messing with these parts. Once the cockpit was complete, I was ready to assemble the fuselage halves. Prior to this I assembled the rudder halves, attached to metal wires which allows the rudder to move freely. The kit provides a nicely detailed Merlin engine which can be displayed with open panels or visible through the clear panels. I'm not a big fan of open panels on my models and chose to close all gun/cannon and engine panels. I attached the spinner mount from the engine unit so I'd have something to hang the propeller from. I also did not want moving parts on my model after assembling the rudder unit. I wanted to depict my aircraft as one that was ready for flight, awaiting its pilot. I also saved a lot of time and frustration not messing with these parts.
The wings came next. As mentioned before, all open panels were assembled closed. Unlike the Airfix kit whose wheel wells are just holes, the Trumpeter kit provides separately molded wheel well enclosures. Once trapped between the wing halves they fit nicely. 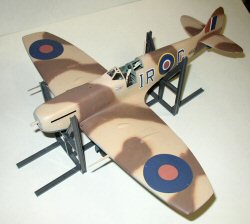 I waited until after the wing was dry before clipping off the wing-tips. I used my Dremel tool (with a miniature saw tip) to quickly cut off the tips. I had previously marked off with a permanent marker where to cut and I purposely gave myself plenty of plastic in case I was a little off when cutting. I used the 48th scale Tamiya Vb kit as my guide using the trusty Mk I Eyeball unit. Once satisfied with the cuts, I trimmed off any excess plastic and started filling the holes with several layers of gap-filling super glue/accelerator. Once dry, I started filing and shaping with an automotive rasp/file. After the rough outline was achieved, I cleaned and smoothed them out with differing coarseness of sandpaper. Finishing touches were performed with a 3-coarse sanding stick. I was pleasantly surprised with the outcome. The result captures the look of the clipped-wing Spit. I waited until after the wing was dry before clipping off the wing-tips. I used my Dremel tool (with a miniature saw tip) to quickly cut off the tips. I had previously marked off with a permanent marker where to cut and I purposely gave myself plenty of plastic in case I was a little off when cutting. I used the 48th scale Tamiya Vb kit as my guide using the trusty Mk I Eyeball unit. Once satisfied with the cuts, I trimmed off any excess plastic and started filling the holes with several layers of gap-filling super glue/accelerator. Once dry, I started filing and shaping with an automotive rasp/file. After the rough outline was achieved, I cleaned and smoothed them out with differing coarseness of sandpaper. Finishing touches were performed with a 3-coarse sanding stick. I was pleasantly surprised with the outcome. The result captures the look of the clipped-wing Spit.
 The wingtip conversion was probably the toughest part of the build. From this point on the rest of the buildup went smoothly - mostly. Airfix's windshield did not conform too well to Trumpeter's contours. I had to carve, cut and file both the fuselage windshield mounts and windshield to get it to fit. Even then it required a considerable amount of putty to conform to the fuselage and attain a proper "sit." The wingtip conversion was probably the toughest part of the build. From this point on the rest of the buildup went smoothly - mostly. Airfix's windshield did not conform too well to Trumpeter's contours. I had to carve, cut and file both the fuselage windshield mounts and windshield to get it to fit. Even then it required a considerable amount of putty to conform to the fuselage and attain a proper "sit."
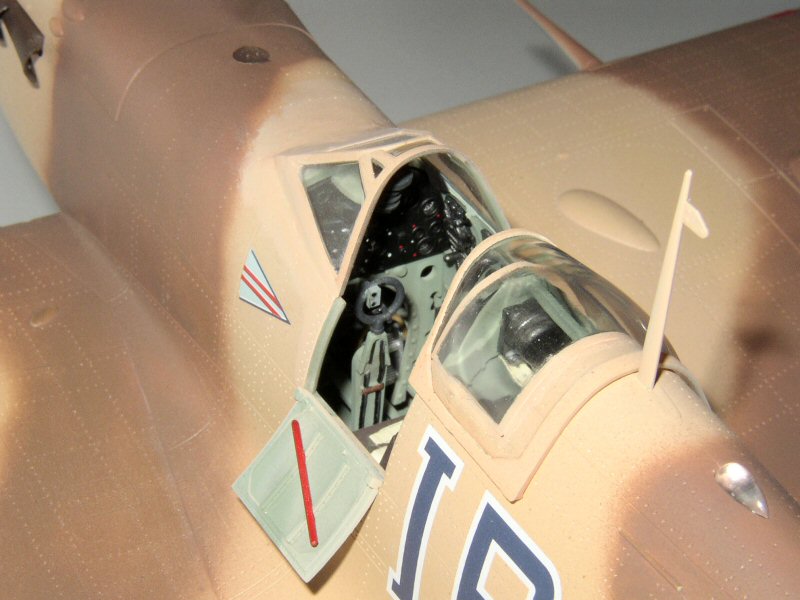
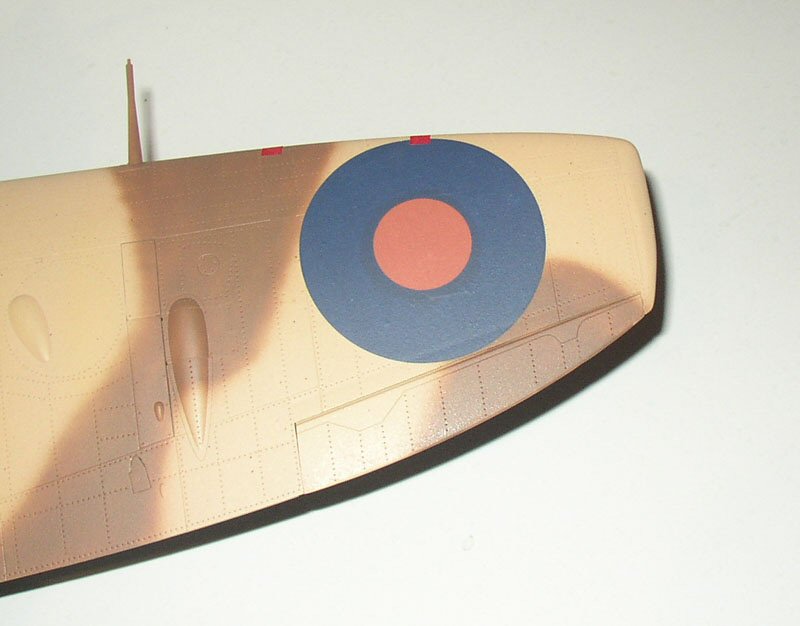
I attached the finished wing to the fuselage, which was also a nice fit. A small gap was visible on the bottom portion where the wing meets the bottom fuselage. I filled that with gap-filling super glue and sanded it smooth. There is also a slight step on the leading edge of the wing-to-fuselage seam. I sanded it level with the wings. Next came the Aboukir filter unit from the Airfix kit. Any gaps were filled with putty and sanded smooth. Painting & Markings 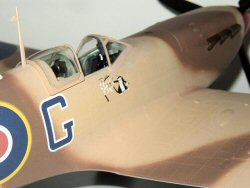 The cockpit was masked off and the model prepped for painting. A layer of Polly Scale Gravel Gray was airbrushed to serve as primer and to check for flaws. I then airbrushed Tamiya Intermediate Blue on the bottom of the aircraft to reflect the Azure Blue used by these tropical Spits. My references indicate that these Spitfires were painted on the field and the undersides were completely covered in this color, including landing gears and wheel wells; similar to the US Navy practice when the gloss sea blue scheme came along. Once dry I masked off demarcation lines for the upper layers of Polly Scale Sand, and, Dirt, for the camouflage pattern, which I airbrushed freely. Purists will shudder at the thought of my using such generic colors and not sticking to the Federal Standard color chips. Let's not forget these were combat aircraft that saw a lot of use and abuse, and, even when photographed in color, depending on the lighting, did not actually reflect these color chips (take a look at current photos of gray-over-gray combat aircraft: how many hues and variations of gray can be seen?). The cockpit was masked off and the model prepped for painting. A layer of Polly Scale Gravel Gray was airbrushed to serve as primer and to check for flaws. I then airbrushed Tamiya Intermediate Blue on the bottom of the aircraft to reflect the Azure Blue used by these tropical Spits. My references indicate that these Spitfires were painted on the field and the undersides were completely covered in this color, including landing gears and wheel wells; similar to the US Navy practice when the gloss sea blue scheme came along. Once dry I masked off demarcation lines for the upper layers of Polly Scale Sand, and, Dirt, for the camouflage pattern, which I airbrushed freely. Purists will shudder at the thought of my using such generic colors and not sticking to the Federal Standard color chips. Let's not forget these were combat aircraft that saw a lot of use and abuse, and, even when photographed in color, depending on the lighting, did not actually reflect these color chips (take a look at current photos of gray-over-gray combat aircraft: how many hues and variations of gray can be seen?).
 The spinner was airbrushed with Acryl Guards Red, the blades in the usual black with yellow tips. I lightly sanded all surfaces with a used fine-coarse sandpaper to remove any paint residue/overspray prior to airbrushing Future, in preparation for the decals. The spinner was airbrushed with Acryl Guards Red, the blades in the usual black with yellow tips. I lightly sanded all surfaces with a used fine-coarse sandpaper to remove any paint residue/overspray prior to airbrushing Future, in preparation for the decals.
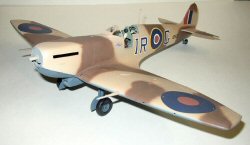
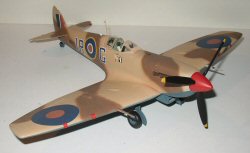
After letting the Future dry for a full day, the decals were placed. Using the Airfix decals throughout, these were applied normally with a little Solvaset to help snuggle them into place. After the decals were dry, a final coat of Acryl Clear Flat was airbrushed on. Finishing touches included the breakable parts: clear parts, landing gears, antenna, etc. Conclusion 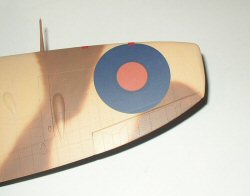 Overall, this wasn't a bad kit. Because of my decision to convert this to a Vb Tropical Spit, Trumpeter should not be faulted for the added workload: Aboukir filter, windshield, spinner and blades, clipped wings, etc. Overall, this wasn't a bad kit. Because of my decision to convert this to a Vb Tropical Spit, Trumpeter should not be faulted for the added workload: Aboukir filter, windshield, spinner and blades, clipped wings, etc.
Until the aftermarket industry catches up with conversion sets, or, until Trumpeter re-issues the kit with extra sprues for tropical/clipped-wing versions as Airfix has (highly doubtful), this is probably the only way one can convert this "one version/one marking" kit to reflect other variants.
Thanks go to Stevens International for this review sample! 
| 


|