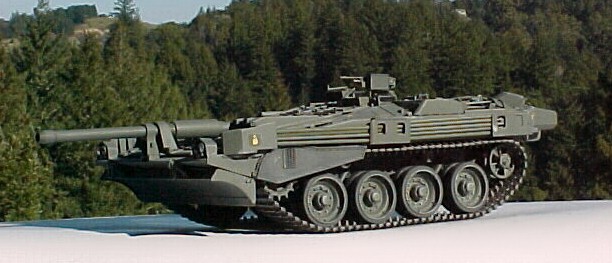
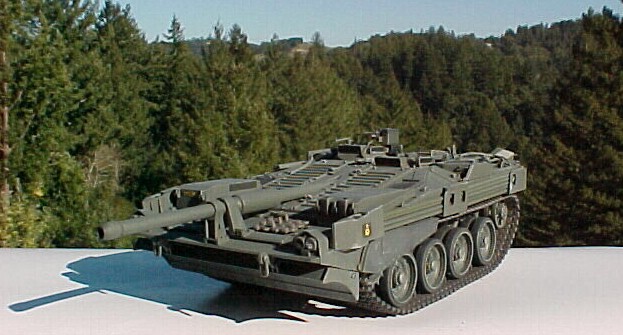
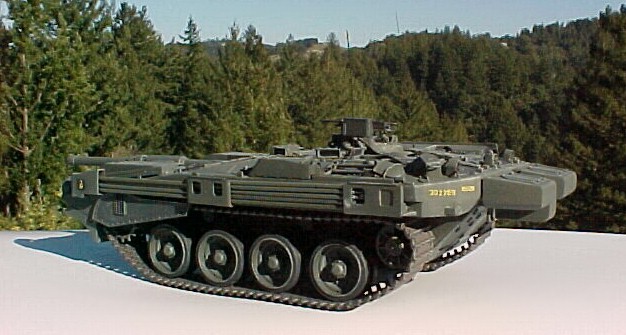
Trumpeter 1/35 Swedish Strv-103B "S-Tank" |  | Introduction: The Swedish Stridsvagn 103 "S-tank" is idiosyncratic to say the least. Taking lessons learned in WW2 about tank survivability, Bofors designed the 103 in the late 50s with maximum crew safety in mind. One of the more vulnerable sections on a tank is the turret - it has a high profile and a weak point at the mounting ring - so the S-tank designers simply got rid of the turret. The 103 had a 105mm L7 autoloading main gun fixed in the wedge-shaped hull. Aiming was done by turning the tank and tilting the hull via a hydraulic suspension system. The end result turned out to be highly accurate, though the hydraulic system was complex and prone to breakdown. It also meant the gun could not be aimed if the tank threw a tread. 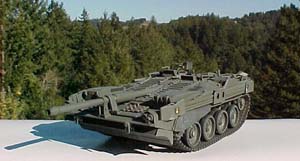 To add to the oddity of the design, the 103 also had two main engines. A Detroit Diesel 2 stroke V-6 mounted in the right side engine bay powered the hydraulics and the "fine" movement of the tank, while a Boeing/Caterpillar gas turbine on the left provided the power for road speed. The automatic transmission was in front of the engines, and the crew compartment in back. The driver could fire the main gun in addition to the commander, and since the tank could go backwards as fast as it could go forwards, a back facing rear driver was provided for as well. The hydraulically operated 50 round main gun magazine was in the very rear and was refilled from a hatch on the back of the hull. To add to the oddity of the design, the 103 also had two main engines. A Detroit Diesel 2 stroke V-6 mounted in the right side engine bay powered the hydraulics and the "fine" movement of the tank, while a Boeing/Caterpillar gas turbine on the left provided the power for road speed. The automatic transmission was in front of the engines, and the crew compartment in back. The driver could fire the main gun in addition to the commander, and since the tank could go backwards as fast as it could go forwards, a back facing rear driver was provided for as well. The hydraulically operated 50 round main gun magazine was in the very rear and was refilled from a hatch on the back of the hull. Almost 300 S-tanks were built for the Swedish Army during the 60s. In the mid-70s the tanks got a major rebuild, becoming the B models, and another extensive upgrade in the 80s resulted in the C model. By this time, however, the vulnerabilities of the 103 were starting to show. The front armor, though very well sloped, didn't stop the newer Soviet rounds. In Swedish tests, these rounds could penetrate all the way to the main gun magazine with unhappy results. In addition to the aforementioned troubles with the hydraulic system, the S-tank also had limited off road mobility due to the use of only four road wheels per side. Many military experts saw the 103 more as a self propelled anti-tank gun rather than a true main battle tank in the first place. The 103 was completely taken out of service by 2001, being replaced with the Leopard A5. Even if its battle effectiveness was somewhat doubtful towards the end, the S-tank was a unique armored vehicle that served for a long time, and no doubt had influence in the design of newer tanks like the Merkava. It is still Sweden's only native MBT, hence the "S" in S-tank stands for Sweden. The Model: Armor fans have been waiting a long time for a 1/35 scale S-tank kit, and Trumpeter has come through with two versions: the B model and the splinter-camo C model. The 103B kit reviewed here came with three sprues of parts and a lower and upper hull, all moulded in an olive green. Also included are two vinyl treads, a set of poly caps for the road wheels, and a small set of decals. The instructions are well illustrated with limited Chinese/English text. The overall quality of the mouldings is not quite up to the high standards of the latest Tamiya or Academy kits, but it is still very good and quite buildable. Some of the more complex parts show the use of sliding block molds - a nice touch. There are no figures nor interior detail included in the kit, but for those who want to add both of those items all of the crew hatches are molded separately. Construction: 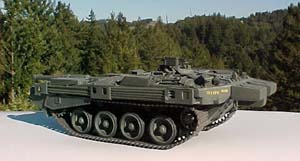 Following the instructions, the road wheels, return rollers, and drive sprockets were assembled. The lower hull assembly was done next, although the road wheels were left off untill the hull was painted later. Make sure that the road wheel suspension arms (parts A13 and A14) are aligned and level with eachother, otherwise the model may sit a bit crooked. It would be fairly easy to cut the alignment tabs off of the suspension arm to hull joints and position them to make a model in the tilted position, but I didn't do that here. Following the instructions, the road wheels, return rollers, and drive sprockets were assembled. The lower hull assembly was done next, although the road wheels were left off untill the hull was painted later. Make sure that the road wheel suspension arms (parts A13 and A14) are aligned and level with eachother, otherwise the model may sit a bit crooked. It would be fairly easy to cut the alignment tabs off of the suspension arm to hull joints and position them to make a model in the tilted position, but I didn't do that here. The next step was the upper hull construction. If you want to have the front 'dozer blade in a down position, make sure you do not glue parts B33 to the upper hull - these are the bulldozer blade support struts. The blade was manually operated on the real item, by the way. I found that the holes for the various grab handles (parts C39, C40, C41, and C42) were too large - I glued the handles in place and filled the gaps around the mounting points with PVA glue. I also substituted most of the handles with bent wire as the kit parts had a bit of a seam on them that would be difficult to clean up. The driver's and commander's main sights were left off until after painting, as they had a large "glass" area that would have been oversprayed. The smaller sight blocks were glued on, however, since their glass area could be painted on later. I found that on these parts and a few others the mounting holes were either too big or too small - I cut off their mounting pegs and just eyeballed the alignment. Another tricky part was attaching the shovels (parts A1); a bit of fiddling is needed here to get them to fit in. There are supposed to be three shovels mounted, but that is nearly impossible to do, and two will do. I also managed to lose the tail lamp units when cutting them off of the sprue and had to scratchbuild new ones out of plastic rod - this is certainly not Trumpeter's fault. The only other problem is that the headlamps stick out a little too much from the headlamp guards - a bit of test fitting and modification of the mounts would prevent this, but I found this out too late. The main gun parts fit well and went on without any problem. The smoke grenade launchers on the commander's cupola must be carefully aligned to prevent them from touching nearby parts on the hull and to keep them at the right angle; a bit of test fitting will help here. I should make the point that the upper hull construction was actually quick and easy - just don't expect the laser precise fit of a new Tamiya kit. The upper and lower hulls were joined together. There is a seam at the rear of the hull that must be filled with putty after this join, but otherwise the fit between the parts is good. I also used a bit of putty on the rear stowage bin seams and the 'dozer blade. The fit of these assemblies onto the hull is a bit touchy - again, test fitting should be done here for sure.  At this point, the model was ready for painting. The instructions call for RLM02 gray for the overall color - this is much too pale. I used Testor's Marine Corps Green (FS 34052) as it seemed to be a good match for the grayish olive green seen in photos of the 103B. I painted the model overall with this green, and then sprayed the lower hull in a darker hue (Marine Corps Green with a bit of black) and the upper hull in a lighter shade (the same green with pale gray added). I simply airbrush downwards over the model with the lighter shade and upwards with the dark shade - this works fairly well to add an artificial shadow, which models need especially indoors with less than bright lighting. The wheels were also painted separately at this time. At this point, the model was ready for painting. The instructions call for RLM02 gray for the overall color - this is much too pale. I used Testor's Marine Corps Green (FS 34052) as it seemed to be a good match for the grayish olive green seen in photos of the 103B. I painted the model overall with this green, and then sprayed the lower hull in a darker hue (Marine Corps Green with a bit of black) and the upper hull in a lighter shade (the same green with pale gray added). I simply airbrush downwards over the model with the lighter shade and upwards with the dark shade - this works fairly well to add an artificial shadow, which models need especially indoors with less than bright lighting. The wheels were also painted separately at this time. The multiple grills and and a few other details were washed with a mix of Tamiya acrylic black and rubbing alcohol, and then I drybrushed the top and sides of the model with Testors RLM02, which turned out to be a perfect highlight color for the Marine Corps Green. I also airbrushed the treads with a mix of Testor's silver, flat black, and rust paint thined with laquer thinner so that it would dry on the vinyl parts. The roadwheels were then attached and their rubber was painted in a dark gray, a task made easier due to the rotation allowed by their poly caps. I then attached the treads with the drive sprockets; the sprockets and idler wheels are fixed on the hull unlike the road wheels. This design actually worked well, as the front and rear of the treads were held in good alignment. The tread tops were glued to the return wheels with a bit of clear epoxy - the tread top should sag just a bit according to the pictures I've seen, though I didn't manage to replicate this too well with the stiff kit tracks. After-market individual track links, anyone? I found that the front skirts, parts C49 and C50, would not fit properly because the tread stuck out and prevented them from laying flat against the hull mounting points. With a Dremel tool I ground down the backs of these parts in the tread contact areas to allow them to fit - they're pretty thick so there's no worry about grinding through them. The photos I've seen also show that these skirts are darker in color than the rest of the tank, so I painted them in a mix of black and Marine Green. The lights were also painted at this time in their respective colors, including clear red over a steel color for the tail lamps. The kit decals were thin and very brittle - some of the markings on the model had to be made by putting back together two or three chunks of decal to re-form the whole piece. Not fun, but fortunately the 103 had little in the way of markings. I found it was important not to bend the decals, as this seemed to cause them to break up. I also used a bit of Future to adhere the decals as they didn't seem to want to stick.  After the decals were dry, I added the fording screen poles, oddly refered to in the instructions as the "discreteness assembly." The poles were cleaned up and each one was painted in a slightly different shade of green to add visual interest. This was a real chore but it adds a lot to the model. The poles were simply stacked into the holders already mounted on the hull. Now the model was given a spray of Dullcote and a very light "dusting" via a mix of Future, Tamiya flat clear, and a bit of acrylic tan paint. The Swedes appear to have maintained their vehicles very well, so I avoided excessive weathering. The vision block glass sections were painted in a gloss black, and the driver's and commander's main sights were now added. After the decals were dry, I added the fording screen poles, oddly refered to in the instructions as the "discreteness assembly." The poles were cleaned up and each one was painted in a slightly different shade of green to add visual interest. This was a real chore but it adds a lot to the model. The poles were simply stacked into the holders already mounted on the hull. Now the model was given a spray of Dullcote and a very light "dusting" via a mix of Future, Tamiya flat clear, and a bit of acrylic tan paint. The Swedes appear to have maintained their vehicles very well, so I avoided excessive weathering. The vision block glass sections were painted in a gloss black, and the driver's and commander's main sights were now added. Final touches include a pair of stretched sprue antennas made as per the kit instructions, and airbrushed dark gray stains on the diesel and gas turbine exhaust ports. I also added the commander's machine gun, painted in Testor's gun metal with drybrushed steel highlights. I plan to add a camo net over the front of the vehicle, as the Swedes seemed to be really into "organic" camo, especially on the C model S-tanks. In some of the photos I've seen, the tanks look like a rolling English garden - if tree branches could stop 120mm rounds, these things would be unbeatable. Conclusion: As it stands, the model looks good largely due to its unique shape, and it does look accurate. I'm pleased with the results, especially considering it's almost all out of the box and the build was quick and painless despite the minor fit problems - Trumpeter has definately become a major player in scale armor with this kit. Anyone who has built a few tank models should have no problem in finishing this one. An open hatch and a figure or two would add a lot; I think the aftermarket makers will soon come out with such accessories for this kit considering its popularity. I'm thinking of an open engine bay with BOTH engines in full detail. Hmmm... | 


|