Octopus 1/72 Blackburn Skua By Tom Gloeckle | 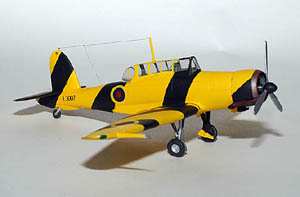 | Octopus (Pavla) Models Blackburn Skua is a typical low-pressure injection molded kit. Thickish, soft gray plastic with large ejector pin tags, vacuform canopies, and a nice set of resin parts for the cockpit, wheels and other detail parts. Decals are provided for different and attractive schemes. Fuselage I started by washing all the parts in warm soapy water to remove mold release agents. This is particularly critical with the resin parts to ensure that paint and adhesive will adhere to the parts.
The first thing I did after the parts had thoroughly dried was to grind off the ejector pin tags on the inner face of the wings and fuselage. The best, and really only way, to remove these is by using a moto tool with a ball cutter and clean up with a sanding bit. Trying to do this bit of clean up by hand could be a real chore without the moto tool.
 I started construction by adding stretched sprue around the gunner/observers position as I thought the ones molded in were too fine. Though later in the cockpit construction I had to remove some of them as they obstructed installation of the cockpit. The bulkhead behind the pilot requires fabrication of support struts, so I used piano wire which seemed strong enough to hold it upright, however stretched sprue would probably also work fine. The rest of the cockpit was built box stock, however I did have to omit the rudder pedals as the space between the bottom of the instrument panel and the cockpit floor was too narrow. Not a real problem as they can't be seen even through the large canopy. The circular bulkhead at the front of the fuselage and the tail hook fairing was installed before assembling the fuselage. The fit was reasonably good, however I did have to add a small wedge shaped sliver of plastic just forward of the windscreen. I started construction by adding stretched sprue around the gunner/observers position as I thought the ones molded in were too fine. Though later in the cockpit construction I had to remove some of them as they obstructed installation of the cockpit. The bulkhead behind the pilot requires fabrication of support struts, so I used piano wire which seemed strong enough to hold it upright, however stretched sprue would probably also work fine. The rest of the cockpit was built box stock, however I did have to omit the rudder pedals as the space between the bottom of the instrument panel and the cockpit floor was too narrow. Not a real problem as they can't be seen even through the large canopy. The circular bulkhead at the front of the fuselage and the tail hook fairing was installed before assembling the fuselage. The fit was reasonably good, however I did have to add a small wedge shaped sliver of plastic just forward of the windscreen. Wings The wings required some special attention to get a good fit and a thinner trailing edge. The wings are molded flat on the inside of the wing at the trailing edge. This was probably done to maintain airfoil shape and keep a reasonably thin trailing edge. Definitely not thin enough, I had to take out the moto tool again and thin down the plastic to mimic airfoil shape on the outer wing surface. Finish sanding was required to clean up the rough plastic and ensure a clean joint. The result was a better and thinner trailing edge, though the thinness of the wing halves was still not the greatest, particularly around the slightly bent wingtips. Putty and gap filling super glue were required for clean up. This was also required when adding the wings to the fuselage. Wing roots were not too bad, though quite a bit of putty was required near the trailing edge on the underside of the fuselage.
 The Pitot tube is an interesting affair. It's an elongated triangle with two little bent tubes at the end. First of all, the kit-supplied part does not include the tubes, and second I lost the silly part after I had mounted it to the wing. That only upset me slightly because it forced me to come up with the solution I had been thinking about. The solution was to take a piece of 1/16th inch diameter aluminum tubing and inserting a piece of piano wire bent in half and curved slightly. Then I took a pair of needle nose pliers and mashed the tube flat. It took a couple of tries, but finally succeeded in getting an approximate profile. I then filed out the plier marks and tapered it to a triangular profile. Followed by a short piece of piano wire placed at the base of the tube so that it could be inserted into a hole drilled into the leading edge of the wing. Pretty involved for a Pitot tube, but effective. The Pitot tube is an interesting affair. It's an elongated triangle with two little bent tubes at the end. First of all, the kit-supplied part does not include the tubes, and second I lost the silly part after I had mounted it to the wing. That only upset me slightly because it forced me to come up with the solution I had been thinking about. The solution was to take a piece of 1/16th inch diameter aluminum tubing and inserting a piece of piano wire bent in half and curved slightly. Then I took a pair of needle nose pliers and mashed the tube flat. It took a couple of tries, but finally succeeded in getting an approximate profile. I then filed out the plier marks and tapered it to a triangular profile. Followed by a short piece of piano wire placed at the base of the tube so that it could be inserted into a hole drilled into the leading edge of the wing. Pretty involved for a Pitot tube, but effective. Engine The engine is mounted within a two-part cowl assembly, and is a bit tricky to get right. The engine also required a great deal of cleanup because of some serious flash between the cylinders and the addition of what I believe are machine gun muzzles located between the top three cylinders. Before the engine was put in place the center of the reduction gear was drilled out and a short piece of 1/16th inch aluminum tubing was glued in place as the propeller shaft. This was a better solution than the little blob of plastic provided.
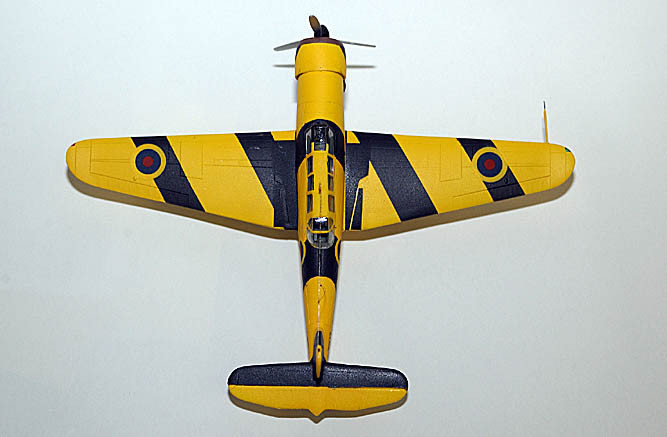
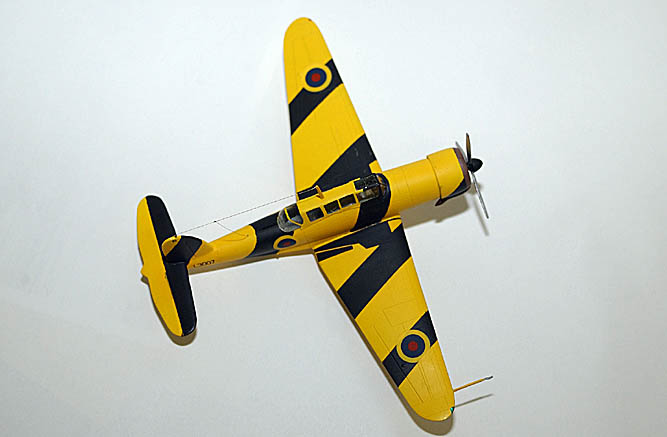
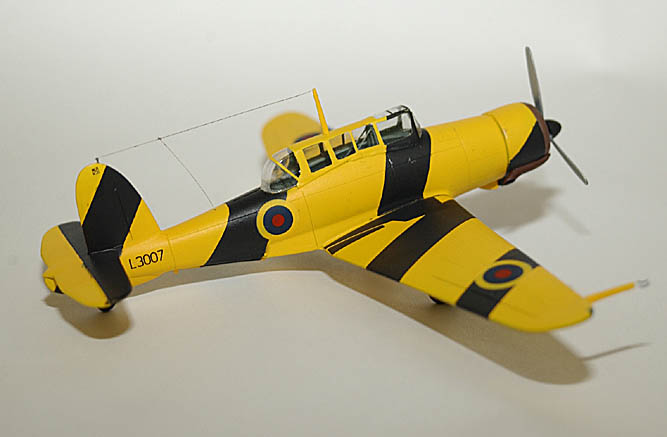
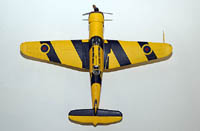
The cowl is substantially deeper than the engine, and there's no semblance of an engine mount. So the simple solution was to assemble the cowl parts, get the engine placed correctly and flood the tops of the piston heads with glue, and while it's setting, get the engine in it's proper place. I then used more piano wire, three pieces cut to the length per the instructions, to make the triangular cowl brace. The engine/cowl assembly was added to the fuselage. Painting 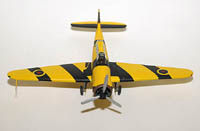 Before painting commenced I mounted the canopy, which is on the very thin side and a little tricky to cut out and mount. Because of it's thinness I had to be very careful masking with Tamiya tape and not cutting through the plastic. I had to really think about which one of the very interesting schemes I'd do. I thought about the aluminum prewar scheme, but settled on the target tug scheme. I always wanted to do a British target tug, as the predominant feature of the scheme is an overall bright yellow with broad black diagonal stripes. Before painting commenced I mounted the canopy, which is on the very thin side and a little tricky to cut out and mount. Because of it's thinness I had to be very careful masking with Tamiya tape and not cutting through the plastic. I had to really think about which one of the very interesting schemes I'd do. I thought about the aluminum prewar scheme, but settled on the target tug scheme. I always wanted to do a British target tug, as the predominant feature of the scheme is an overall bright yellow with broad black diagonal stripes.
Before I started painting I went to Kinko's to copy the instruction's paint diagram for placement of the stripes, particularly on the wings. So, the fuselage drawing was copied at 100% and the wing drawings were enlarged 150%. The first step to painting was to shoot the canopy in Testors Acryl British Interior Green-gray. I then shot the model in Tamiya fine white primer to ensure a bright yellow finish, which was accomplished with Tamiya XF-3 yellow. I then used the enlarged drawings to determine where the stripes should go, and mask the areas where the under wing serial numbers are supposed to go. Masking was once again done using Tamiya tape. I shot the Testors Aircraft Interior Black for the stripes. The masking was removed, and when completely dry the model was coated with Future. I also painted the ring around the lip of the engine cowl Tamiya Bronze and the wheel wells Green-gray.
Decals The decals are thin and very easy to work with. Nice registration and color, however the yellow surrounding the roundels is a bit transparent, so when they cross the black stripes the yellow is discolored. The solution would be to either add a disc of yellow or white decal behind the roundel, or a really complicated bit of masking where the roundel is supposed to go. After the decals had dried the model was flat coated. I kept the weathering to a minimum. Final Assembly  Construction was completed by adding the main gear, which is mounted with the main wheels toed in, and the gear mounted so that it's perpendicular with the ground when the model is sitting on it's wheel. This looks really bizarre, especially when holding the model in wings level straight flight. I also added the antenna mast to the canopy and finally the propeller to the engine. Tamiya Smoke invisible thread was added for the antenna wire. Construction was completed by adding the main gear, which is mounted with the main wheels toed in, and the gear mounted so that it's perpendicular with the ground when the model is sitting on it's wheel. This looks really bizarre, especially when holding the model in wings level straight flight. I also added the antenna mast to the canopy and finally the propeller to the engine. Tamiya Smoke invisible thread was added for the antenna wire.
As a final note, I chose to not mount the bomb sling to the model as I thought that it would no longer be needed on a target tug. This is a personal decision based on absolutely no reference-based fact, just a little logical thinking. I have very little references on this particular aircraft; however, it does look like a Skua. So it passes the "duck theory" principle, and does give satisfactory results.
As limited run kits goes, it's a decent kit; it's certainly no Tamiya kit. I can recommend this kit to more experienced modelers, especially modelers who like strange, gawky looking aircraft or real Anglophiles like myself.
| 


|