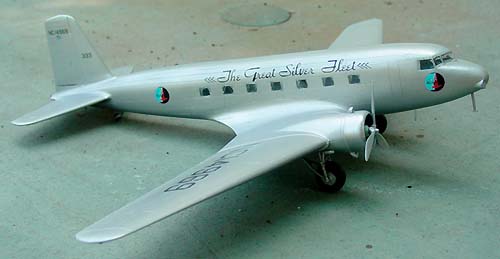
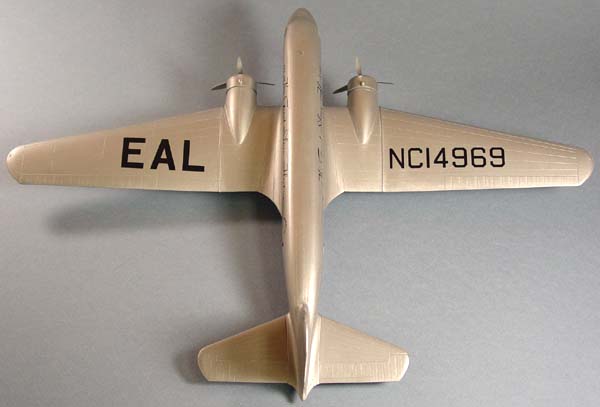
Building MPM's 1/72 DC-2 | 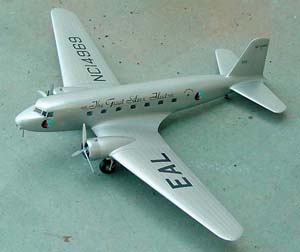 | Overview While kits of the DC-3 and C-47 – rightly called “the airplane that changed the world” – are not difficult at all to find, it’s been nearly impossible to find models of the aircraft from which it was developed, the Douglas DC-2. First flown in May 1934, the  DC-2 had a distinctively narrower, shorter fuselage that seated 14 passengers two abreast. Though it could be a beast to fly and to land (and I’ll refer you to Ernest K. Gann’s Fate Is The Hunter for his colorful descriptions of that), the sturdy DC-2 did help establish the place of the Douglas Aircraft Corporation in the air transport field, and helped prove many concepts that made the follow-on DC-3 an airplane that endures to this day. DC-2 had a distinctively narrower, shorter fuselage that seated 14 passengers two abreast. Though it could be a beast to fly and to land (and I’ll refer you to Ernest K. Gann’s Fate Is The Hunter for his colorful descriptions of that), the sturdy DC-2 did help establish the place of the Douglas Aircraft Corporation in the air transport field, and helped prove many concepts that made the follow-on DC-3 an airplane that endures to this day. Though overshadowed by the DC-3, the DC-2 carved out its own place in aviation history. Not only was it operated by several airlines around the world (including TWA, Eastern, Delta, American, Lufthansa, KLM and many others), but it saw service with the Republicans in the Spanish Civil War as a bomber, and was used in the Second World War by the United States, the Royal Air Force, the Royal Australian Air Force and the Finnish Air Force, among others. Not only did the DC-2 serve the U.S. military as the C-33 and C-39, but its design served as the basis for the B-18 Bolo bomber. Of the 198 DC-2s built between 1934 and 1937, only a handful survive today.  The DC-2 is a pivotal but forgotten aircraft in the histories of many airlines around the world -- not just for spawning the DC-3 and C-47, but also for how it brought many airlines into the “modern era” of air travel. For example, new DC-2s and Lockheed Electras let Eastern Air Lines retire its old Condors, Kingbirds, Stinsons and Pitcairn Mailwings by 1935. The DC-2 is also noteworthy in Eastern’s history as the first to carry the “falcon” logo and the title “The Great Silver Fleet” (both were the ideas of Brad Walker of the Campbell-Ewald advertising agency). Replaced by roomier, more capable DC-3s in the late 1930s, Eastern’s remaining ten DC-2s ended up with the Royal Australian Air Force, where they served during the Second World War. The DC-2 is a pivotal but forgotten aircraft in the histories of many airlines around the world -- not just for spawning the DC-3 and C-47, but also for how it brought many airlines into the “modern era” of air travel. For example, new DC-2s and Lockheed Electras let Eastern Air Lines retire its old Condors, Kingbirds, Stinsons and Pitcairn Mailwings by 1935. The DC-2 is also noteworthy in Eastern’s history as the first to carry the “falcon” logo and the title “The Great Silver Fleet” (both were the ideas of Brad Walker of the Campbell-Ewald advertising agency). Replaced by roomier, more capable DC-3s in the late 1930s, Eastern’s remaining ten DC-2s ended up with the Royal Australian Air Force, where they served during the Second World War.
The Kit  Since Chris has already reviewed both the basic MPM DC-2 kit and this release in particular, I’ll stick instead to a few subjective comments about things I noticed. The structural breakdown – fuselage halves, five-piece wing with center carrythrough, etc. – are pretty much the same as any DC-3 or C-47 kit I’ve ever built. There were several times, in fact, that I felt almost like I was working on the 1:72 Italeri DC-3 kit, and building one of those as a dry-run before you try the DC-2 isn’t a bad idea. It’ll also give your finished Two a companion later on. Since Chris has already reviewed both the basic MPM DC-2 kit and this release in particular, I’ll stick instead to a few subjective comments about things I noticed. The structural breakdown – fuselage halves, five-piece wing with center carrythrough, etc. – are pretty much the same as any DC-3 or C-47 kit I’ve ever built. There were several times, in fact, that I felt almost like I was working on the 1:72 Italeri DC-3 kit, and building one of those as a dry-run before you try the DC-2 isn’t a bad idea. It’ll also give your finished Two a companion later on.
 The other thing that really sticks out is the quality of the plastic. As is the custom with many limited-run kits, MPM’s plastic is considerably softer than that you’ll get from Italeri, Revellogram or any of the majors. Because of this, you’ll need to take greater care handling the plastic, and you won’t want to scratch it any more than you have to. I approached the DC-2 almost the same way I approach a vac-form kit, and some of the same skills one learns from vac-forms can make a big difference too. The other thing that really sticks out is the quality of the plastic. As is the custom with many limited-run kits, MPM’s plastic is considerably softer than that you’ll get from Italeri, Revellogram or any of the majors. Because of this, you’ll need to take greater care handling the plastic, and you won’t want to scratch it any more than you have to. I approached the DC-2 almost the same way I approach a vac-form kit, and some of the same skills one learns from vac-forms can make a big difference too.
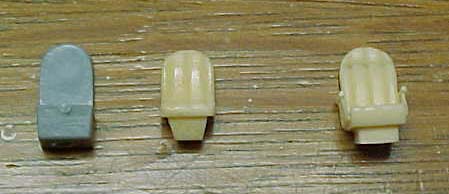
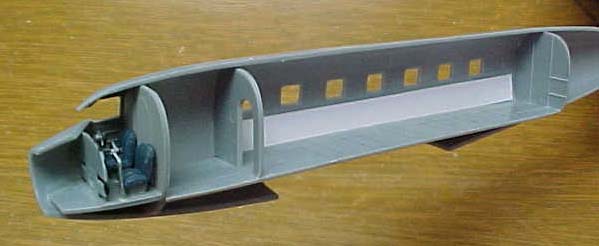
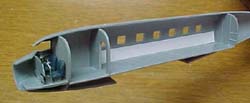
Before we go any further, I should point out that most of the problems I encountered along the way were of my own doing. MPM’s kits, especially the more recent ones, turn into very nice models if you work very carefully and take your time. Since, however, I’m endowed with all the patience of your average 15-year-old, I created a few problems for myself along the way. Follow along as we learn about airplanes, modeling, and even a little bit about life itself. Construction  The journey began with the cockpit and cabin interior. Given how little of either you can see when the model is completed, the kit’s offering is more than adequate; there’s the standard twin seats, yokes and control wheels, and instrument panel. The passenger cabin gives you a floor and an aft bulkhead. For most folks, that’ll do nicely. However, Chris threw some resin passenger and cockpit seats into the deal, and I couldn’t help myself. Since I wasn’t around in the 1930s and didn’t have many references on Eastern’s DC-2 interiors, I painted the interior sort of a generic gray with dark blue seat cushions. I’ve since learned my guesstimation is probably mistaken, but since you really can’t see the interior anyway, it’s sort of a moot point. In addition, since there's nothing to fill the space between the cabin floor and the inside of the wing/fuselage fairing, I added bulkheads made from sheet styrene to seal things off. It was probably worry expended over nothing, but better safe than sorry. The journey began with the cockpit and cabin interior. Given how little of either you can see when the model is completed, the kit’s offering is more than adequate; there’s the standard twin seats, yokes and control wheels, and instrument panel. The passenger cabin gives you a floor and an aft bulkhead. For most folks, that’ll do nicely. However, Chris threw some resin passenger and cockpit seats into the deal, and I couldn’t help myself. Since I wasn’t around in the 1930s and didn’t have many references on Eastern’s DC-2 interiors, I painted the interior sort of a generic gray with dark blue seat cushions. I’ve since learned my guesstimation is probably mistaken, but since you really can’t see the interior anyway, it’s sort of a moot point. In addition, since there's nothing to fill the space between the cabin floor and the inside of the wing/fuselage fairing, I added bulkheads made from sheet styrene to seal things off. It was probably worry expended over nothing, but better safe than sorry.
Here’s where the fun started. MPM gives you a set of nice, injection-molded windows for the cockpit and passenger cabin. Unfortunately, the window openings are just a teensy bit too small for the windows, and the clear plastic is brittle. I was merrily rolling along on construction when I heard “snap!” Yep, I’d just cashed a window. I ended up junking the kit’s cabin windows in favor of windows cut from clear sheet plastic. It was tedious work, but I found my replacement windows a little more forgiving.  The other thing I added were window curtains. Remember, this was the 1930s, and today’s form-fitting pull-down window shades were decades away. The aircraft of yesteryear made do with curtains. To simulate opened curtains, I cut little curved pieces of thin sheet plastic, painted them gray, and stuck them in the upper corners of each cabin window. It gives a suggestion of tied-back curtains, but were I to do it again, I’d use tissue paper strengthened with thinned white glue, painted aluminum foil, or something that would let me show the folds of the fabric. The other thing I added were window curtains. Remember, this was the 1930s, and today’s form-fitting pull-down window shades were decades away. The aircraft of yesteryear made do with curtains. To simulate opened curtains, I cut little curved pieces of thin sheet plastic, painted them gray, and stuck them in the upper corners of each cabin window. It gives a suggestion of tied-back curtains, but were I to do it again, I’d use tissue paper strengthened with thinned white glue, painted aluminum foil, or something that would let me show the folds of the fabric.
 With everything in place I was all ready to button up the fuselage. Just fine, right? Not so fast there. First off, while MPM gives you an approximate location for the cabin interior, there’s no positive locators, pins or anything else to guide you in the fore-aft placement of the interior. That means lots of eyeballing and test-fitting. The other thing is, if you don’t get the interior in properly, it can mess up the alignment of the fuselage halves. Remember, the bulkheads have the same curvature as the fuselage, and the fuselage tapers fore and aft. If you mess something up fore or aft it has serious consequences on your finish work. This step is where you really have to take your time. You can do it carefully and save yourself a lot of cleanup work, or you can do it the way I did... With everything in place I was all ready to button up the fuselage. Just fine, right? Not so fast there. First off, while MPM gives you an approximate location for the cabin interior, there’s no positive locators, pins or anything else to guide you in the fore-aft placement of the interior. That means lots of eyeballing and test-fitting. The other thing is, if you don’t get the interior in properly, it can mess up the alignment of the fuselage halves. Remember, the bulkheads have the same curvature as the fuselage, and the fuselage tapers fore and aft. If you mess something up fore or aft it has serious consequences on your finish work. This step is where you really have to take your time. You can do it carefully and save yourself a lot of cleanup work, or you can do it the way I did...
 ...which was to blaze boldly forward in my best “don’t persuade it, get a bigger hammer” manner. Remember how I said I approached this kit like a vac-form? That’s right down to cutting styrene tabs and gluing them inside the fuselage halves to reinforce the soft plastic along the fuselage seams. Problem is, if you don’t install them to lie exactly flat, you end up with a step. “No problem!” says young, naive Jodie, again giving reason to believe her doctorate was honorary instead of earned.. “I’ll just sand it down.” But that opens another problem: the more you sand, the more you scratch up the soft plastic, and the more rescribing you have to do later on. That’s unfortunate, because the MPM kit has wonderful, delicate scribing that looks gorgeous under a finish coat, and also because my rescribing skills aren’t the best in the world. We’ll talk more about that later. ...which was to blaze boldly forward in my best “don’t persuade it, get a bigger hammer” manner. Remember how I said I approached this kit like a vac-form? That’s right down to cutting styrene tabs and gluing them inside the fuselage halves to reinforce the soft plastic along the fuselage seams. Problem is, if you don’t install them to lie exactly flat, you end up with a step. “No problem!” says young, naive Jodie, again giving reason to believe her doctorate was honorary instead of earned.. “I’ll just sand it down.” But that opens another problem: the more you sand, the more you scratch up the soft plastic, and the more rescribing you have to do later on. That’s unfortunate, because the MPM kit has wonderful, delicate scribing that looks gorgeous under a finish coat, and also because my rescribing skills aren’t the best in the world. We’ll talk more about that later.
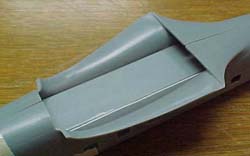
 After the fuselage was together I installed the wings. It’s best to install the center (carry-through) section first, then the tops of the wings, and then the lower halves of the wings. The tops of the wings butt up against the fuselage/wing fillet just as they do on the Italeri kit. Here’s another area where you’ll want to be extremely careful! Blaze forward (again, as I did) and you’ll have to do lots of sanding, filling and rescribing, which is especially fun given the complex curves of this area. It’s also a good idea to install tabs inside the fuselage for aligning and reinforcing the carry-through section, since it’s also easy to end up with a step there too. You’ll also want to strengthen the inboard half of each lower wing piece; the soft plastic makes it easy to accidentally squeeze the wing flat and pop the joints open. After the fuselage was together I installed the wings. It’s best to install the center (carry-through) section first, then the tops of the wings, and then the lower halves of the wings. The tops of the wings butt up against the fuselage/wing fillet just as they do on the Italeri kit. Here’s another area where you’ll want to be extremely careful! Blaze forward (again, as I did) and you’ll have to do lots of sanding, filling and rescribing, which is especially fun given the complex curves of this area. It’s also a good idea to install tabs inside the fuselage for aligning and reinforcing the carry-through section, since it’s also easy to end up with a step there too. You’ll also want to strengthen the inboard half of each lower wing piece; the soft plastic makes it easy to accidentally squeeze the wing flat and pop the joints open.
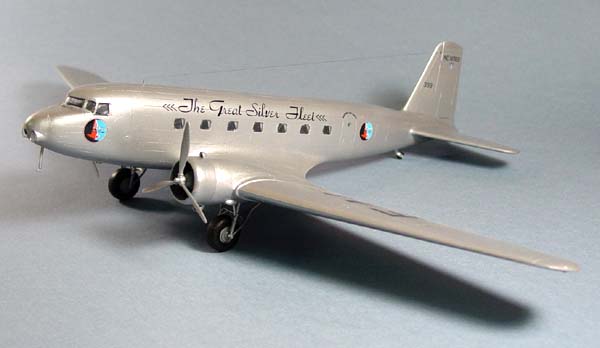
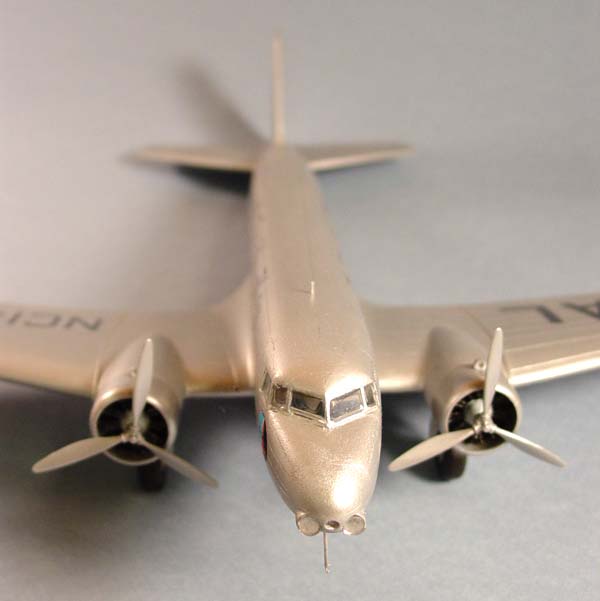
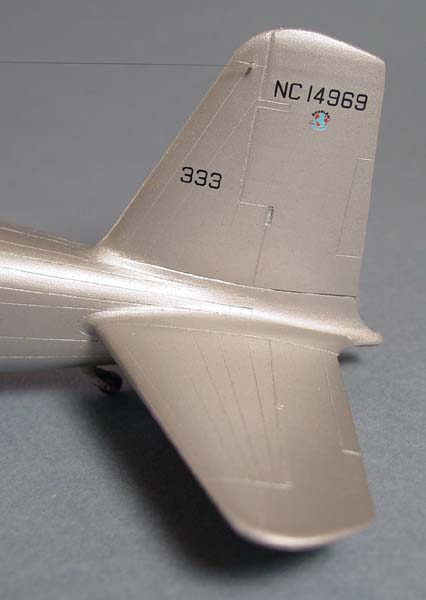
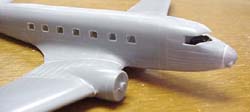
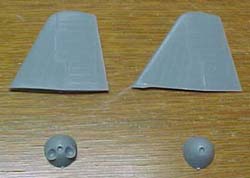 The stabilizers, vertical tail and nose cap round out the basic airframe. MPM gives you two options for the tail and nose cap, and it’s very important you read the instructions carefully so you don’t install the wrong ones! The Eastern aircraft required the smaller tail and the nose cap with the two large landing lights. The larger tail and alternate nose cap are for later military variants, as I recall. The stabilizers, vertical tail and nose cap round out the basic airframe. MPM gives you two options for the tail and nose cap, and it’s very important you read the instructions carefully so you don’t install the wrong ones! The Eastern aircraft required the smaller tail and the nose cap with the two large landing lights. The larger tail and alternate nose cap are for later military variants, as I recall.
Had I been careful during assembly, I’d be able to go ahead and paint. But my gung-ho attitude had gotten the better of me, and all of a sudden I discovered lots of panel lines had disappeared. I’d try to rescribe them, but the soft plastic wouldn’t cooperate. I just wasn’t happy with how things were going with the poor little Two. Charlie Brown Syndrome – “Everything I touch is ruined!” – set in. I’d take a stab at working on the Two and then lose hope. My beloved Ralph, bless his soul, even tried his hand at it, smoothing out a few seams and trying some rescribing. But little else happened. Months passed. The seasons changed. Time marched on. 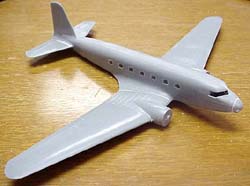 Then, one fine day, I took the poor little Two out and took another look at it, and shot a coat of Tamiya Spray Primer -- one of the world’s greatest inventions, right up there with sliced bread and Diet Cherry Coke -- over it to see how bad the damage was. That did two glorious things: first, it showed me the damage wasn’t as bad as I’d feared. Second, the Tamiya primer gave the plastic sort of a harder outer shell that was much easier for me to rescribe upon. Life suddenly looked a lot happier! Then, one fine day, I took the poor little Two out and took another look at it, and shot a coat of Tamiya Spray Primer -- one of the world’s greatest inventions, right up there with sliced bread and Diet Cherry Coke -- over it to see how bad the damage was. That did two glorious things: first, it showed me the damage wasn’t as bad as I’d feared. Second, the Tamiya primer gave the plastic sort of a harder outer shell that was much easier for me to rescribe upon. Life suddenly looked a lot happier!
Finishing 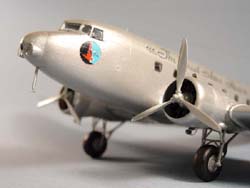 A little scribing and a little sanding later, and the DC-2 was ready for paint at long and blessed last. I coated the windows with white glue, then shot it with Polly Scale Aluminum acrylic through Ralph’s Badger 150 at about 20 psi. I didn’t want to go for a super-shiny, factory-fresh finish -- that wouldn’t quite be characteristic of Eastern, whose aircraft were always worked hard and often showed it. In fact, if one wanted to, one could mask off panels and give some of them a slightly more tarnished look. I could have done that, but by this point I wanted to finish the project and get on with my life. A little scribing and a little sanding later, and the DC-2 was ready for paint at long and blessed last. I coated the windows with white glue, then shot it with Polly Scale Aluminum acrylic through Ralph’s Badger 150 at about 20 psi. I didn’t want to go for a super-shiny, factory-fresh finish -- that wouldn’t quite be characteristic of Eastern, whose aircraft were always worked hard and often showed it. In fact, if one wanted to, one could mask off panels and give some of them a slightly more tarnished look. I could have done that, but by this point I wanted to finish the project and get on with my life.
After the paint dried I swabbed the areas to be decaled with Future acrylic floor polish, then prepared myself to do battle with the Propagteam-printed decals. The one time before I’d used them, I hadn’t known of their tendency to not move once they were on the model, and since then I’ve viewed them with fear and loathing. But, hey, I’m the one who wanted an Eastern DC-2 so bad, right? 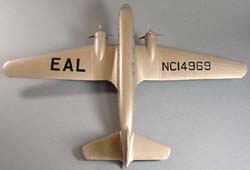 There’s a simple, if slightly disgusting, way to get Propagteam decals to cooperate with you: saliva. That’s right, you rub a little spit on the area the decal will land upon, and that will let you poke the decal into position just as you would any other. It’s important you put the spit so it’s underneath the decal when you slide it off. Otherwise, you’ll want to spit on the decal when it won’t do anything. There’s a simple, if slightly disgusting, way to get Propagteam decals to cooperate with you: saliva. That’s right, you rub a little spit on the area the decal will land upon, and that will let you poke the decal into position just as you would any other. It’s important you put the spit so it’s underneath the decal when you slide it off. Otherwise, you’ll want to spit on the decal when it won’t do anything.
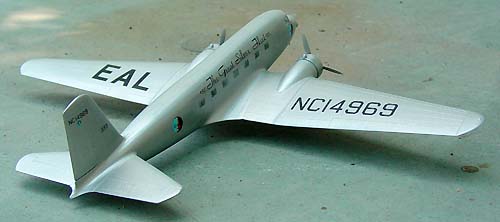
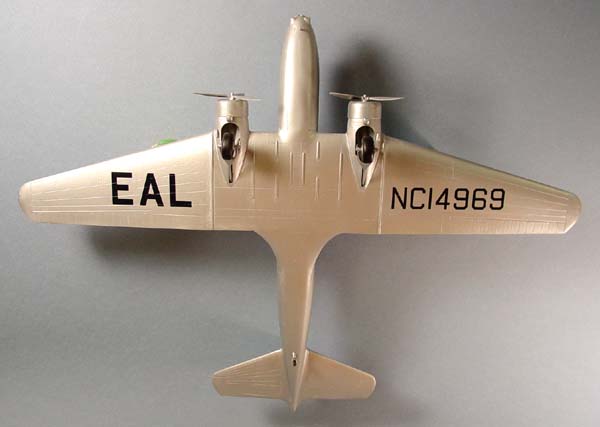
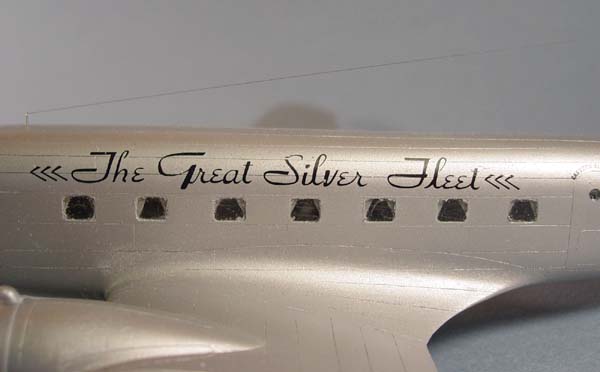
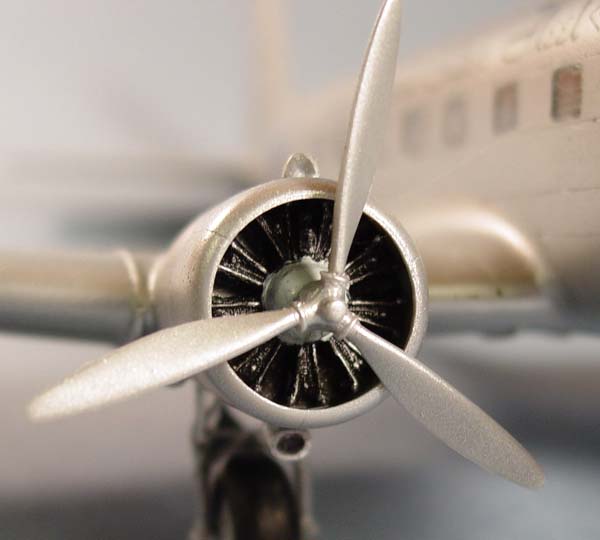
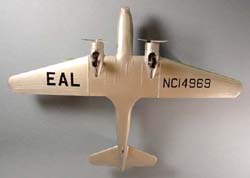
With the little spit trick in hand (ewww, gross!) I had no crises during the decaling process, other than a heart-stopping moment when one of the “Great Silver Fleet”decals got a little ornery and wrapped around itself. MPM’s decaling instructions are generally good, though the one good reference photo I could find of an Eastern DC-2 indicates the fore and aft logos were in different positions (the aft one should be centered in line with the port-side baggage compartment door, between the passenger door and the baggage door) and the “Great Silver Fleet” titles should be a little farther forward. I didn’t have to use any solvents or setting solutions on the decals, which was a pleasant surprise. While the decals aren’t the most accurate in the world, and though I have questions about some of the colors MPM used in printing them, they look good on the model. 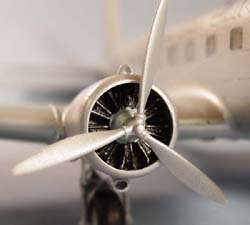 With the decals in place, I could install the engines, cowls, landing gear and props. The engines are very simple one-piece units, not detailed much at all, and you’ll probably want to replace them with resin units from Engines & Things. The props are four-piece subassemblies, with each blade separate, so take care to get them consistently angled, aligned and pitched if you don’t want to infuriate your 1:72 flight crew! The landing gear components are configured very much like those of the Italeri C-47, so veterans of that kit know what to expect. With the decals in place, I could install the engines, cowls, landing gear and props. The engines are very simple one-piece units, not detailed much at all, and you’ll probably want to replace them with resin units from Engines & Things. The props are four-piece subassemblies, with each blade separate, so take care to get them consistently angled, aligned and pitched if you don’t want to infuriate your 1:72 flight crew! The landing gear components are configured very much like those of the Italeri C-47, so veterans of that kit know what to expect.
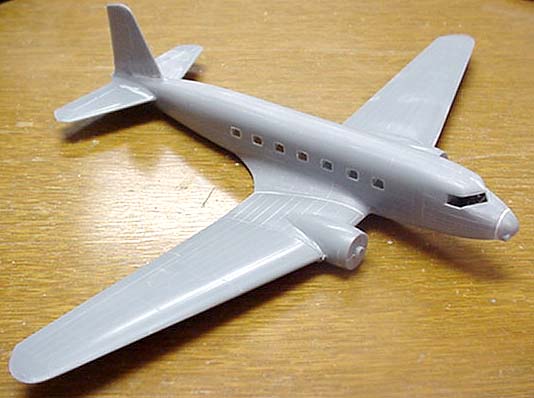
After that, it was only a matter of the fiddly bits like oil cooler inlets and exhaust stacks (since it’s a limited-run kit, these parts aren’t molded with even representations of inlets, so you have to bore them out yourself if you’re a stickler about such things), the pitot tube and the lenses for the nose lights. Since the cockpit  windscreen was broken in transit, I made new posts from strip styrene and filled the window openings with white glue. It’s not perfect, I know, but it’s better than nothing. A couple of antenna posts made from pieces of a staple, a length of “invisible thread” for an aerial, and there you are – one each completed Eastern Air Lines DC-2. At some point I may bring out some of the panel lines with a light wash, but for now I’m just happy enough to be done with it. Besides, other uncompleted projects need me, too. windscreen was broken in transit, I made new posts from strip styrene and filled the window openings with white glue. It’s not perfect, I know, but it’s better than nothing. A couple of antenna posts made from pieces of a staple, a length of “invisible thread” for an aerial, and there you are – one each completed Eastern Air Lines DC-2. At some point I may bring out some of the panel lines with a light wash, but for now I’m just happy enough to be done with it. Besides, other uncompleted projects need me, too. Conclusions Well, it’s finished, and it sure looks like a DC-2, anyway. The proportions all look correct to me, and the only shape problem I can find is that the engine nacelles don’t taper sharply enough into the cowls – it’s very noticeable on DC-2s and the early Wright-powered DC-3s. It’s nothing a little sandpaper and a little invention can’t fix, though.  You may have the impression I was put off by this kit. Far from it! Given what we can realistically expect from MPM, and given that we finally have an injection-molded DC-2, I have absolutely nothing to complain about. As I said, I was my own biggest obstacle in this project, and in the hands of a more patient and careful modeler the DC-2 will build up smoothly. It won’t hurt to have a few limited-run kits under your belt, even some vac-form experience, before you tackle this beast. You may have the impression I was put off by this kit. Far from it! Given what we can realistically expect from MPM, and given that we finally have an injection-molded DC-2, I have absolutely nothing to complain about. As I said, I was my own biggest obstacle in this project, and in the hands of a more patient and careful modeler the DC-2 will build up smoothly. It won’t hurt to have a few limited-run kits under your belt, even some vac-form experience, before you tackle this beast.
In the hands of a skilled modeler, the MPM DC-2 can become a real beauty, and it makes a natural companion to a 1:72 DC-3 or C-47. In fact, it’s not too much of a stretch to imagine chopping the fuselage two scale feet and modifying the rudder to produce a model of the lone DC-1 prototype. And far from being put off, I’m planning on building another DC-2 or two someday. Maybe it’ll be another Eastern aircraft, when I can find proper references to do more accurate markings. And there’s always Delta’s DC-2s, with their DC-3-style markings and leading edges painted black to simulate de-icer boots. And Ralph will need one for his Spanish Civil War collection, too! Oh, how endless are the possibilities! References: Davis, Larry. C-47 Skytrain In Action. Carrollton, Texas: Squadron Signal Publications, 1995.
Pearcy, Arthur. Douglas Propliners: DC-1 to DC-7. Shrewsbury: Airlife, 1995.
Serling, Robert. From The Captain To The Colonel: An Informal History of Eastern Airlines. New York: The Dial Press, 1980.
| 


|