Building the Choroszy Modelbud 1/72nd Ansaldo SVA
10
|
 |
The Aircraft
The Ansaldo SVA family of scout aeroplanes was probably the most famous
design of the Italian aircraft industry during the years of the Great
War, on par with the Caproni bombers manufactured during the same period.
According to the old Profile series volume dedicated to this line of
scouts, they were the first Italian manufactured aircraft to result from
a truly scientific design process that involved actual forecasts of expected
performances, as far as both aerodynamics and structural features were
concerned.
 The
most distinguishing feature of the SVAs has to be the complex interplane
strut arrangement, that would years later be seen in products of the FIAT
factory (CR 32, 42) what would be not unexpected if we consider that one
of the names behind the drawing board of the aircraft was Celestino Rosatelli
that would later become Chief Designer for the Fiat Company. The true
fathers of the aircraft though were Rodolfo Verduzio and Umberto Savoia,
both technical Officers at the Direzione Tecnica dell'Aeronautica Militare. The
most distinguishing feature of the SVAs has to be the complex interplane
strut arrangement, that would years later be seen in products of the FIAT
factory (CR 32, 42) what would be not unexpected if we consider that one
of the names behind the drawing board of the aircraft was Celestino Rosatelli
that would later become Chief Designer for the Fiat Company. The true
fathers of the aircraft though were Rodolfo Verduzio and Umberto Savoia,
both technical Officers at the Direzione Tecnica dell'Aeronautica Militare.
With full financial back up from this governmental department the production
of the aircraft was entrusted to Soc. Ansaldo of Genova, the first flight
of the SVA prototype taking place on the 3rd March 1917.
Ansaldo scouts would soldier on after the war, both in civil and military
guises, in such diverse countries as Latvia and Peru, to name but two,
but without a doubt the most famous episode associated with an SVA Scout
was the raid over Vienna led by poet Gabriele D'Annunzio, in a custom
modified SVA 10, during which the city was showered with several thousand
pamphlets, showing that the capital of the dual Monarchy could also be
within range of the Italian bombers.
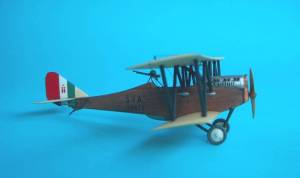
The model featured in this article represents an SVA 10 in post war
markings and was made as out of the box as possible using the Chroroszy
Modelbud 1/72nd model.
The Kit
  There's
nothing much to say of the Choroszy kit except that from the first you
open the box you realize this is a very good product and that all care
has been taken to ensure that the kit comes to your hand in good shape,
hence the 3 self sealing plastic bags containing the many well moulded
parts, with almost no signs of air bubbles, except on the wheels and on
a strut, in my case. The decal sheet is also very good, as are the actual
decals and on it you get not only the markings for your kit but also for
the other SVA models released by Choroszy. This echoes what happens with
the resin parts, since included in my kit were parts that I suspect are
for the other SVA versions. There's
nothing much to say of the Choroszy kit except that from the first you
open the box you realize this is a very good product and that all care
has been taken to ensure that the kit comes to your hand in good shape,
hence the 3 self sealing plastic bags containing the many well moulded
parts, with almost no signs of air bubbles, except on the wheels and on
a strut, in my case. The decal sheet is also very good, as are the actual
decals and on it you get not only the markings for your kit but also for
the other SVA models released by Choroszy. This echoes what happens with
the resin parts, since included in my kit were parts that I suspect are
for the other SVA versions.
The only slight criticism has to do with the instruction sheet. The
assembly instructions are of the exploded view type and at times it really
is not clear "what goes where".
Construction
Fuselage
 As
usual, first thing to tackle was the cockpit, and Choroszy provides just
about anything you need to come up with a busy office there. This notwithstanding,
upon inspecting kit parts, I came to the conclusion that one seat was
missing. "No big deal, I'll scratch one later", thought I, and
proceeded with washing the cockpit parts with some detergent to get rid
of the moulding agent. After all the cockpit parts were dry, I realised
that I had sent the dashboard through the sink, since I couldn't find
it anywhere and I did remember washing it. As such I had to scratch not
only a seat but also the instrument panel. Nothing really serious though,
and the only other addition I made to the cockpit area were some PE seatbelts,
taken from a PE seatbelt generic set. As
usual, first thing to tackle was the cockpit, and Choroszy provides just
about anything you need to come up with a busy office there. This notwithstanding,
upon inspecting kit parts, I came to the conclusion that one seat was
missing. "No big deal, I'll scratch one later", thought I, and
proceeded with washing the cockpit parts with some detergent to get rid
of the moulding agent. After all the cockpit parts were dry, I realised
that I had sent the dashboard through the sink, since I couldn't find
it anywhere and I did remember washing it. As such I had to scratch not
only a seat but also the instrument panel. Nothing really serious though,
and the only other addition I made to the cockpit area were some PE seatbelts,
taken from a PE seatbelt generic set.
The sidewalls were painted in my usual "wood" technique (humbrol
63 + watercolour pencils) while the structural members were picked out
in a darker, contrasting shade of brown.
The fuselage halves were then brought together and for this I used
5-minute epoxy. I don't like to work with epoxy glue, since somehow I
end up always getting my fingers smeared in it, what is really nasty since
I then leave tacky fingerprints  everywhere
I touch. Still I find epoxy is much more convenient to use for this kind
of work than CA since it does provide you with just enough flexibility
to ensure that you get things properly aligned before glue sets. CA is
much more of a binary option: either you get it right and you can breathe
deep or, as it usually happens to me, you get it slightly wrong and you
go away to curse alone for the next 5 minutes. everywhere
I touch. Still I find epoxy is much more convenient to use for this kind
of work than CA since it does provide you with just enough flexibility
to ensure that you get things properly aligned before glue sets. CA is
much more of a binary option: either you get it right and you can breathe
deep or, as it usually happens to me, you get it slightly wrong and you
go away to curse alone for the next 5 minutes.
After the glue had set, I inspected the fuselage and found that it
needed some filler at several spots on the underside, most of it due to
tiny breaks in the resin that occurred while cutting the part from the
pouring blocks.
I filled and sanded the offended areas and installed the underside fuel
tank filler cap and supplementary tank, only to find later on that I had
misplaced those since they were some 2mm to the front of where they should
have been, due to a mistake in the side elevation drawing that came with
the kit. I managed to unglue the parts and glued them again at their correct
locations. I could now concentrate on the:
 Tail
Section Tail
Section
The stabilizer, if glued onto the fuselage rear as Choroszy shows in
the instructions would stand too proud of the fuselage, so I filed down
the stabilizer contact area, so that it would seat flush. I found that
the fin needed a bit of plastic attached to its base or else it would
not sit perpendicular to the stabilizer. As such the fin was slightly
elevated, the holes for the command cables for rudder and elevators on
the fuselage were drilled and I went to work on the:
Wings
SVA aircraft were atypical as far as wings go, due to 2 facts: the wings
were asymmetrical (one side longer than the other) as a way of compensating
the torque effect of the propeller, and the bottom wing did not abut completely
into the fuselage, i.e., the wings were joined to the fuselage only by
protruding front and rear spars, leaving a very prominent gap between
the fuselage and the wing root.
 Choroszy
duly considered this last feature and while the nice 3 view plans that
came with the kit clearly show one side of the wing to be longer than
the other, I found out that not only the top wing had its cut-out exactly
at the middle, with both halves being the same length, but also the lower
wings were of the same length. To correct this would imply major surgery
and extension of the wings, and since I was determined to build the kit
as OOB as possible I left it as it was. Choroszy
duly considered this last feature and while the nice 3 view plans that
came with the kit clearly show one side of the wing to be longer than
the other, I found out that not only the top wing had its cut-out exactly
at the middle, with both halves being the same length, but also the lower
wings were of the same length. To correct this would imply major surgery
and extension of the wings, and since I was determined to build the kit
as OOB as possible I left it as it was.
To replicate the wing attachment points, Choroszy moulded tiny stubs
both on the roots of the lower wings and also on the sides of the fuselage.
These cannot be used alone to support the wing since the mating surface
is very small and as such would never ensure a strong bond. Also the combined
length of both stubs would determine a gap some 2 mm wide, what would
be too much. To overcome all this problems, I shaved off the fuselage
stubs and in their places I drilled .6mm holes into which I then epoxied
pieces of brass tube with an inner section of .5mm.
 The
"spars" on the wings were then drilled with a .5mm bit and into
the holes thus created tiny sections of .5mm brass rod were also epoxied.
I now had a perfect sliding mount for my wings with the added benefit
of the brass wire having sufficient flexibility to allow me to induce
whatever degree of diedhral I might want once the wings glued in place. The
"spars" on the wings were then drilled with a .5mm bit and into
the holes thus created tiny sections of .5mm brass rod were also epoxied.
I now had a perfect sliding mount for my wings with the added benefit
of the brass wire having sufficient flexibility to allow me to induce
whatever degree of diedhral I might want once the wings glued in place.
It was now time to come up with a strategy to tackle the complex strut
arrangement of the SVA and after considering several options I decided
that probably the easiest way would be to get the top wing securely in
place through the cabanes and then to pop each strut member, one at the
time, onto their respective locations.
Upon examination, the struts on the Choroszy kit look quite useable,
being well moulded and looking quite strong. But I found out that once
cut from the pouring blocks they came out a tad to short, each and every
one, so I decided I'd fashion some new struts from contrail strut stock.
As such I started with the cabanes and I inserted very small pins of copper
wire at the bases and apexes of each cabane member that would later fit
into matching holes on the fuselage and undersurface of the top wing.
 I
had to make more than one inverted V for the front cabane, so that I was
satisfied with the incidence angle of the top wing, and when I finally
got it correct, I epoxied the cabanes to the fuselage and left it to dry
for 24 hours. The next day I epoxied the lower wings to the fuselage and
again let it dry for a full day, before epoxying the top wing to the cabanes.
I now had all the wings in place and the stress-inducing task of fitting
the struts to their locations could now begin. I
had to make more than one inverted V for the front cabane, so that I was
satisfied with the incidence angle of the top wing, and when I finally
got it correct, I epoxied the cabanes to the fuselage and left it to dry
for 24 hours. The next day I epoxied the lower wings to the fuselage and
again let it dry for a full day, before epoxying the top wing to the cabanes.
I now had all the wings in place and the stress-inducing task of fitting
the struts to their locations could now begin.
I had pre-painted a couple of lengths of the smallest Contrail strut
stock and using dividers I measured the spaces where the struts would
have to fit, being helped in that by the strut locating holes that were
originally moulded in the wings. (These would be covered by the base of
the strut once glued in place, so I didn't have to fill them in).
 Dry
fitting is the name of the game here and once I got the correct length
for a strut, I'd drill a .3mm hole at both its ends and insert the tiniest
piece of copper wire, that would help align it with the locating holes
on the wings. I'd then drop a tiny drop of ca at both locating holes with
an applicator fashioned out of a needle with its eye cut so as to leave
only a very small u. Then, holding the model in one hand, the tweezers
with the strut in the other (and my breath for as long as I could….)
I'd gently drop the strut into its location. This was time consuming and
strenuous. I also had some ca runs, but I managed to wipe most of them
clean. After each set of 4 struts I'd go watch TV for a while, to relax
and rest my eyes and shaky hands. In the end, in the course of an evening
modelling session I managed to get all the struts in place and I felt
quite happy with that, but was also a bit suspicious too that when I got
around to rig the wings, some struts might come out, due to the contact
points between the base of the struts and the wing being so small. Dry
fitting is the name of the game here and once I got the correct length
for a strut, I'd drill a .3mm hole at both its ends and insert the tiniest
piece of copper wire, that would help align it with the locating holes
on the wings. I'd then drop a tiny drop of ca at both locating holes with
an applicator fashioned out of a needle with its eye cut so as to leave
only a very small u. Then, holding the model in one hand, the tweezers
with the strut in the other (and my breath for as long as I could….)
I'd gently drop the strut into its location. This was time consuming and
strenuous. I also had some ca runs, but I managed to wipe most of them
clean. After each set of 4 struts I'd go watch TV for a while, to relax
and rest my eyes and shaky hands. In the end, in the course of an evening
modelling session I managed to get all the struts in place and I felt
quite happy with that, but was also a bit suspicious too that when I got
around to rig the wings, some struts might come out, due to the contact
points between the base of the struts and the wing being so small.
Now came rigging and this was done with invisible wire painted black
with a permanent marker. As anticipated I knocked a couple of struts off
while rigging, but I was able to easily repair whatever damage there was.
All that was left now was the:
Undercarriage
 At
first I had planned to use the kit's undercarriage struts, but these were
a bit chunky and one broke in 2, due to a large air bubble it had, so
again I resorted to scratchuilding a new undercarriage out of contrail
strut stock and other bits and pieces of plastic and wire, using the kit
plans and parts as guide. At
first I had planned to use the kit's undercarriage struts, but these were
a bit chunky and one broke in 2, due to a large air bubble it had, so
again I resorted to scratchuilding a new undercarriage out of contrail
strut stock and other bits and pieces of plastic and wire, using the kit
plans and parts as guide.
I inserted the pins on u/c struts into the pre-drilled holes in the
fuselage and with the addition of the wheels (that had to have a large
segment of the tyres made in miliput, due to casting flaws) and propeller
I had another model ready to put into the display shelf.
Painting
You will notice I didn't mention painting on the construction notes
above, and this is due to the fact that I followed a different approach
this time: usually I'd only paint the outer side of the upper wing and
the inner side of the lower wing after rigging is done, to be able to
completely putty and sand the little holes caused by the rigging method
I use. This time though, I pre-painted all the sub assemblies, i.e. fuselage,
wings and struts, because I really didn't want to mess up with the wings
once the struts applied, due to their fragility.
 The
"woodwork" was, as I've already said my usual technique of Humbrol
63 base coat with pencilled in grain with watercolour pencils. The CDL
on the flying surfaces is a mix of household enamel - Dyruflat white with
as much as needed Robiallac SMP chocolate, yellow and red - and finally
the metal areas are Dyrup aluminium paint. The
"woodwork" was, as I've already said my usual technique of Humbrol
63 base coat with pencilled in grain with watercolour pencils. The CDL
on the flying surfaces is a mix of household enamel - Dyruflat white with
as much as needed Robiallac SMP chocolate, yellow and red - and finally
the metal areas are Dyrup aluminium paint.
Weathering and rib details were achieved with watercolour pencils.
Conclusion
I am not that keen on resin kits. For me nothing beats the flexibility
of plastic. This notwithstanding, Choroszy has improved my opinion regarding
resin kits quite a few marks. I would of course not recommend this kit
to a beginner due to the complicated nature of the strut system and also
to the need to substitute all the struts in the kit (a common problem
to all resin kits I've seen till now, even though Choroszy came real close
to overcome this), but other than that there's nothing to keep a more
experienced modeller from having a beautiful addition to her/his collection,
and if you are familiar with biplane building I can only say, go for it!
 As
a final note I'd like to say that this kit came into my hands as part
of what has now become a tradition in the WW1 Modelling Mailing List:
a Christmas exchange of gifts between its members. As
a final note I'd like to say that this kit came into my hands as part
of what has now become a tradition in the WW1 Modelling Mailing List:
a Christmas exchange of gifts between its members.
To be able to finish it I benefited not only from the immense generosity
of my Secret Santa, Buz Pezold, who gave it to me, but also from the outstanding
help of fellow list members Lance Krieg and Grzegorz Mazurowski with whom
I was able to discuss whatever doubts surfaced during the assembly. As
such, in a way, this model represents the spirit of the List, down to
the promoting of WW1 modelling, since it was built as part of a group
build dedicated to canvas and wood aircraft at the Aviation Hobby Site
Forum, a Portuguese aviation enthusiast's site.
|
|


