America's First Pursuit:
|
 |
History
The United States entered the Great War by declaring war on Germany in April 1917. At this point, America had no air force to speak of, certainly not on the scale of anything then in Europe. The American aircraft industry was still in its infancy, and was then unable to provide an offensive fighter of any kind. The American Expeditionary Force turned to France to supply the necessary aircraft. The first choice was the SPAD XIII, but France herself needed them desperately to help counter an imminent German offensive, so the French suggested the Nieuport 28 instead. The Nieuport 28 thus became America's first pursuit fighter.
The Nieuport 28 was a relatively small, light-weight fighter, powered by a 160 hp 9-cylinder Gnome Monosoupape (single valve) rotary engine. The gyroscopic effect of the whirling crankcase turning with the propeller made the aircraft extremely maneuverable, and the high power to weight ratio resulted in a rapid rate of climb. The aircraft was normally fitted with two Vickers machine guns synchronized to fire through the propeller. One was mounted between the cabane struts, and the other on the left side of the fuselage.
Nearly a year passed before U.S. air units arrived and were ready for combat in France. The first two U.S Aero Squadrons to be equipped with the Nieuport 28 were the 94th and 95th, which formed part of the First Pursuit Group. Guns for the new aircraft were in short supply, so the first missions were flown without guns (not in combat, of course!), and as guns became available many aircraft flew for a while with only one Vickers installed.
As with most new aircraft types, the aircraft had many teething problems, the most alarming of which was the tendency of the upper wing to fail in high-G maneuvers, ripping back the upper wing fabric and collapsing the leading edge, often in the midst of combat! This terrifying experience was survived by several pilots of the Group, including Eddie Rickenbacker and James Meissner.
Needless to say the pilots of the 94th and 95th became somewhat wary of their new mount, and moved to replace it with the SPAD XIII. Several other units such as the 27th and 147th Aero Squadrons actually preferred the Nieuport 28, having had time to learn its idiosyncrasies and correct many of its flaws. Nevertheless the type was phased out in favor of the SPAD.
After the war many Nieuports were sent back to the U.S. to be used in the training role. Twelve machines were transferred to the U.S Navy, to be flown off of platforms on the turrets of warships. At least one example was obtained by Switzerland, where it now hangs at the Fliegermuseum at Duebendorf. A few Nieuport 28s eventually made their way to Hollywood, where they appeared in several movies such as Dawn Patrol. Many also ended up in the racing circuit.
In 1986 the National Air and Space Museum obtained a Nieuport 28 from
Cole Palen of Old Rheinebeck Aerodrome. This aircraft has since been restored
as 6144, to the way it appeared while flown by Lt. James Meissner of the
94th Aero Squadron in May 1918. Meissner, an American born in Canada,
scored four victories in the Nieuport and survived two wing failures in
6144! Meissner went on to command the 147th Aero Squadron, where he scored
four additional victories in the SPAD XIII. His aircraft is the subject
of this model.
Construction
A review of the kit contents can be found in the First Look Preview by Matt Bittner in the March 2004 issue. The only comments I will add are that some of the parts have an odd pebbly finish, notably the fuselage halves and the wheel covers. Whether this is deliberate or not I cannot tell but this is easily knocked down with wet-and-dry if desired. The plastic also has small flecks of black material in it, suggesting some kind of impurity, but this caused no trouble during the build.
 The
plastic sprues were first prepared by cleaning them with Windex ammonia
cleaner to remove any mold release agents. This is an important step,
especially as many of the eastern European manufacturers use release agents
quite liberally, and this can cause problems during cementing and/or painting
later on.
The
plastic sprues were first prepared by cleaning them with Windex ammonia
cleaner to remove any mold release agents. This is an important step,
especially as many of the eastern European manufacturers use release agents
quite liberally, and this can cause problems during cementing and/or painting
later on.
Roden takes a rather unique approach to assembling the interior of this model. The fuselage halves were first painted inside with Gunze H85 Sail Color, then cemented together to form a cone shaped assembly open at the large end. Into this can be inserted the finished interior assembly.
The interior framework assembly was constructed with thin superglue, building up into a simple box-like structure into which went the rudder pedals, control stick, instrument panel and seat. Many parts are very thin and delicate, and require extra care during cleanup and assembly. The assembly was painted with various Citadel and Gunze acrylics, before getting a light wash of raw umber oil. The instrument panel was modified, removing the triangular area at the top (the real aircraft did not have this) and adding an instrument dial from Eduard's WWI Instrument set.
 On
the real aircraft, the seat appears to be an affair resembling a peach
basket. Photos of this are on the NASM website. I attempted to replicate
this in several ways, using paper, thin brass and styrene sheet, and even
decal film. I failed miserably at each attempt. I just could not pull
off the woven effect convincingly enough. Late in the program I found
out that Lonestar Models has a photoetch fret used on their old Nieuport
28 kit that contains the peach basket seat, but I knew I would not get
this set in time for this build due to our very slow mail service. Well,
call me a coward, but I decided to use the seat provided, and painted
it resembling a seat covered with some non-descript fabric or hide. I
added some rather large photoetch seatbelts from the Eduard French WWI
Seatbelt set, which ends up hiding most of the seat anyway.
On
the real aircraft, the seat appears to be an affair resembling a peach
basket. Photos of this are on the NASM website. I attempted to replicate
this in several ways, using paper, thin brass and styrene sheet, and even
decal film. I failed miserably at each attempt. I just could not pull
off the woven effect convincingly enough. Late in the program I found
out that Lonestar Models has a photoetch fret used on their old Nieuport
28 kit that contains the peach basket seat, but I knew I would not get
this set in time for this build due to our very slow mail service. Well,
call me a coward, but I decided to use the seat provided, and painted
it resembling a seat covered with some non-descript fabric or hide. I
added some rather large photoetch seatbelts from the Eduard French WWI
Seatbelt set, which ends up hiding most of the seat anyway.
 While
all this was drying, I turned attention to the engine and firewall. The
engine in this kit is a little gem, and is easily one of the finest I
have seen of an injection molded rotary engine in this scale out of the
box, and looks very accurate compared to photos of the original. Some
care has to be taken when removing the pushrod assembly from the sprue,
as they are very thin and break easily. The hole at the center of the
pushrod assembly had to be bored out slightly with a mousetail file so
it fit snugly onto the crankcase. The engine fits into a plastic bushing
and retainer, which allows the engine to rotate like the original. This
finished assembly can then be fitted to the fuselage firewall at the stage
desired by the modeler. The engine was airbrushed with Citadel Boltgun
Metal (a steel shade) with white sparkplugs. The whole was then given
a light wash of Flat Black enamel, and then set aside.
While
all this was drying, I turned attention to the engine and firewall. The
engine in this kit is a little gem, and is easily one of the finest I
have seen of an injection molded rotary engine in this scale out of the
box, and looks very accurate compared to photos of the original. Some
care has to be taken when removing the pushrod assembly from the sprue,
as they are very thin and break easily. The hole at the center of the
pushrod assembly had to be bored out slightly with a mousetail file so
it fit snugly onto the crankcase. The engine fits into a plastic bushing
and retainer, which allows the engine to rotate like the original. This
finished assembly can then be fitted to the fuselage firewall at the stage
desired by the modeler. The engine was airbrushed with Citadel Boltgun
Metal (a steel shade) with white sparkplugs. The whole was then given
a light wash of Flat Black enamel, and then set aside.
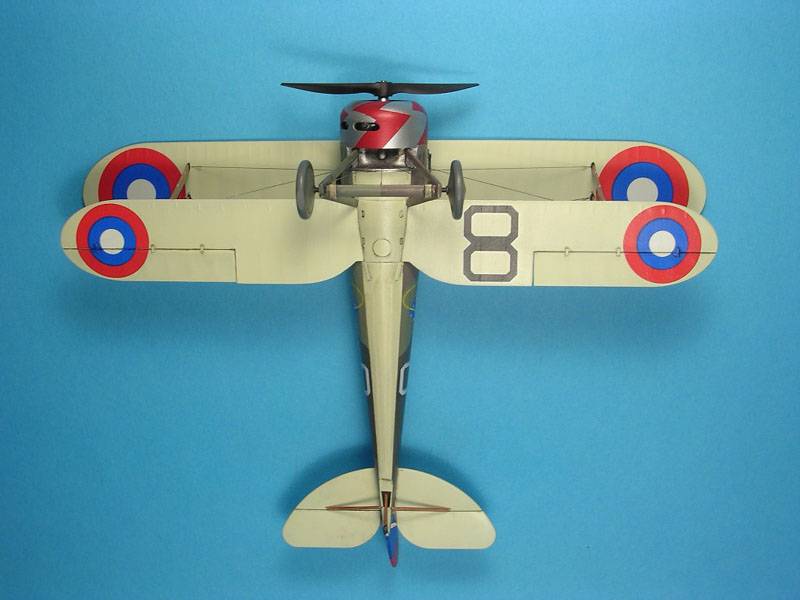
The upper and lower wings were removed from the sprue and cleaned up.
The wings are very  nicely
done, without the overdone drooping fabric effect evident on many models
of this genre. The ailerons were cut out on the lower wing and reposed
slightly deflected to give a more life-like appearance. The hinges were
restored with short strips of .005" card. The same was done for the
rudder and elevator. Normally I attach the lower wing to the fuselage
on a model like this before painting, as generally some filling and sanding
is required. While checking the fit of the lower wing to fuselage, I found
that the fit was so good that I decided to try painting the wing separately
before attaching it to the fuselage. This greatly eased masking and painting
of the model later on.
nicely
done, without the overdone drooping fabric effect evident on many models
of this genre. The ailerons were cut out on the lower wing and reposed
slightly deflected to give a more life-like appearance. The hinges were
restored with short strips of .005" card. The same was done for the
rudder and elevator. Normally I attach the lower wing to the fuselage
on a model like this before painting, as generally some filling and sanding
is required. While checking the fit of the lower wing to fuselage, I found
that the fit was so good that I decided to try painting the wing separately
before attaching it to the fuselage. This greatly eased masking and painting
of the model later on.
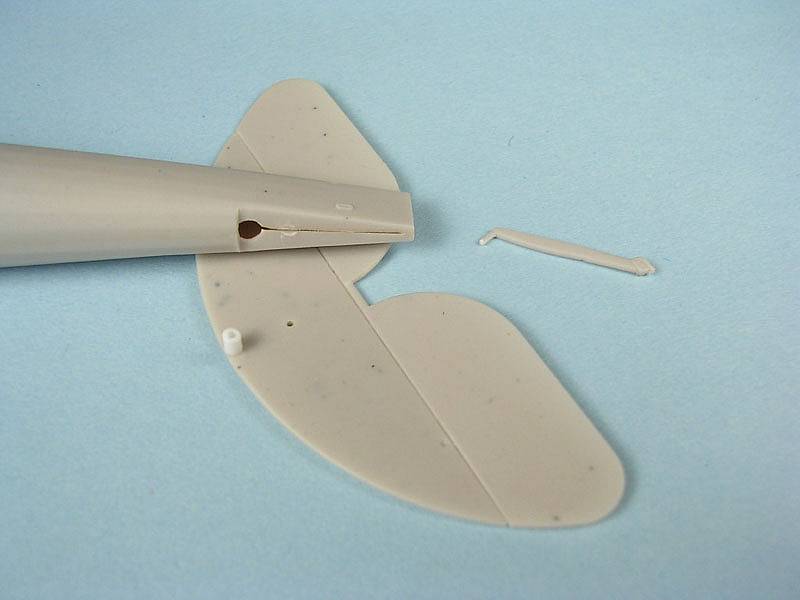
Back to the interior assembly, which was now inserted into the fuselage
as advertised. This fit snuggly and was secured in place with a few drops
of thin superglue. Ironically, very little of the 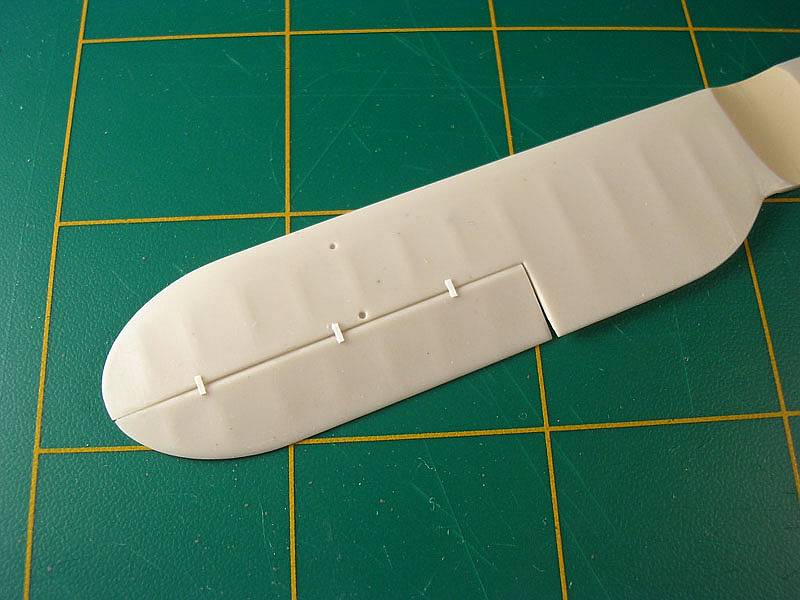 interior
can be seen through the very small cockpit opening. The firewall was then
cemented to the front of the fuselage, but only after about 3mm of the
forward end of each cockpit longeron was trimmed away. The horizontal
tail and elevator were installed after fabricating a mount for the tailskid.
This was accomplished with a short length of Evergreen rod, into which
was drilled a suitably sized hole for the tailskid. This was cemented
to the bottom of the horizontal tailfin, and went into an opening prepared
on the top of the fuselage. A little extra work, but well worth the effort.
Any seams and gaps were filled where necessary with a lick of Squadron
White putty, the excess removed with a cotton bud moistened with Cutex
nail polish remover, and lightly sanded. The finished engine assembly
was mounted to the front of the firewall. The rear cabane struts were
added at this time, making sure all was true and plumb by eye.
interior
can be seen through the very small cockpit opening. The firewall was then
cemented to the front of the fuselage, but only after about 3mm of the
forward end of each cockpit longeron was trimmed away. The horizontal
tail and elevator were installed after fabricating a mount for the tailskid.
This was accomplished with a short length of Evergreen rod, into which
was drilled a suitably sized hole for the tailskid. This was cemented
to the bottom of the horizontal tailfin, and went into an opening prepared
on the top of the fuselage. A little extra work, but well worth the effort.
Any seams and gaps were filled where necessary with a lick of Squadron
White putty, the excess removed with a cotton bud moistened with Cutex
nail polish remover, and lightly sanded. The finished engine assembly
was mounted to the front of the firewall. The rear cabane struts were
added at this time, making sure all was true and plumb by eye.
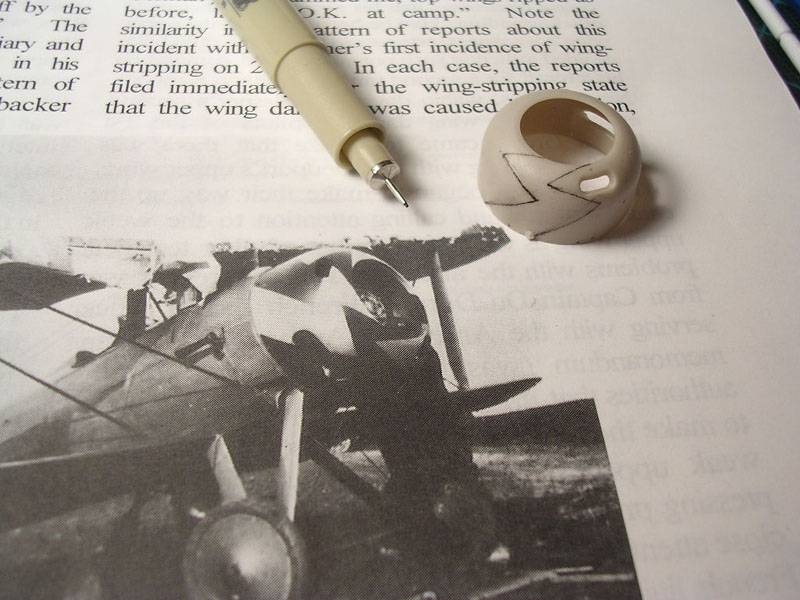
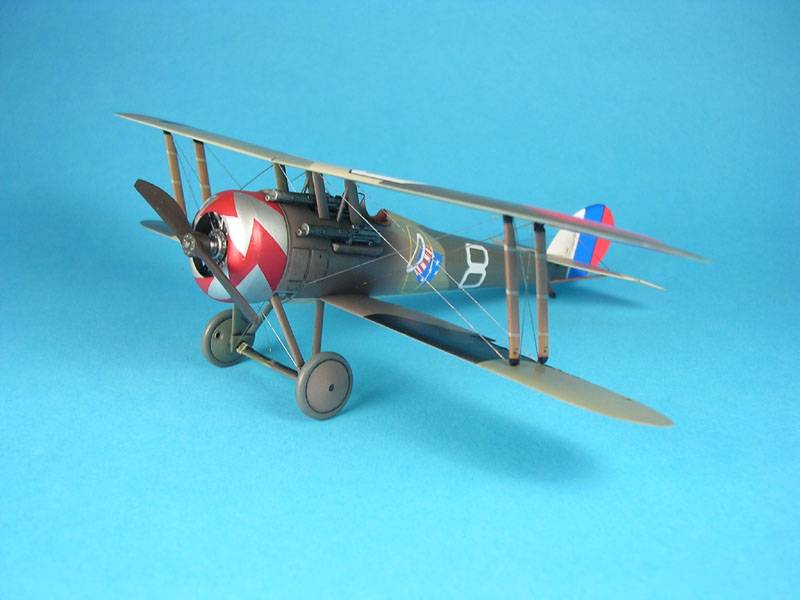
 The
next step was a bit of a puzzler, and that was how to replicate the lightning
bolt motif on the cowling of Meissner's aircraft. I figured it would be
better to have this sorted out before mounting the cowling, as this is
what I wanted to do next. After figuring out the geometry of the lightning
bolt design from studying photos of the original and from the NASM site,
I determined that there were eight alternating lightning bolts of red
and silver (Careful, the Roden instructions call for white and red, and
the lightning bolts go the wrong way). I first tried masking the bolts
with Tamiya tape, but this was unsuccessful because I could not get all
the bolts the same. Next I tried laying out the pattern on the cowl itself
with a technical pen. I then layed tape onto this and cut out the shape
with a sharp scalpel, using the marks I made as a guide. I removed the
resulting tape design and stuck it to a piece of .010" styrene card,
and cut this out to use as a template to make decals. This worked great!
Using this template, I made four identical lightning bolts out of clear
decal film. I painted the decal film Gunze flat red. I had my lightning
bolt decals for later, so now I glued the cowling onto the front of the
fuselage. Now it was time to paint the exterior.
The
next step was a bit of a puzzler, and that was how to replicate the lightning
bolt motif on the cowling of Meissner's aircraft. I figured it would be
better to have this sorted out before mounting the cowling, as this is
what I wanted to do next. After figuring out the geometry of the lightning
bolt design from studying photos of the original and from the NASM site,
I determined that there were eight alternating lightning bolts of red
and silver (Careful, the Roden instructions call for white and red, and
the lightning bolts go the wrong way). I first tried masking the bolts
with Tamiya tape, but this was unsuccessful because I could not get all
the bolts the same. Next I tried laying out the pattern on the cowl itself
with a technical pen. I then layed tape onto this and cut out the shape
with a sharp scalpel, using the marks I made as a guide. I removed the
resulting tape design and stuck it to a piece of .010" styrene card,
and cut this out to use as a template to make decals. This worked great!
Using this template, I made four identical lightning bolts out of clear
decal film. I painted the decal film Gunze flat red. I had my lightning
bolt decals for later, so now I glued the cowling onto the front of the
fuselage. Now it was time to paint the exterior.
Exterior Finish and Decals
 Nothing
beats the French four and five-color camouflages schemes for variety,
attractiveness and, well, color! I have always found the French five-color
scheme difficult to pull off, because I have found it hard to find paints
that match close to the colors outlined by various sources. Add to this
the fact that the discussion of French colors is contentious at best,
and that shades differed whether painted on fabric or metal surfaces.
It is like the PC10 debate, multiplied five-fold (six, if you include
clear doped linen!). Therefore a discussion about the accuracy of French
colors is beyond the scope of this article.
Nothing
beats the French four and five-color camouflages schemes for variety,
attractiveness and, well, color! I have always found the French five-color
scheme difficult to pull off, because I have found it hard to find paints
that match close to the colors outlined by various sources. Add to this
the fact that the discussion of French colors is contentious at best,
and that shades differed whether painted on fabric or metal surfaces.
It is like the PC10 debate, multiplied five-fold (six, if you include
clear doped linen!). Therefore a discussion about the accuracy of French
colors is beyond the scope of this article.
For this build I decided to try the line of acrylic paints by Misterkit of Italy, obtained from Aeroclub in the UK. Among the many WWI colors produced by this company are about a dozen or so French WWI colors, among which are those for the five-color camouflage. In every case the paint has a somewhat creamy consistency, and brushes well out of the bottle to a smooth, opaque finish. The paint airbrushes well also, which I will get back to later. I cannot comment on the accuracy of the colors, but together they look convincing enough.
 Here
a few words on spraying acrylics with an airbrush are in order. In the
past with other brands of acrylic paint, I found that there was an overall
tendency for the paint to lack adhesion to plastics and to wear off easily
during handling. Masking was a tenuous affair, often resulting in the
underlying colors peeling off in great shards with the tape. Acrylics
often do not spray well, clogging the tip causing stoppages, or worse,
shooting out gobs of coagulated paint. At some point I stumbled across
the idea of mixing in a certain amount of clear varnish to fortify the
paint and improve the flow. Whether I read this or heard about it from
someone, I cannot remember. I began adding Future (Also marketed as Kleer,
Klir, among others) clear acrylic floor wax into the paint mixture for
spraying. The results were immediate and dramatic. The addition of Future
improves flow, prevents clogging, and enhances adhesion and strength.
As the paint dries, it shrinks, thereby conforming closely to surrounding
detail. When mixed with matte colors, the paint tends to dry gloss or
semigloss, making decal application easier. The addition of the clear
medium also makes the paint somewhat transparent, allowing for special
effects such as post- and pre-shading. The amount added depends on the
effect you want. For painting colors such as camouflage I add about 10%-20%
Future to the paint. Needless to say, all the Misterkit colors and others
sprayed on this model were "fortified" with Future in this way.
An Aztec 470 airbrush was used throughout, air pressure 20-30 p.s.i.
Here
a few words on spraying acrylics with an airbrush are in order. In the
past with other brands of acrylic paint, I found that there was an overall
tendency for the paint to lack adhesion to plastics and to wear off easily
during handling. Masking was a tenuous affair, often resulting in the
underlying colors peeling off in great shards with the tape. Acrylics
often do not spray well, clogging the tip causing stoppages, or worse,
shooting out gobs of coagulated paint. At some point I stumbled across
the idea of mixing in a certain amount of clear varnish to fortify the
paint and improve the flow. Whether I read this or heard about it from
someone, I cannot remember. I began adding Future (Also marketed as Kleer,
Klir, among others) clear acrylic floor wax into the paint mixture for
spraying. The results were immediate and dramatic. The addition of Future
improves flow, prevents clogging, and enhances adhesion and strength.
As the paint dries, it shrinks, thereby conforming closely to surrounding
detail. When mixed with matte colors, the paint tends to dry gloss or
semigloss, making decal application easier. The addition of the clear
medium also makes the paint somewhat transparent, allowing for special
effects such as post- and pre-shading. The amount added depends on the
effect you want. For painting colors such as camouflage I add about 10%-20%
Future to the paint. Needless to say, all the Misterkit colors and others
sprayed on this model were "fortified" with Future in this way.
An Aztec 470 airbrush was used throughout, air pressure 20-30 p.s.i.
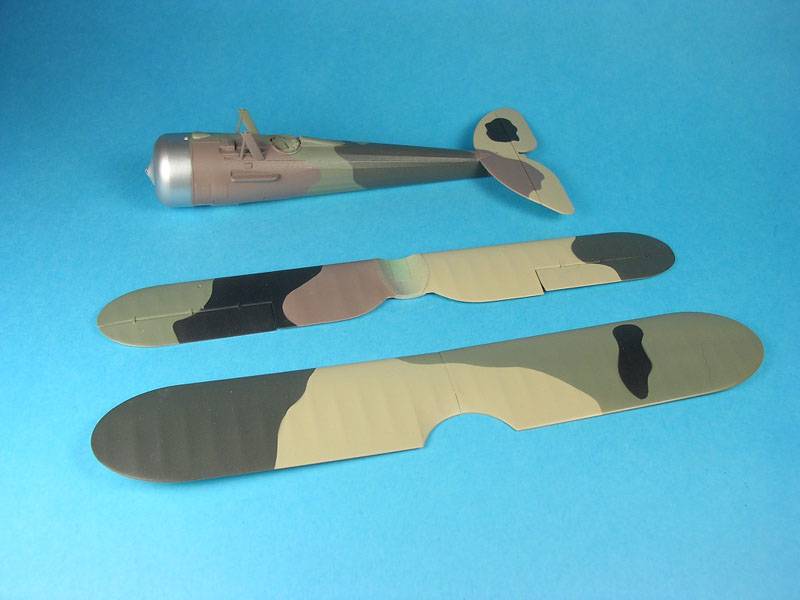 Back
to the model, all assembled components were gathered and remaining parts
prepared for painting by removing them from the sprues and cleaning up
seam lines and so forth. Parts were mounted on toothpicks or held with
suitable holders for painting. The colors were sprayed initially in the
order Beige, Light Green, Dark Green, Chocolate Brown, Black (Gunze) and
French Clear Doped Linen, with at least two hours drying time allowed
between colors. Masking was accomplished for the most part with Tamiya
tape and KleenEdge brand low tack painter's tape, produced by DCP-Lohja
Inc., the patterns cut out with a swivel knife. The patterns on the Roden
instruction sheet and on Bob Pearson's excellent CD were used as a guide.
Finally the fin and rudder were sprayed Gunze Flat White and the cowling
was sprayed with Citadel Mithril Silver, a very fine-grained acrylic metallic
resembling aluminum.
Back
to the model, all assembled components were gathered and remaining parts
prepared for painting by removing them from the sprues and cleaning up
seam lines and so forth. Parts were mounted on toothpicks or held with
suitable holders for painting. The colors were sprayed initially in the
order Beige, Light Green, Dark Green, Chocolate Brown, Black (Gunze) and
French Clear Doped Linen, with at least two hours drying time allowed
between colors. Masking was accomplished for the most part with Tamiya
tape and KleenEdge brand low tack painter's tape, produced by DCP-Lohja
Inc., the patterns cut out with a swivel knife. The patterns on the Roden
instruction sheet and on Bob Pearson's excellent CD were used as a guide.
Finally the fin and rudder were sprayed Gunze Flat White and the cowling
was sprayed with Citadel Mithril Silver, a very fine-grained acrylic metallic
resembling aluminum.
The wing interplane struts were painted Gunze H85 Sail Color, and then
given a wood grain treatment with a streaky application  of
Testors Modelmaster Burnt Sienna enamel. I thought the tapes on the struts
were too heavy in relief, so these were sanded down and replaced with
thin strips of decal film painted Sail Color. The strut end fittings were
painted black. The cabane struts are the same color as the camouflage,
as these are actually metal fairings on the real aircraft. The tail skid
was painted in the same manner as the interplane struts. The tires were
painted PollyScale Ocean Grey. The propeller was sprayed with Testors
Acryl Raw Umber, with the thrust plate painted Citadel Boltgun Metal.
The machine guns have excellent detail, and were painted with Boltgun
Metal and a wash of flat black enamel.
of
Testors Modelmaster Burnt Sienna enamel. I thought the tapes on the struts
were too heavy in relief, so these were sanded down and replaced with
thin strips of decal film painted Sail Color. The strut end fittings were
painted black. The cabane struts are the same color as the camouflage,
as these are actually metal fairings on the real aircraft. The tail skid
was painted in the same manner as the interplane struts. The tires were
painted PollyScale Ocean Grey. The propeller was sprayed with Testors
Acryl Raw Umber, with the thrust plate painted Citadel Boltgun Metal.
The machine guns have excellent detail, and were painted with Boltgun
Metal and a wash of flat black enamel.
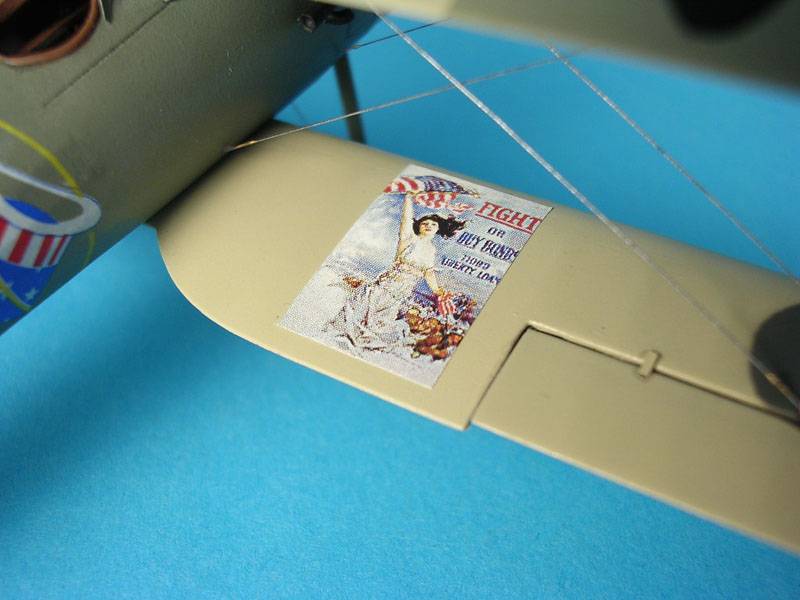
The kit decals were used, and this is where the kit suffers. Many are
out of register, especially the black trim on the white numbers. Some
of the colors have a visible overlap, such as where the blue 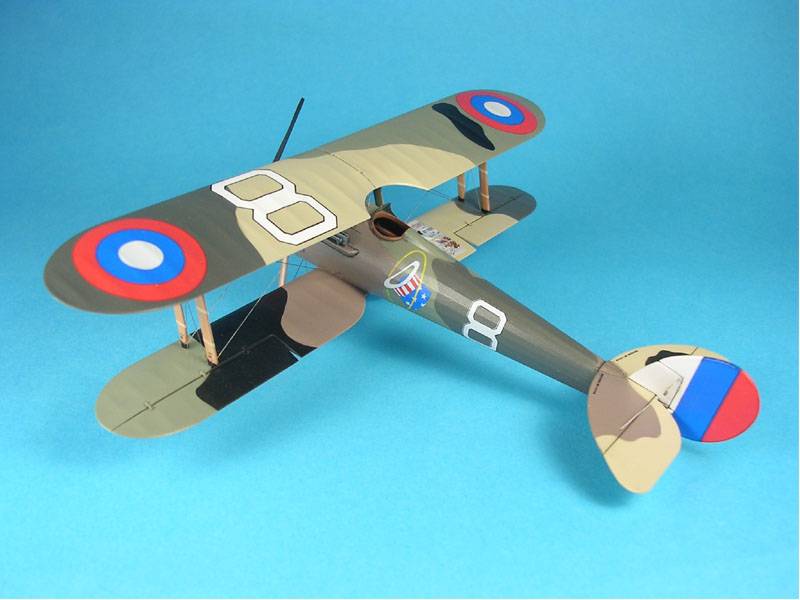 and
red meet on the roundels and the fin flash. The "Hat in the Ring"
insignia is too big by far. The ring needs to be reduced in height. I
managed to accomplish this by cutting the decal on each side into three
parts, consisting of the hat and lower part of the ring, and the top of
the ring cut in two. About 2mm were trimmed off of the ring where it meets
up with the hat and all was realigned. This turned out well, fortunately,
because I had no aftermarket replacements. The white of the numbers was
somewhat transparent, so I doubled up the large number "8" on
the top wing, as I had another set of decals from a spare kit. The fin
flash was troublesome, the decal crumbling around the edge of the rudder.
This was touched up with some Gunze Flat Red and Testors Acryl French
Blue, which matched up fairly closely. Future was used again, this time
as a setting solution, and very little silvering resulted. Any such areas
were soaked with a generous helping of Walther's Solvaset. The homemade
lightning bolt decals were applied with little trouble and touched up
where necessary with Gunze red paint.
and
red meet on the roundels and the fin flash. The "Hat in the Ring"
insignia is too big by far. The ring needs to be reduced in height. I
managed to accomplish this by cutting the decal on each side into three
parts, consisting of the hat and lower part of the ring, and the top of
the ring cut in two. About 2mm were trimmed off of the ring where it meets
up with the hat and all was realigned. This turned out well, fortunately,
because I had no aftermarket replacements. The white of the numbers was
somewhat transparent, so I doubled up the large number "8" on
the top wing, as I had another set of decals from a spare kit. The fin
flash was troublesome, the decal crumbling around the edge of the rudder.
This was touched up with some Gunze Flat Red and Testors Acryl French
Blue, which matched up fairly closely. Future was used again, this time
as a setting solution, and very little silvering resulted. Any such areas
were soaked with a generous helping of Walther's Solvaset. The homemade
lightning bolt decals were applied with little trouble and touched up
where necessary with Gunze red paint.
A light wash of Raw Umber enamel was applied to the panel lines and recessed
areas. All the sub assemblies were then sprayed with Testors Acryl SemiGloss.
Final Assembly and Rigging
 After
everything was painted, final assembly proceeded fairly rapidly. The lower
wing went on to the fuselage and fit very well. A few paint strokes with
a brush touched up the joint, disguising it as a panel line. Next the
fin and rudder went on, followed by the machine guns. The landing gear
is well thought out by Roden much to their credit, as the split axle is
there, which is often missed by other manufacturers. The landing gear
struts went on next with the spreader bar, everything was just dry fitted
in place then fixed with Tamiya Extra Thin Cement and thin superglue.
After
everything was painted, final assembly proceeded fairly rapidly. The lower
wing went on to the fuselage and fit very well. A few paint strokes with
a brush touched up the joint, disguising it as a panel line. Next the
fin and rudder went on, followed by the machine guns. The landing gear
is well thought out by Roden much to their credit, as the split axle is
there, which is often missed by other manufacturers. The landing gear
struts went on next with the spreader bar, everything was just dry fitted
in place then fixed with Tamiya Extra Thin Cement and thin superglue.
The top wing went on with very little fuss. The locating holes for the interplane and cabane struts had to be drilled out with a #69 twist drill. Tamiya Extra Thin cement was used to glue the interplane struts to the lower wing. When these were dry enough, the top wing was mounted using the rear cabane struts as a datum, and again using Tamiya Extra Thin cement. No jig or fixture was required. A few drops of thin superglue then froze everything in place. The front cabanes were then added. These could actually have been installed beforehand, as everything lined up perfectly, which would have made mounting the top wing even easier.
 Rigging
was accomplished with heat stretched sprue, painted Citadel Boltgun Metal
by running the stretched sprue between my fingers wet with paint. A pair
of dividers was used to measure the lengths, and each was attached with
white carpenter's glue. Any slack lines were tightened with a glowing
matchstick held close by. Turnbuckles were simulated in appropriate locations
with thick Testors PLA Gold enamel paint from the small square bottle,
applied with a small brush. Other fittings such as the oil cap and the
small cap on the prop thrust plate were picked out in gold as well, which
closely resembles weathered brass to my eye.
Rigging
was accomplished with heat stretched sprue, painted Citadel Boltgun Metal
by running the stretched sprue between my fingers wet with paint. A pair
of dividers was used to measure the lengths, and each was attached with
white carpenter's glue. Any slack lines were tightened with a glowing
matchstick held close by. Turnbuckles were simulated in appropriate locations
with thick Testors PLA Gold enamel paint from the small square bottle,
applied with a small brush. Other fittings such as the oil cap and the
small cap on the prop thrust plate were picked out in gold as well, which
closely resembles weathered brass to my eye.
The small windshield was carefully cut out from the acetate sheet with
a sharp scalpel, lightly scored and bent before being painted and attached
with white glue. The propeller, wheels and tailskid were glued on, and
the model was complete.
Conclusion
 Roden
continues to be the rising star with this latest release. This is an excellent
model. While some of the smaller parts are quite fiddly the fit overall
is good and the model builds up very quickly and easily. The vast majority
of time on this build was spent painting and decaling. The attention to
detail is outstanding, the engine and the guns being miniatures in their
own right. The kit decals are poor, which is a shortcoming the manufacturer
is well aware of. Go with aftermarket if you can find them. Americal Gryphon
makes USAS roundels and there are some Lonestar sheets floating around
as well. The kit would also benefit from a photoetch peach basket seat
and seatbelts. This would be a good kit for the first-time biplane builder.
Roden
continues to be the rising star with this latest release. This is an excellent
model. While some of the smaller parts are quite fiddly the fit overall
is good and the model builds up very quickly and easily. The vast majority
of time on this build was spent painting and decaling. The attention to
detail is outstanding, the engine and the guns being miniatures in their
own right. The kit decals are poor, which is a shortcoming the manufacturer
is well aware of. Go with aftermarket if you can find them. Americal Gryphon
makes USAS roundels and there are some Lonestar sheets floating around
as well. The kit would also benefit from a photoetch peach basket seat
and seatbelts. This would be a good kit for the first-time biplane builder.
Highly Recommended.
 Special
thanks to Roden for supplying
the model, and to Matt Bittner for allowing me the chance to build this
fine kit. Also thanks to my brush-wielding Nieuport 28 building colleague
Ken Schmitt, and to the many good folks on the WWI Modellers Forum and
the Aerodrome Forum, where several of the ideas to improve this kit originated.
Special
thanks to Roden for supplying
the model, and to Matt Bittner for allowing me the chance to build this
fine kit. Also thanks to my brush-wielding Nieuport 28 building colleague
Ken Schmitt, and to the many good folks on the WWI Modellers Forum and
the Aerodrome Forum, where several of the ideas to improve this kit originated.
References
Nieuport 28, Broken Wings in the Pursuit Group, Bert Frandsen, WWI Aero Magazine, August 1999
Nieuport Fighters in Action, Peter Cooksley, Squadron Signal, 1997
Nieuport Aces of WWI, Norman Franks, Osprey Publishing, 2000
 The
Smithsonian National Air and Space Museum Website,
The
Smithsonian National Air and Space Museum Website,
https://www.nasm.si.edu/museum/garber/nieuport/nieuport.htm
https://www.nasm.si.edu/research/aero/aircraft/nieuport.htm
Colours & Markings of the World's Air Forces, CD, Bob Pearson, 2000