Modelart By Marco 1/48 Savoia Pomilio SP.3
|
 |
History.
There¹s no history of this type included in the kit. What I know of
it comes from the Windsock article cited later. The SP.3 was an Italian
pusher type developed from the (suprise!) SP.2. The wingspan was shortened
to improve manoeuvrability, giving only three bays in place of four. Introduced
in early 1917, it was designed as a reconnaissance and artillery observation
machine, powered by a Fiat 240 hp A12 engine and armed solely with a Fiat-Revelli
machine gun. It seems to have been reasonably successful and popular with
its crews, and also saw some (desperate) use for the strafing of ground
forces. I doubt anyone would have gone up in one in preference to an FK8,
or even an RE8, but the Italians didn¹t have that choice. In short it
was one of those unsung workhorses that did vital work for little glory,
and like the largely forgotten folk who flew and sometimes died in it,
shouldn't be forgotten. This kit, with a little effort, helps to do that
in some measure.
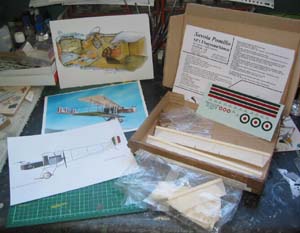
The Kit.
The stout top-opening box (looks like the sort Aeroclub use) reveals
three very nice pieces of A4 artwork before you get to the kit proper,
namely a painting by Robert Karr, a profile by Bob Pearson, and a coloured
cutaway by Diego Fernetti. These are all very well executed and will contribute
vastly to converting the kit into a model. They¹re also nice pictures
in their own right. In addition there¹s a double sided A5 and single sided
A4 sheet with assembly diagrams, a few painting and detail notes, references,
and a rough sketch giving true size templates for all the items needing
fabricating, such as some struts. For rigging and colour schemes you are
referred to the aforementioned artwork, and the article by Alberto Casirati
in Windsock vol. 19, no.3 (there are 1/72nd plans there by Marty Digmayer
which will be essential for the build).
But enough of the paperwork, what about the juicy resiny stuff? Well,
plenty of it. There¹re some 40 parts in a creamish coloured, shiny textured
resin. I¹ve cleaned up the flash on some parts and it¹s quite soft but
workable. Only four large airbubbles that I can see (two in the lower
wing, two in the nacelle, 3mm each but placed to be easily filled). The
wings come separately on two substantial leading edge pour blocks that
serve to prevent any in-box warping. In a plastic envelope you find the
rest of the resin the other flying surfaces on leading edge pour blocks,
three detail parts on a very thin wafer, 21 parts such as wheels on six
very thick wafers (3mm, which will take some elbow grease to remove) and
the rest separate with pour blocks already removed. I think there's a
small panel missing from the thin wafer, probably present as dust in the
bag, but should be easy to scratch a replacement since there should be
two of them and I can use one as a pattern).
That¹s not all, though. two further bags hold 12 nicely cast white
metal pieces: axles, undercarriage strut/skid assemblies, control wheel
assembly, Fiat Revelli m/g, gun mount, top radiator pipe, and fore and
aft one-piece assemblies each consisting of the nacelle to wing cabanes,
with the cross-bracing struts cast in place. If they fit okay they should
ease main assembly a lot. And (large fanfare) two really nice boom and
strut assemblies, complete with tail skids. They may be slightly overscale,
but I think they¹re good enough to use, and certainly a much better solution
than resin.
There are also two pieces of clear acetate for windows and windshield,
two sections of Contrail-type extruded plastic strut for the interplane
struts, and a length of rod (can¹t tell yet if it¹s resin or plastic)
for sundry items to be scratched.
The decal sheet has plentiful marking for two subjects and looks to
be printed well, in register, and thin. Personally I think the green is
too dark but that¹s a simple matter to fix.
A few comments on the components. The resin parts are well executed,
including a really nice engine, needing only light de-flashing and removal
of four small resin spheres that have collected in awkward places. The
main nacelle parts and engine clip together with no problem, but a bit
of filling will be needed. The interior structure has failed to cast properly
in a couple of places but should be easily repaired with sprue and plastic
strip. Strangely, while the inside of the nacelle looks okay, the underside
is slightly misaligned to give a 1mm step. Presumably a three part mold.
It¹s not a big problem since a flat skin of 5 thou card should fix it.
There is one large grey area however. Just as the 1/72nd version reviewed
by Pedro Soares in Windsock vol. 21, no.1, and previewed
here, the wings could be better. They¹re a bit better than what Pedro
describes, and the undersides may be okay with just a light sand and a
few coats of paint. But the top surfaces have rib tapes that, although
straight, are of variable thickness (about half of them) and they sometimes
fade out completely (3 or 4 of them) I¹ll have a go at removing and replacing
them. The wavy surface Pedro noted doesn¹t occur in this case I¹m happy
to say. The tailplane and elevator are similar, but not so bad and I may
get away with just sanding them a bit to de-emphasise the ribs. The fin/rudder
pieces are okay, although one had been broken off it¹s pour block. Trailing
edges on all horizontal surfaces need a bit of thinning. It doesn¹t look
like much work but that¹ll depend on how the resin used takes to sanding.
I¹ll let you know when I get there.
In general, all the fine parts are usable with minimal clean up, the
only doubt being the thickness of the wafers holding the wheels and bits.
Actually these are not the usual wafers with parts embedded, they look
more like thick vacformed sheets with the parts sitting on the surface.
I¹ll try treating them the same, i.e. outlining with grey paint or a marker
pen, then sanding off the excess.
The white metal is all fairly cleanly cast with no pitting and little
flash to remove. Some parts that didn¹t work well in 1/72nd have been
transferred to this medium. The control wheel is still a bit dubious-I
think I need to replace the spokes. The machine gun is a good basic casting
with few details, but very crisp. The booms are definitely a good move.
Conclusion
At the time of writing I still have to scale up the Windsock plans
to 1/48th before checking pedantically, but compared to the photos in
the referenced articles the supplied components look the part. What comes
in the box should allow you to build a convincing replica of a pleasingly
weird aeroplane without too much effort, considering this is a biplane
and a boomer to boot. Rigging the sucker may be another matter. Anyhow,
it looks like it should be fun to build, which is what I am about to do.
Stay tuned
|
|


