Crown 1/144th SF-37 Viggen
|
 |
Background
 The
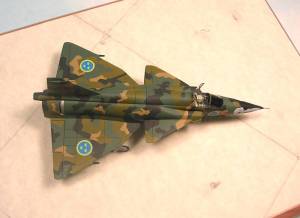
aircraft is an SF-37 Viggen, which is the photo-recon version where SF
stands for "Spanning Foto" in Swedish, meaning "Recce Photo".
The aircraft depicted belongs to the 1st squadron of the F21 Wing in Luleå,
up in the far north of Sweden, and the call sign for that division is
Urban Röd (Urban Red), that's why you have the letter U; the 21st
letter of the alphabet (F21 Wing) and the red color is for the 1st squadron
(blue for 2nd and yellow for 3rd) in the squadron emblem. The text Akktu
Stakki means "Lone Wolf" in saami language. The logo was painted
on the vertical stabilizer. Barely visible in 1/144 scale. The
aircraft is an SF-37 Viggen, which is the photo-recon version where SF
stands for "Spanning Foto" in Swedish, meaning "Recce Photo".
The aircraft depicted belongs to the 1st squadron of the F21 Wing in Luleå,
up in the far north of Sweden, and the call sign for that division is
Urban Röd (Urban Red), that's why you have the letter U; the 21st
letter of the alphabet (F21 Wing) and the red color is for the 1st squadron
(blue for 2nd and yellow for 3rd) in the squadron emblem. The text Akktu
Stakki means "Lone Wolf" in saami language. The logo was painted
on the vertical stabilizer. Barely visible in 1/144 scale.
Nose art was applied for the Viggen Photocall ceremony on April 6-7,
2005, before being replaced by JAS-39 Gripens. The nose art came off during
ceremonial flight.
I was inspired to build this subject, since it’s rare to see splinter
camouflaged Viggen with nose art.
Construction
I used the old Crown kit for this project. Basic shape is reasonable
and the fact it’s the only kit available in 1/144 scale.
First I opened the jet thrust redirection vents by thinning the inner
fuselage areas. Then using the back of a number 11 Xacto blade, started
scribing until the vent was open.
Next, I constructed a jet thrust redirection shield. I started out with
a 1/144 B-17 engine cowling. I filled the cowling opening edges away until
I reached the prop shaft hole. I attached styrene strips to accent the
three clam shells of the closed shield. Then painted the shield with Gunze
acrylic gun metal.
|
 |
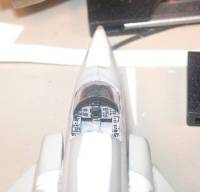
Detailing the cockpit was the next task. I used a piece of sheet styrene
for the floor and added smaller pieces with angled edges for the side
instrument panels. Next I made the main instrument panel out sheet styrene.
I painted in the instrument gauges and added a piece of photo etched bezel
for center console screen. I cut a piece of square styrene rod and used
it as part of the gun sight. The instrument panel shroud was a fun task.
Cut a piece of paper thin styrene sheet, larger than the area where the
shroud should be located to allow for curved surface. Then, trimmed to
fit, while retaining a curved surface. Then I glued into place with super
glue. I added ejection guide rails and various details to the rear bulkhead.
The ejection seat was constructed from various, tiny blocks and strips
of styrene. I made a new “Heat-n-Smash” canopy using original
canopy as the master. I heated clear styrene over low heat, then smashed
over the master. I used Squadron vacuform materials for the canopy. I
attached the windscreen with white glue and after drying applied super
glue to anchor permanently.
 |
 |
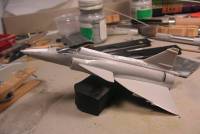
Next, was modifying the nose. I applied strips and chunks of styrene
to the nose using super glue. Then I started filing and sanding to the
correct shape. I used a clear styrene piece for the forward camera lense.
I drilled a shallow hole in the clear piece without going all the way
thru. Painted the hole silver and then painted remaining areas black.
Then I applied glue to the painted side of the lens, attached to the nose
and filed and sanded to match all surfaces. Using a template, I scribed
two camera lenses on the bottom of the nose.
I noticed the spine was missing the distinctive hump. I glued thin layers
of styrene and then filed and sanded until all edges are a smooth match.
I repeated the process because I underestimated the height of the hump.
 I
test fitted the canards and noticed the deflection angle was too steep
in this scale. I filled in the insert holes with styrene and super glue
and created a new insert hole and clipped the canard tabs until there
was narrow rod. The insert rod allows me to reduce the deflection angle. I
test fitted the canards and noticed the deflection angle was too steep
in this scale. I filled in the insert holes with styrene and super glue
and created a new insert hole and clipped the canard tabs until there
was narrow rod. The insert rod allows me to reduce the deflection angle.
 Next,
I extended the outer wing leading edges with styrene strips and used styrene
rods for leading edge probes. Also added outer hard points. Next,
I extended the outer wing leading edges with styrene strips and used styrene
rods for leading edge probes. Also added outer hard points.
 The
kit wheels looked too plain and I replaced them with DML 1/144 F/A-18
wheels. The nose wheels where perfect but the main wheels were too thick.
I reduced the thickness with a file and re-scribed backside detail and
sanded tire areas smooth. I also added scissors to all landing gear using
styrene and electronic wire. The
kit wheels looked too plain and I replaced them with DML 1/144 F/A-18
wheels. The nose wheels where perfect but the main wheels were too thick.
I reduced the thickness with a file and re-scribed backside detail and
sanded tire areas smooth. I also added scissors to all landing gear using
styrene and electronic wire.
All raised panel lines were replaced with scribed panel lines. I used
Duplo tape as a guide for the back edge of a number 11 Xacto blade.
Painting and Decals
I found an old Fine Scale article detailing how to accomplish the dreaded
splinter camouflage. I reduced the article’s camouflage diagram
to 1/144 scale and used it as guide for masking each color. There are
four upper surface colors. I sprayed the first color, then applied masking.
I repeated this process for the other colors. The key is restraining myself
from applying a thick coat of paint, which will cause thick edges after
removing masking tape. I used the following paints:
Polly Scale |
Tamiya |
| US Med Green mixed with 1% white |
Sky Grey |
| German RLM 67 Dark Olive green |
Desert Yellow |
| Black mixed 1% US Med Green |
Clear Gloss |
| Light Ghost Grey |
|
| Grimy Black |
|
| Clear Flat |
|
As for the markings, they were custom made Alps decals produced by my
good friend Mark Tutton. If
anyone is interested, Mark can reproduce the decals any scale.
|
|


