Cheap, Simple, Portable Vacu-forming Rig
|
|
INTRO
Some years ago, a friend of mine was helping a buddy remodel a Chinese
restaurant. The owner asked that a long countertop be shortened. The head
worker looked it over and thought doing so would be unsafe, so he told
the owner it couldn’t be done. The owner couldn’t see why
not: it seemed simple enough to him. He replied, “Take saw; cut
here”.
I think that if you’re determined to give something a good solid
try, the battle is already half won. Giving up before you’ve even
started, is the only sure way to lose.
I say that as a guy who was “chicken of” vacu-forming my
own parts, for far too many years. Several things conspired to keep me
from even trying. One was the machinery I’d have to build: it always
sounded like too much could go wrong. If it wasn’t that then it
was, “They must be leaving a lot out: it can’t really be that
simple”. Also, I wasn’t in any hurry to waste boatloads of
sheet plastic, while learning. And no one likes feeling dumb, after failing
many times.
Sound familiar? Hopefully, not for much longer.
THE LEARNING PROCESS
To misquote the restaurant owner, the main rules of the vacu-forming
process are as simple as this: “Take plastic; heat it; turn vacuum
machine on; put plastic on machine”.
It boils down to just five variables -- a heat source; a vacuum source;
plastic sheets (of a type made for this sort of work – but the ones
sold in hobby shops will be: so no worries there); and a form or shape
you wish to duplicate.
The fifth major variable is practice. With that you can gain both practical
knowledge and increasing confidence. And early “mold form testing”
can be done for free, with a plastic bag: instead of wasting expensive
sheet plastic.
Each of those four main steps has several sub-steps or things you should
know something about -- but none of them are all that difficult. The laws
of physics aren’t going to arbitrarily change, just because you’re
vacu-forming.
I’m convinced average folks could build the very simple vacuum
machine I’ll describe, in one evening, using common hand tools.
After that, if a person were to make one fair attempt per evening, at
making one “real” part; and then thought about what did or
did not work out very well, on that particular attempt, over the next
day ... and then repeated those experimental steps the next day ... I
think that person would have very pleasing results in one week, and they’d
no longer be intimidated by the process.
I took that a step farther: I tried to “re-work” each of
the parts I made, which weren’t quite perfect. I messed the already-bad
parts up, even worse, in the process ... but it didn’t matter. I
learned a lot from trying to fix what had gone wrong. Each new thing I
learned was applied to my next attempt to vacu-form real parts. And my
results improved.
HEAT SOURCES
I’ll mostly talk about the vacuum machine I made, in this article.
Suffice it to say I’m experimenting with open flames - partly because
I like the idea of “portable” scale modeling. (But “Safety
First,” folks! Use common sense!)
Many of you will no doubt want to stick to trying what’s been
proven to work, time and again: a kitchen oven. Be sure to check out the
nice, brief tutorial on the WarmPlastic.com
web site, to get an idea of how “normal people” do things.
VACUUM SOURCE CONSIDERATIONS
Let’s discuss the vacuum-related machinery. What is it really
doing? What basic purpose do those tools serve?
What’s really going on is that you’re creating a small
difference in air pressure, above and below a warm plastic sheet. It isn’t
that you’re suctioning air out of under your plastic sheet, so much
as you’re allowing the weight of the air above that sheet, to push
it onto a form.
Even a difference of one PSI will potentially allow work. Any air that
remains below the sheet tends to create a balance. We want an imbalance.
Put another way -- any air that remains below the sheet will fight the
air above it.
So the more air you can get rid of, the better things work. Speed is
a factor, too: your plastic begins to cool as soon as you remove it from
your source of heat. When you place it in contact with a mold form, some
of the heat is absorbed into that form: rapidly cooling the sheet.
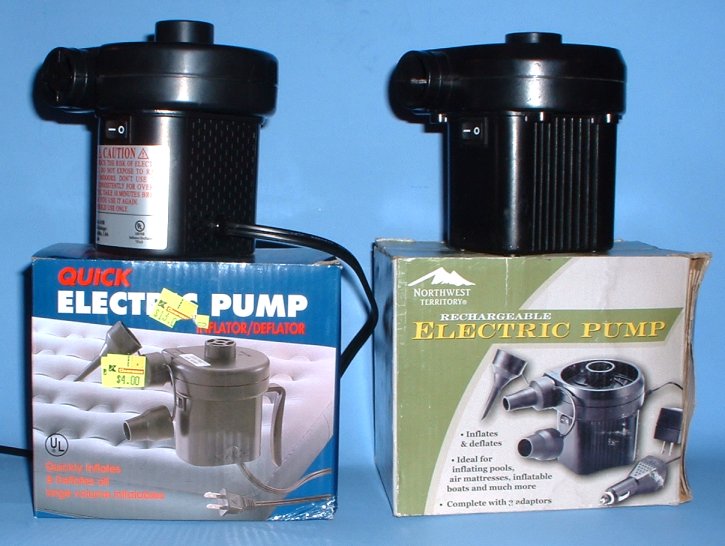
AN UNUSUAL VACUUM SOURCE
Most articles suggest a wall-socket-powered, household vacuum cleaner
as your system’s source of vacuum. I suggest something quite different:
a small, inexpensive, sometimes even just-battery-powered device. It’s
stated purpose? To rapidly inflate or deflate things like air mattresses.
The packaging will say these are low-pressure devices. Measurements
with a vacuum tune-up gauge told me my pair have one third of the negative
pressure you’d get out of a common vacuum cleaner. That doesn’t
sound very impressive. What is impressive, however, is seeing how quickly
one of these little deflators can suck all the air out of a large, inflatable
air mattress. Just minutes, to empty out many cubic feet of air. It’s
low pressure ... but high volume.
Pressure isn’t a measurement of work being done; it’s only
a measure of potential work. Push as hard as you can against a brick wall:
lots of pressure, but no work being done. Volume indicates that work is
actually being done.
Initial suction tests proved to me that pressure alone isn’t everything.
A thin shopping bag pulled down not only very quickly and tightly, but
with an audible snap. Even a thicker bag (gallon Zip-Lock) snugged down
firmly.
SIDE BENEFITS
One nifty thing about using a deflator is that you don’t have
to worry about building a fancy vacuum box; or trying to get correctly-sized
hose adapters fitted and leak-free.
Cost and space savings are other benefits. These nifty little devices
are available at the usual discount stores (Kmart, etc.) for as little
as $10 USD, on up to about $22. Years ago, I paid $20-ish for one powered
by rechargeable internal batteries. It came with an AC adapter (house
“wall wart”) and a car’s adapter. I recently bought
a second (wall-socket only) deflator for $4 USD at Kmart, brand new! Why
so low? Winter clearance sales, on summer-only items.
GENERAL DESIGN CONSIDERATIONS
A vacuum source, by itself, is not enough. You need some sort of tool
to control that pressure differential, and to put it to work. Let’s
break it down, functionally. What do we really need this tool to do? We
need three main things:
(1) Some sort of a flat working surface for our master part (positive)
or our “mold” (negative) to sit on. It has to be solid enough
to hold our molds firmly in place, while we drape warm plastic sheets
over them. However, air needs to be able to get through it: to remove
air from the space between the sheet of plastic, and what we might think
of as a “floor”. It also has to be able to withstand the heat
that our sheet of warm plastic will try to transfer to it, when the sheet
touches the floor. And the edges of the sheet must touch the working surface’s
floor, or an airtight seal will not be achieved, around the mold (which
sits in the center of that floor). If we don’t achieve an airtight
seal, no work can be done.
One common solution for this part of the tool is a flat piece of wood,
with many holes drilled in it.
(2) We need some way of connecting our vacuum source to that working
surface or “floor”. This is usually not an easy thing to do,
because the working surface tends to be a very different shape and size
than the connection from our vacuum source. We’re presumably going
to desire our custom device to sit, upright and unclamped, on a standard
horizontal workbench. That eliminates a bottom-inlet connector; which
as we’ll see in a moment, would maximize efficiency.
There is no easy solution to this, hence needing:
(3) Some sort of right-angle-adapter, for our vacuum source’s
adapter. One common solution to this problem is to introduce a relatively
large, box-like enclosure. The sides of this box will extend down, from
the working surface (the top); and must be as tall as needed, to be able
to plug in our vacuum source’s air intake -- through an adapter
placed on one side (not the bottom) of the boxy enclosure.
If you want to see two examples of the item described above, then check
out Michael Benolkin’s reviews of the “Kingston
Micro” or their “Canopy
Master” wooden boxes.
Granted, their solutions are very pleasing, cosmetically. I think my
solution is quite elegant, functionally ... and if I wasn’t freezing
/ rushed when I made my first test unit, and hadn’t used scrap plywood,
it could also be a looker.
SUPER-EASY ASSEMBLY
What I did was to simply take three pieces of 3/8” inch thick
plywood, and assign one of those functions to each of the three “slices”.
The upper surface has holes drilled into it. I also rounded the outer
edges, a bit -- to make it easier to self-align holding frames, as I lower
them.
The slice on the bottom just has one round hole in it: that’s
my dirt-simple adapter, for my vacuum source. The deflator’s air
intake simply sticks up through the hole. The rest of that slice rests
on top of the deflator’s flat upper side. One board; one hole; couldn’t
be much simpler!
The middle slice is my “incompatible size and shape” adapter,
between the other two slices. It’s just a big square hole, cut into
a single flat board. That means there is no need to cut perfect corners
/ edges on a set of four different side pieces; nor to make sure that
all four side pieces plus a top and a bottom, become totally airtight.
That one board with one hole serves as all four walls. Glue it in between
the top and bottom slices, and you’re done!
OTHER CONSIDERATIONS
Technically, that middle hole may be called a “plenum”
area. One hidden advantage to my type of vacuum enclosure is that the
plenum area is quite tiny. (It measures only 3.375 cubic inches.) A large
plenum will hold a lot of air -- and all of that air must be removed,
first, by our vacuum source. That’s not efficient. A small plenum
can be evacuated quickly, so the vacuum source can focus on its primary
job: removing air above the table, not below it.
A related bonus: no long hoses, connecting our vacuum source to our
custom enclosure. That’s another big, empty area that could potentially
be fighting our vacuum source.
Keep in mind that it’s inevitable that you “waste”
some plastic, with each part you’ll make -- since you have to be
able to hold a sheet in some sort of holding frame, and to have the edges
of the sheet self-seal to the table border.
To date I haven’t used any gasket materials, where the wooden
enclosure meets the deflator unit’s upper side. I’ve ignored
that so far: mostly to make it easier to take one top off, and drop another
one on, for design testing.
Now that the process no longer intimidates me, I can already imagine
it would be nice to have a working area of twice that size or greater,
for making the kinds of parts that tend to be longer than they are wide.
I’m toying with the idea of a much smaller working surface, too.
I’m even wondering if I can’t re-flatten and reuse scrap pieces.
Be sure to check out the download-able drawings I’ve included,
if you want to duplicate my test machine. What’s there is a slight
“shoulda done it this way” upgrade: the original bottom and
middle slices were swapped around.
HOW WELL DOES THIS DEVICE WORK?
On only my second-ever vacu-forming attempt, I pulled a 0.040”
inch thick plastic sheet down over something taller than it was wide;
and got results of about 85% of the shape I had tried to obtain. (Bottom
corners were soft: the mold form needed to be raised up more.) On attempt
number three I got almost perfectly usable results. That despite the mold
form having several sharp 90-degree-or-worse corners, and a few other
things you’re supposed to try to avoid.
No wimpy super-shallow mold forms here; no sir! And no super-thin plastic,
which easily forms over anything. No sissy tests for this kid! I test
stuff like I mean it!
(In case you’re wondering, the project seen here is a sleigh-like
custom car body, designed to fit on a Chuck Wagon kit’s chassis.
It’s based on a drawing Dave’s
Showrod Rally displays on holidays. Yes, I asked for permission.)
CONCLUSION
I’ve read many vacu-forming articles over the years. Most accidentally
gave me the impression that messing up was the norm, and making a usable
part on your first try has odds similar to winning the lottery without
buying a ticket. I finally understand why; and no longer worry.
It boils down to this: every new part you’re trying to make is
essentially a prototype. Even if you’ve vacu-formed parts often,
that particular part “master” or mold form is a prototype:
a first. There are bound to be a few bugs to work out, with anything brand
new. I no longer see a few bad parts, before I get one right, as failure.
(Early "mold form testing" can be done for free with a loose,
unheated plastic bag. Instead of wasting expensive sheet plastic, just
watch for where the bag wrinkles badly..) Shoot for a “C”
letter grade, on try number one. Learn. Accept what worked well. Try again;
shooting for a “B” grade. You may want to accept that “B”?
If not, then shoot for an “A”.
REFERENCES
If you want more info, be sure to check out the nifty little vacu-forming
book I review this month, or buy a copy of DVD
#7 in the CultTVman’s Fantastic Modeling series. They’re
both well worth the money; and it’s always nice to see what others
say about a technique.
I know of at least six articles by Fine Scale Modeler on the subject
of making vacu-formed machinery or parts. Check out their Mar/Apr 1985,
Aug 1986, Oct 1986, Mar 1998, May 2002, or Mar 2005 issues for a variety
of viewpoints.
Good luck! Have fun with your new toys and skills!
|
|