![]()
![]()
![]()
![]()
![]()
![]()
![]()
![]()
![]()
![]()
This site is best
viewed at 800x600
and 16 bit color.
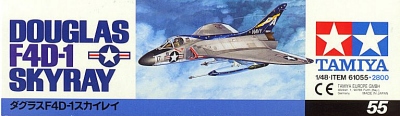 |  |
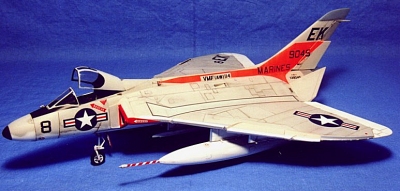
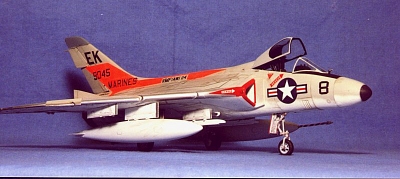
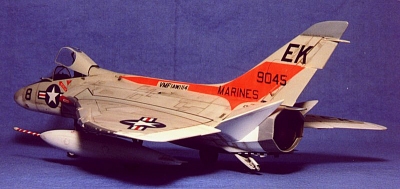
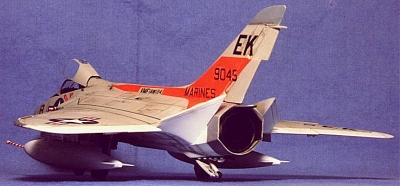
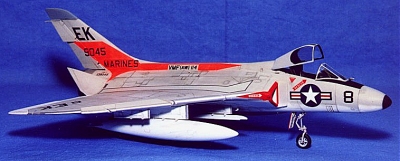
| 1/48 Tamiya F4D-1 Skyray by Will Riepl When someone says Ford, most people think of Henry and his products, but there are those few who know what a real Ford is. Back in the old days at El Toro I would watch these planes take off and it was a site to see. Ever since I've wanted to build one, but my only option was either the Allyn kit or the Lindbergh kit, both of which would suck years of life out of you. Well, Mr. Tamiya has come to the rescue with a little surprise: a beautiful 1/48 F4D-1 Skyray. The kit is typical Tamiya, which means excellent engineering, great detail, good fit, and fair decals. With a little care, and some careful following of directions, this kit can be a box shaker. The first step is to be sure to follow the instructions carefully. By doing that and dry fitting everything beforehand, there will be no surprises.
The first steps cover the cockpit and nose assembly. The cockpit is absolutely amazing, with the seat alone being four pieces. The only thing missing is seat belts. Careful painting here will really pay off. Once the cockpit is painted and attached to the nose gear bay, it's time to fit it into the nose section. Here is where you get out all those fishing weights. The instructions don't mention it, but a couple pounds of lead will ensure that this kit sits on its nose. Err on the side of heavy just to be safe. Then the nose goes together. Fit this carefully here and you will get a better fit to the main wing/fuselage. This step also has you assemble the "trimmer", which is the big flap thingie that always sticks up on Skyrays on the ground. Here is one of Tamiya's gimmicks. These are designed to be movable, so they are joined together by a rod. I found it much easier to do the natural metal back end when I cut these apart and glued them separately.
Next up is the fuselage innards. Engine front, wheel bay sidewalls, and wingfold detail are all provided as inserts. It's at this point that you need to decide if you want folded wings or not. If you do, you'll need to remove some plastic. Be sure to fit part no. B5 in at this point, as it's easy to forget and a real bear to get in otherwise. Glue the top wing/fuselage onto the bottom wing/fuselage and we're on to the next step. The next step is the air intakes. Dry fit these carefully to get the best possible fit. One minor problem with the kit is the lack of intake trunking. I got around this by taking a piece of 10 thou plastic card and fitting it to the inside of the intake lip, then bending it around and inserting it into the hole on the wing. Gluing down the intake lip sandwiches this piece in place and effectively takes care of the intake trunk. With careful fitting, you won't need any putty here.
Next up is the exhaust nozzle, which is really straightforward. After that , Tamiya has you do the landing gear, but that really is best left for after painting. The wingtips and tail are really all that's left. If you do your Ford with folded wingtips, you'll probably want to leave them off until after painting and decalling. Stores included in the kit are two fuel tanks (try to find a picture of a Skyray without them!), a pair of early Sidewinders, a pair of rocket pods, and the NAVPAC, a bomb-shaped navigation pack. The left tank has the refueling probe attached, which is a nice touch.
In painting my Ford, I used the Aeromaster acrylic paints. These are very nice paints and airbrush quite well. Since the only true connoisseurs of the Skyray were Marines, I had to do a Marine bird. But which one? I could do the kit one, but everyone would be doing that one. So I picked up the excellent Ginter book and started flipping through the pages. And then I found it. It was even from the same squadron as the kit decals, so I could use their tail code. A VMF(AW)-114 Ford with a bright dayglo spine/fin flash. I had to decide how to do the dayglo, though. I could mask it off or try and use a decal. I went the decal route. I took some white decal film and created a mask out of frisket paper, then sprayed the dayglo on. Once that was dry, I lifted the mask off and cut out the pattern. I also used decal paper for the silver leading edge of the wing and on the leading edge of the pylons, as it would have been a bear to mask. Luckily, I still have some Alclad left and that stuff goes GREAT on decal film! I wish someone like Aeromaster would put a set out solely for this purpose.
So far, so good. The decalling was going great, and it really looked sharp with the dayglo on there. I found the VMF AW 114 decal on a Superscale F-8 sheet, and it had the right style, so on it went. Then came the kit decals. I must have got a bad set, because these were lousy. It was like there was no adhesive. It took a lot of work to get them to do anything, and those long wing walk ones were the worst. I finally got them all on, but it was a close thing. This Ford almost tried to fly.... To make up for the bad decalling time, I had some fun with the weathering. We Marines USE our equipment, and it shows. I used various colored washes to bring out the detail and make this Ford look like a Marine Ford. Overall, this is a great kit of a neat plane. Aside from the decals, it was a fun build. I can see several more gracing my shelves. This one only took about two weeks, so I could have a whole squadron done by summer. By then, the Tamiya Skyraider will be in abundance here and I can start on my squadron of those. I just hope that Tamiya puts out an AD-5, too! | 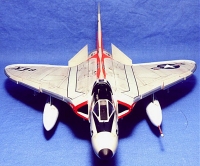 The Ford.
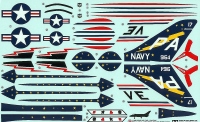
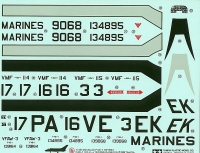
Two decal sheets are included. |