![]()
![]()
![]()
![]()
![]()
![]()
![]()
![]()
![]()
![]()
This site is best
viewed at 800x600
and 16 bit color.

 |  |
Building the Tamiya He-219 Owl by Will Riepl | |
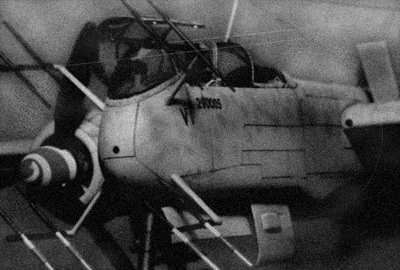
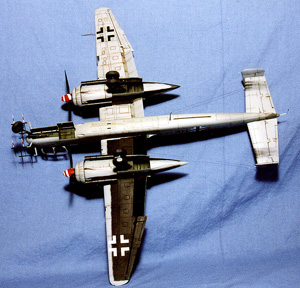
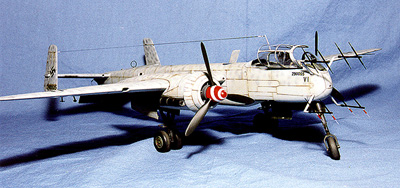
| The Heinkel He-219 was the penultimate night fighter design of Germany during the Second World War, with 268 of this superlative design being made before the end of the war. For a long time, the only choice of building a kit of this night fighter in 1/48 was spending a lot of money on a resin kit. Tamiya took care of this with their recent release of the He-219A-7 "Uhu". This kit is incredibly well designed, on par with the Beaufighter and the Betty. The kit comes with 125 grey parts, 8 clear parts, and one white metal part. The white metal part forms the nose wheel bay and part of the cockpit, as well as giving ample weight to keep this plane from being a tail sitter. Surface detail is finely recessed, and the cockpit detail is raised and very fine. While there is an incredible amount of detail in the kit, there are still some little things that you can do to really set this kit off. | |
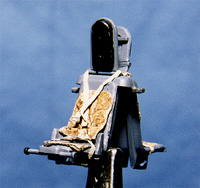
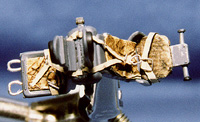
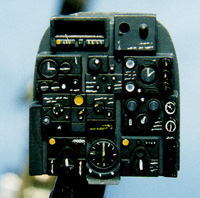
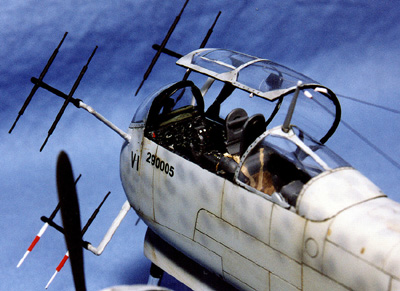
| The cockpit is the usual place to start off in, and this kit is no exception. I started with the seats. Here is the first change that you need to do to have an accurate He-219. The way the kit is molded, the pilot’s headrest is set wrong. To correct it, you need to cut off the headrest at the angle and turn it around 180°. Instead of having the headrest angle back, it should now angle forward. The other thing on the seats that needs to be changed is the footrests, as the bar style was only found on the A-0 series. I cut those off and replaced them with a piece of properly bent wire. To model the seat cushions, I took a piece of aluminum foil and formed it over a piece of paper towel to give it thickness. I then gently pressed it on a wood rasp to give it texture. I painted the cushions up with some brown shades of Delta Ceramcoat acrylic craft paint. Check your local craft store for these paints, as they are great for brush painting, come in a huge variety of colors, and are considerably cheaper than regular model paints. |
|
|
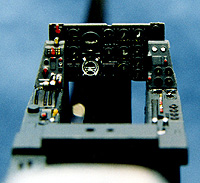
| Once the seats were done, I turned to the rest of the cockpit. Not much to add here, I sprayed the whole cockpit with Aeromaster RLM66 and set about painting up the various details on the instrument panels and cockpit sidewalls. The only thing I added to the final cockpit was the oxygen hose, which I made from tightly wrapping some very fine brass wire around a piece of appropriate sized flexible wire. After I had about an inch or so wrapped, I carefully slid it off the music wire and painted it green. After the paint was dry, I slid it back onto the music wire and bent it to shape, using round rat tail files to get smooth curves. I cut it to size and glued it in place. Inside the fuselage, not much was done. I painted the interior sections RLM66, and I built a jig for the jazz music so I could use steel tubing for the gun barrels. I made a holder to keep the barrels aligned and glued that into the jazz music cover. In fitting the jazz music cover to the fuselage, I noticed that it didn’t quite fit right, so I shimmed it up with a piece of 5 thou plastic card. The ventral gun piece fit beautifully, so all that was left with the fuselage was some light sanding on the seams, and then I went on to the wings. |
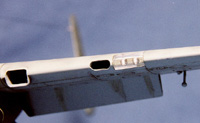
| Continuing on the steel tubing gun theme, I did the same thing for the wing guns as well, using a piece of styrene rod glued in the wing to keep the gun barrel straight. I didn’t want to waste all that gun detail Tamiya gives you for the jazz music, so I decided to open up one of the wing gun hatches. I cut the twin kit guns apart and built a box in one wing for it. I then cut open the hatch in the top of the wing and scratchbuilt a new hatch out of plastic card. |
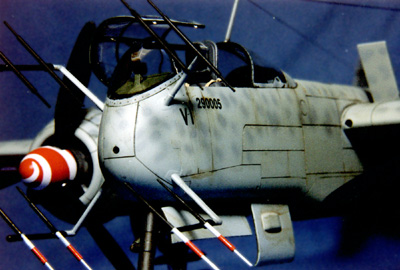
| To fend off the flashlight police, I cut out the intake scoops and blanked those off with plastic card as well. For the supercharger intakes next to the engines, I curved the card in towards the nacelle, while the outboard scoop I blanked off deep into the wing, giving it suitable depth. I added details to the winglights by using HO scale train signal lights for landing lights and cutting out the wing lights and replacing them with Crystal Clear, using a piece of painted styrene rod for representing the lights themselves. I dropped the flaps according to the instructions, and then turned to the engine cowls. |
|
| I wanted to display the cowl flaps in the open position, and it was very nice of Tamiya to give us this option. There is one thing missing, though, and that is the cowl flap actuators. The trusty styrene rod saves the day again, as I set about drilling holes in the cowl flaps. Once I had the holes drilled, I then inserted the styrene rod and cut off the excess. Once that was dry, I sanded the flaps smooth and started assembling the main subcomponents. The wings and the tail went on with no hitches, and it was now time to set that aside to set up and start on the landing gear. |
|
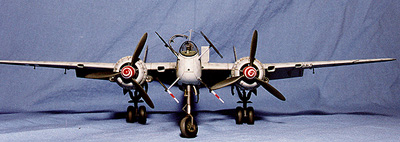
| The landing gear is well detailed in the kit, but after checking the Flugzeug Profile on the He-219, I saw that there was more detail that could be added. I used copper wire to simulate the brake lines, and added the piping coming out of the wheel hub center. For the nose gear, I cut the strut and angled the wheel to one side. I made new oleo scissors out of 10 thou plastic to give a more realistic look. I wrapped Bare Metal Foil around the oleos, painted the struts RLM02, and set them aside for later. |

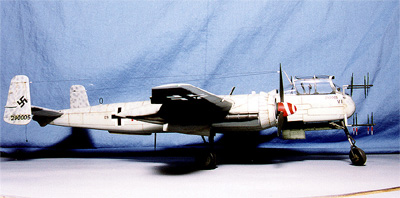
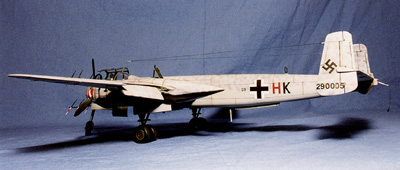
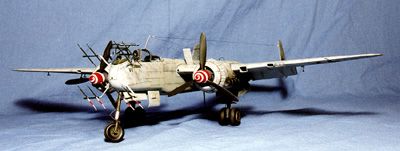
| With everything ready, it’s time to figure out how to paint this thing. There isn’t much choice, but there are some interesting variations. I chose to do one black wing, with RLM76 overall and RLM75 dots. To start out, I sprayed the whole plane with Aeromaster RLM76. After this had dried thoroughly, I thought about how the best way to do the dot pattern would be. I settled for the following method, and it worked out pretty well. Instead of RLM75, I sprayed all the dots with Aeromaster Gunship Grey (FS 36118). To tone them down, and build up a nice fade line, I then lightly oversprayed them with the RLM76. This method makes doing this pattern much easier, as I didn’t have to be as precise as if I was doing the dots with RLM75. Once the dots were painted on, I then sprayed the one black wing and set everything aside to dry thoroughly. After it had dried for a couple of days, I sealed it with Testors Acrylic Flat and began the weathering process. |
|
|
|

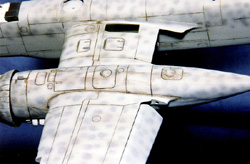
I used artist’s oils to weather it with. Black, burnt umber and a rust red were used throughout, using a turpentine wash over the acrylic flat. With the acrylic flat on, the turpentine wash doesn’t affect the paint underneath, and a very realistic effect can be achieved. I weathered before decalling because of the amount of rubbing the weathering process entails, and I didn’t want to risk removing the decals. Once the weathering was done, I then placed the decals on. The decals were a mix of kit and Aeromaster decals, and there were no problems with any of them. Once the decals were on, I lightly weathered over some of them and then sealed the whole thing again with the Testors Acrylic Flat. |
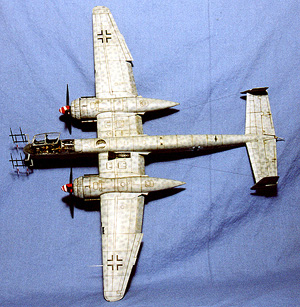
| Coming down the home stretch, I glued the landing gear on, added a steel pitot tube, affixed the gun hatch, and made an additional touch with a drooping trailing antenna. The Uhu was looking really good at this point, and all that was left was to add the nose radar array. After building my Bf-110G and Ju-88G night fighters, I have worked up a very good method of making the radar array. I built a jig to hold the main radar strut, with holders for the individual antennae. I made the steel tubing and music wire for the thinner part. This was then trimmed up and set on the jig. The tubing/wire antenna was then glued to the arm, and this was repeated for all four arms, giving me a perfectly aligned, scale radar array. For the bottom ones, I painted them white and wrapped a red decal around the middle. |
|
|
| All that’s left is the canopy and the wiring. The armor plate in the nose of my kit is depicted in the down position, and I added the overhead Revi gunsight for the jazz music. I positioned this on a sliding rail that kept the gunsight out of the way during normal flight operations. For the antenna wires, I used invisible thread. I drilled a hole in the rudder where the wire goes and a matching hole in the antenna mast. I then made insulators out of very thin armature wire wrapped the smallest drill bit I had and painted white. After threading these onto the antenna wire, I then threaded the thread in one tail from the outside in and superglued it in place. Next, I pulled it |
| through the antenna mast and brought it back to the opposite fin, threading it from the inside out. Grabbing the wire with a pair of tweezers, I held the kit up so that the weight of the tweezers gave the thread some tension, then I superglued the attachment point at the tail. I then cut the remainder off as close as I could with a pair of scissors, then finished it off with a sharp knife blade and covered it up with a little bit of paint. I carefully set it down, stepped back, and took a look at the finished kit. It looks like a He-219 to me!
I thoroughly enjoyed building this kit, and it filled a hole in my growing WW2 Luftwaffe night fighter collection (currently containing a Bf109D, Bf110C, Bf110G, and the Ju88G). Now that I have this one done, I think that I will dig out that Do-217N. I don’t know, though. Drop me a line if you want to see me finish that one next….. |
|
|

..