Tamiya 1/24 Subaru WRC '98 Safari
By Zeljko Segin
 |

|
|
 On the suspension you must remove flash on spring, left after molding. As usual with Tamiya, between suspension and disk brake parts go rubber tubes so you can push wheels on without glueing. Front drive is steerable so you can put the wheels in different positions.
 There are many details - pedals, hand brake, fire exstinguisher, shifter, etc. The aluminum sticker that goes under driver's feet should be thicker so it can be easier attached on the floor. You need to push it over raised and sunken panels. On the seats, beware of the decals that go on the rear side because they are too large.
 Now we turn for that thing that is most visible on every car - the body. First you must cut part of front bumper as stated in the instructions and drill holes on the roof and rear bumper. You can put the antennas on later, but my advice is to drill the holes at this stage so you can put anntenas on in the end.
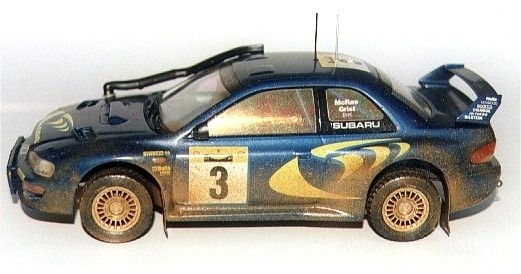 The snorkel has a hole on the bottom side and doesn't look realistic. I filled the rounded part of the snorkel with excess plastic from part-trees, filled with putty to get the good shape. The end of the snorkle is square so I used paper from a pocket calendar, cutting it into shape and attached with CA glue.
 Most of the car is painted with Mica Blue color, which you can only find in Tamiya production in sprays. Name of color is TS-50 Mica Blue and is good for all Subaru WRC versions. Inside the light lenses I painted silver. When you glue on the transparent parts, the lights look more realistic.