ARBA 1/48 Blenheim Mk.IV
By Tom Cleaver

 Yet, such was the pace of combat aircraft development
during the last two years of peace in Europe that, when the RAF went
to war in September 1939, it soon found that the Blenheim was not the
redoubtable weapon it had supposed. Nevertheless, it was to bear the
brunt of much fighting on every front to which the RAF was committed
for the first three years of the war, and despite its limitations,
it served valorously. However divergent were views of the effectiveness
of the Blenheim as a weapon, it was one of the truly historic aircraft
of the war.
Yet, such was the pace of combat aircraft development
during the last two years of peace in Europe that, when the RAF went
to war in September 1939, it soon found that the Blenheim was not the
redoubtable weapon it had supposed. Nevertheless, it was to bear the
brunt of much fighting on every front to which the RAF was committed
for the first three years of the war, and despite its limitations,
it served valorously. However divergent were views of the effectiveness
of the Blenheim as a weapon, it was one of the truly historic aircraft
of the war. 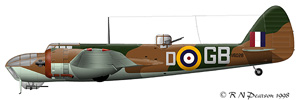 To date, any modeler wanting to do this famous and
important aircraft was limited to two not-so-great 1/72 scale models:
an almost-acceptable Mk.I by Frog, and a truly dreadful Mk.IV by Airfix.
There was also an indifferent 1/48 vacuform once released; I looked
at it and rejected it for obvious quality deficiencies
ten years ago, and have managed to forget the name of the malefactor who
created it. Thus, when I came upon the ARBA table at this year's IPMS-USA
Convention in Santa Clara and saw the kit Alan Ranger and Bill Anderson
had created of the Blenheim Mk.IV, I wanted it. At US$95.00 retail, it
was out of my budget; but then I discovered I had something they wanted
for a new project and...to make a fast deal even faster, business was quickly
transacted.
To date, any modeler wanting to do this famous and
important aircraft was limited to two not-so-great 1/72 scale models:
an almost-acceptable Mk.I by Frog, and a truly dreadful Mk.IV by Airfix.
There was also an indifferent 1/48 vacuform once released; I looked
at it and rejected it for obvious quality deficiencies
ten years ago, and have managed to forget the name of the malefactor who
created it. Thus, when I came upon the ARBA table at this year's IPMS-USA
Convention in Santa Clara and saw the kit Alan Ranger and Bill Anderson
had created of the Blenheim Mk.IV, I wanted it. At US$95.00 retail, it
was out of my budget; but then I discovered I had something they wanted
for a new project and...to make a fast deal even faster, business was quickly
transacted. 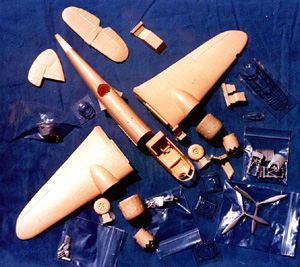 The kit comes in a strong cardboard box with a photograph
of the restored Blenheim IV on the cover. Inside is a well-cast resin
model as seen in the accompanying photo. The fuselage is broken aft
of the cockpit, since ARBA also makes a kit of the Mk.I. The quality
of the casting is high, with only a very little bit of flash to clean
off. Once the parts are cut free of their mount pieces, construction
proceeds quickly.
The kit comes in a strong cardboard box with a photograph
of the restored Blenheim IV on the cover. Inside is a well-cast resin
model as seen in the accompanying photo. The fuselage is broken aft
of the cockpit, since ARBA also makes a kit of the Mk.I. The quality
of the casting is high, with only a very little bit of flash to clean
off. Once the parts are cut free of their mount pieces, construction
proceeds quickly. 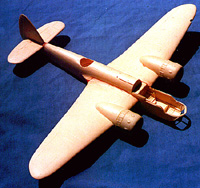 Basic assembly is easy since there are only eight
parts: cockpit, aft fuselage, left and right wing, left and right engine
cowling, horizontal stabilizer and vertical fin. Since you must use
cyanoacrylate, be sure to test-fit everything; it is crucial to eyeball
the wing installation to get the inner sections horizontal, and it
is easy to miss this. Attachment of tail surfaces presents no problem
other than to be sure things are lined up properly inasmuch as there
are no attachment guides. While everything joins nicely, putty will
be needed along all joints; fortunately, resin sands easily (wear
a face mask so you don't inhale the dust!) and the basic construction
of the model is complete.
Basic assembly is easy since there are only eight
parts: cockpit, aft fuselage, left and right wing, left and right engine
cowling, horizontal stabilizer and vertical fin. Since you must use
cyanoacrylate, be sure to test-fit everything; it is crucial to eyeball
the wing installation to get the inner sections horizontal, and it
is easy to miss this. Attachment of tail surfaces presents no problem
other than to be sure things are lined up properly inasmuch as there
are no attachment guides. While everything joins nicely, putty will
be needed along all joints; fortunately, resin sands easily (wear
a face mask so you don't inhale the dust!) and the basic construction
of the model is complete. 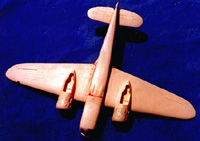 The first thing to do is test-fit the components
of the cockpit and rework them as necessary to obtain proper fit; the
only part that had more than a bit of sanding to do was the navigator's
table that fits to the left side of the nose. There is a well-cast
resin seat for the pilot, and two white metal seats for the bombardier/navigator,
one for the Mk.I, one for the Mk.IV; I determined I would fold mine
against the wall, inasmuch as it kept popping off when attached on
the "in use" position. If you are doing the early Mk.IV -
as I did - you must also open that part of the lower hatch that allows
access to the undernose gun. An outline is lightly engraved in the
resin, so boring it out with a craft knife and opening it is not hard.
The first thing to do is test-fit the components
of the cockpit and rework them as necessary to obtain proper fit; the
only part that had more than a bit of sanding to do was the navigator's
table that fits to the left side of the nose. There is a well-cast
resin seat for the pilot, and two white metal seats for the bombardier/navigator,
one for the Mk.I, one for the Mk.IV; I determined I would fold mine
against the wall, inasmuch as it kept popping off when attached on
the "in use" position. If you are doing the early Mk.IV -
as I did - you must also open that part of the lower hatch that allows
access to the undernose gun. An outline is lightly engraved in the
resin, so boring it out with a craft knife and opening it is not hard. 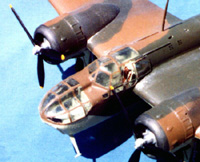 I masked off the canopy using Scotch shiny transparent
tape, then painted the model in the early war camouflage scheme of
Dark Earth/Dark Green uppers, Sky lowers, using Gunze Sanyo acrylics
and following the official camouflage pattern. Once dry, the entire
model was shot with several light coats of Future to seal it with a
glossy surface for decaling.
I masked off the canopy using Scotch shiny transparent
tape, then painted the model in the early war camouflage scheme of
Dark Earth/Dark Green uppers, Sky lowers, using Gunze Sanyo acrylics
and following the official camouflage pattern. Once dry, the entire
model was shot with several light coats of Future to seal it with a
glossy surface for decaling. 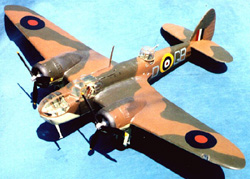 I washed the model to get rid of setting solution
and gave it another shot of Future. Once that was dry, I shot the model
with thinned Testor's Dullcote to get the proper flat finish. I then
used ModelMaster Metallizer "Aluminum" to pick out paint
chipping on the foot holds, and along the wing root. I shot a mixture
of thinned Tamiya black and brown for exhaust staining. When all was
dry, I fitted the painted engines in the cowlings, unmasked the canopy,
set the assembled gun turret in position, attached the undernose clear
fairing with the Vickers "K" gun, and installed the landing
gear. I used clear repair thread for the radio and IFF antenna wires,
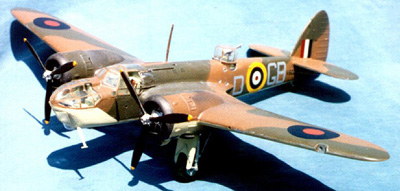
glued on the side windows and, voila! Wing Commander Hughie Edwards'
VC-winning Blenheim sat before me on the worktable.
I washed the model to get rid of setting solution
and gave it another shot of Future. Once that was dry, I shot the model
with thinned Testor's Dullcote to get the proper flat finish. I then
used ModelMaster Metallizer "Aluminum" to pick out paint
chipping on the foot holds, and along the wing root. I shot a mixture
of thinned Tamiya black and brown for exhaust staining. When all was
dry, I fitted the painted engines in the cowlings, unmasked the canopy,
set the assembled gun turret in position, attached the undernose clear
fairing with the Vickers "K" gun, and installed the landing
gear. I used clear repair thread for the radio and IFF antenna wires,
glued on the side windows and, voila! Wing Commander Hughie Edwards'
VC-winning Blenheim sat before me on the worktable.