From Internet Modeler
Eduard's 1/72 Spitfire Mk. 21
By Drewe Manton
Oct 1, 1998 - 11:09:38 PM
The Airplane
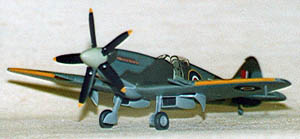
The Spitfire 21 was the final variant of the Spitfire to see wartime service. Reaching squadrons in March of 1945, it never engaged in air to air combat; its use being limited at this stage of the war against Germany to a few fighter sweeps over Europe. The only actual combat recorded was when a pair of aircraft from No 91 squadron strafed and disabled a German midget submarine off of the coast of Holland. A few days later the war was over and the massive orders for this aircraft were drastically cut (from the original 3000 ordered, an eventual total of 120 were built)
As an aircraft the Spitfire 21 was sufficiently different from preceding Spits that at one point a new name was planned for the aircraft: Victor. From the side, the aircraft would 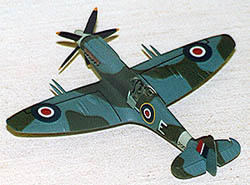 be easily confused with a Spitfire XIV. Only when viewed in plan do the differences become very obvious -- this aircraft has a completely new wing. Whilst retaining the beautiful elliptical shape of other Spitfire wings, the tips were squared off in a manner similar to the Hawker Tempest and new larger ailerons were fitted with a piano type hinge. Armament for this wing was four 20mm Hispano cannons. Other changes were a larger diameter propeller, though the engine generated the same power as the Mk XIV, and deeper radiator housings. For the first time on a production Spit the undercarriage was completely enclosed when retracted. The aircraft was a star performer but the age of the jets was nigh and it never really had a chance to shine. It could be said that the 20-series Spits took the basic airframe to the very limits of its growth; the later Spiteful/Seafang aircraft were in most respects a profound disappointment, though the wing did find it's way onto the Attacker jet for the FAA.
The Kit
From the time Eduard announced their Spitfire 21 in 1/72nd, I had eagerly awaited it. I 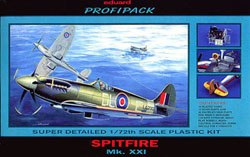 had given some thought to crosskitting the Airfix and Hobbycraft kits in 48th to make one (and may yet do so) but my main sphere of interest is 1/72nd, so as soon as it was available I ordered three of them (A common modellers problem: why have one when you can have three?).
The kit is in the "profi pack" series and so contains limited run injection moulded components with details in resin and etched brass. At some point Eduard usually release these kits sans resin for a cheaper price so it may make another appearance in the fullness of time (When I will no doubt have another three!).
The kit comes in a very attractive box with a very atmospheric piece of art depicting the mini-sub attack. I defy anyone to resist the huge smile that crossed my face upon opening the box! Eduard's pretensions to the mainstream of modelling become more and more obvious (and valid!) with each new kit they release. This kit is GOOD! Two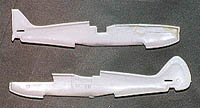 light grey sprues contain the main airframe parts; in fact my earlier suspicions are correct -- this model can be built without recourse to the resin or etch at all. Sprue gates are not far short of mainstream manufacturers and surface detail is delightfully engraved and very restrained. If the fuselage halves were shown to me on their own they could almost pass for Hasegawa -- they are that good! Options include a five blade prop or the six blade contra-prop one or two 21's flew with, moulded beautifully throughout.
The clear sprue contains a one piece and three piece canopy to give the modeller the option of open or closed, along with the rear view mirror and gunsight. The transparencies are easily up with the best in the mainstream and are thin and clear (also packed separately to avoid scratching). As one would expect from Eduard, the etched brass is a work of art; building the cockpit will be a major challenge but should look great if done carefully, although if this is too scary you can always fall back on the plastic parts in the main kit.Rounding the kit off is a small bag of resin consisting of tail control surfaces, seat, door, bulged wheels and some other small interior parts. All look very well moulded and free of air bubbles.
Decals are very well done indeed and contain options for four aircraft. Register in my sample was spot on and it even includes a small supplement sheet with a couple of additional C1 type roundels. Colours look good -- the sky codes being very nicely done -- and if up to normal Propagteam standards will need care in applying but once on will settle down a dream.
The final part of the kit is the instructions. These are produced to a standard that shame many much larger manufacturers and deserve special mention. They are clear and concise and suggest a construction sequence that may even be worth following; they are clearly the work of a modeller! Painting details are called out throughout with reference to Tamiya, Humbrol, Revell, Testors and Aeromaster paint ranges, so most bases are covered! Two of the schemes are covered on the main instruction sheet and two on a separate sheet along with a stencil placement plan.
Construction
The Eduard Spitfire has all the hallmarks of a standard injection moulded kit with the addition of aftermarket parts to detail, i.e., the kit is complete and able to be built without the additional detail parts. To this end it is necessary to remove some of the moulded detail in order to incorporate the finer etched and resin parts into the model.
I began by removing all the sidewall detail from the cockpit areas. To do this I began with a small router bit in my power tool to cut away the bulk of the detail before scraping the fuselage side interiors with a fairly sharp (but not new) curved knife blade. I find that using a blade that is not new gives me more control over the scraping and has less chance of leaving unsightly marks if the blade should slip or dig in. Once all the detail had been removed, I sanded the areas with 400 grit wet&dry paper; this smoothes it well but also provides a nice key for the etched sidewalls that have to be added.
I used a combination of razor saw, files and knife blade to remove the port side door for later replacement in the open position with the resin piece included in the kit. After the door had been cut away to size the fuselage around this area had to be thinned from the inside to give a scale effect later.
Fuselage Interior
The next job was to cut away the moulded in rudder for later replacement with the lovely resin part included for this purpose; this is literally a five minute job as not too much care is needed to preserve the rudder since it is replaced completely by resin. I chopped mine away quite brutally and then it was a simple job to lightly sand the area and once again thin down the area where the rudder sits from the inside. The final job in this stage was to add the engine cowlings. Eduard have chosen to mould the rocker covers in with the cowling halves in order to capture the shape; personally I prefer the Academy/Airfix approach of separate covers, but in the 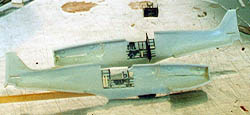 event after a little trimming the fit was good. The cowling halves were each glued to their respective fuselage half with liquid poly before reinforcing from the inside with a bead of superglue set with accelerator. Any gaps present will be filled with putty thinned with liquid glue and applied with a brush, to ensure neatness. The photo shows one fuselage half prepared and with the cowling in place and the other before it goes under the knife.
Now it is time to start building up the interior from the etched brass and resin provided.
I am not a big user of resin and brass but this kit really does make it about as easy as a job like this can be! All parts appear to have been made to fit the kit and as a result of this, whilst there is a multitude of parts to go in and some tricky bending of brass to be done the end result fits into the fuselage perfectly. I am more used to having to chop bits about and thin others to get a fit (the likes of MPM kits for instance) so this was a major delight to me; the satisfaction as the interior pops into place and the fuselage joins perfectly has to be experienced!
I built up the cockpit in stages and painted as I went along. The fuselage halves had all the detail added along with the rear bulkhead, and the cockpit floor and instrument panel were made and painted separately, and could be put in place after the fuselage is joined. The interior was painted Humbrol 78 cockpit green and after 12 hours or so was given a wash of raw umber oil paint. Once this was dry the interior was drybrushed with Humbrol 120 (Israeli green) to highlight detail prior to detail painting with Humbrol and Extracolor. The instrument panel was painted black and highlighted with a pale grey drybrush. Areas in front of and behind the cockpit were painted matte black to ensure no plastic was visible through the cockpit.
The end result is without a doubt the best and busiest cockpit I have ever included in a 1/72nd model, and I still like to look at it! With all interior painting done the fuselage was joined with plastic weld and the floor and instrument panel were superglued in place. Joints along the fuselage needed a spot of filler and a light sanding to hide.
The Rest
With the fuselage done attention was turned to the wings and tailplanes. The wings are the usual Spitfire affair of one piece lower and two piece upper, and went together with no problems; they were just held together with finger pressure and plastic weld was run around the seams -- after a few seconds the joints are given a light squeeze and that's 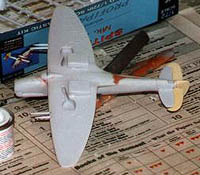 it! A light sanding when dry and they were done. The only thing I would say is that if I were to do this kit again (when!) I would perhaps scrape the trailing edge interior to thin that a bit as due to the limitations of limited run moulding they are perhaps a little thick, but nothing too obtrusive.
With the wing joints dealt with they were offered up to the fuselage. Fit was not great and in the end I first glued the underside front in place, let that dry, glued the underside rear in place, and finally once dry ran plastic weld along the wing roots.
The front of the air intake was glued in place and then the joints looked at. The rear half of the air intake needed some fairly drastic carving to blend with the front and achieve the correct profile-this I did with a new blade in my scalpel; the rear joint would just need a light sanding and some filler. The wing root fairing in the fuselage had quite a step at the rear, which was dealt with using a couple of swipes with some 80 grit (yup! 80 grit) sandpaper and the inevitable deep scratches filled and sanded. All the joints around the wing were now filled as necessary. For this I thinned Dr Microtools putty with liquid poly and brushed it in with a small brush. This is a great method for filling, very controllable and seems to avoid the pits and air bubbles you can get spreading this kind of filler; since discovering it I use it for most jobs.
 The final job in this section was the tailplanes, and as with the rudder they come with resin elevators to replace the moulded in items- simply cut away the moulded-in items, glue the tailplanes in place -- fit is good -- and finally add the resin items with superglue dropped or raised as you see fit; very easy and looks great! All sanding was carried out with 600 and 1200 grit wet and dry paper.
With the radiators glued in place the model was given a coat of Halfords grey primer to highlight any imperfections- these were dealt with and the model given another coat of primer and finally a rub down with scotchbrite. Windscreen and rear of the canopy were glued in place with a mixture of crystal clear, superglue and liquid poly as needed and masked with Tamiya tape and crystal clear. Almost time to paint!
Painting
The model was given a wipe over with a kitchen towel moistened with white spirit to remove grease etc. and painting could commence. First up the Sky fuselage band and spinner were sprayed (all colours are Extracolor unless otherwise indicated) and wing leading edges and propeller tips were sprayed insignia yellow (maybe not exactly right but close enough and it's all I had at the time) and the model was set aside to let these parts dry.
Once dry the rear fuselage band and wing leading edges were masked with Tamiya tape and the undersides sprayed medium sea grey. I only mask the fuselage demarcation and undersides of the tailplanes prior to spraying the topsides of my models; I rely on the angle I spray at to achieve a more predictable and even line than I ever get with tape along wing leading edges. Try it and see what I mean; just don't spray the model lying on something as paint can tend to "bounce" back and hit the underside, thus leaving a messy clean up job!
With the ocean grey done, the camouflage could be applied. For this I use rolled up sausages of Blu-Tack to outline the camouflage and fill the areas to be masked with a mixture of Tamiya tape and masking fluid. The Blu-Tack gives a basically hard edge with the merest hint of overspray and looks great; if you want a larger overspray use larger diameter sausages -- totally predictable and really suits RAF subjects. I had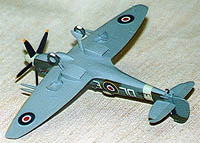 planned to use Extracolor dark green for the camouflage but upon opening my tin discovered that it had a curious gritty texture which meant it was going nowhere near either my airbrush or the model! A pot of Humbrol super enamel No. 163 Dark Green came to the rescue; it would just mean a coat or two of Klear prior to decalling to gloss it up a little.
With this sprayed, all the masking (bar the canopy) was removed and to my delight and surprise only a tiny bit of paint needed attention: a bit of green had got onto the underside of the model and was removed in seconds with a moistened rag. Two coats of Klear applied with a wide flat brush and I was on to the decals.
Decals
The decals are beautifully printed but very thin and require care to apply. I decided to use Klear to seal them in place and pull them down rather than setting solutions due to their thinness. This is a method I sometimes use with decals that look like they may be 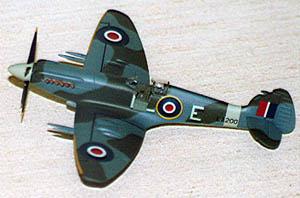 a challenge; the advantage is that it more or less guarantees no silvering at all, as the decals are being sealed between two coats of wax.
After applying all the major decals I decided only to use the most obvious stencils - many of them become completely invisible when applied and so were a waste of time (not a criticism of the decals - more a tribute to their finesse!).
When done, I applied a couple more coats of Klear and I was ready for the final coat, for which I used a 50/50 mixture of Aeromaster acrylic matte and semi-matte varnishes airbrushed on. This gives a basically matte finish with just an "edge" of satin that to me looks just right. This done I was ready to move on to the final assembly, and all masking was removed from the cockpit/canopy.
Finishing
I had to drill out the location points for the undercarriage legs before fitting them but this was no great hardship. I then added the undercarriage and doors -- taking the usual 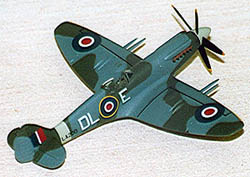 Spitfire care with alignment! -- and then the model was turned over and the canopy and pre painted cockpit door were added with dabs of superglue. Whilst the canopy is thin and clear it is still thick enough that it sits a little high and is a prime candidate for replacement with a vac-form item.
With the addition of the prop and exhaust stacks, the kit was basically finished. I applied just a few touches of weathering with black and brown pastels, since at the time this aircraft is depicted it was still new and thus was not yet "battle weary." There you have it -- a beautiful model of one of my favourite Spitfires.
Conclusions
This kit represents the current state of the art as far as limited run kits go. The plastic is 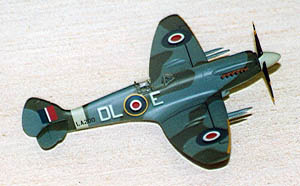 getting closer and closer to mainstream standards as are the instructions (in fact the instructions are far superior to most mainstream efforts) and the excellent brass, resin and decals all combine to make a superb package. The small and fiddly but incredibly well detailed interior will make for a challenge but one that you can be very proud of; as far as overall looks go this will sit alongside the best in the mainstream in terms of finesse and detail. You can probably tell I'm a fan of this model -- I have a couple more and plenty of plans for them, not the last of which is for a Seafire 45 conversion! Recommended to all!
© Copyright 2023 by Internet Modeler