
Eduard 1/48 Roland C.II
By Dennis Ugulano
Last month I gave a brief review of this kit and how I wanted to build it since it's initial release in 2000. The kit is now complete and I had as much fun as I had hoped to.
 My reference material is Windsock Datafile # 49 with some reference to Ray Rimell's review in Windsock International, Vol 16, No. 3, May/June 2000 pages 27 and 28. With the exception of an undersized engine, Ray's review is very positive and he makes only minor recommendations for improving the kit. I have built the kit 100% out of the box for the modeller who wants to build the kit as it comes out of the box and be happy with the results. I did use most of the metal etch parts and that increased the building time considerably. I did it to satisfy my own curiosity and to show that with a little extra care, metal etch can be made to look very conniving. But enough talk, let's get on with the build.
Interior
 This is where most of the work takes place. The interior surfaces and bulkheads were painted wood and a little shading was done to bring out some details. One word of caution. The windows are for a specific location. Cut them out one at a time and follow the instructions exactly and there will be no sanding or fit problems. The observer's seat is a little wide, preventing the seat belts from hanging straight down. A little sanding on the seat will correct this problem.
The camera is a real jewel and goes together just as advertised. After all of the window frames, ammo boxes, wireless equipment, etc, are attached to the fuselage halves, the cockpit assembly slides into place without any protest.
 After the engine is assembled, parts A20 and A21 (shelves that the engine mount on) are glued to the edge of the ridges molded into the fuselage. Do not mount them on top of this ridge as the engine will sit too high. After the engine was in place, the last of the metal etch parts were added to the rear of the engine and the fuselage was closed up. At this time 90% of this beautiful interior disappers from view. Sigh.
Fuselage
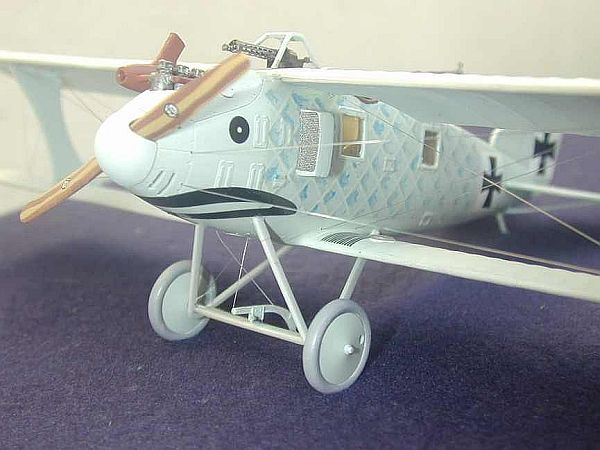
 At this point I attached the lower wings and horizontal stabilizers and the observers gun ring (part B7). B7 is a very ill fitting part and had to have putty applied several times before it looked like the real aircraft. After all seams have been removed, the undercarriage and stabilizer supports are attached and the entire model was painted light blue. The decals were then applied. If you are going to build the fish scale version, do not attach the radiators until after the scale decals have been applied.
 The fish scale decals went on as they were supposed to. A good amount of setting solution was need to get the decals to contour to the fuselage but there were no problems encountered here.
Before attaching the top wing, attach the radiators on top of your decals. After this is done, the top wing is attached after filing and sanding to ensure an exact fit as it will be attached after the fish scale decals are in place. It was also at this time I drilled my holes for the rigging, both in the fuselage and the wing struts.
 From here on it is just a matter of attaching all of the small metal etch parts in their proper locations. The instruction sheet is very clear as to their location. The rigging was also installed at this time. I used my DURAS system and it is a very easy kit to rig. A coat of semi gloss clear was sprayed over the kit and the masking on the side windows was removed. The only thing left to do is the machine guns.
Machine Guns
 I left this step for last and separate because the machine guns in my opinion are the most delicate and impressive part of the kit. On both the gunner and pilot gun, the molded barrel was removed, a rod was installed for a new barrel and the cooling cylinder was attached. All of the cocking handles and other parts were all attached to both guns. The observer's gun was mounted on it's base and attached to the ring inside his station. The pilot's gun was mounted in front of the windscreen and the model was complete.
Conclusion
 This is a very easy kit to build but it is very time consuming. The actual build took less than 10 hours to complete. Most of the 20 hours of construction is painting and attaching the metal etch parts. Eduard is to be commended for such an excellent kit, that almost 10 years old, is still a charm to build and will make an impressive addition to someone collection.
My thanks to Eduard for the kit and Internet Modeler for allowing me to build it.


