Introduction
From Wikipedia:
"The Lockheed Martin F-35 Lightning II is a family of single-seat, single-engine, fifth-generation multirole fighters under development to perform ground attack, reconnaissance, and air defense missions with stealth capability. The F-35 has three main models; the F-35A is a conventional takeoff and landing variant, the F-35B is a short take-off and vertical-landing variant, and the F-35C is a carrier-based variant."
The Kit
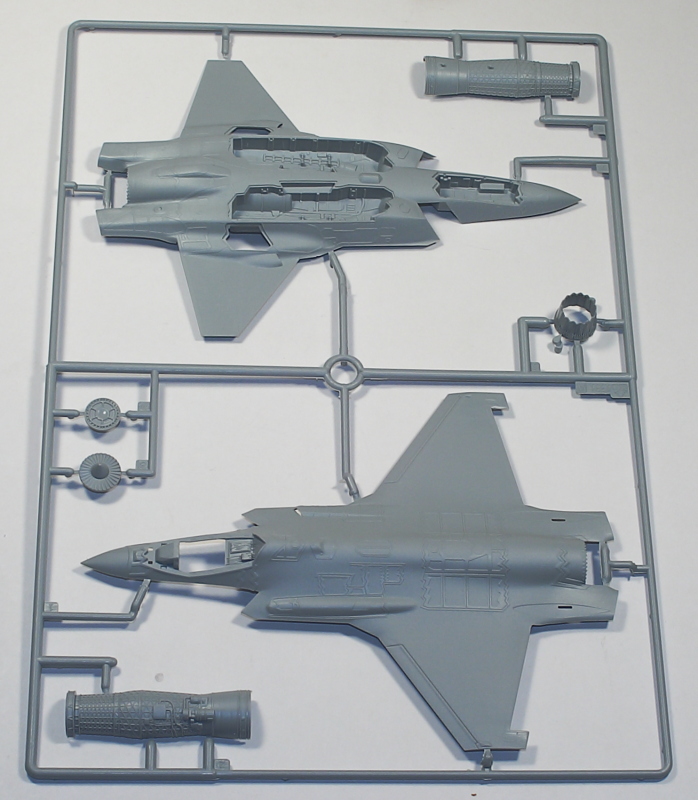
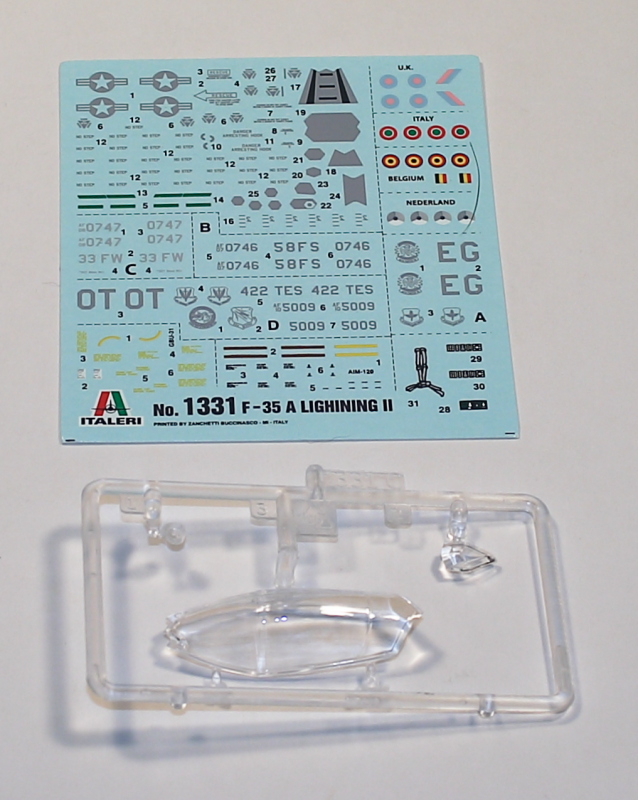
This brand new Italeri 1/72 F-35A consists of 82 pieces of gray, injected plastic and one clear sprue with three pieces on it. The molding is very nice, the detail superb, and it looks like an F-35 out of the box. There are decals for three USAF F-35As:
- 08-0747, 33rd FW, Eglin AFB, Florida, 2013
- 10-50049, 422nd Test and Evaluation Squadron, Nellis AFB, Nevada, 2012
- 07-076, 58th FS, Eglin AFB, Florida, 2013
 Decals are nicely done and appear to be in register. Also, while the instructions don't show them being used, there are extra decals for for the UK, Italy, Belgium and The Netherlands.
Assembly starts differently than most other model aircraft. Since the intakes of the F-35A are pretty unique, you start kit construction with this area. Each intake consists of two parts that are glued to the lower fuselage half (the fuselage is split laterally). The instructions are primarily picture-based, and this section is nice and clear, showing just how the pieces not only fit together, but also what they're supposed to look like after assembly.
The next step in the instructions have you glue the main landing gear into the main wheel wells, prior to adding those to the lower fuselage. I will definitely try and see if it's possible to fit the landing gear after the wells have been glued in. This is just a recipe for disaster leaving the gear legs on during painting.
In an unusual step, Italeri provides a pretty complete engine with a nicely detailed exhaust cone. Unfortunately the entire engine is glued to the upper fuselage after building it up, so you won't be able to see it afterwards. Also unfortunate is that the intake and exhaust blades are attached inside the engine halves, so unless you can find a tube about the same diameter, you'll have to use the engine regardless.
 You'll need to decide if you're opening the canopy or not, because if you are then the actuating mechanism for the canopy is installed into the upper fuselage prior to adding the cockpit tub and closing the fuselage halves. However, once that is accomplished and the engine and assembled cockpit tub are in place in the upper fuselage then the fuselage halves can be glued together. Note that Italeri calls for weight in the nose; unfortunately it doesn't say how much. I would just pack the entire nose with weight; better safe than have a tail-sitter.
Now the rest of the aircraft-proper comes together. Wing flaps are added to the trailing edge; horizontal tail surfaces built up; vertical tail surfaces are built up, and when both tail sections are complete, then they are added to the fuselage. Italeri shows three parts as optional, an antenna and two "bumps" on the wing (I'm not exactly sure what those bumps are supposed to represent); however, Italeri doesn't mention why they're optional nor when they should be added or not. This is an area where further research is required.
The next sections have you build the nose landing gear, gear doors and build-up the weapons bay. The just supplies two GBU-31s (JDAM) as well as two AIM-120 missiles for displaying the weapon bays open. Unfortunately the instructions do not show anything about closing this area. Nothing at all, so you're on your own if you don't wish to display the weapon bays open. There is a little bit of surgery required on a couple of parts (outlined in the instructions) I suspect doesn't need to be accomplished if you plan to close the weapon bays, but because of the lack of instructions we'll never know. The entire weapon bay areas are really nicely detailed and the doors include four separate actuating arms that are added to each door.
 Unfortunately the main wheels are split in half, so take care during assembly to you won't have a step or seam to deal with later. The final steps in the instructions are adding the wheels and main gear-door, assembling the ejection seat (four separate pieces), gluing that into the cockpit tub, and adding the canopy (either opened or closed – opened there are a further two pieces to add between the canopy and fuselage). Now you have a finished 1/72 F-35A Lightning II.
Conclusion
Since Italeri is first out-of-the-gate with an operational 1/72 F-35A Lightning II, adding one to your collection should not be difficult at all. In fact, the build itself could go quite quickly; faster if you can figure out how to close the weapon bays. The kit has a real nice level of detail. The only complaint I have (aside from the lack of direction on how to close the weapon bays) is most model companies provide really poor injected plastic ejection seats. That is one area that definitely could be improved with aftermarket, along with the main wheels.
Huge thanks to MRC for providing the kit to review.