• Menu
  • Home
  • Columns
    • Industry News
    • Editorials
    • Now and Then
  • Features
    • Armor
    • Automotive
    • Aviation
    • Figures
    • Ships
    • Space/Sci Fi
    • Special Reports
  • How To
    • Construction
    • Detailing
    • Painting
    • Finishing
  • First Looks
    • Armor
    • Automotive
    • Aviation
    • Figures
    • Ships
    • Space/Sci Fi
  • New Releases
    • Armor
    • Automotive
    • Aviation
    • Figures
    • Ships
    • Space/Sci Fi
    • Book Reviews
    • Tools
  • Gallery
    • Armor
    • Automotive
    • Aviation
    • Figures
    • Ships
    • Space & Sci Fi
    • Drawings
    • References
Internet Modeler : Features: Ships RSS News Feed

White Ensign Models 1/350 Resin Ton Class Minehunter HMS Bronnington

By Felix Bustelo

Introduction

As a result of the experience gained from World War II, the need for coastal and inshore mine countermeasure ships became apparent. Large ocean minesweepers were not adequate for coastal and inshore waters, so a new design was sorely needed.

After several years of development on the drafting table, the Ton Class minesweeper was born and it is arguably one of the most successful designs, with over one hundred ships constructed between 1951 and 1960. More than 30 ships have been transferred to British Commonwealth and foreign navies.

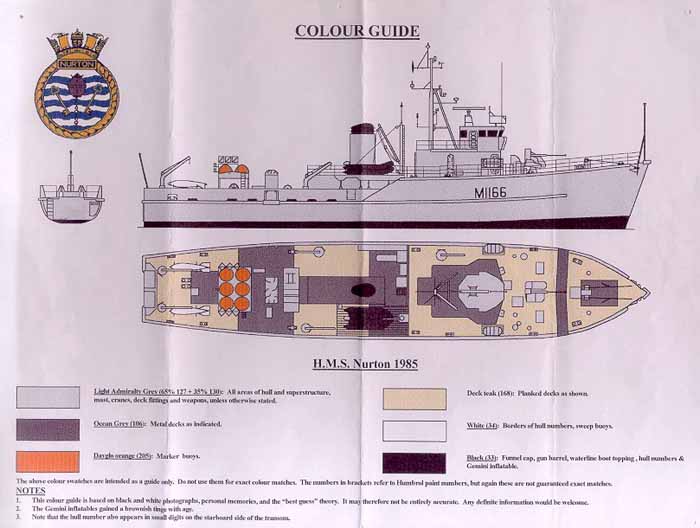
The Ton Class ships were designed to sweep both moored and ground mines. To minimize the ship's magnetic field, these ships were constructed almost totally from light aluminum alloy and other materials. The one exception is the double mahogany hull planking. A "Cascover" nylon protective sheathing was fitted below the waterline to prevent damage from underwater parasites. The result of this design and construction is a ship that is well suited for coastal minesweeping with the lowest possible magnetic field but is sturdy enough to withstand ocean-going voyages. Eighteen Ton Class vessels were subsequently converted to minehunters, which involved removal of the sweeping gear, installation of Type 193 minehunting sonar and active twin rudders which allowed these ships to position themselves close to a mine so that divers could be deployed to blow it up. Some vessels also carried a Sperry Towed Acoustic Generator.

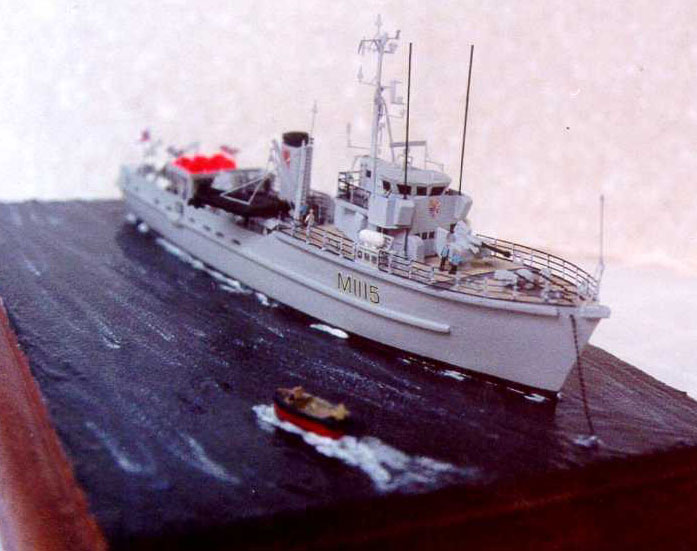
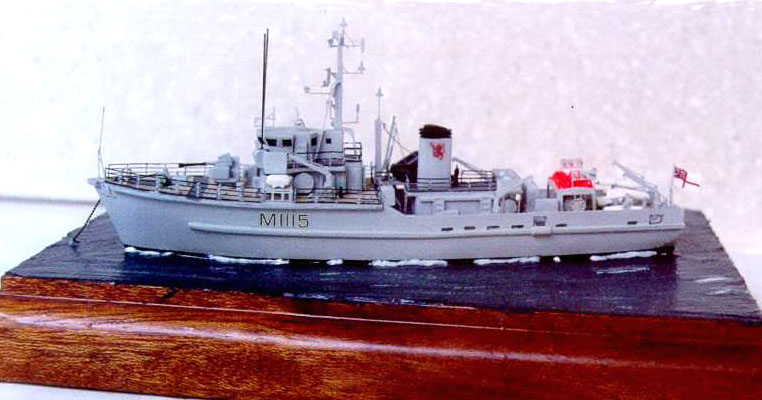
The HMS Bronnington was launched on March 19, 1953 and she served in various minesweeping squadrons before she was converted to a minehunter in 1963. During this refit, the Bronnington had her bridge enclosed and a tripod mast and the latest sonar equipment fitted. She served mostly off the British, western European and Scandinavian coasts. In 1974, she joined the 1st Mine Counter Measures Squadron based out of Rosyth in Scotland. From February through December of 1976, His Royal Highness Prince Charles, then a Lieutenant, was the Commanding Officer of the Bronnington.

In the 1980s, the Bronnington served in the 2nd Mine Counter Measures Squadron, as part of the NATO Standing Naval Force Channel and in the Fishery Protection Squadron before she was paid off on June 30, 1988. The Bronnington, affectionately nicknamed "Old Quarter Past Eleven" because of her pennant number 1115, is current owned by the Bronnington Trust and is preserved as a museum in Manchester, England.

The Kit

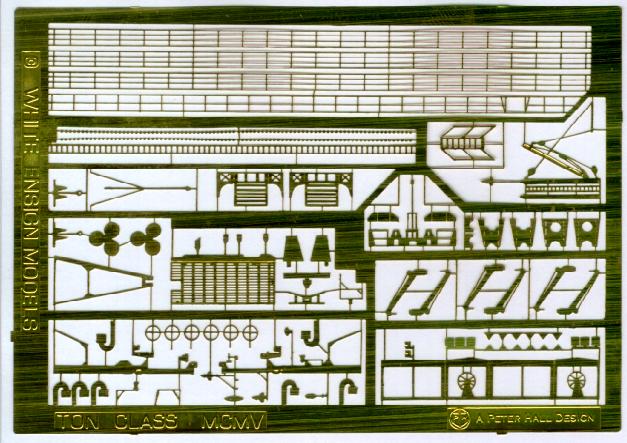
The White Ensign Models HMS Nurton kit was released in 1996 and has proven to be a very popular seller. This kit is an excellent choice for your first foray into resin but it is just as enjoyable for the more seasoned ship modeler. The kit is very simple to build and the photoetch brass provided, while not too difficult to work with, does present some nice challenges. The kit master and the photoetch design were made by Peter Hall. The larger resin parts are comprised of the waterline hull, the bridge superstructure and the funnel. A small ziplock bag contains the smaller resin parts:

Four magnetic sweep buoys 
40mm Bofors
two Gemini inflatable rafts
two outboard motors
marker buoys/sweep winch housing platform
sweep winch
winch spool
anchor windlass
cable reel
two liferaft canisters

A piece of square styrene is also provided for use as the Gemini crane around which the photoetch part is suppose to be wrapped around. The resin parts are very cleanly cast and required only a little bit of clean up, such as removing some casting plugs and light sanding in spots.

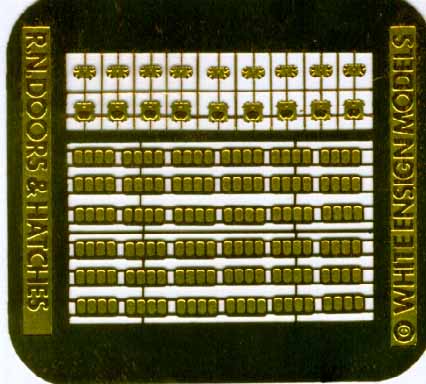
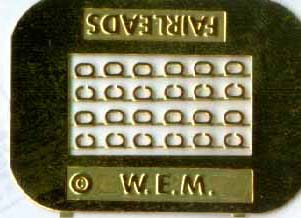
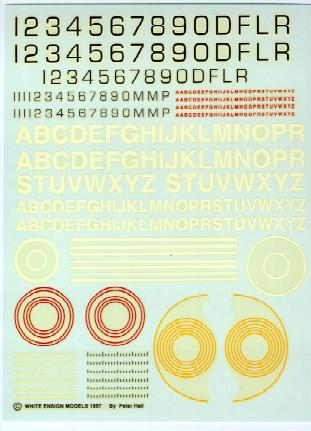
The model comes with three brass photoetch sets: two sets of more general items that are also sold separately and a detail set specifically designed for this model. The generic sets include watertight doors (WEM PE3503) and fairleads, or chocks to Americans like me, (WEM PE3511). The detail set for the kit includes:

tripod mast components and yardarms
sweep davit handwheels
"U" bend vents
anchors and anchor cables
radar scanner and D.F. aerial
inclined and vertical ladders
Gemini launch crane and stowage platform
sweep buoy stowage racks
liferaft canister stowage racks
sweep davits
sweep winch housing
radar reflector sides
stern guides and guard rails
jackstaff
3-bar and 2-bar railing.

The photoetch set is good but not quite as refined as some of the newer photoetch offerings that I have seen from WEM. Then again, this kit is now five years old and all WEM products have been continually improved over these years. The only complaint with the kit that I found is that the "U" bend vents appear to be very overscale. Based on some photos that I have seen of Ton Class ships, these vents appear to be about 3 feet tall and not too wide. When compared to the Gold Medal Models 1/350 scale photoetched sailors, the kit versions are taller than the crew and therefore over 6 scale feet tall. They are also too wide, so I decided to omit these from my build.

The detailed assembly instructions are provided on five pages. They cover in detail the assembly of the model and the placement of the photoetch parts. The tricky tripod mast assembly is clearly explained with clear written instructions and a blow-up diagram.

A full color painting guide is provided with matches to Humbrol paints. A mix recipe is provided for the overall Light Admiralty Gray. I mixed a batch and it matched some color photos that I have of modern Royal Navy ships. Decals for the pennant number are not provided with the kit, requiring you to purchase the WEM Modern Royal Navy Markings (Decal Set D3501) separately.

The Build

When I conducted an Internet search for reference photos for this kit, I came across the Ton Class Association website. This site is a virtual cornucopia of information on Ton Class ships with photos of each vessel in this class. Through this site, I came upon the Bronnington and after reading about her, I decided that this would make a good modeling subject.

While the Bronnington and Nurton where both members of the Ton Class, they were not identical ships and had some minor differences. The Bronnington had a chart house added just aft of the bridge and the deck just aft of the funnel was extended a few feet. Also the wheelhouse on the Bronnington has five windows on its forward face where the Nurton had three.

The bridge and funnel parts do not have locator pins so I decided to add some. I drilled two holes into the bottom of each part and glued bits of brass rod into them. I then punched a piece of index card through these pins and traced the outline of each part making a template. I cut the template out and I used this to mark where the corresponding holes were to go into the deck. Doing this was a little extra effort, but I wanted a stronger bond for these parts as well as ensuring that I would position these parts properly on the decks.

For the charthouse addition, I used some 0.20 styrene sheet to make the three walls and the roof. I used my judgement based on photos to determine the size of the charthouse, so I made it extend 6mm from the back of the bridge and as wide and tall as the section of the bridge it would be mated against, about 4mm and 6mm respectively. I used bits of black stripe decal to represent all of the windows on the bridge structure.

For the funnel deck extension, I again used some 0.20 styrene relying on some photos to determine just how big it should be. Based on these references, this platform was slightly wider than the rest of the funnel deck but extending only a few feet aft, so I cut the bit of styrene 10mm by 5mm. The photos also show that some cable reel winches were on this deck, so I added to small ones from the Gold Medal Models Assorted Cable Reel Set (Set 350-23). This deck also had a canvas covered railing along the edge. The Gold Medal Models Extra USN Railing Set (Set 350-18) has some simulated canvas covered railing so I used a bit for this section. For the supports I used braces from some spare photoetch left over from another project.

I wished to model the Bronnington as she appeared while under the command of HRH the Prince of Wales, to which she has been restored to as a museum ship. To do this, I made some custom decals for the red lion funnel badge of the 1st MCM Squadron, the special ship's crest that was designed by the Bronnington's company for their new commander and the tiny pennant number that appears on the transom. I had clear laser printer decal paper but the crest is basically a white shield and the color printer in my office cannot print white. My solution: I made two decals of the crest, affixed the first one in place, filled it with some white paint using a microbrush and then affixed the second one over this white field. I was able to download the artwork of the 1st MCM Squadron and the Bronny's crest from the Ton Class Association website with the kind permission of webmaster Rik Furnival (who served on the Bronnington as well as several other Ton Class ships).

Early on in the project, I had to make a change in plans. While I was attempting to attach one of the photoetch anchors to the hawsehole I drilled into the hull, I dropped it only to disappear into the black hole we all have under our workbenches. I tried and tried, but I could not find it! So, in light of this loss I decided to build an at anchor scene (the other anchor was firmly in place) with some photoetch anchor cable extending from the hawsehole. As the saying goes, when you have lemons, make lemonade!

Once the larger resin components were glued together, I started to work with the photoetch components. The photoetch was basically easy to work with and only two parts presented some work. The Gemini stowage platform supports that attach to the bulwarks needed some trimming in order to make it level (this was expected as the instructions warned you that this might be needed). The platform has a square opening to accommodate the base for the handling crane that is molded into the edge of the upper deck. I had to trim away some brass from this opening using my Xuron micro shears to make it fit around this base.

The other small problem I encountered was assembling the sweep winch-housing frame, but it had more to do with the resin marker buoys part than the actual brass. The marker buoys are represented in the kit as a rectangular sheet with six domes that are the upper portions of the buoys as stowed. I had to file this part down quite bit, especially rounding off the corners, so that the photoetch housing frame would fit around it properly. Aside from these two little speed bumps, the model went together extremely well.

The kit's photoetch tripod mast was designed to be free standing, as the Nurton did not have a charthouse extending aft off the bridge. On the Bronnington, the mast went into the charthouse and the forward legs of the tripod extend down on either side of the structure. Based on my visual references, there are a pair of supports that meet the mast at the point it enters into the charthouse and extend down to the bridge deck. These supports look very much like the two front tripod legs that extend from the photoetch mast halves (parts 1 and 2). To make the adjustment of the mast for the Bronnington, I clipped off the front tripod legs and set them aside. I glued the two halves together, bending the different mast arrays and arms as instructed. I then clipped the bottom of the mast off at the point where it met the charthouse and glued the mast to the roof. I modified photoetch part 5, which is the front tripod leg, to allow it to fit around the charthouse and attached it as instructed. Finally, I trimmed the lower portions of the tripod legs that I had clipped from parts 1 and 2 and used them as the supports that are just aft of the charthouse.

Since I was making an at anchor diorama, I decided to make it interesting. I added several Gold Medal Models 1/350 Scale Naval Figures (Set 350-8) doing various tasks around the ship. I have a pair doing maintenance on the 40mm Bofors and a group lowering one of the Gemini inflatables. I had a spare lifeboat from another project, so I added it to the scene passing by the Bronnington with one of the two passengers waving hello to a crewmember on the bridge wing.

I mounted the model to a piece of scrap mahogany that a neighbor of mine whose hobby is woodworking gave me. I used acrylic gel medium to make the water and I used Tamiya Sea Blue lightened with some Tamiya Field Blue for the base color. I lightened the base coat with some more Field Blue and added some highlights to the darker color to give it some depth. I used white acrylic craft paint for the wake made by the small boat and some white caps I added to the scene.

Conclusion

Overall, I am happy with the way my Bronnington came out. The White Ensign Models kit was pleasure to work with and I am looking forward to building some more of their kits. I would like to thank Rik Furnival, webmaster of the Ton Class Association Website, for his assistance with some background information on the Bronnington and for letting me use the artwork on his site and Peter Hall for answering some questions I had about the kit.