From Internet Modeler

RealSpace 1/72 Soyuz TM

Posted in: Space/Sci Fi
By Morgan Girling
Apr 11, 2011 - 9:20:23 AM

Background

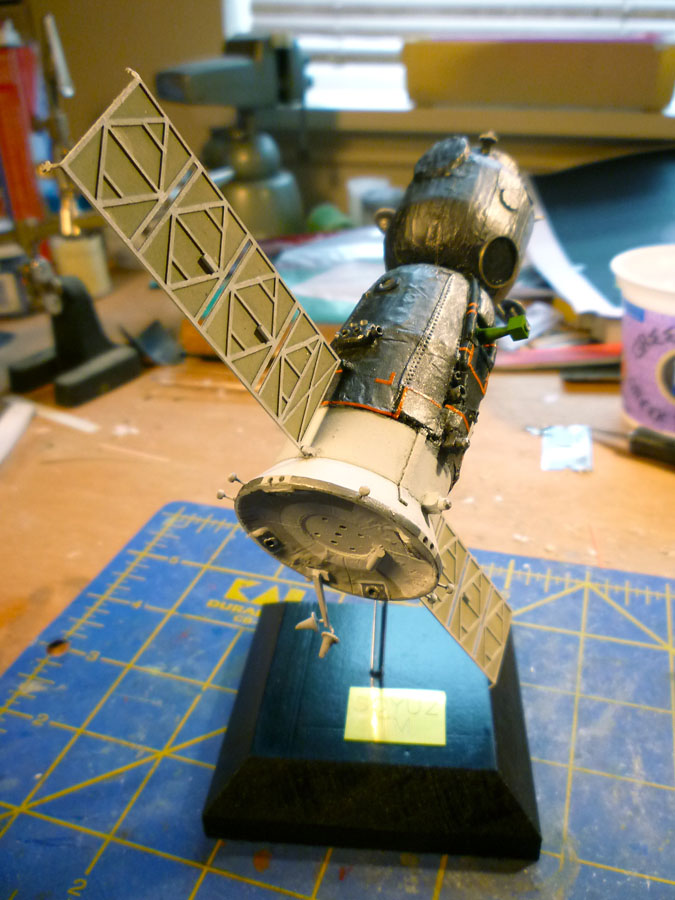
The Soyuz (Union) spacecraft series, designed by the Korolyov Design Bureau, has been in service since the first manned launch in 1967. Today they serve as the International Space Station's lifeboat, and with the retirement of the Space Shuttle, the crew and resupply vessels. RealSpace Models' 1/72 resin offering is of the 4th generation Soyuz TM.

What's in the box?

The kit arrived in a sturdy end-opening cardboard box with a photo of the finished model on the outside. Inside were 2 major resin castings for the orbital module and re-entry/service modules, and a separate plug containing the various antennae and struts. There was also a sturdy photoetch for the solar panels and a few greeblies, and a small sheet of self-adhesive "solar panel" material. A single-sided instruction sheet completed the package.

First Impressions

Girling_2.jpg

My initial impression of the finished model artwork and the major resin pieces was frankly underwhelming, though this was entirely my own fault. My memory of what a Soyuz was supposed to look like dated back to Gatland's books and the illustrations of the Apollo-Soyuz mission, both from the early 1970s. In that alternate universe, the spacecraft had a smooth skin and was predominantly a forest green. What lay before me looked like a prune, albeit one of about the right shape, with the cover art showing it predominantly dark grey.  A quick troll with Google showed me the error of my ways: the spacecraft is covered in thermal blankets, which explained the wrinkled appearance. It also showed that, like soviet cockpit green/blue/whatever, the thermal blanket color depends greatly on the angle of the light and which mission it was on. It has a strong retroreflective quality and generally looks silver-grey, not unlike spandex-lycra, but sometimes appears green, blue, dark grey or dirty tan. I also believe that the actual color has changed over the years, with the early ships being more of a teal green.

The instruction sheet is fairly typical of earlier resin kits, showing a numbered callout of the parts, a drawing of the finished model, and showing vaguely where the parts go, and a full size template for cutting out the solar panel material.

The Buildup

Girling_1.jpg

The kit is much cruder than contemporary resin offerings from the likes of Czech Master or New Ware, but it can be built up into a nice representation of a Soyuz without resorting to heroic measures. The wrinkle effect for the thermal blankets is understated, being more random waves than the sharper wrinkles seen in reference photos. Admittedly, it's hard to model and cast wrinkled fabric, as one can see by comparing Heller's Breitling Orbiter against photos, but it was nonetheless underwhelming. Some of the cast-on maneuvering thrusters looked like they had been dipped in sand, and required some clean-up. Other thrusters were represented by small divots in the cluster housing – these I drilled out and replaced with brass tubing, reamed to approximate the inside of the bell. Other than these problems, the main body went together with very little cleanup. Five-minute epoxy applied to the butt-joint between the modules was sufficient. There was enough surface area that I didn't see a need to also pin to the joint.

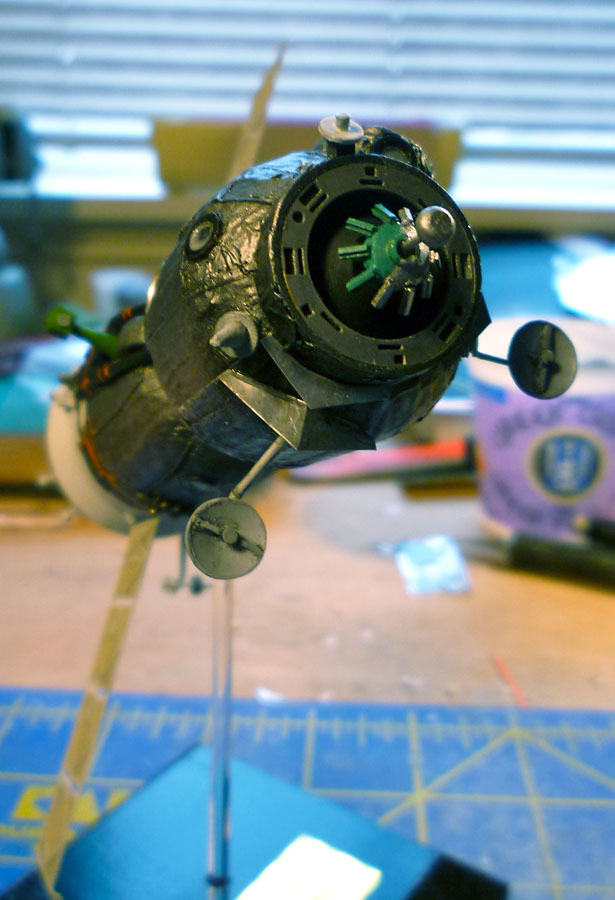
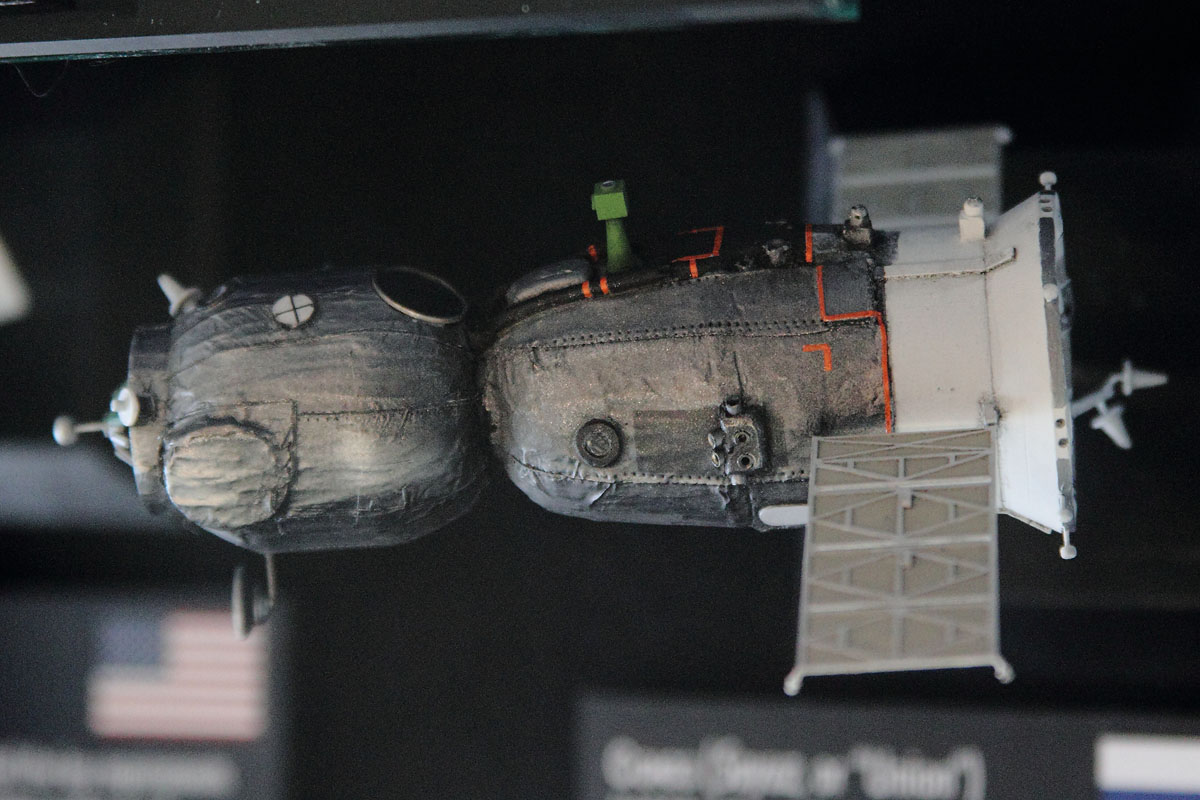
One of the difficulties with this subject is that spindly delicate things poke out from every side making it virtually impossible to assemble and paint without breaking something. I found that, by leaving the conical antennae subassembly off the rear rim of the service module until it was mounted on the stand, I could at least stand it upright throughout the build. I took the opportunity to add a series of what look like deelybobbers around the rim of the base of the service module, using glass seed beads on bits of brass wire.

IMG_2322.JPG

The plug containing the various antennae was compromised by major air bubbles, which eliminated the box structure on top of the periscope, the docking probe and most of the struts.  Luckily, these were easy enough to replace or fix using some Evergreen rod and strip. Glenn, the owner of RealSpace Models is very helpful with replacing defective parts and the likes, but I had put off this build until the last minute, so it was quicker to build the replacement bits.  The 2 parabolic docking antennae are somewhat oval, but clean up adequately with some judicious filing. There are 2 conical antennae which mount on a strut at the rear of the spacecraft and look a bit like witch's hats. They were cast as simple cones with an overly-thick ground plane, but in real life the cones look more like milk bottles. I compromised and used the conical parts with some thin styrene ground planes. Their strut was a microblob, which I replaced with more strip styrene and brass wire.

Up front is a petaled docking adapter, looking like a cross between a Dalek and a cocktail umbrella. As mentioned above, the ball-on-a-stick docking probe was a goner, so I substituted a glass bead and some brass wire. The kit part for the petaled piece is at best highly asymmetric, and even if one succeeds in removing it from the plug and cleaning it up, it still looks very, very wrong. I salvaged the center portion and added strip styrene petals.

The PE fret is very thick, which makes for sturdy solar panels, and docking collar, but is hopelessly thick and stiff for the shields in front of the dish antennae.  I cut duplicate shields from a disposable pie pan and tarted up the strut work on the solar panels with some more bits of Evergreen strip.

Finishing

IMG_2330.JPG

I simulated the thermal blankets' reflectance properties by painting on the shadows. The wrinkle texture is too subdued and lacking crevices to lend itself to using a wash. Instead, I sprayed Alclad duraluminum on the sunny side, with a bit of bright aluminum for the highlights, and Alclad dark aluminum on the shadow side for the blanketed portions. Matte white and light grey sufficed for the bare portions of the service module. I picked out a few panels of aft face of the service module with light gull grey to match the reference photos (though I suspect that they're all the same in real life and that the variation was due to the differing angles).

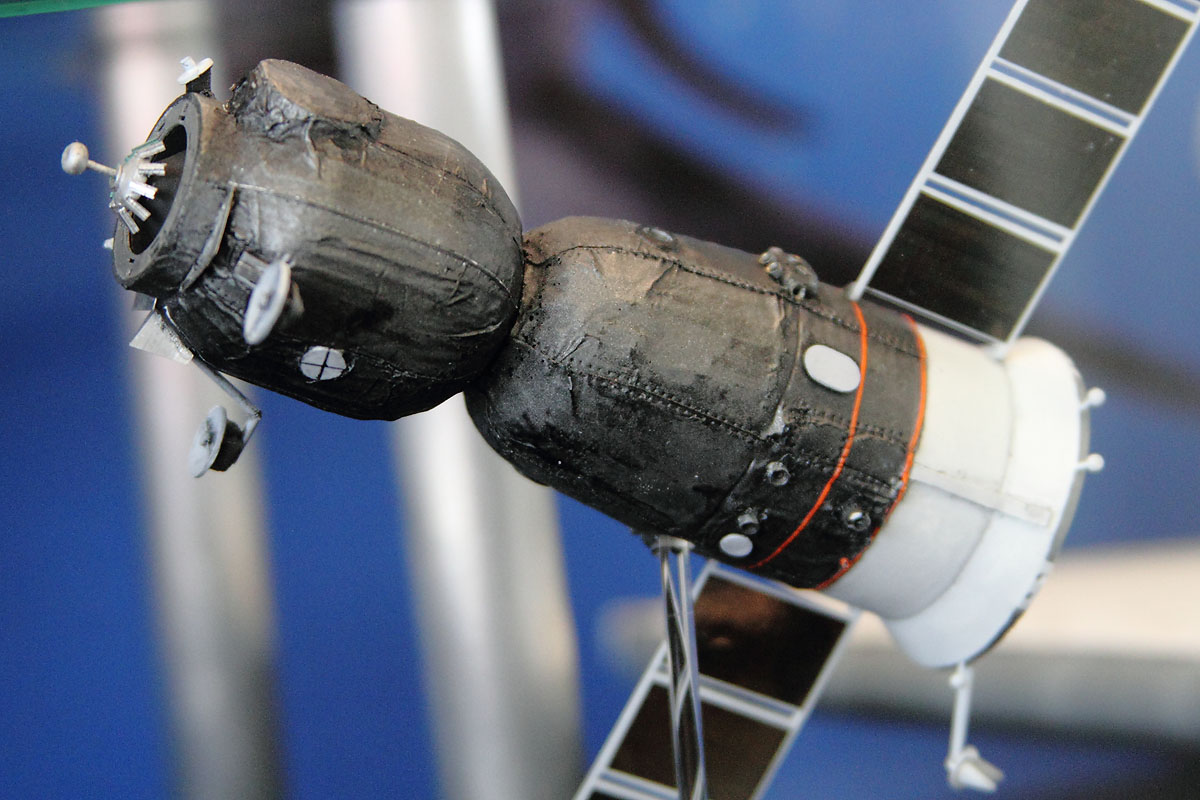
The Soyuz has several prominent seams in the thermal blanket which appear to be sealed with Space Duct Tape™ in black and bright orange. Simulating these with painted decal strips really improves the appearance. The solar panels are radome tan with matte white braces on the braced side, and matt white on the solar cell side. The iridescent self-adhesive solar panel material looked depressingly toy-like until cut out and applied. While very wrong as scale duplicates of the Soyuz panels, they give a surprisingly good impression of the solar panels. (First impressions can be misleading.)

Accuracy

The parts and finished model generally look a lot like a Soyuz, though the orbital module seems a little long and cylindrical rather than melon-shaped. A few access panels are not quite where they belong, but the thermal blanket texture makes moving them impractical. The base of the service module should flair out to a sharp edge, but the model chamfers the edge. Again, it is impractical to fix, but doesn't detract from the overall effect.  The bracing strut pattern on the inboard bay of the panels is completely wrong and can't be fixed by adding strip styrene – it will bother you but not the viewers. Note that the positions of the 2 parabolic antennae and their brackets are swapped in the instruction sheet.

Overall, it makes a credible addition to one's spacecraft collection, and apart from the problems caused by the bubbles in the small parts pour, should go together fairly smoothly.


© Copyright 2023 by Internet Modeler