


 The
Birth of the Luftwaffe: Building a Pair of Heinkel He51s in 1/48
The
Birth of the Luftwaffe: Building a Pair of Heinkel He51s in 1/48

By Will Riepl
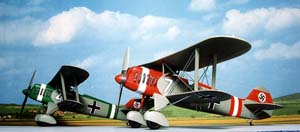
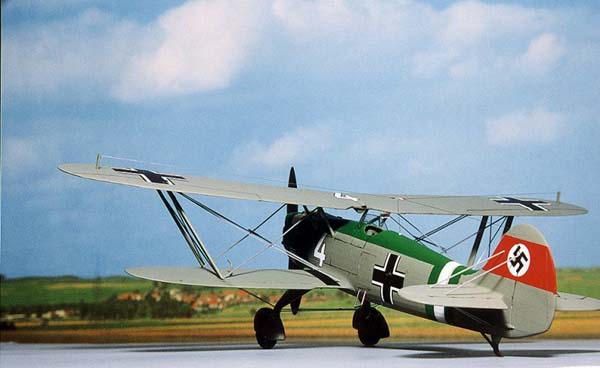
The Heinkel He51 was one of the last biplane fighters and one of the
first Luftwaffe fighters. In the early years of the Luftwaffe, the Heinkels
and Arados also had the distinction of being some of the most colorful
planes in the Luftwaffe, with brightly colored noses adorning different
squadrons. It was this color that drew me to the Heinkel He51, and when
the Classic Colours series of Jagdwaffe books came out, I just knew that
I had to do one. To help things along, Aeromaster came out with some decal
sheets to coincide with the Jagdwaffe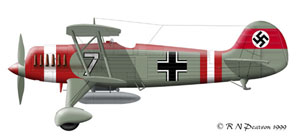 books and I was set. But first I needed to get the kits. Kits? Yup, kits.
I had decided to do a red-nosed one, and since the holiday season was
upon us, what better complement to the red one than having a green-nosed
one sit next to it?
books and I was set. But first I needed to get the kits. Kits? Yup, kits.
I had decided to do a red-nosed one, and since the holiday season was
upon us, what better complement to the red one than having a green-nosed
one sit next to it?
The Kit
In 1/48 scale the only choice for an injection molded He51 is the Classic Airframes kit. This is definitely not a kit to start this hobby with, but if you've built a few short run kits or resin kits you should have no problems with this one. Be prepared for a fair amount of work though. As Classic Airframes offers both the wheeled and float versions, I had ordered two of the wheeled version. Through a mix-up, though, I ended up with two floatplane versions. Luckily the wheel parts were in there as well, so now I have four floats that I'll have to find a use for. I've got some ideas on that, but you'll just have to wait and see.
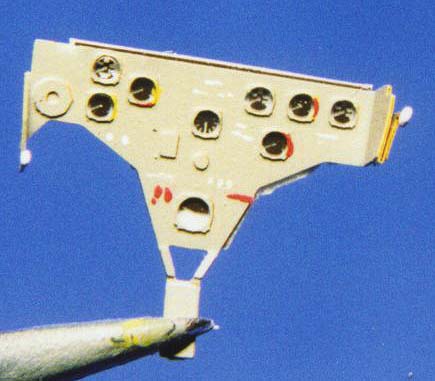
 The
plastic in the kit had a rough texture to it, so I smoothed that down
with some fine steel wool. This smoothed out the plastic without removing
any of the detailing like you would if you used sandpaper. Next up, I
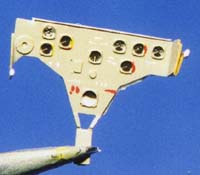
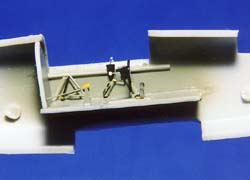
took a look at the interior. With brass and plastic parts to be fitted
in place without any guides or locator pegs, a lot of trial and error
shows up here. By marking where the cockpit floor went, I was able to
get a better idea as to what went where and it made it easier to paint
up and detail. Of course, with that small cockpit opening and the upper
wing in the way not much can be seen once everything is together.
The
plastic in the kit had a rough texture to it, so I smoothed that down
with some fine steel wool. This smoothed out the plastic without removing
any of the detailing like you would if you used sandpaper. Next up, I
took a look at the interior. With brass and plastic parts to be fitted
in place without any guides or locator pegs, a lot of trial and error
shows up here. By marking where the cockpit floor went, I was able to
get a better idea as to what went where and it made it easier to paint
up and detail. Of course, with that small cockpit opening and the upper
wing in the way not much can be seen once everything is together.
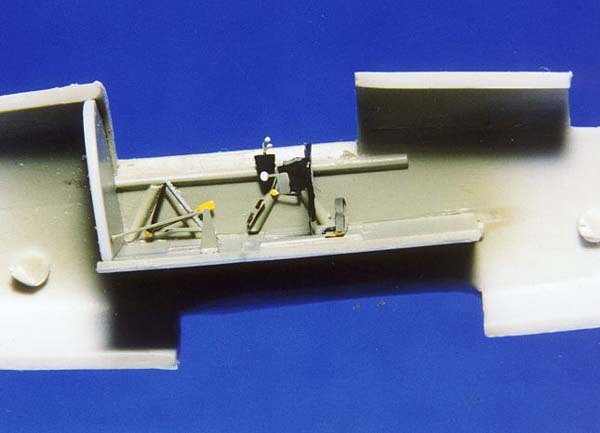
Since the plane is from the early days of the Luftwaffe, I painted the interior RLM 02 and detailed it with other colors. Once that was out of the way, I started looking at how to get the fuselage together easily. Since there isn't any locating pegs, I made tabs out of styrene and used those to keep the parts aligned as I glued the two halves together. Once the halves were together I added the top of the cowling. This part was a bit tricky to get to fit right and it took me several tries on each kit to get it on there.
 The
bottom wing was attached and lined up, and then I turned to the tail.
No pegs here either, so I made my own by drilling holes in the fuselage
and tailplane and inserted plastic rod to keep things in place while I
glued everything together. With the bottom wing and tail on, it was really
starting to look like a He51, so I moved right along to the next step:
the struts.
The
bottom wing was attached and lined up, and then I turned to the tail.
No pegs here either, so I made my own by drilling holes in the fuselage
and tailplane and inserted plastic rod to keep things in place while I
glued everything together. With the bottom wing and tail on, it was really
starting to look like a He51, so I moved right along to the next step:
the struts.

Here is where I ran into some problems. The struts are the weak point of the kit and I ended up using only the cabane struts. I made a jig for the cabanes to keep them aligned properly with the fuselage. I also drilled a small hole in the top of the struts for a wire pin that will fit into a corresponding hole in the wing. By taking my time here and being very careful I was able to make sure the top wing was position perfectly.
 After
the cabane struts were securely fastened to the fuselage with both plastic
and CA glue, I set the top wing in place and measured the outer struts.
After getting the proper length, I cut new ones from plastic card stock
and drilled holes in the wing for the mounting pins. Once those are thinned
down to a scale size, they are flexible enough to bend and snap into place
once the top wing has been attached, so that worked out really well.
After
the cabane struts were securely fastened to the fuselage with both plastic
and CA glue, I set the top wing in place and measured the outer struts.
After getting the proper length, I cut new ones from plastic card stock
and drilled holes in the wing for the mounting pins. Once those are thinned
down to a scale size, they are flexible enough to bend and snap into place
once the top wing has been attached, so that worked out really well.
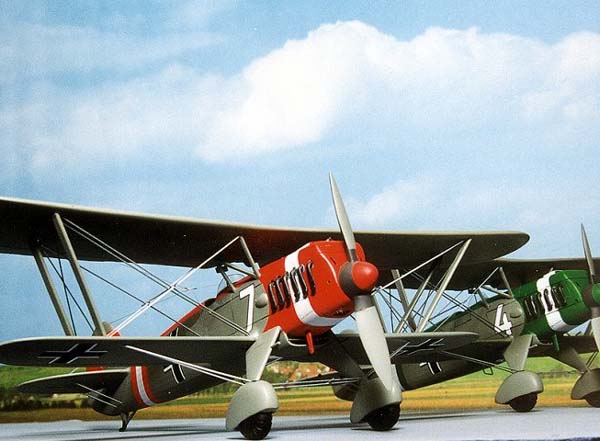
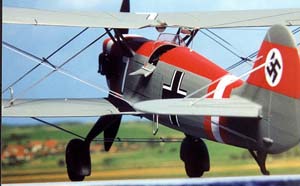
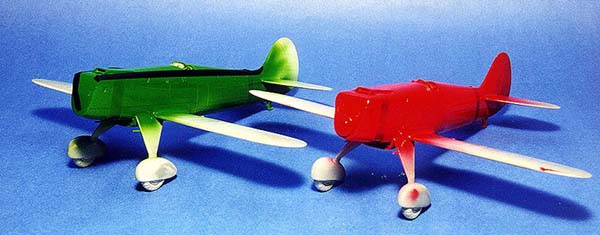
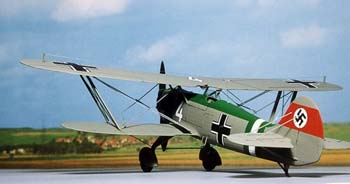
Things were starting to look good so it was now time to turn to painting
my Heinkels. I wanted to do a red nosed one and a green nosed one, so
I started out by painting them gloss white to give a nice backing for
the red and green. After spraying the red and green on, I masked off the
scalloped nose and spine  and
painted the RLM 63 color on next. The new Jagdwaffe books has this color
as almost an RLM 02 shade instead of a light gray, and some more digging
in my references showed that there were, in fact, two different shades
of RLM 63, with the later, more greenish gray one being applicable for
the Heinkels. I started with Testors RLM 02 and added some dark green
to it until I got a shade that I liked, then I airbrushed both planes
with that mix. Once the tape came off of the color it really looked sharp
and I was ready to start putting decals on.
and
painted the RLM 63 color on next. The new Jagdwaffe books has this color
as almost an RLM 02 shade instead of a light gray, and some more digging
in my references showed that there were, in fact, two different shades
of RLM 63, with the later, more greenish gray one being applicable for
the Heinkels. I started with Testors RLM 02 and added some dark green
to it until I got a shade that I liked, then I airbrushed both planes
with that mix. Once the tape came off of the color it really looked sharp
and I was ready to start putting decals on.
I used the Aeromaster sheets (48-456 & 48-457) to do my two He51s. Being typical Aeromaster sheets the decals went down very well, but there were some inaccuracies in the shape of some of the numbers. I got around that by using different numbers but if you want to do the same ones as on the sheet, refer to the photos in the Jagdwaffe books to see what needs to be corrected.
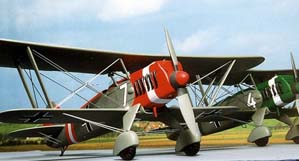
 Coming
down the home stretch now, it was time to add the wings and put on the
finishing touches. The wing went on easily and after supergluing it in
place I started to look at the rigging. Initially I was just going to
use invisible thread, but after looking at pictures I saw that the flying
wires were actually flat. I checked out the local hobby shop looking for
something that I could use that would work for that and I came up with
some Evergreen dimensional lumber in .010x.020 size. I trimmed that to
the right size, set it into place, and it looked really good. Adding all
of these in took a lot of time, but once it was done it was worth it.
Now that these are done, I've discovered some brass stock in the railroad
section that is .010x.018 that would work even better, so when I build
a Tamiya Swordfish I'll pass on their etched set and just use that instead.
For $3.00 I can get 36" of brass, more than enough to do the Swordfish
and one or two other kits, at a fraction of the cost of the Tamiya etched
set.
Coming
down the home stretch now, it was time to add the wings and put on the
finishing touches. The wing went on easily and after supergluing it in
place I started to look at the rigging. Initially I was just going to
use invisible thread, but after looking at pictures I saw that the flying
wires were actually flat. I checked out the local hobby shop looking for
something that I could use that would work for that and I came up with
some Evergreen dimensional lumber in .010x.020 size. I trimmed that to
the right size, set it into place, and it looked really good. Adding all
of these in took a lot of time, but once it was done it was worth it.
Now that these are done, I've discovered some brass stock in the railroad
section that is .010x.018 that would work even better, so when I build
a Tamiya Swordfish I'll pass on their etched set and just use that instead.
For $3.00 I can get 36" of brass, more than enough to do the Swordfish
and one or two other kits, at a fraction of the cost of the Tamiya etched
set.
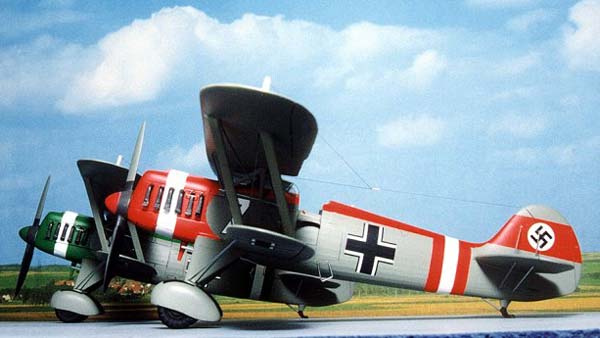
 With
the rigging in place, all that was left was the antenna wires. Running
those from the wings to the tail went quickly on the workbench, and there
they were, two colorful Heinkel He51s sitting side by side on the table.
The only problem was that after all the rigging and running the antenna
wires, it took me a moment to figure out how to pick them up without breaking
a wire!
With
the rigging in place, all that was left was the antenna wires. Running
those from the wings to the tail went quickly on the workbench, and there
they were, two colorful Heinkel He51s sitting side by side on the table.
The only problem was that after all the rigging and running the antenna
wires, it took me a moment to figure out how to pick them up without breaking
a wire!

 Building
these two kits helped fill in my early years of my Luftwaffe collection,
but I really needed a break after doing them. Thankfully, the Hasegawa
Hs129 came out shortly afterwards and I got that break I needed. Even
though the kits took some work to get things just right, I am tempted
to do one or two more, this time from the Spanish Civil War. While the
Heinkel He 51 had a fairly short life span in the Luftwaffe, those early
years saw it in many different schemes and options, making it an excellent
example of the birth of the Luftwaffe.
Building
these two kits helped fill in my early years of my Luftwaffe collection,
but I really needed a break after doing them. Thankfully, the Hasegawa
Hs129 came out shortly afterwards and I got that break I needed. Even
though the kits took some work to get things just right, I am tempted
to do one or two more, this time from the Spanish Civil War. While the
Heinkel He 51 had a fairly short life span in the Luftwaffe, those early
years saw it in many different schemes and options, making it an excellent
example of the birth of the Luftwaffe.


Previous: Contents

