


 MPM/HML
1/48 Me209A-2 (A1)
MPM/HML
1/48 Me209A-2 (A1)
By Allan Wanta
History
The venerable workhorse of the World War 2 German Luftwaffe, the Bf109, had seen better days and was being bested by numerous allied designs. Messerschmitt, in 1943, went forth designing a replacement that could match the Allied Mustangs and Spitfires in order to turn the tide of the war. Utilizing some 65% of a Bf109G-5, the new fighter, designated 209V-5, started its development. The 209 was a direct competitor of the Ta152 and Fw190D, so much was at stake with its hoped for success. The dwindling supplies of DB 603 engines meant that an alternative power source was needed, and it was the Junkers Jumo 213E engine which was found to be the most suitable. With minor and major changes the aircraft took to the air in late 1944, only to find it was some 30-mph slower than the Fw190D with a similar engine. In order to continue development, the entire project was re-designated the Me109L In the end no further development was undertaken due to the worsening situation in all fields of German aviation and production.
The Kit
The kit comes in the usual white HPM box we've come to know and love, however it's evident that the little bag of parts could have used a much smaller box. All resin, white metal and vacuformed parts are neatly heat-sealed in their own pouches and I saw no broken or damaged items. A decal sheet meant for both the V5 and V6 versions are on the same sheet and include a split swastika emblem.
Assembly
 I
began assembly with the cockpit, which appears to be missing a rear bulkhead
and a forward engine firewall, so you might want to make these with plastic
card to eliminate the see-through effect. All details are cast onto the
sidewalls and are convincing enough, overall RLM 66 and dry brushing brought
out the highlights, a resin instrument panel also looks good but could
do with some photo-etching. Luckily we have made a bulkhead so the two
piece seat has a place to rest, strange way of engineering a plane don't
you think? Without further ado, we join the two fuselage halves together;
good matching of engraved panel lines and minimal putty.
I
began assembly with the cockpit, which appears to be missing a rear bulkhead
and a forward engine firewall, so you might want to make these with plastic
card to eliminate the see-through effect. All details are cast onto the
sidewalls and are convincing enough, overall RLM 66 and dry brushing brought
out the highlights, a resin instrument panel also looks good but could
do with some photo-etching. Luckily we have made a bulkhead so the two
piece seat has a place to rest, strange way of engineering a plane don't
you think? Without further ado, we join the two fuselage halves together;
good matching of engraved panel lines and minimal putty.

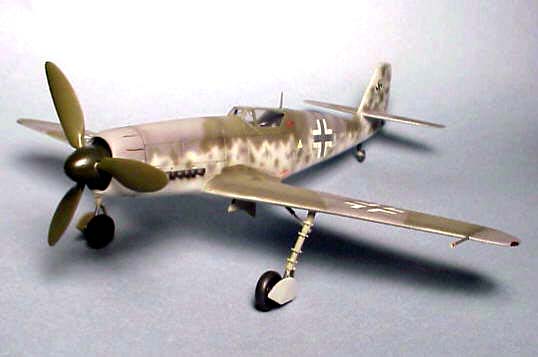
The design of the kit does not exactly match with historical reality. A Jumo 213 engine has a round cross section - that is every Jumo 213 I've ever seen did, so why does the kit have a pronounced oval section? Looks like more of a DB 603-engine profile to me, alas I think I've solved the problem. We have a kit more akin to the DB engine V5 airframe than the V6 Jumo engine, why do these things always happen to me? Well, let's still call it the V6 and get on with it.
The one piece wings require a bit of fiddling and it seemed the fuselage was a bit too wide, or perhaps I didn't sand the fuselage halves enough, so be careful here, mine may not have the engineered dihedral, but then again it does have bulkheads for the cockpit! Tailplanes are butt jointed and a separate rudder are attached easily with little work, some reworking of their edges are needed to get clean lines.
 My
example's gear legs are a bit vague on detail and it's a little hard to
discern the oleo from the rest of the structure, so some Ta152 gear was
used and looks a ton better. The V6 had exposed gear legs with covers
only for the wheel areas, so the gear legs themselves may benefit from
some hydraulic lines. A small white metal tail wheel is well cast and
just sits in the tail, no wheel well needed here.
My
example's gear legs are a bit vague on detail and it's a little hard to
discern the oleo from the rest of the structure, so some Ta152 gear was
used and looks a ton better. The V6 had exposed gear legs with covers
only for the wheel areas, so the gear legs themselves may benefit from
some hydraulic lines. A small white metal tail wheel is well cast and
just sits in the tail, no wheel well needed here.
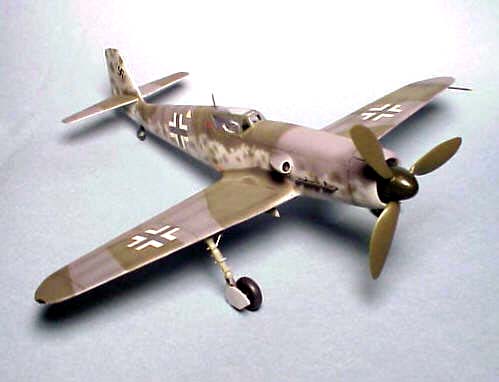
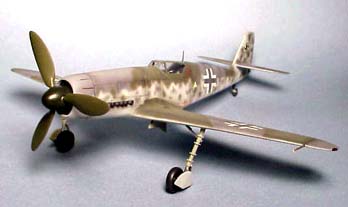
All in all this kit goes together pretty easily, but the annoying idea that this kit is a mish-mash of the two prototype ergs me to no end. How shall I complete and finish this? Like a Me209A-1 or a Me209A-2? I went for the A2 version, which did not have any radio call letters on it and the standard RLM 74, 75, 76-splinter scheme.
The canopies are usable but for the nasty pits and scratches from vacuforming, I would use a replacement canopy from the parts box next time, that is when I do a proper A2 version.
Conclusion
Well, as we can see from my write-up, the kits not bad and builds up to nice looking model of, well, a Me209 and you can pick which one! You should have some experience with resin for this one and a nice spare parts box if you'd like to give this kit some extra detail.


Previous: Contents

