


 Tamiya
1/24 Ford Focus WRC
Tamiya
1/24 Ford Focus WRC
By Tony Paton
Introduction
After many years racing the Escort, Ford developed a new car to take on the 1999 WRC championship. The Focus debut at the Rally of Monte Carlo, with World Champion driver Colin McRae (who was previously driving for Subaru), was an eventful one. The Commissioners of the rally refused to accept the car due to the water pump being located off the engine in a remote area. After an appeal by Ford, with the support of all the other manufacturers except Subaru, the Focus was allowed to race.
McRae finished third with Simon Jean-Joseph, in the second Focus, claiming 11th spot. Not a bad effort for a car in its first rally. Two weeks later Ford's appeal was rejected, thus disqualifying the car and deleting the driver and manufacturer's points.
Throughout the season, Ford had shown the potential that it could win the championship. Mechanical failures and numerous crashes destroyed their hopes of a dream debut. Ford hope to do better in the 2000 season with the signing of another great driver in Carlos Sainz, who comes from the now defunct Toyota Rally team.
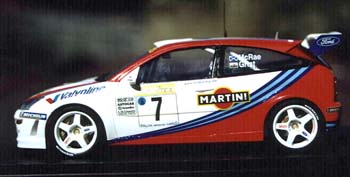
Tamiya's example of the Focus represents the car in its debut race in the Rally of Monte Carlo 1999. Two decal options are available; No 7 of McRae and No 8 of Jean-Joseph.
For this build I chose McRae's No.7. Additionally I picked up aftermarket detail sets from Studio27 - these are reviewed elsewhere in this issue.
First Step
 The
front bumper, brake cooling ducts and roof vent were glued to the body.
The rear wing was also constructed and glued to a toothpick in preparation
for painting. Due to the front grill, where the Ford badge is attached,
is molded in solid plastic and the Studio 27 fret includes this front
grill. The plastic one was removed and the area sanded with frequent dry
fitting of the grill to make sure it was flush to the bodywork. Care must
be taken with the PE grill, as they are very fragile and easy to bend.
The
front bumper, brake cooling ducts and roof vent were glued to the body.
The rear wing was also constructed and glued to a toothpick in preparation
for painting. Due to the front grill, where the Ford badge is attached,
is molded in solid plastic and the Studio 27 fret includes this front
grill. The plastic one was removed and the area sanded with frequent dry
fitting of the grill to make sure it was flush to the bodywork. Care must
be taken with the PE grill, as they are very fragile and easy to bend.
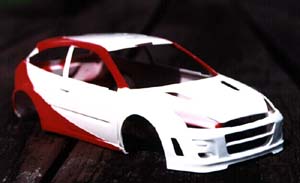
They were then sanded with 1200 grit wet & dry and washed. After drying, the body and wing were sprayed with Tamiya's flat white as an undercoat. As most of the other parts are painted gloss white, the remaining frets were given a coat of Tamiya's Gloss white (Ts-26).
Interior construction.
 The
undersurface and suspension is engineered beautifully in this kit. There
is also a lot of interior detail to this kit. The spare tire is a highlight
and the roll cage has to be the most complicated structure I've seen for
a racecar. This caused a few problems while constructing but my advice
is to glue it together one part at a time and go off and do something
else before continuing.
The
undersurface and suspension is engineered beautifully in this kit. There
is also a lot of interior detail to this kit. The spare tire is a highlight
and the roll cage has to be the most complicated structure I've seen for
a racecar. This caused a few problems while constructing but my advice
is to glue it together one part at a time and go off and do something
else before continuing.
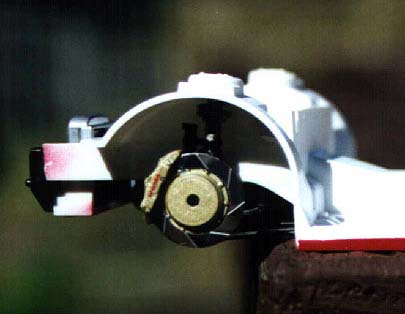
 The
photo-etched brake discs make a difference and Tamiya have supplied brake
caliper decals as well.
The
photo-etched brake discs make a difference and Tamiya have supplied brake
caliper decals as well.
The Body
After the body had dried it was time to mask off and apply the Bright red (TS-49). Beforehand I had cut out the blue decal that divides the red and white colors on the car. I used this as a stencil and made a custom mask. Make sure the interior is masked, as red paint will go everywhere and it is hard to remove from white, even if you attempt to re-spray the affected area.
 After
this had dried, I removed the mask. Some paint had crept under, but on
dry fitting the decals this would not show as they
After
this had dried, I removed the mask. Some paint had crept under, but on
dry fitting the decals this would not show as they 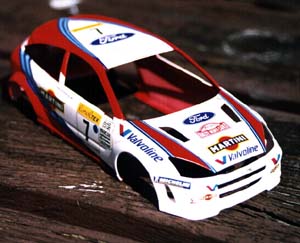 covered
it. When this had dried over a few days the decal process was started.
The only problem I had was with the Martini decals for the side. They
are placed mainly on the white painted area with a small corner showing
on the blue stripes. The blue stripes show up under the white Martini
lettering. My advice would be to remove the area of blue stripe these
decals go over.
covered
it. When this had dried over a few days the decal process was started.
The only problem I had was with the Martini decals for the side. They
are placed mainly on the white painted area with a small corner showing
on the blue stripes. The blue stripes show up under the white Martini
lettering. My advice would be to remove the area of blue stripe these
decals go over.
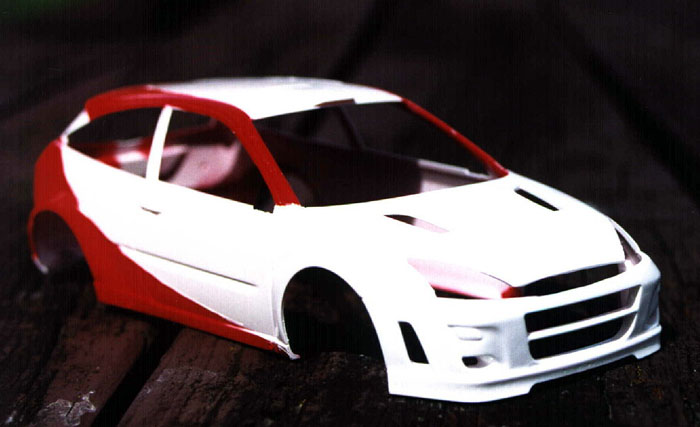
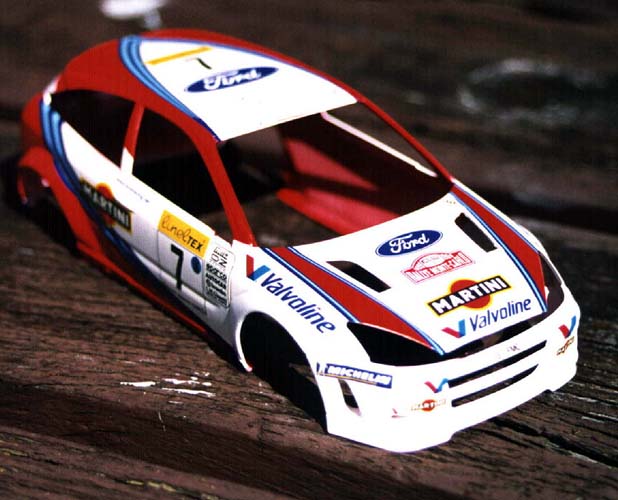
When they had dried the whole body was sprayed in Testors Glosscoat.
Fine detailing
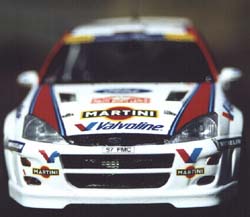 The
Studio27 PE fret made a huge difference to this kit. They supplied a lot
of the mesh grills that replace Tamiya's plastic versions and look a whole
lot better. The front grill was carefully put in place with the headlight
pods next to it. The effect looks so much better than being molded in
solid plastic. The PE Ford badges topped off the whole realistic look.
These were painted gloss blue, when the paint dried a knife scrapped off
the excess paint to display the Ford in Chrome.
The
Studio27 PE fret made a huge difference to this kit. They supplied a lot
of the mesh grills that replace Tamiya's plastic versions and look a whole
lot better. The front grill was carefully put in place with the headlight
pods next to it. The effect looks so much better than being molded in
solid plastic. The PE Ford badges topped off the whole realistic look.
These were painted gloss blue, when the paint dried a knife scrapped off
the excess paint to display the Ford in Chrome.

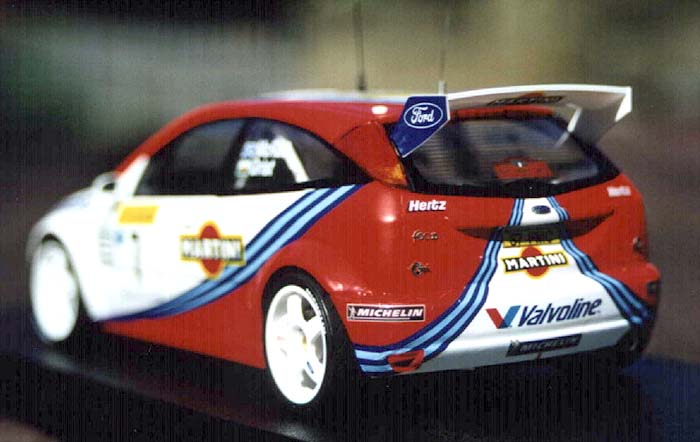
As there are two great big holes in the hood, Tamiya have included two tubs that go under these to display a small portion of the engine bay. When the body is introduced, the top of the suspension also appears through the vent. Topped with the Studio27 grill, this part is my favorite area of the whole kit.
 There
is also PE for the hood and trunk pins, tow cables and a great "Focus"
badge for the rear. I also added two Sakatsu aerials that added to the
realism. Better looking than heat stretched sprue as Tamiya suggest.
There
is also PE for the hood and trunk pins, tow cables and a great "Focus"
badge for the rear. I also added two Sakatsu aerials that added to the
realism. Better looking than heat stretched sprue as Tamiya suggest.
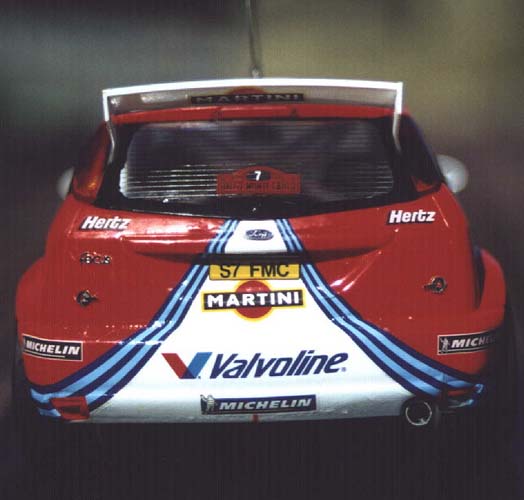
The windows were painted with the aid of the supplied masks. Be careful with the rear window as that incorporates the rear lights as well. It is also where the rear wing is attached.
The windows were attached with white glue and the body was attached to the Chassis, no drama at all.
On all the photos I have with the Focus from the Monte Carlo rally of 1999 (which this kit represents) the driver's names appear on the rear side windows. Tamiya do not supply these for some reason. Thankfully the Studio27 aftermarket kit supply these window decals and the small decals that appear on the rear vision mirrors. The names for the Number 8 car are supplied as well.
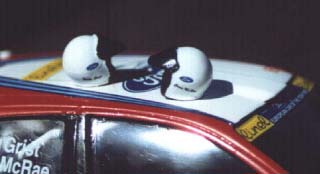 Finally
the driver's helmets, that Studio27 provide, were painted and placed near
the car. I didn't glue them on the car, as that would be silly.
Finally
the driver's helmets, that Studio27 provide, were painted and placed near
the car. I didn't glue them on the car, as that would be silly.
Conclusion
For a curbside car kit from Tamiya, it was a little bit tricky. This was in the area of painting the body and constructing the roll cage. Apart from that, the photo-etched parts made it more challenging but that was my decision to fine detail this car. The only other gripe is the lack of driver's decals for the rear side windows. I don't recommend this kit for the beginner but if you want a car kit that is more challenging, this is the kit for you.
The end result is a stunning World rally Car, which keep getting better and better from Tamiya.
I'd like to thank Hobbylink Japan for the review sample.
The Studio27 upgrade parts and Sakatsu aerials can be purchased from Hobbylink or RainbowTen where the examples used were purchased.


Previous: Contents


