


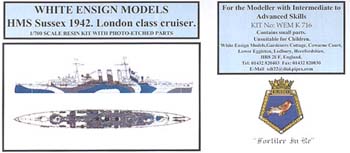
 White
Ensign Models 1/700 Resin County class cruiser
White
Ensign Models 1/700 Resin County class cruiser
HMS Sussex,
by Mike Dunn
Introduction
HMS Sussex was the second of the London variant of the County class (the other variants being the Kents and the Dorsetshires). Built under the Washington Treaty, this class was in many respects the worst of all worlds - side armour was non-existant, the guns were only 8", and they were very expensive. Regardless of this, they were fine ships at sea, and had high endurance. Sussex was launched on the Tyne in Hebburn (a stone's throw from my old house) in 1929, and was under refit on the Clyde when hit by a bomb, then flooded to reduce damage in 1940. Refloated and repaired in 1942, she joined the Home Fleet for a year before continuing her War in the Far East. She was scrapped in 1950. This model is of her during her time in the Home Fleet.
"I need a WWII era ship between destroyer and carrier - what do you suggest?" I asked Caroline Carter of WEM while at the Fleet Air Arm show. "Well, how about a County class cruiser?" she replied. As the length fits nicely between those others I have planned for a dockyard diorama, I readily agreed.
the kit
So, what do you get for your money? On opening the box, with its colour cover of the starboard profile and plan view as well as a little info on the ship, you see two bubble-wrap packages, two clear envelopes with brass, and the envelope containing the instructions. Let's start with the hull.
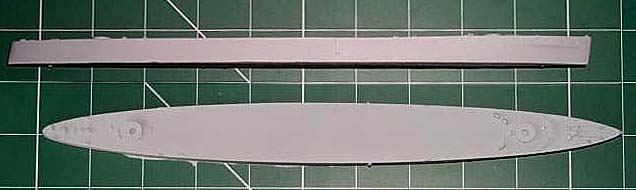
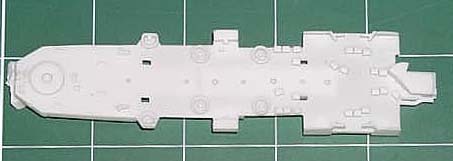
On opening the long bubble-wrap, just under 11" long, you have the hull and it appears to be mostly devoid of detail. The bow sides are sculpted to shape, and hold the anchor housing. The middle of the starboard side has a ladder going down, the stern deck has some detailing with the aft gun mount, and the forward deck has detailing (including the anchor chains) and the fore gun mount. There are a number of chocks along the deck, and all are fine. One final note; the Sussex had a teak deck. This is wonderfully shown by the deck having individual planklines - these are extremely fine, and are perfectly cast. And that's all, because this class is quite 'clean' fore and aft, with all of the 'clutter' being on and about the superstructure.
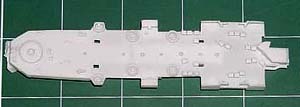 Speaking
of which, this consists of one large deck, running almost the
Speaking
of which, this consists of one large deck, running almost the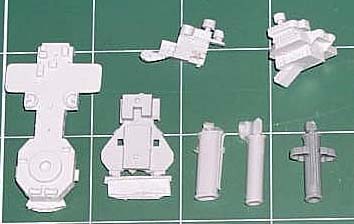 length of the cleared area on the ship, and a smaller one that fits against
this at the rear. There are several other pieces that mate with these
two, these being the funnels and the bridge. These pieces are all in a
plastic bag, securely wrapped in bubble-wrap. Also in this bag are three
smaller ones, holding the various detailing parts.
length of the cleared area on the ship, and a smaller one that fits against
this at the rear. There are several other pieces that mate with these
two, these being the funnels and the bridge. These pieces are all in a
plastic bag, securely wrapped in bubble-wrap. Also in this bag are three
smaller ones, holding the various detailing parts.
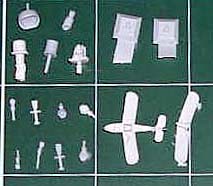
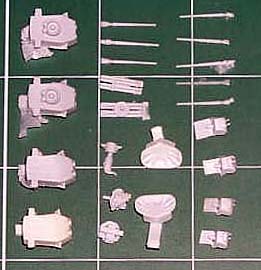
The first of these contains all the ships boats and liferafts - 16 liferafts and nine larger boats from dinghy up to pinnace. The photos don't do these justice - there is cross-hatching inside the liferafts, for example. The second bag holds the Walrus aircraft (in two parts) as well as various detailing parts for the superstructure. The last bag holds the turrets, the gun barrels, the torpedo tubes, the oerlikons and pom-poms.
 |
 |
 |
 Moving
up to the brasswork, you get a length of brass rod to use in the mast
construction. The instructions mention a narrower plastic rod as well
- it was only when checking the brass rod that the plastic one was seen
nestled right beside it. Just goes to show - ALWAYS double-check! The
sheet of photo-etch is next, and this is full of detailed parts. These
range from the usual two- and three-bar railings, to the crane and catapult
for the Walrus, to the funnel caps, to the ladders, to the radars, to
the oerlikons and pom-poms. Hold on a mo - but weren't they in resin?
Yup - you have a choice - for those happy with the resin versions, you
can ignore the PE ones. These are more detailed, but the trade-off is
that the pom-poms are in eleven parts! You can also mix and match bits
of the resin parts for the PE parts, getting the best of both worlds -
the thicker pieces in resin and the smaller ones in PE.
Moving
up to the brasswork, you get a length of brass rod to use in the mast
construction. The instructions mention a narrower plastic rod as well
- it was only when checking the brass rod that the plastic one was seen
nestled right beside it. Just goes to show - ALWAYS double-check! The
sheet of photo-etch is next, and this is full of detailed parts. These
range from the usual two- and three-bar railings, to the crane and catapult
for the Walrus, to the funnel caps, to the ladders, to the radars, to
the oerlikons and pom-poms. Hold on a mo - but weren't they in resin?
Yup - you have a choice - for those happy with the resin versions, you
can ignore the PE ones. These are more detailed, but the trade-off is
that the pom-poms are in eleven parts! You can also mix and match bits
of the resin parts for the PE parts, getting the best of both worlds -
the thicker pieces in resin and the smaller ones in PE.

 Now
on to the instructions. To me, these are one of the most important parts
of the kit. Good clear instructions help you get the best from ANY kit
- poor ones will turn the best kit into a poor model. So, what are these
like? You get eight pages of A4 paper. The first page has some history
of the Sussex, including her particulars in this build (1942), as well
as the usual small parts and resin warnings. The reverse has a 1:1 copy
of the PE parts, which have all been numbered (there are 45 different
parts), and starts out telling you what part is what and how it is assembled.
This continues onto pages 3 & 4, before finishing on page 5. Also on that
page is the mast layout, and the instructions on making and detailing
both the mainmast and foremast. The diagrams are at least twice model-size,
and are very clearly marked with all the dimensions. Page 6 starts with
the resin instructions, and also spans pages 7 & 8, being broken down
into 38 clearly marked and illustrated steps. Pages
Now
on to the instructions. To me, these are one of the most important parts
of the kit. Good clear instructions help you get the best from ANY kit
- poor ones will turn the best kit into a poor model. So, what are these
like? You get eight pages of A4 paper. The first page has some history
of the Sussex, including her particulars in this build (1942), as well
as the usual small parts and resin warnings. The reverse has a 1:1 copy
of the PE parts, which have all been numbered (there are 45 different
parts), and starts out telling you what part is what and how it is assembled.
This continues onto pages 3 & 4, before finishing on page 5. Also on that
page is the mast layout, and the instructions on making and detailing
both the mainmast and foremast. The diagrams are at least twice model-size,
and are very clearly marked with all the dimensions. Page 6 starts with
the resin instructions, and also spans pages 7 & 8, being broken down
into 38 clearly marked and illustrated steps. Pages 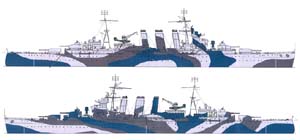 9
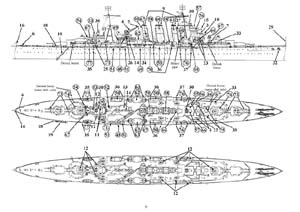
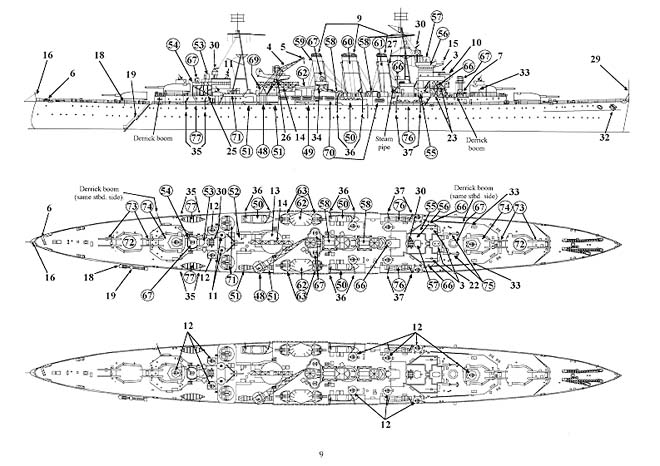
& 10 are very valuable, and I will be making at least one working copy
of these, because they show where every part goes - page 9 has a port,
plan and starboard view, with page 10 having an isometric exploded look.
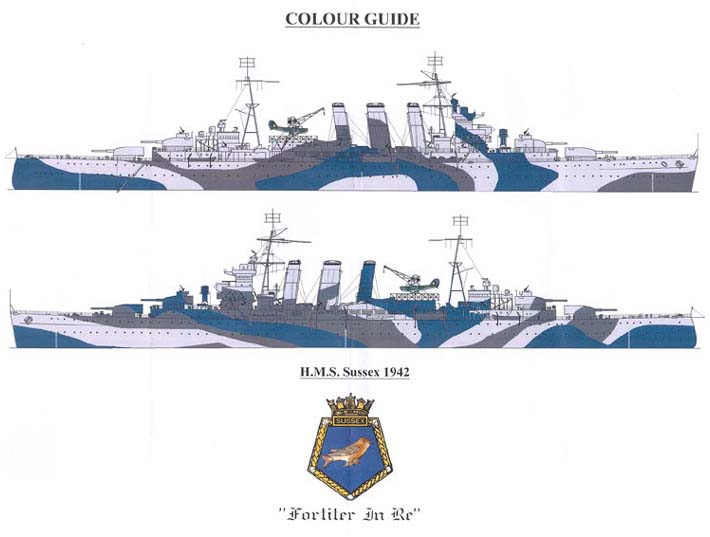
If you screw up, don't blame the instructions! Page 11 is a single-sided
sheet, and has port and starboard colour profiles, as well as having the
ships badge. Page 12 is a colour plan view, and also has information –
where known – on the colour scheme. Page 13 is the usual faulty parts
sheet - again, not one I expect to be using.
9
& 10 are very valuable, and I will be making at least one working copy
of these, because they show where every part goes - page 9 has a port,
plan and starboard view, with page 10 having an isometric exploded look.
If you screw up, don't blame the instructions! Page 11 is a single-sided
sheet, and has port and starboard colour profiles, as well as having the
ships badge. Page 12 is a colour plan view, and also has information –
where known – on the colour scheme. Page 13 is the usual faulty parts
sheet - again, not one I expect to be using.
The parts are finely modelled, with wonderful detailing. The photo-etch is again perfect, and the instructions are a brilliant example of what kit instructions should be. Is there anything I don't like about it? Well, the casting!! Maybe I've been spoiled on HMS Brilliant, but the casting here isn't as good. The main hull needs a little bit of work to remove excess resin in several places on the waterline, all of the larger pieces for the superstructure still have their casting lugs attached (and will need to be cleaned up), and a lot of the smaller parts have flashing around them. OK, I'm being a little picky here, but I expect the cleaning up will take 20-25% of the actual building time. On the other hand, I can't recall seeing a single blemish or air bubble, so I guess it balances out - any filling work will be an absolute minimum and limited to the fit.
There has been some discussion in recent months about that is best for detailed parts – resin or injection moulding. Well, each have their good points. I understand that the latest Tamiya big models are absolutely superb in their mouldings, with very little (if any) flash and distortion. But I have models by them, and other big-name manufacturers, where there is a lot of flash, distortion and even partially-missing pieces. Resin kits have their faults as well - I have a number of small-run kits where the detail is so minimal as to be non-existant. But I have to say that every resin item from WEM has been of a very high quality. To me, resin is best. If you have had bad encounters with a resin kit, buy a small one from another manufacturer, one that has a good reputation. I don't think you'll be disappointed.
Conclusion
So, is this kit worth it? Even with the niggle on the casting, I would give a massive YES. If you want a County class cruiser - get this one. I am impressed once more by the standards of White Ensign Models. 10/10 to Brian Fawcett for the master, to Peter Hall for the photo-etch, and to Dave Carter for the instructions. What a team!


Previous: Contents

