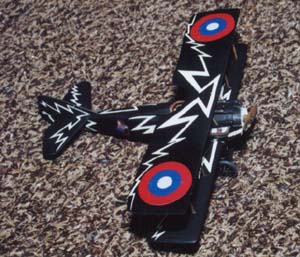
 Showbirds:
Cook's 'Lightning Bolt'
Showbirds:
Cook's 'Lightning Bolt'
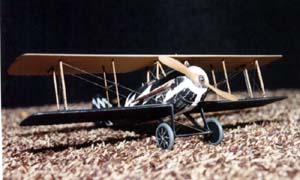
DML 1/48 SPAD XIII

by Matt Bailey
Introduction
I was looking for some ideas for an IPMS Nationals project when I came across Lt. Robert W. Donaldson's Checkerboard Spad in Squadron's 'Spad in Action' book. I thought that it would be great to 'super detail' Revell's old Spad XIII in 1/28 scale and paint it in Donaldson's checkerboard markings.
I put out a request on the WWI newsgroup for more information on Donaldson's Spad, and in the process of receiving responses I was invited by Bob Pearson to submit my model for an issue of Internet Modeler featuring several Spads from the 94th Aero Squadron.
 As
I was planning the project, Bob also made the 'mistake' of sending me
some color profiles of several other Spads from the 94th. I became ambitious
and decided that eventually I needed to do a model of every showbird in
the 94th. About this same time, I also found out that I was going to be
out of town during Nationals in Dallas, so I would not be able to attend.
Because of this and because I wasn't up to doing 9+ different Spads in
1/28 scale, I asked Bob if I could do the model in 1/48 scale instead.
I used DML's Spad kit with the Rickenbacker markings.
As
I was planning the project, Bob also made the 'mistake' of sending me
some color profiles of several other Spads from the 94th. I became ambitious
and decided that eventually I needed to do a model of every showbird in
the 94th. About this same time, I also found out that I was going to be
out of town during Nationals in Dallas, so I would not be able to attend.
Because of this and because I wasn't up to doing 9+ different Spads in
1/28 scale, I asked Bob if I could do the model in 1/48 scale instead.
I used DML's Spad kit with the Rickenbacker markings.
The kit
 The
construction was pretty straightforward, and the kit was built 'out of
the box' except for one item – the pictures I saw of Donaldson's
Spad all had the engine access panels missing. Luckily, DML included some
of the engine bearers (parts 25 & 26) with the kit. A little scratch building
and I was able to realistically show off the access areas of the engine.
The
construction was pretty straightforward, and the kit was built 'out of
the box' except for one item – the pictures I saw of Donaldson's
Spad all had the engine access panels missing. Luckily, DML included some
of the engine bearers (parts 25 & 26) with the kit. A little scratch building
and I was able to realistically show off the access areas of the engine.
After the fuselage was glued together and the bottom wing, rear wings, and tail were glued on, I cleaned the model with Polly S 'Plastic Prep'. Next, I primed the model with Model Master Acryl Primer (unless otherwise noted, all paints were Model Master Acryl). I then painted the model white. This was followed by the masking.
 I
used Microsoft 'Paint' to get a copy of Bob Pearson's profile of the Spad
in 1/48 scale. I then took a sheet of plastic and covered it with masking
tape. A layer of scotch double-sided tape was put over the top of this.
I then put the profile images over the scotch tape and pressed down. I
next started cutting out the checkers with a new Xacto blade and a metal
straight edge. This was tedious work and I had to start over several times
in certain areas. I also had to make some of my own checkers to go around
curves and to cover areas that were not covered by the profile. After
I masked the plane to my satisfaction, (the whole process took a few weeks)
I painted the model black.
I
used Microsoft 'Paint' to get a copy of Bob Pearson's profile of the Spad
in 1/48 scale. I then took a sheet of plastic and covered it with masking
tape. A layer of scotch double-sided tape was put over the top of this.
I then put the profile images over the scotch tape and pressed down. I
next started cutting out the checkers with a new Xacto blade and a metal
straight edge. This was tedious work and I had to start over several times
in certain areas. I also had to make some of my own checkers to go around
curves and to cover areas that were not covered by the profile. After
I masked the plane to my satisfaction, (the whole process took a few weeks)
I painted the model black.

 To
my horror, in the process of taking the masking off, the paint peeled
off in several places - all the way down to the bare plastic. Fortunately,
the model survived my anger and I used 'Strip-a-kit' to remove the paint.
I thought I would go insane if I had to mask those checkers again. Luckily,
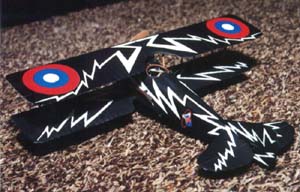
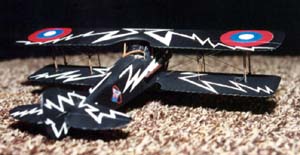
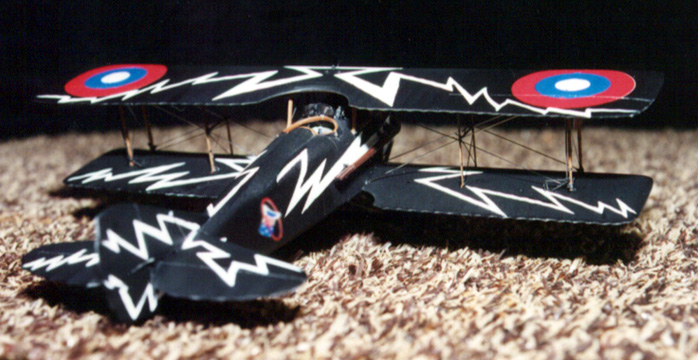
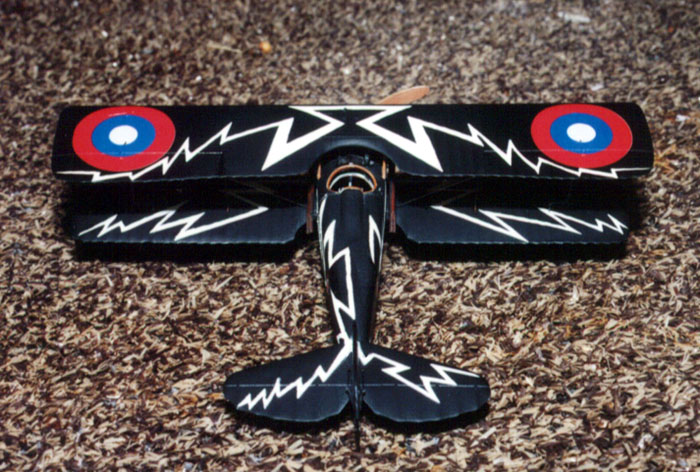
Bob told me that no one was doing Lt. Weir Cook's Spad in the 'lightning
bolt' markings from the 94th . So I decided to take the lazy way out and
model this one. It still took some time, but the masking was a little
bit easier. I went through the same process to mask the 'bolts' as I did
for the checkers, and when the masking came off, none of the paint came
off with it. (I still don't know what happened earlier). Finally, the
decals went on.
To
my horror, in the process of taking the masking off, the paint peeled
off in several places - all the way down to the bare plastic. Fortunately,
the model survived my anger and I used 'Strip-a-kit' to remove the paint.
I thought I would go insane if I had to mask those checkers again. Luckily,
Bob told me that no one was doing Lt. Weir Cook's Spad in the 'lightning
bolt' markings from the 94th . So I decided to take the lazy way out and
model this one. It still took some time, but the masking was a little
bit easier. I went through the same process to mask the 'bolts' as I did
for the checkers, and when the masking came off, none of the paint came
off with it. (I still don't know what happened earlier). Finally, the
decals went on.
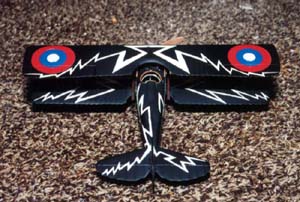
 I
have not seen any photos of what the underside of Cook's Spad looked like.
Therefore, I left the bottom of the lower and rear wings black and I did
not include the roundels on the undersides of the wings. This way, if
I find any new documentation in the future, I can easily go back and add
the markings.
I
have not seen any photos of what the underside of Cook's Spad looked like.
Therefore, I left the bottom of the lower and rear wings black and I did
not include the roundels on the undersides of the wings. This way, if
I find any new documentation in the future, I can easily go back and add
the markings.

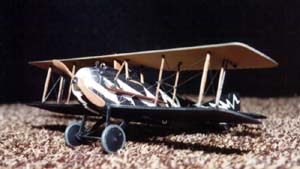
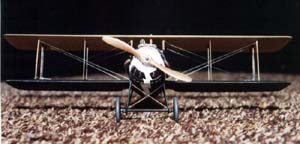
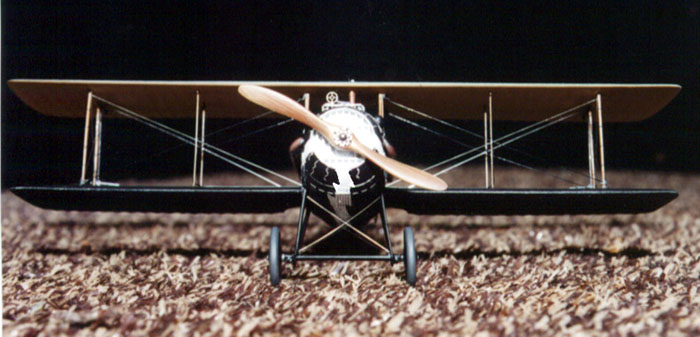
Once the decals were sealed, I finished building the rest of the plane. The exhausts were painted with Gunze Sangyo 'steel' and then dry brushed with 'rust'. The wood areas were painted with 'wood' and then dry brushed with 'earth red'. For rigging, I used .006 fishing line dyed in pearl gray fabric dye (only the rigging came out black). I also used .006 stainless steel wire from Small Parts, Inc. For the areas that had 'double' rigging on the real plane, I used .012 stainless steel wire. For the little 'bolts' around the cowling and the left wheel, I used a straight pin and etched through the black paint. All of the photos show Cook's plane with the access covers in place, so I ended up having to cover my interior scratch built work.
Conclusion
 I
still consider myself a novice when it comes to modeling, but I am happy
with the overall results. I must admit, however, that I am lacking the
ambition to model the rest of the 94th. Maybe someday . . .
I
still consider myself a novice when it comes to modeling, but I am happy
with the overall results. I must admit, however, that I am lacking the
ambition to model the rest of the 94th. Maybe someday . . .

Special thanks goes to David Dossey for the photographs, Bob Pearson for graciously supplying photos, profiles, and answering my endless questions, and to the rest of the WWI Newsgroup continuously providing me great modeling tips and insights.
References used:
-
Squadron/Signal Publications, SPAD Fighters In Action
-
Glencoe Spad Scouts SVII – SXIII
-
Windsock Datafile 32: Spad 13.C1
-
Bob Pearson's Profiles of the 94th Aero Squadron


