MPM 1/72 Mitsubishi Ki-21 'Sally' (or Miss Stress.. Sally)by Simon Wolff | 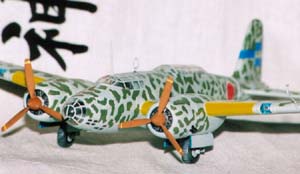 |
Introduction
The Mitsubishi 'Sally' is an aircraft I have waited many, many years to build in 1/72 scale. For no other reason than that I find the aesthetics of this plane are very pleasing to the eye (other than looking like beached whale side on). So when the opportunity came up to review this kit from MPM I pleaded to do the build review.. although there were times during construction when I truly questioned the wisdom/sanity of that initial enthusiasm. Never judge a model by its box art.. or something like that.
This kit has already had an inbox review in Internet Modeler, this article deals with the construction.
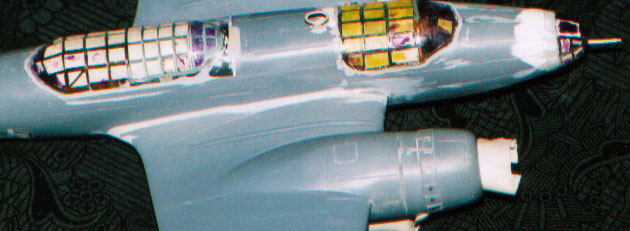
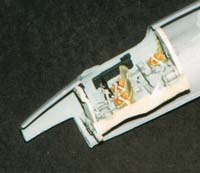 Assembly was started with the fuselage, this involved first assembling and painting the two resin fuselage interiors prior to fitting, both of which have excellent detail. One is for the cockpit area and another for the gunners position towards the rear. The cockpit section consists of three seats, two control columns, some sort of stick and two forward panels. I found it took some careful dry fitting to check the correct location of these parts, and am still puzzled by the location of the navigator's seat which in the kit is located directly in front of the access way leading to the rear of the plane. What little information I have seems to show no bulkhead at the rear of the cockpit nor anything resembling a doorway. But besides that, the detail is lovely and should be painted carefully as it is clearly on show once the clear part is attached.
Installation of this section required patience and a lot of dry fitting, because the location is not indicated on the fuselage interior halves and the resin cockpit part does not fit very well. It required a bit of help by shaving back the resin sides to get it to fit, being careful not to cut too much and thus damage the integrity of the cockpit. This exercise was a real pain but what else can you do. Prior to assembling both fuselage halves there is a small clear part to be installed on the right side, this I found did not fit at all well and required enlarging of the area for this part.
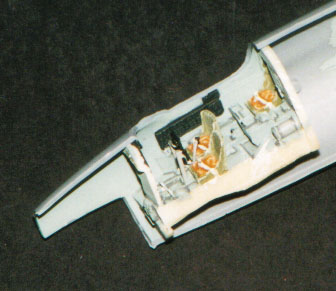
 The rear resin part is just a floor section with fuel tank, this is positioned behind and under the gunner's seat. Above this is located a panel section to which the gunner's seat is attached, this in turn is glued to the clear part (green house more like it). The irritation with both resin sections is locating them correctly to the fuselage halves! Besides the illustrations in the instruction sheets, which are rather vague, there is no indication on the parts to help you. This is especially annoying as this part has to be located precisely otherwise you may bugger up the gunner's seat. This means you have to assemble the parts in section three (upper fuselage section and seat) to indicate where to put the floor/fuel tank resin part. All nicely moulded but sadly once finished you see only the resin floor.
 Once the rear resin part location is known (after doing a dry fit with the gunners section and perspex section) then this can be installed, here you have to use a bit of judgement to get the floor correctly level inside the fuselage. As with all other parts the fuselage halves have no locating pins (aaahhh sorry just tearing my hair out), so lining up these two parts requires a good eye and judgement. To help improve the bond of the fuselage I added a strip of plastic card around the inside of one fuselage half, before bonding the two sides together. A bit like a 'tongue and groove' (so doing Woodwork at school proved of use after all), this made the join much stronger (especially as I had to rip the wings off at one stage).
Clear parts
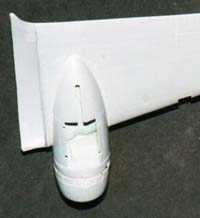
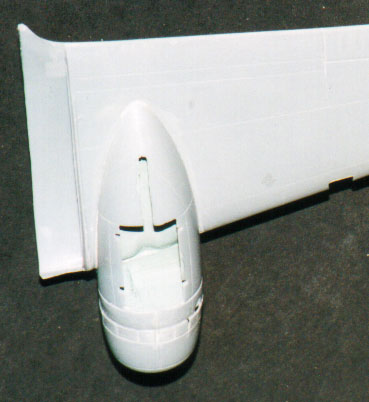
 There is a true plethora of clear parts, the smaller windows in the nose and in the lower rear area are incorporated in larger clear parts. This is an excellent idea and reduces greatly the number of clear parts to be inserted. However fitting the clear parts did not go well, they just would not line up cleanly and the lower clear part section was by far the very worst with bad gaps. I must add that I did rush this part of the procedure, but even taking this into account the overall fit was bad. That said they are very clear parts, no marks and well moulded with the framework clearly defined. One area that required extra work was the nose section (which mounts a machine gun). This proved to be wider than the fuselage leaving an embarrassing overlap, to rectify this problem the nose section of the fuselage was built up with small sheets of plastic card and putty, which meant re-scribing some panel lines and some sanding back.
Before fitting the transparencies you will need to choose whether to fit any of the machine guns, you have a choice of about seven. I chose only to install the nose gun, chiefly because to me they just beg to be snapped off! (yes I managed to break that off!)
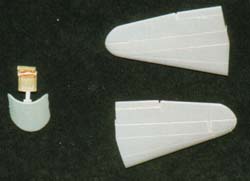
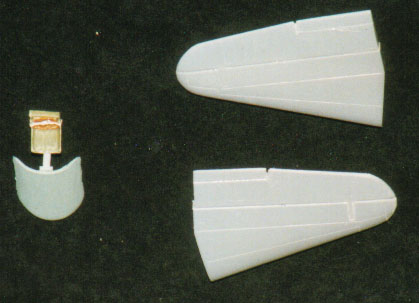
 The wings are your normal two slabs of plastic, basic detailing but enough. What I couldn't figure out is why the separate lower wing-strip parts. One thought is that it is to help with locating of the wing. I chose to build the three parts prior to fitting to the wing. Care was needed in lining up the wings, as there are no locating pins to help (please Mr MPM make locating pins on your kits!). To give strength and stability I added vertical strips of cut down sprue slotted in between the wing ends, it is suggested you do something to increase the structural integrity, due to wing size and limited area for attachment to the fuselage. The angle of the wings seems pretty good, there is a drawing in the instructions to help.

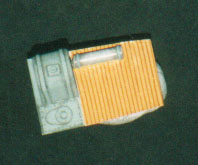
Nacelles and cowlings provided all sorts of wonders and joy when assembling! The engine nacelles are two parts fitting to the leading edge and under the wings, there is also included a resin fire wall for inside the wheel wells. By trial and error it seemed the best way to fit the nacelles and resin fire wall was glue the two nacelle parts together, then holding (not glued yet) resin firewall in place, locate and glue the nacelles to the wing. It is a fiddly and laborious exercise but I found that the resin part did not fit cleanly and needed to be juggled/wiggled about, this was after cleaning up the part.
 The resin engines need to be fitted in the engine cowling, yes more fun, as only the pusher rods seemed to touch the inside of the cowling thus there was little space for glue to hold the resin cowling in place. A solution I tried was to insert short pieces of sprue behind the resin engine and in between that and the cowling, to hold it in place. Now the cowling could be glued to the nacelles, care is needed when fitting these so that they are straight, as with the entire kit there is no fitting guide to hold the parts straight and level.
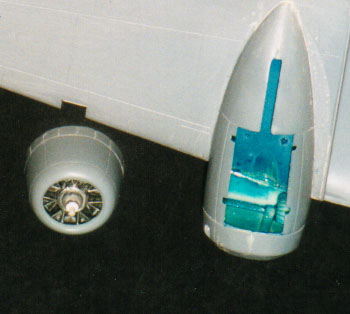
For some reason the propellers come in two parts, the blades moulded on one part and then attached to a part that fits to the resin engine. As with the nose cone these parts did not match in size and putty had to be used to build them up. I felt that these parts were a bit 'chunky' and needed tidying up with some sanding back.
 Undercarriage: Reasonable level of detail, bit of a hassle here. To start with no holes for the main legs, there was some sort of marks for their location but in one case one part would not fit (after drilling the holes out) because two locations indicated were too wide. Next no firm level alignment is provided for the two main undercarriage legs, you need to make sure when gluing that they are vertically in alignment, especially as an undercarriage strut (part 5) runs from the bottom of the main legs to the rear of the undercarriage bay. This strut was also a problem as it was too long to fit from the leg to the rear of the inside of the nacelle, to resolve this I chopped it short a couple of millimetres. I also found that the door (part 14) attached to this strut was to wide for the space it is provided for, again.. also found it better to glue this to the strut AFTER the strut is fitted to the leg and inside undercarriage bay.
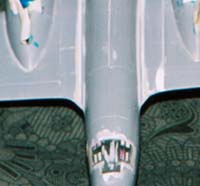
The tail 'stinger gun' consists of two parts, the gun and canvas fitting to the end of fuselage part which is in turn fitted to the fuselage. The part that fitted to the fuselage did not match the diameter of the rear fuselage and needed trimming down (you guessed it, I snapped that gun too!).
Painting
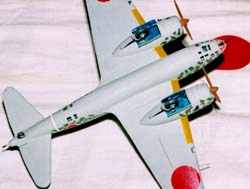
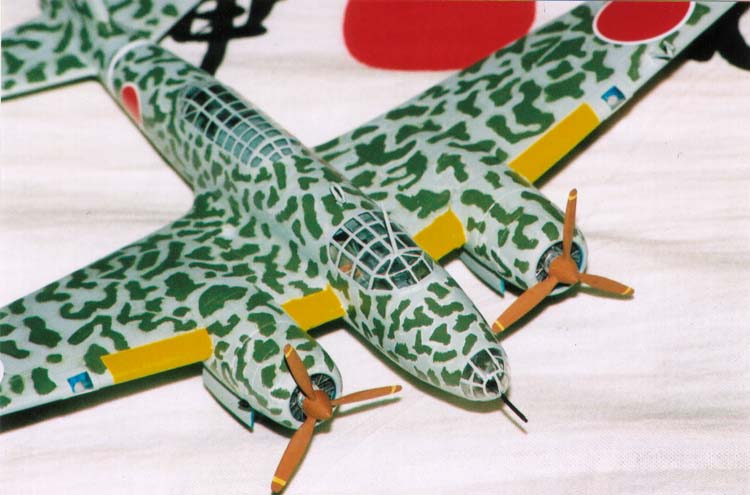
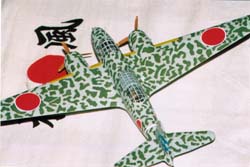
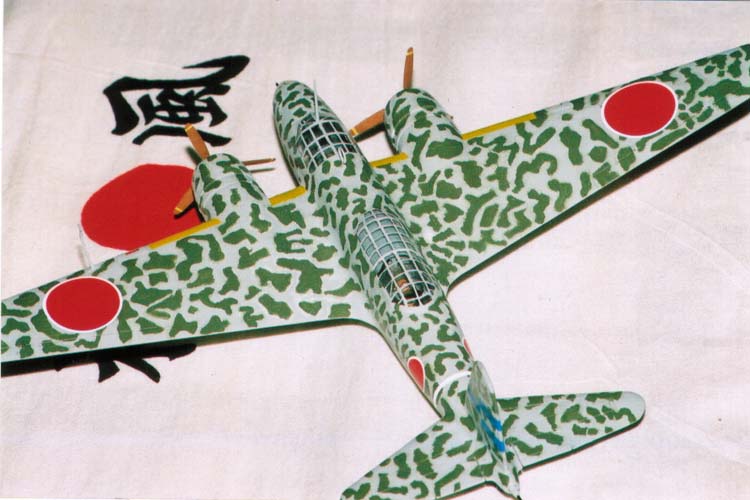
 Two schemes are provided, one Dark Green/Light Grey Green and the other Dark Green and Silver. Sadly no information is provided on the two aircraft illustrated. I chose to do the second scheme. But as there seems some controversy about the Sallys being in Silver I chose to paint it as Light Grey Green (that and I hate painting silver) instead of silver, then the splotches of Dark Green on top of this (using Tamiya and Gunze Sangyo acrylics). If nothing I learnt that trying to mask off one hundred and fourteen clear panes requires unending patience and sure isn't a fun way to spend an evening after work. But I did anyway, in hindsight it would be much easier to mask off a length of frame at a time and paint these with a brush.

Decals
The decals are by Propagteam , register was fine and except for the tail markings there was hardly any decal film showing, these decals are really very good and went on the matt painted service easily, so no complaints here!
 The camouflage illustrations show the wing 'meatballs' as being half the size of the actual decal. This is rather confusing if you are following the mottle camouflage shown in the instructions closely. I really don''t know how accurate the mottle scheme shown in the instructions is and certainly would like to see some information on this scheme.
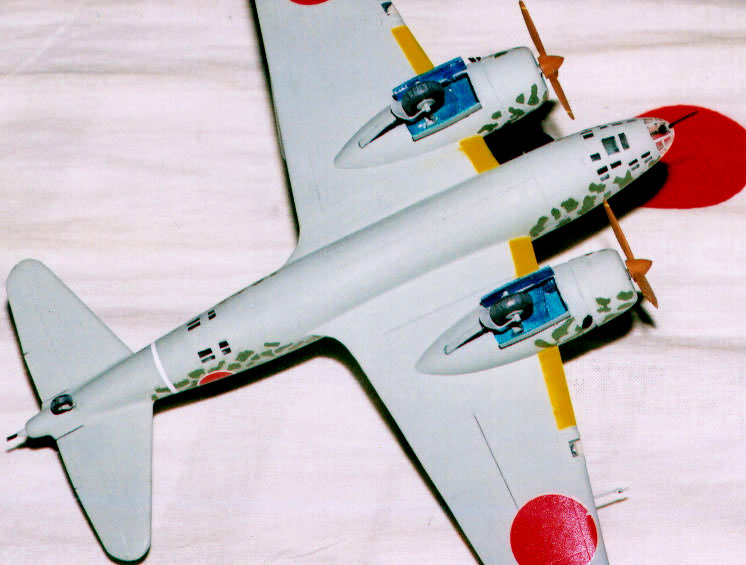
Interior colours: The instructions say the fuselage interior should be painted Humbrol 52, Baltic Blue. There seems some controversy about what the interior colour should be, as there is no firm information either way I chose to paint the interior a blue grey scheme. However I left the wheel wells Metallic Blue.
As for the colour scheme only Humbrol colours are given and I have no idea how accurate they are.
Additions:
 There
are no wing light parts, you have some engraved lines to indicate position
and that's it. I chopped out the area, boxed it in with plastic card and
made up a couple of lights and "Bob's your Uncle". Covered them with some
pieces of clear plastic sheet, not much extra effort required and she
looks a whole better for it.
There
are no wing light parts, you have some engraved lines to indicate position
and that's it. I chopped out the area, boxed it in with plastic card and
made up a couple of lights and "Bob's your Uncle". Covered them with some
pieces of clear plastic sheet, not much extra effort required and she
looks a whole better for it.
The cowling cooling gills are faintly engraved (almost invisible), but as the plastic is rather thin where these are located care was needed when improving these.
The fuselage door has no clear part for its window, this can be added by drilling out the window and adding a piece of clear stretched sprue which can then be cut off.
Conclusion
Wonderful subject for which there seems very little information about. The model 'looks the part' but felt a bit like making an old Revell kit, could its ancestry be traced back to the old Revell product? The model shines in some areas of detail (resin parts, clarity of clear parts, decals) and despite the problems and concerns looks pretty fine once completed. However if this 'Sally' was a peace of real estate it would have to be advertised as a 'renovators dream'. Lot of extra hours involved to bring it up to a decent finished standard, I would say an excessive amount of extra work is needed on this model.
 If
you build an MPM 'Sally' a recommendation is to study the instructions
and drawings carefully and thoroughly also make absolutely certain you
test fit of parts. I can not recommend this action strongly enough! As
for the drawings, to me at least, they were annoyingly ambiguous in places.
If
you build an MPM 'Sally' a recommendation is to study the instructions
and drawings carefully and thoroughly also make absolutely certain you
test fit of parts. I can not recommend this action strongly enough! As
for the drawings, to me at least, they were annoyingly ambiguous in places.
There is a lot of potential with this kit, hopefully more information will become available and the 'cottage industry' might provide other options such as decals, vac-form canopies etc.
This is currently the only 1/72 Mitsubishi Ki 21 model around, so it is currently the best example on the market! I love the wonderful subjects that MPM choose to produce and 'more power to their elbow' for doing so but this is surely not one of their better products.
Footnote
Incredibly the day after finishing the MPM 'Sally' kit I got hold of the Revell 'Sally', having waited years one turned up out of the blue merely because of a wrong phone number (Twilight Zone stuff ooh spooky)!.
References
Maru Mechanic
Putnam Aeronautical Books 'Japanese Aircraft'
Scale Modeler November 75 (review of Revell Sally)
J-aircraft, which had information on the Sally on a Message Board, a highly recommended site on Japanese aircraft!
Thanks to fellow modellers who helped; Al Black and Peter Mitchell.


![]()


