Parts 1/72 Polski | 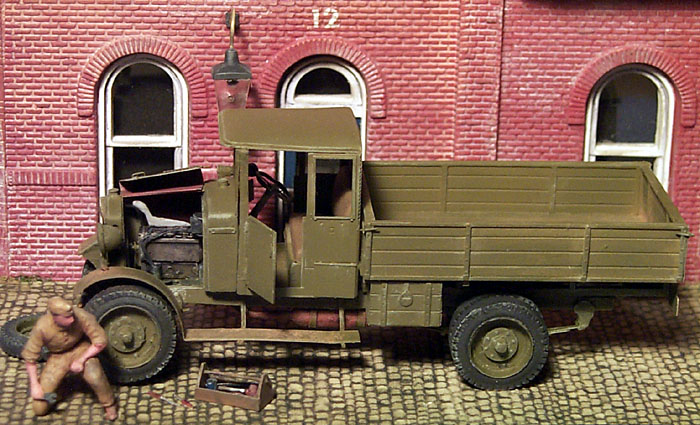 |
Vehicle History
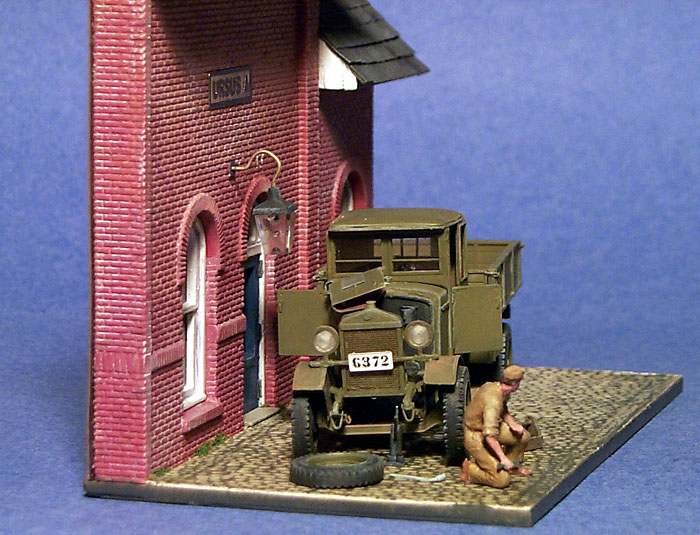
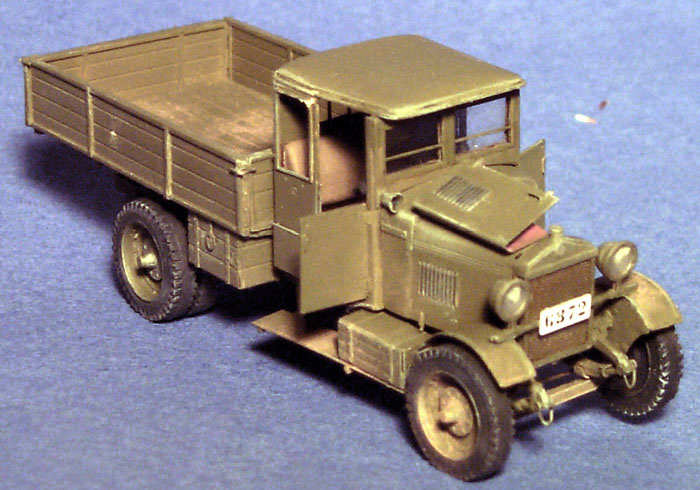
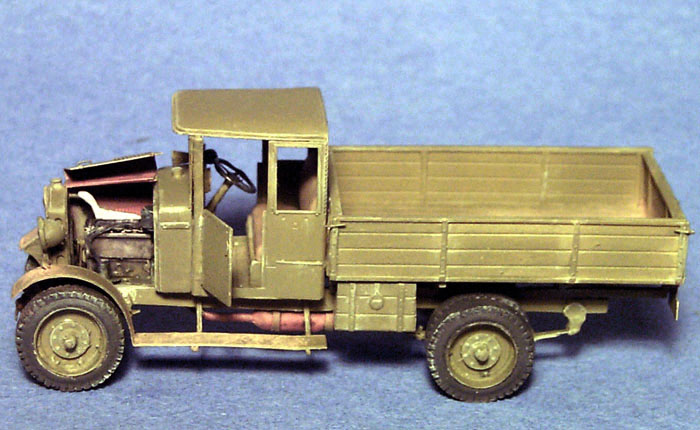
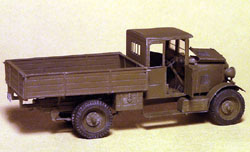
The URSUS A truck was produced in Poland from 1928 to 1931 and is a licensed built copy of the Italian SPA Model 25/C. Its Italian heritage is evident in its steering wheel being on the right side, like in British vehicles & Italian military softskins of the WW2 period. Production was only about 800 units. It was rated as a 4x2 (4 wheels and 2 wheel drive), having 2.5 ton load and rear-wheel drive. Powered by a 35, 40 or 45 hp, four-cylinder gasoline engine and with a maximum speed of about 50 km/hr. Besides the cargo version represented in this kit the truck was also used in ambulance, fire truck, bus, and armored car (Wz.29) derivatives. The kit instructions give a brief history written in Polish. Not reading Polish I acquired my vehicle information from the very nice website of Andrei Bogomolov. One photo at this website shows this truck carrying a French 75-mm M1898 field gun and crew in the truck bed. I am not sure of the truck being used during Polands September 1939, war with Germany and the USSR, though I suspect it was.
The Kit & Preconstruction Planning
This is a pretty unique kit in several ways. First, it is the only kit of this truck I know of at this time, in two versions offered by PART, the 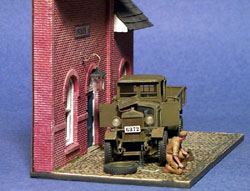 URSUS A, and URSUS A-30. Also offered by PART is a Wz.29 armored car. The URSUS truck kit is constructed almost entirely of resin and photo-etched brass and appeared most daunting when I first opened the box. The only plastic parts included are a small clear sheet with a windscreen and a set of dials for the dashboard. You will have to supply several pieces of plastic rod for things like the steering column. Those involved with small scale armor modeling may already be familiar with Parts high quality etched brass detail sets for kits such as PSTs Stalin and ISU kits, and many others. This is one of their three complete kits in small scale. Being the second opportunity for me to work with a PART product, I am very pleased with the detail and sharpness of the etched parts.
There are 37 amber colored resin parts making up the wheels, frame, cab roof, muffler, radiator, engine block, and the bed frame, floor & walls. The resin is cast in the two-part-mold pancake method (what Chris refers to as wafers). A sharp #11 blade is needed to cut and scrape away the flash, which is not at all difficult.
The brass parts include large ones such as the cab, hood (bonnet) fenders, and storage boxes. The etched brass parts come on two frets and total about 200 individual parts. The kit also includes intimidatingly small, actually tiny, parts such as the braces for the bedsides and radiator caps. Fortunately some of the smaller parts have extras in case you lose them to the ozone as I did! This is definitely not the ideal kit I would recommend for a beginner or war gamer, as it is too complicated and too delicate. A modeler who builds for display will likely be very proud of the final product.
I thank PART of Poland, Roll Models, and Internet Modeler magazine for supplying this kit for me to build and review. For a First Look of this kit please 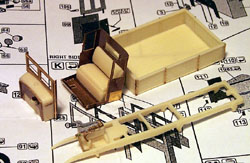 see Chris Banyai-Riepls November 2000 in-box review.
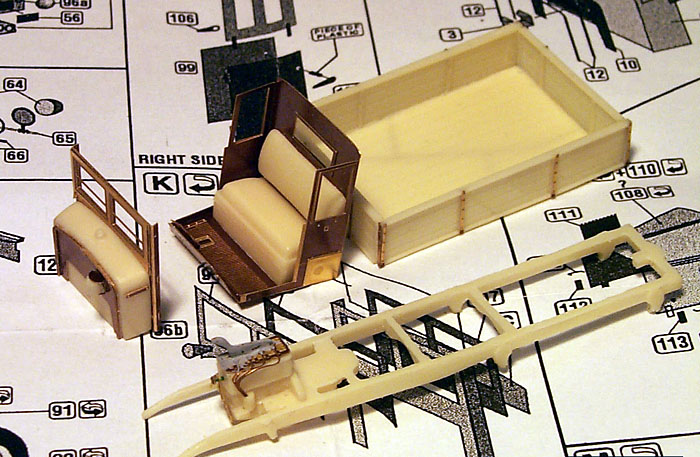
Construction Photo 1: The initial subassemblies of the firewall & windscreen, the cab, the frame & engine and the bed. The leaf springs, axles and drive shaft have not been added yet. At this point the engine is glued in with white glue until I could determine its exact position on the frame. When complete, the cab alone consisted of over 25 brass parts; five resin parts and two plastic parts. (Photo by SGB)
Construction Tips
Before cutting, gluing and painting, wash all the parts off in a mild detergent to remove any dirt and oils. I used cyanoacrylate glue for most parts. For parts that you need a longer time work with and slide around, or need greater strength, I recommend 5-minute epoxy. When placing some parts on the frame, such as the cab and engine, the instructions are not that clear; for this I used white glue (i.e. Elmers) till I decided I got the position right.
Pay very close attention to the SKALA 1:1 drawing on the last page of the instructions. This is your major guide to placement of the major parts (cab, bed and engine) onto the truck frame. Screw up the placement of any of these parts and youll need some super glue solvent to fix it. If youre not sure dry fit and test fit with white glue.
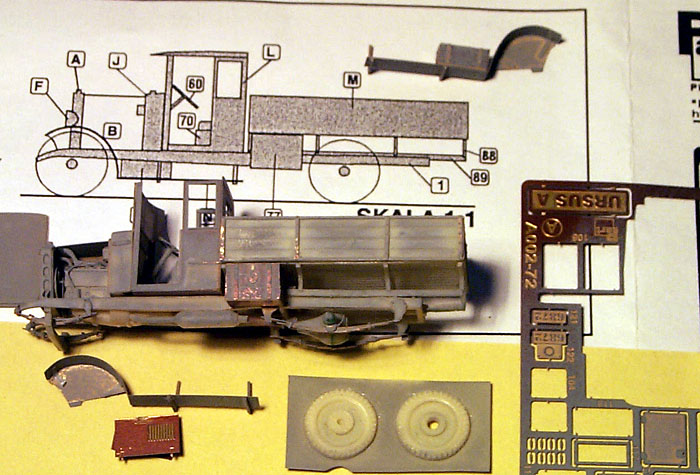
 Construction Photo 2: The partially assembled and primed truck. The engine, cab, bed, suspension, muffler and storage boxes are now installed. At the top is the SKALA 1:1 drawing so important to correct assembly. Below the truck is the left fender & running board assembly. Below the fender is the opened hood so the engine is visible. In the center is the spare wheel that I drilled the hub and lug nuts out of. (photo by SGB)
A sharp curved blade is my preference for removing the brass pieces from the fret. Cut the pieces off over a stiff backing such as a piece of glass or thick styrene sheet. Use a small, good quality file to then remove any remaining nubs. I strongly recommend doing all of your cutting and construction with the kit parts confined to an 18 by 12 or so cardboard box top to keep everything together. Also assemble the parts in subassemblies as described in the instructions. Keep all your parts and subassemblies in little plastic bags or small boxes when you are not working on them.
Unless you solder the fender parts 114 & 116, these will be weak bonds. I recommend gluing on some right-angle tabs to add strength. No glue beats soldering for strength and neatness but it will be very tough to do on such a small, complicated model such as this one.
 Before assembling the four pieces making up the windscreen frame I recommend that you build the brass pieces into two subassemblies (parts 96, 97 & 95, and parts 107 & C) and prepaint them so you dont have to mask off the clear windscreen when painting.
Prior to gluing on the cab roof (part #67), paint and detail the inside of the cab. It will be hard to paint the seats and dashboard with the roof in place.
With the nature of etched brass, some parts intended to be round will be flat, such as the kits steering arms and shift lever (parts 50,51,53, 54, 62 & 63). A trick to giving these parts a little depth and roundness is to give them multiple light coats of white glue.
 The exact placement of the radiator on the frame I found to be the biggest construction problem. There are no tabs or other physical marks to show exactly where the radiator (or other parts for that matter) goes on the frame. What I did was to place the radiator on last based on the length of the hood (bonnet). One royal screw-up I am guilty of is not knowing if the radiator is supported by the small braces (parts #) glued to the lower sides of the radiator, or if the radiator is attached directly to the longitudinal frame members. I glued the radiator directly to the truck frame only to find later that the hood sides would not fit over the small protruding braces; and that bending the frame in to glue it to the radiator distorted the frame. With the frame members bent too far in, the front fenders and other parts didnt fit correctly. Next time Ill get it right!
The brass cab walls looked too thin to be in scale (now parts being too thin is not often a complaint you hear about in modeling!). I added thin styrene strips to represent frame members inside the cab. I have no photos showing this to be correct but fell back on what makes sense to me and to artists license.
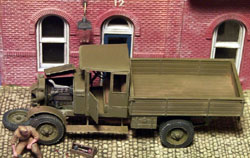
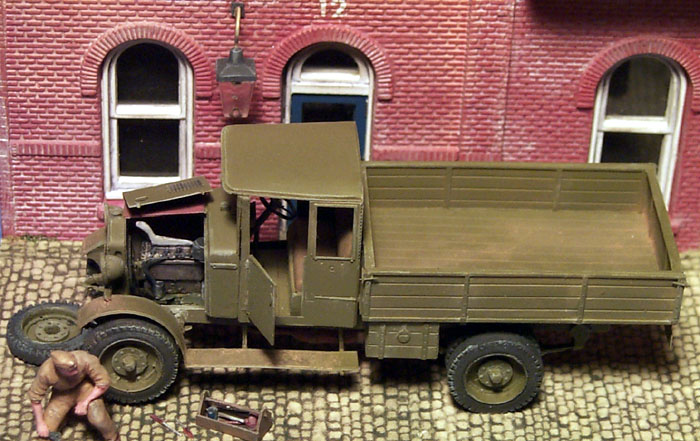
The photo on the boxtop shows the spare tire mounted on the outside of the drivers side cab-wall while the instructions dont tell you where to put it. If I mounted the tire on the cab wall the drivers door could not be opened which did not seem correct. Lacking a reliable place to mount the spare on the truck, I put the front end up on a jack and lay the tire on the ground next to the truck.
 Painting & Markings
Prior to painting with the base color the model should be primed with an undercoat/primer paint to insure that the basecoat adheres well. I prefer a gray auto-primer as it will show surface defects before you do the final painting.
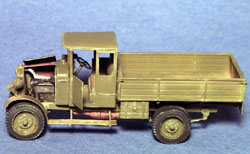
There is no paint color specified for the completed model (at least in English). Turning to the instructions for Marss resin kit of a Polish Polski-Fiat 621, MARS instructs you to paint the model a Polish Olive, but give no example of what Polish Olive is. Going to Steven Zalogas book BLITZKRIEG I found some color plates of Polish AFVs in a tri-color camouflage that includes a light olive green that is a good match for a Poly-Scale acrylic BR, BRN DRAB PC-10 (British Brown Drab?) color that I have. In one photo I have noted it appears that the wheel wells and frame/underside was black, which I have noted on Soviet trucks and some contemporary cars & trucks as well. For this I used Poly-Scale Scale Black that is actually a dark gray. Using a true black in this scale for anything other than dark shadowed areas just does not look right to me. Using a dark gray takes into account weathering and the scale-effect.
Overall I am not a stickler for exact shades. Military vehicles are very prone to dirt and fading, and in combination with varying paint shades from different manufacturers and the scale effect, I believe any close shade of a color will do. Mr. Zaloga has a very good discussion of this subject in the beginning of his BLITZKRIEG book. What is important to me is not what shade of paint or how much weathering, but how well they are applied.
 The kit comes with two, nicely done brass license plates with raised letters. A photo in Zalogas book shows the plate to be white with black numbers. No decals or other markings were supplied so the license plate must be carefully hand painted. In the few photos I have seen of Polish trucks of the 1930s, I have not noted any unit markings.

Conclusions
The Good Parts
-
The kit is really no more difficult than many complex resin kits such as from MARS and Modekrak Companies. The kit will provide a fun challenge and break from building all plastic kits. I commend PART for offering this rare subject.
-
I noted only one air bubble on the seat cushion, which didnt show after construction anyway.
-
The etched detail is very good and clean.
-
The resin flash is easy to cut and scrape off.
-
The kit instructions are better than many resin kits and conversions.
The Problems
-
There was one etching blemish on the hood/bonnet that could not be hidden or fixed.
-
After priming I noted dozens of tiny air bubbles on the edges of several tires where the tread is. Having cast resin before I know how hard it is to control air bubbles in locations like this. I got this somewhat fixed using white glue to fill in the holes.
-
The instructions should be clearer and with more diagrams, such as overhead and end-on views to help in the placement of subassemblies.
-
I would like to see vehicle history and specifications in languages other than just Polish.
-
This kit is for best for experienced modelers who have worked with brass, resin and cyanoacrylate glue before.


