Flashback 1/48 Brandenburg W.29By Dave Calhoun | 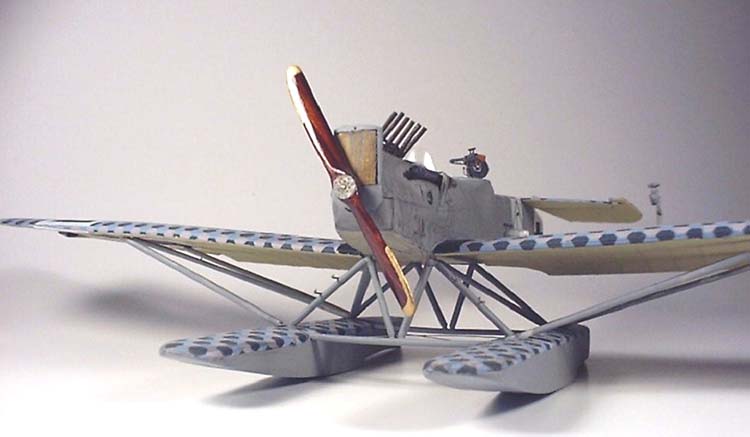 |
History
The Hansa-Brandenburg W 29 two-seat floatplane was designed in 1918 to replace the Brandenburg W.12 Biplane. The German naval air service had asked for an aircraft with increased speed and firepower to counter the heavily armed Felixstowe flying boats used by the British in the North Sea. The monoplane configuration was chosen to allow less drag and greater speed than a biplane. The Brandenburg W.29 prototype first flew on March 27, 1918. There were several production batches of W 29s. Batch 2507-2536 were powered by the 150hp Benz III engine. Armament was a pair of Spandau guns synchronized for the pilot and a Parabellum on a ring for the observer.
 The first combat for the W.29 took place on July 4, 1918. Four planes under the leadership of Oberleutnant Friedrich Christiansen intercepted and attacked three Felixstowe flying boats. They shot down all three of the British flying boats without a loss. On July 6 1918, Christiansen lead a flight of five W.29s which located and damaged the British submarine C 25. On July 31, 1918 Christiansen downed another Curtiss flying boat. (1)
Friedrich Christiansen learnt to fly in 1914, and was stationed at Zeebrugge in 1915. He rose to become station commander in 1917 and was awarded the Pour le Merite. By the end of the war he had 13 confirmed victories. (2)
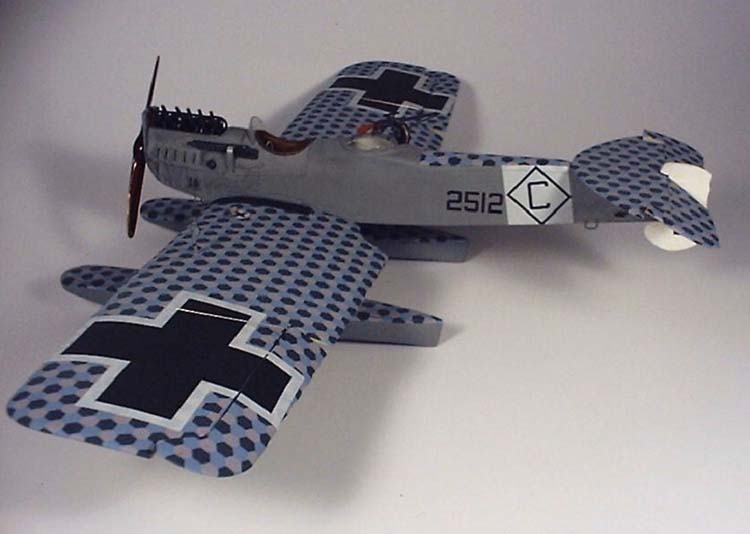
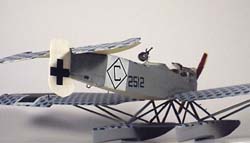
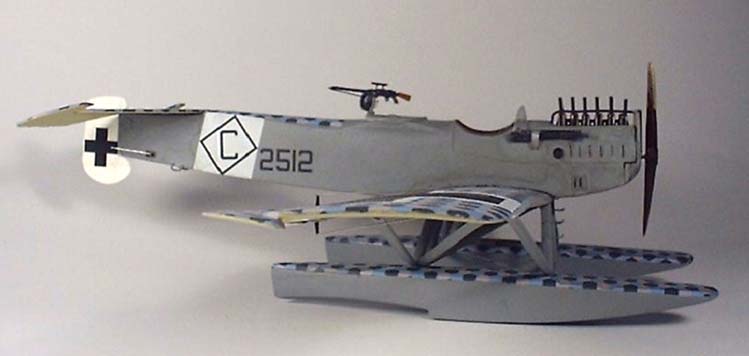
The model that I chose to build was Christiansen's W 29 #2512, used in the July 1918 victories.
The Model
 The model is the Flashback kit in 1/48 scale. Upon opening the box there are four sprues of plastic parts, a sheet of excellent photoetched parts, clear film for instruments, and several highly detailed resin parts. There are also two decal sheets - one with lozenge decals and one with insignia and personal markings for Christiansen's 2512 and also 2292.
Before starting the kit, good references were needed. The Windsock Datafile #55 Brandenburg W.29 was the primary reference, providing excellent scale drawings and several good photos. It also pointed out several flaws and errors with the kit. Most notably was the horizontal tail, which was for a late model W.29, starting with # 2565. Both decal options in the kit are for earlier numbers, and should have the larger rounded edge tail surface. The engine is also incorrect for this aircraft. Instead of a 150hp Benz III, the kit contains a 160hp Mercedes. The shape of the fuselage around the rear gunner's position is correct for the prototype, but should be faired into the fuselage on the production models. Also the observer's machine-gun and ring are incorrect for this version.
Construction
 I began construction with the wings. The wings had a trailing edge about 1/16" thick. They must be sanded down to a sharp trailing edge with a coarse sanding stick. I removed most of the rib detail on the upper wing at this time. After thinning the wings to an acceptable thickness I wet-sanded them to give me a smooth surface. The ribs then had to be scribed into the upper wing surface.
An easy way to do this is by photocopying scale drawings, and drawing the rib lines about 1" longer than the actual wing. Then tape the wing to the drawing and you will have lines to place your ruler for scribing. I used a method learned from Peter Leonard on the World War 1 modeler's web page. Take a utility knife (Stanley or other type available at Home Depot) and unscrew the large screw. Then insert two new blades into the handle, and screw the handle back together, trapping the two blades together. The two blades will be spaced about 1/32" apart, allowing scale rib tapes to be scribed into the plastic wing. I was suprised how easy this method was, I was able to do both wings in about a half hour. I then cut out the ailerons and repositioned them.
 The tail provided in the kit is a late production tail, and was not correct for these early aircraft. I scratchbuilt the tail and rudder from .040 Evergreen styrene sheet, sanding it to the correct shape with a rounded leading edge and a very thin and sharp trailing edge. The ribs were scribed in the same as the wings.
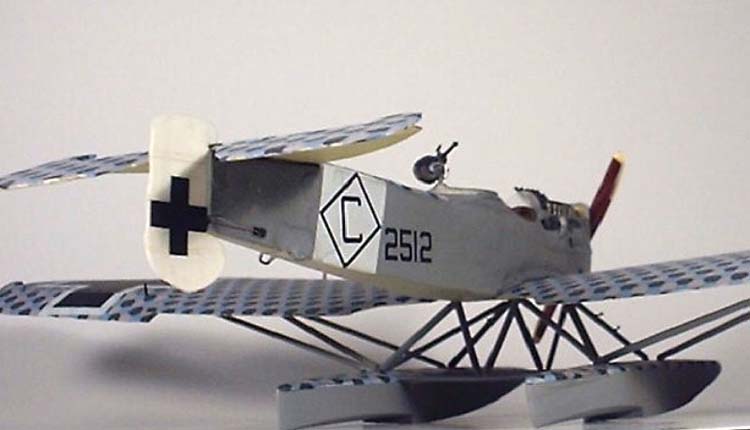
The wings and tail must be painted and decaled before assembly. I used Model Master Radome Tan for the clear doped linen undersurfaces. I then sprayed a coat of Future floor wax over both surfaces to prepare it for the decals. I used German naval lozenge from Lonestar models since the ones supplied in the kit were incorrect. They were at a 45 degree angle, but the lozenge on the W.29 ran chordwise. I used the Lonestar decals because I had these available, good naval lozenge is also produced by Americal/Gryphon and Copper State models. The kit insignia was used, but be careful with the Propagteam decals - they are very thin and like to stick to themselves. I placed the wing in a pan of water and floated the decal onto them using lots of water to allow proper placement. They settled down beautifully.
 The floats were also done at this time. I painted them Model Master FS 36173 Air Mobility Command Gray. This was also used for the fuselage and struts. This color represents the original Light Gray Blue fairly well. The floats should have lozenge on the upper surface as well. To get a good separation line, I applied a stripe of masking tape covering the blue gray area of the float. I then applied the lozenge decal cut slightly oversize and allowed it to stick over the tape. A coat of Micro Set allowed it to suck into all of the ribs and panels on the float. When dry, I ran a sharp X-Acto blade around the edge of the tape. When I peeled off the tape, I had a perfect sharp edge where the decal met the painted edge.
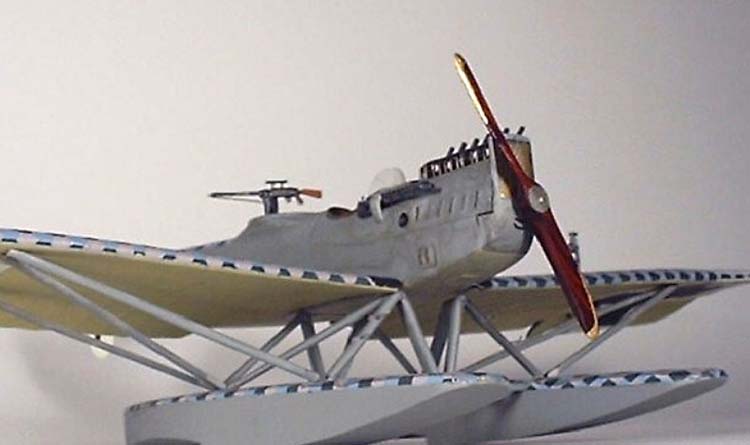
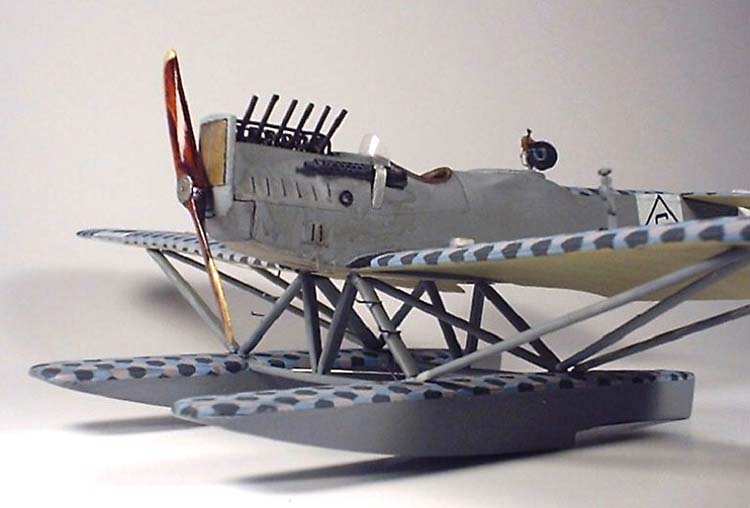
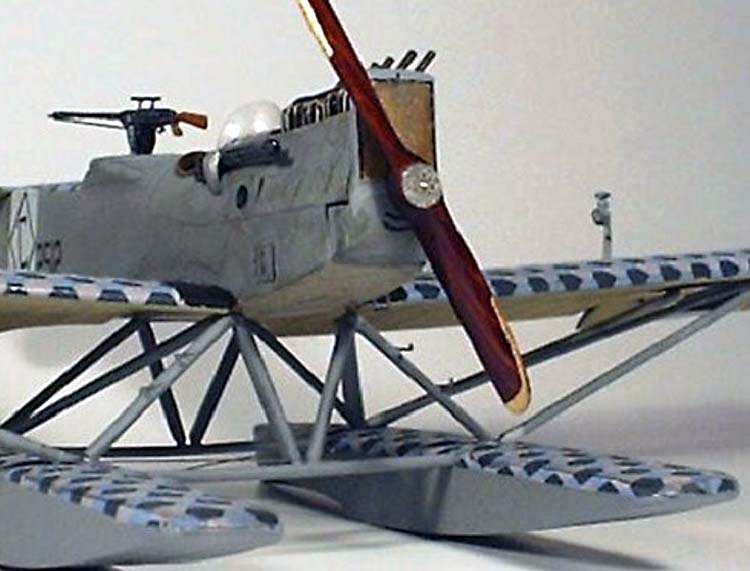
 The engine was the next step. The kit engine is the 160hp Mercedes and looks to be taken from the Eduard Albatros engine. This was used in one of the prototypes, but all of the production W 29s used the 150hp Benz III engine. The main difference was the Benz had the camshaft in the crankcase, and there were two pushrods per cylinder with rocker arms and valve springs on top of the head. A good photo of this appears in the book German Naval Air Service by Alex Imrie - photo #74. I used the kit engine, but did not use the overhead cam and intake system from the Mercedes. I added valve springs used from a single strand of speaker wire wrapped around a pin. 12 springs are needed, two per cylinder. The rocker arms and pushrods were made from brass rod and glued in place with super glue. On the other side of the engine the intake tubes were scratchbuilt with solder. The kit exhaust pipes were added after drilling out the ends. Note the location of the intake and exhaust ports, the center two cylinders are different from the other four. I did not detail the ignition and water pump, this is not visible in the completed cowling.
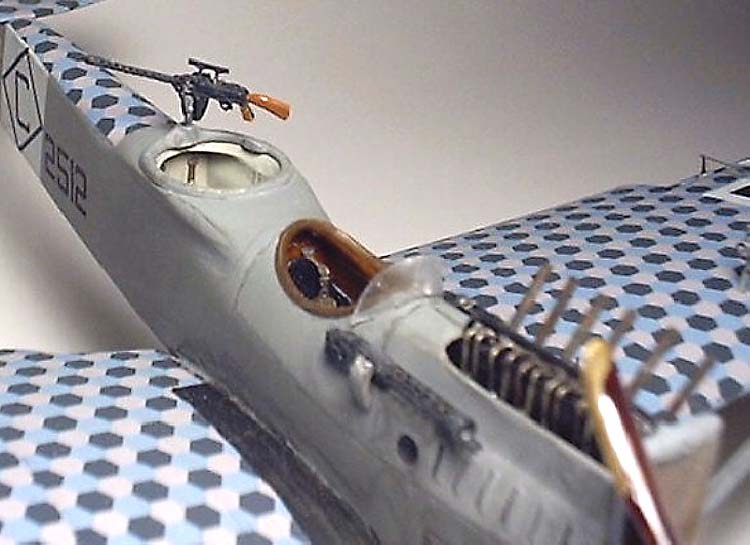
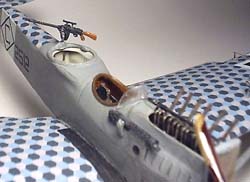
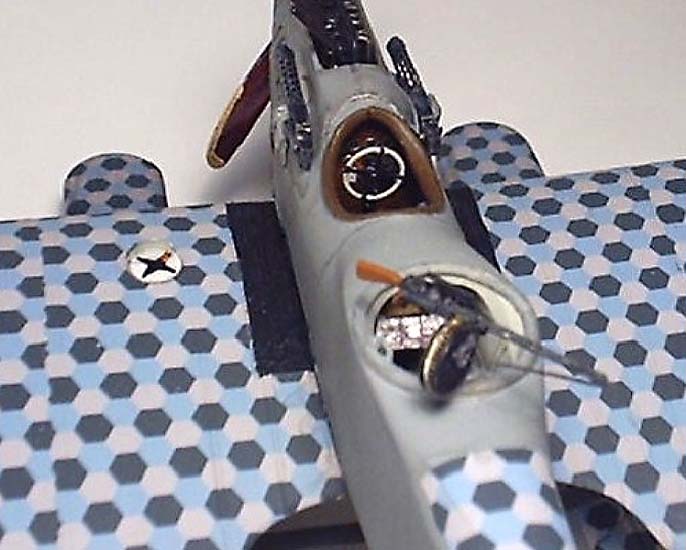
 The interior was next, and consisted of a resin floor with gas tank and pilot's seat molded in place. After cutting off the pour area on the bottom, the interior fit into the fuselage perfectly. The rear compartment wall was glued in place with super glue, and all interior details were attached. The entire observer's cockpit should be painted light gray. I used Model Master Gull Gray for the interior and lower fuselage. After this dried, I painted the pilot's cockpit interior with Poly S red brown, and gave it a wash of Testors gloss mixed with dark brown to give a varnished wood finish. The photoetched instrument panel was also painted this color. Interior details were picked out in black and aluminum. Additional details added were two Parabellum drums, a map table and map, and a box for a carrier pigeon.
The fuselage was cemented together after all of the interior was finished. Be sure to trim 1mm off of both engine mounts before cementing them in place or you will not be able to fit the engine in place. I also thinned the inside of the engine cowling to a realistic sheetmetal appearance, and painted the interior gull gray. The engine can slide in after the fuselage is assembled and painted. The gap in the lower fuselage took quite a bit of filler to smooth out, but came out OK.
There are several photoetched panels to be added to the fuselage and the instructions says to paint these steel. I doubt that the Germans would leave any parts of an airframe exposed to the salt water in untreated steel, and painted all of these parts the fuselage color. The fuselage was gloss coated and decaled. after all of these dried, the wings were attached. I drilled holes in the wings and fuselage, and used brass rod for spars. I superglued them in position making sure to set the proper angle per the plans. The tail and rudder were added next.
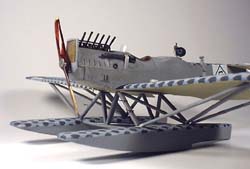
 A styrofoam block was used to make a jig to hold the floats in position for adding the struts. I glued the struts into position and secured them in place with superglue once the proper angles were set. Note that the two cross braces that go between the floats are about 1/2" too short according to the Windsock drawings. They can be used, but leave a 1/4" gap at each end that must be filled to prevent seeing into a hollow float. The floats were superglued to the fuselage after drilling small holes for alignment. The three struts on each wing running from the float must be shortened about 1/4" to make up for the extra space between the floats. Careful test fitting is needed to get these struts correctly placed.

Rigging (or lack of it). This is one of the few WW1 kits that needs almost no rigging wires. Only eight are needed - two for each aileron, two for the rudder and two between the floats. These form an 'X' in the center of the floats, and can be seen in several photos in the Datafile. Drill a hole for the brass control horns, a hole for the other end of the wire, and cut a piece of wire (I used the stainless steel wire that came inside the DML Spad 13 kit) and super glue in place. A couple of coats of dull coat sealed the finish and covered up any slight glue spots.
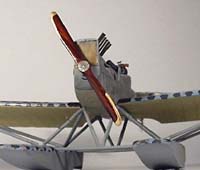
 The weapons and accessories were the final items added. The two Spandau guns were built out of the box using the excellent photoetched jackets and resin muzzles. The ammo chutes were also furnished in resin. For the rear gunner's position, some extra work was needed. I made the gun ring out of a resin copy of the ring in the Koster Hannover kit. The photoetched gun ring in the kit represents another early item, and was not the type used on Christiansen's plane. The photoetched Parabellum jacket was also an early type. I saved this for a future project and used an Aeroclub white metal Parabellum with a photoetched small jacket from Fotocut's WW1 German gun set. The sight was made from stretched sprue. The air speed indicator on the left wing was taken from a DML Fokker D.VII and mounted to a styrene rod. A film gauge was added to the air speed indicator. A clear windscreen was made from Squadron clear thermoform. The finishing touch was a hand carved wooden prop made by Martin Digmayer from the Czech Republic. His props are available from Copper State models.

 I completed the kit by adding a wash of black over the engine panels and fuselage to pick out the details. Light gray pastel was used to simulate salt on the wing and floats.
The finished model is an excellent representation of the Brandenburg W.29. It took a lot of work, and a little research on Flashback's part would have eliminated a lot of extra work. Due to the amount of work needed to thin the wings and correct the fuselage and engine, I can only recommend this kit to experienced modelers. If it were not for these problems it would be a great kit for the beginning WW1 modeler since there is virtually no rigging and minimal struts.
References
-
Brandenburg W 29 Windsock Datafile #55
P M Grosz
Albatros Publications, Ltd. 1996 -
German Knights of the Air 1914-1918: The Holders of the Orden Pour le Merite
Terry C. Treadwell & Alan C. Wood
Barnes & Noble, Inc. 1997 -
German Naval Air Service Vintage Aviation Fotofax
Alex Imrie
Arms and Armour Press 1989


