Building Toko's 1/72 | 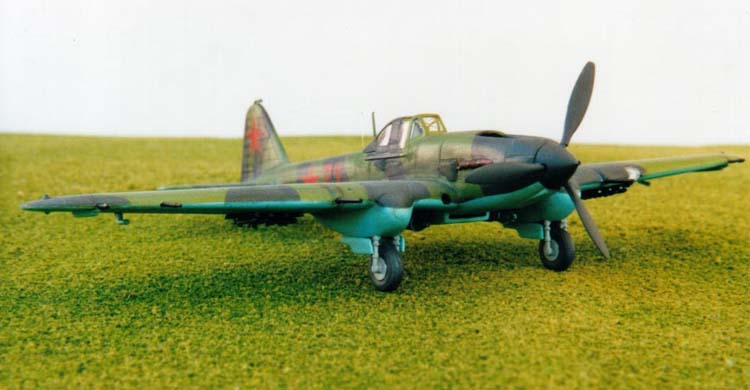 |
Overview
The Ilyushin IL-2 or 'Shturmovik' needs little introduction to most enthusiasts: its reputation having made legend during the Great Patriotic War. Over 34,000 of various types of Shturmoviks were manufactured, which by many definitions makes it the most-produced aeroplane in history. It was designed by Sergei Ilyushin, and provided the VVS (Soviet Air Force) with a maneuverable and effective ground attack aircraft. It was also legendary and popular with its crews for its durability: the flyers being surrounded by an amour-plated shield.
The Kit
 I picked up this kit for $5 at my local model shop: Nostalgic Plastic in Silver Spring, Maryland. I believe that this kit remains available despite Toko's demise. Inside the box there are five sprues, one of which contains the clear parts. The molding is typical decent Toko quality and for the most part, the kit is fairly accurate: certainly nothing that cannot be fixed with a couple of strips of plastic card, as I describe below. The detail is excellent, though there are some missing items that the more fussy of us will want to add, however, the panel lines are excellent, and all engraved, where appropriate.

The small eight-page booklet contains clear instructions for both assembly and colour schemes and there is an additional colour scheme on the back of the box. Unfortunately, none of the colour schemes are accurate for the model contained in the kit: an early single-seat IL-2 with a four-stack exhaust. Apparently, pictures of such an aeroplane are thin on the ground, though a captured German example appears on page 4 of the ancient Profile Publication. Most of the older research on colour schemes has been improved upon and there are question marks regarding the accuracy of the colour profiles depicted in extant publications. I was somewhat privileged in that I was aided in my selection of a colour scheme by Erik Pilawskii, who has collected some of the most recently available data on USSR World War II aeroplanes.
Cockpit Interior
 I chose to detail the interior using the photoetch interior set from PART. With the benefit of hindsight, I should have saved it for another kit. The fret itself is excellent, containing more than 80 pieces of detail. Some of these are quite tiny, even for 1/72nd scale and I omitted a fair number of these. It was also difficult for me to gauge the precise location of some of these pieces, however, with a little thought and the aid of the Wings and Wheels publication, I managed. I should have realized beforehand but I did not notice that the photoetch fret was for the IL-2 two-seater and so some of the pieces were superfluous. I also did not have sufficient patience with some of the components, which resulted in some of the construction results being less than I would have liked it to be. In particular, the seat came in two pieces and I found it difficult to bend and glue the pieces together using super glue, without making a small amount of glue mess. All this was primarily due to my own shortcomings and I now wish I had kept the photoetch piece for the two-seater version. I would say that the PART photoetch has the potential to make a really nice looking interior. The next time I use the photoetch set, I will certainly be better prepared.

 Once the cockpit components were all assembled, I sprayed them a mid-grey. After giving the subassembly an oil wash, I picked out a few details – knobs and levers with a tiny brush. As I mentioned, although it was hardly a disaster, I had not done as nice a job as I had hoped for, so I decided to have the cockpit closed and use the kit canopy, preferring to save my Falcon vacuform canopy for another day. The kit canopy is a little thick, though it is nicely detailed and quite acceptable.
Fuselage and Flying Surfaces
 My first task in this area was to box-in the wheel wells using the Wings and Wheels publications pictures as guide. No doubt I did not do full justice to those pictures with my rendition. I simply laid a thin piece of plastic card over the top of the inside of the lower wing parts (part numbers 30-E and 31-E). When they had dried, I used thin strips of .02" x .01" plastic card to make the interior detail of the wheel wells. It looked quite good considering it was my first attempt boxing-in wheel wells and I was reasonably satisfied: at least you could not see through to the kit's wing insides. After the gluing the upper and lower wing halves together and closing the fuselage, I glued on the wing subassembly to the fuselage. On the upper side, the fit was fine and Toko were sufficiently "humane" to create the join at the same place as a "real" panel line. The underside fit was another matter. There were significant gaps and ledges, and considerable putty, sanding and re-scribing of detail was required. I also found it difficult to apply the roughly circular pieces that are on the front of the landing gear at the wing's leading edges. I believe the join has to be made to disappear and it was difficult to do that while trying to keep the detail at the front of those pieces.

The horizontal tail parts are the most problematic pieces in the kit, in terms of accuracy. For some reason, Toko molded these with significant gaps at the fuselage-to-elevator join and I had to use strips of plastic card to fill these. Again, more puttying and sanding followed.
Painting and Color Scheme
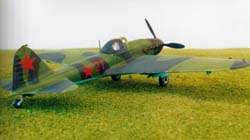
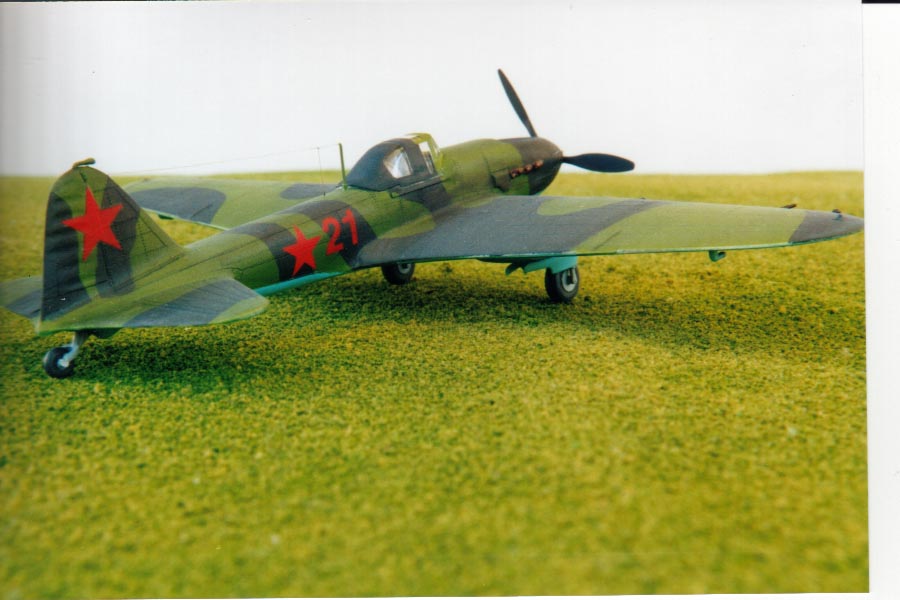
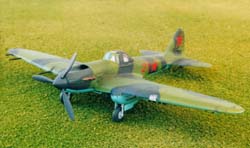
 At this juncture it was necessary to find and select a colour scheme, which is where Mr. Pilawskii really came to my assistance. It's no easy task to find early colour schemes, except the captured scheme mentioned above. Mr. Pilawskii showed me a fairly straightforward green and black over blue scheme – "Red 21". First, I sprayed the underneath parts USSR underside blue. It is an extremely bright colour and though it may have been "correct", in 1/72nd scale one could consider lightening it a little. Personally, I did not do this since I used a couple of oil washes on it, which tended to tone it down somewhat. Once this was complete, I masked off the underside and sprayed the topside aII green ("Interior Green" FS-4151). Once dry, I masked this off using Parafilm. Using a brand new Exacto knife blade, I cut away the Parafilm to expose the area to be painted black. I used Scale Black for the "black" area and for the propeller and spinner.

For those wishing to match VVS colours to available paints, I recommend paying a visit the VVS World War II modeling site maintained jointly by Matt Bittner and Erik Pilawskii.
Landing Gear, Ordnance and Markings
The parts supplied for the landing gear are decent and finely molded, though, as with many kits, there is limited detail: the builder can add more detail though I declined. The pieces went in easily enough considering the instructions recommend inserting the landing gear before gluing the wing halves together, and I had waited until the wings were completely glued and the wheel wells detailed. A little judicious twisting and gentle use of pliers was all that was required.
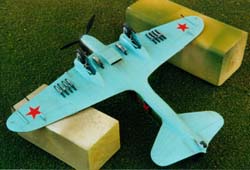 I used the RS-82 rockets, which are quite good though they do require you to sand off the molding seam: a little tricky for such small pieces. These all went on easily and were painted scale black with a slight dry brushing of aluminum.

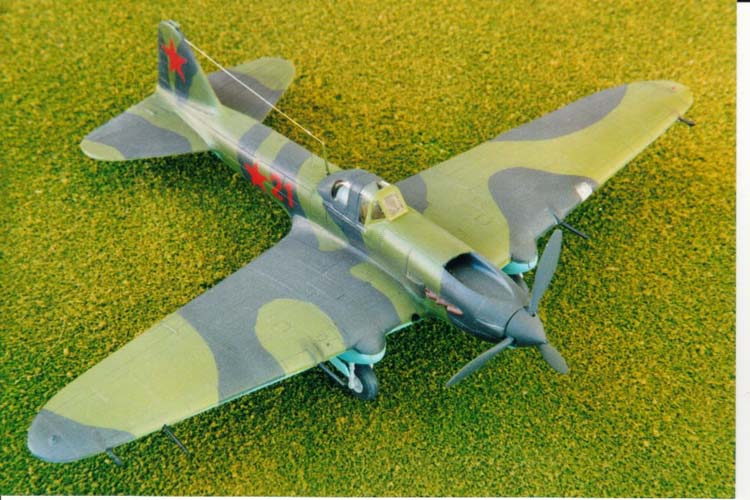
When all the pieces were assembled, I gave the entire model a burnt umber and black oil wash. This helped to bring out the panel lines and to provide some depth and character to the model. The entire model was then given a coat of Future in preparation for the decals.
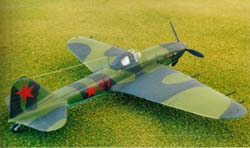
Aside from the red "21", the only markings are red stars on the wing undersides and tail rudder. I used the kit's red stars and some dry letter transfers for the "21" on either side. Once this was complete, I gave the model a coat of Testors clear flat coat to seal things in. My observation is that Testors clear flat, is not that "flat": I generally use Polly Scale if I want a really dull flat finish.
Conclusion
 I would recommend this kit to the average builder, provided they are prepared to supply a bit of effort and patience into the process. I am pleased that I built it and look forward to building another Shturmovik in the not too distant future.
Acknowledgments
I would like to thank Erik Pilawskii who provided a significant amount of information on IL-2s. Mr. Pilawskii is an expert on VVS Great Patriotic War aeroplanes in general, and IL-2s in particular and has a forthcoming book on VVS colours (see below). His advice and patience helped me avoid numerous errors in terms of accuracy. I would also like to thank Matt Bittner for his help and advice during the building of this kit. All remaining mistakes are my own responsibility.
References
-
Frantiek Koøán and Michal Ovèáèík. "IL-2 Type 3 and IL-10/Avia B-33 in detail." Wings and Wheels Publications, RAK Czech Republic. 1997
-
Witold Liss. "The Ilyushin IL-2 - Profile Publications Number 88. Profile Publications Ltd., Leatherhead, Surrey, England. Printed by Hills & Lacy Ltd., London and Watford, England.
-
Erik Pilawskii. "VVS Colours." Classic Pubs. Ltd. Expected publication date, forthcoming in early 2003.
-
Hans-Heiri Stapfer, Color by Don Greer, Illustrated by Joe Sewell. "IL-2 Stormovick in Action - Aircraft Number 155." Squadron/Signal Publications, Inc., Carrollton, Texas, U.S.A. 1995.


![]()


