Revell 1957 Cadillac El Dorado Brougham | 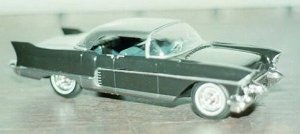 | Overall this is a simple, fun kit - quick and easy to build, in 1/25 scale. State-of-the-art modeling technology circa 1957, which means it is neither too detailed nor too challenging to build. This Caddy, purchased and built as a gift for a friend, was a 1996 reissue of the original 1957 kit, right down to the instruction sheet. Assembly The only major flaw in this kit is the molding of the body, which for some reason Revell chose to mold as two pieces rather than one. In my opinion this is the kiss of death to a good fit in any car kit, unless the kit is designed with the idea in mind that parts of the body will be removable to display the engine, interior, etc. The top half of the Cadillac's body, to which the headlights must be glued in advance, attaches to the bottom half, containing the interior cabin assembly. Works great in theory, but like many Revell kits of this and later vintage, there is a little warping of the plastic and getting the two halves to fit flush together is extremely difficult, even with the liquid version of Testors Model Cement. Testors liquid glue is often a cure-all for this problem, since used in the proper amount it will "melt" two warped pieces at the point of contact enough for them to fuse together. Not so with Revell's 1957 Caddy. The result is a predictable gap between the top and bottom halves, which can only be partially concealed by the skillful painting of the silver trim along the forward two-thirds of the car's side (a nice long length of chrome would have been much better for the pinstripe -- it would have duplicated the way the actual car looked, and would likely have concealed the gap - but was not provided in the kit). 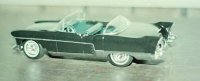 I could have sealed the gap with plastic putty, but I did not want to do this as I had already primed and painted the body, begun some of the detailing, and did not want to have to start the paint job from scratch at a relatively late stage of production. Given the glossy black paint job of the body, the gap was not large enough to be all that noticeable, and the trim helps draw the eye away from it. I could have sealed the gap with plastic putty, but I did not want to do this as I had already primed and painted the body, begun some of the detailing, and did not want to have to start the paint job from scratch at a relatively late stage of production. Given the glossy black paint job of the body, the gap was not large enough to be all that noticeable, and the trim helps draw the eye away from it.
To its credit, Revell tried to eliminate the gap problem by using a series of opposing tabs in the top and bottom halves of the body that would fit next to one another and hold the halves in place upon gluing. Great in theory, but it did not overcome the warping in practice. I used Testors liquid cement to glue the body halves together, since it was the only glue that could cope with the warping and not destroy the paint job (I painted the body in advance, mainly because of the need to protect the interior from overspray). While effective, once you apply the liquid cement to the parts to be glued, there is a definite sense that the clock is ticking. Testors liquid dries rapidly in the open air, and Testors claims you have about 20 seconds to get the pieces together once the glue is on, but it's more like ten to fifteen. Revell in my opinion employed too many tabs, which must be individually fitted together around the perimeter of the car body, a time-consuming process and not for the impatient or easily frustrated modeler. Anticipating this, I cut off four of the tabs in the midsection of the car, a spot where the fit was good and the tabs were least needed, and still I could not get the body halves sealed together before the glue evaporated in some places. 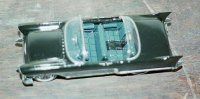 Note: Warping and the resulting gaps are the standard flaw with most American-made Revell kits of the mid 70s and earlier. Modelers with a little skill and a lot of patience can overcome it. I had the same problem, conquered to various degrees, with their 1/72nd scale F-4E Phantom II, PT-109 torpedo boat, and B-17E kits. From the late 1970's on (witness their 1/48 P-40E, Messerschmitt Bf109G and 1/72nd A-7 Corsair II kits), Revell eliminated this problem from their moldings and began putting out much better quality kits. Nod to the Germans: Revell Germany had it licked from the start. Note: Warping and the resulting gaps are the standard flaw with most American-made Revell kits of the mid 70s and earlier. Modelers with a little skill and a lot of patience can overcome it. I had the same problem, conquered to various degrees, with their 1/72nd scale F-4E Phantom II, PT-109 torpedo boat, and B-17E kits. From the late 1970's on (witness their 1/48 P-40E, Messerschmitt Bf109G and 1/72nd A-7 Corsair II kits), Revell eliminated this problem from their moldings and began putting out much better quality kits. Nod to the Germans: Revell Germany had it licked from the start.
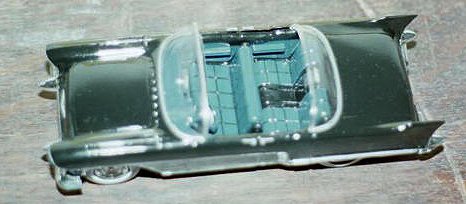
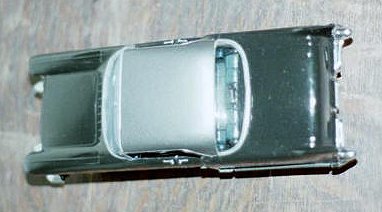
The Cadillac's seats, the standard bench-type used in the '50's, must be carefully positioned. I glued the rear seat about a quarter-inch too far to the rear, and later discovered that the top half of the body would not fit over the lower half because the seat needed to be a tad farther forward. Moving it was not a major problem, although the contact points for the rear seat were limited at best and to get a good bond upon re-gluing it, I had to use heavy-duty epoxy. Another part of the Caddy requiring epoxy was the front bumper. Given its size and weight, its contact points on the forward section of the body were much too small for regular plastic cement, whether tube or liquid. Since the bumper was completely covered in chrome plating, its contact points had to be scuffed or sanded until the plating was removed, but even with this precaution ordinary glue would not do. Epoxy saved the day. The front suspension, a one-piece assembly covering the front axle, was a little too wide to fit flush between the wheels, since the axle was slightly narrower in width. Heavy sanding on both ends cured the problem. Painting For the two-tone paint job, I used Testors Gloss Black spray paint and Tamiya Stainless Steel. The 1957 Eldorado Brougham had a distinctive look because of its stainless steel hardtop and mid- and rear undersides, which thankfully on the Revell kit were separate pieces. The Tamiya Stainless Steel went on beautifully, better than any metallic spray I've ever used, and barely needed two coats. To do a quality job with any glossy color you need two or three coats to produce that sheen that comes with fresh wax on a real car, or that looks like perpetually wet paint on a model. The Cadillac was molded in black, so I sprayed it with gray primer first to better gauge the progress with the different coats of gloss black. Since the parts to be painted stainless steel were separate, I was able to save time by spraying the body gloss black without masking any part of it.  I used Testors silver (in the small bottle) for the side trim, dashboard, and windshield trim, and for touchup of the chrome plating on the front and rear bumpers in places where it had rubbed off. Silver is a remarkably neutral color, and was close enough to the chrome and metallic stainless steel colors to be almost unnoticeable. I could not use it for touchup over the stainless steel, though, because it showed up very clearly looking like light gray. Additional spraying with the Tamiya stainless steel took care of the needed touchup on the undersides. I used Testors silver (in the small bottle) for the side trim, dashboard, and windshield trim, and for touchup of the chrome plating on the front and rear bumpers in places where it had rubbed off. Silver is a remarkably neutral color, and was close enough to the chrome and metallic stainless steel colors to be almost unnoticeable. I could not use it for touchup over the stainless steel, though, because it showed up very clearly looking like light gray. Additional spraying with the Tamiya stainless steel took care of the needed touchup on the undersides.
For the interior, I also used gloss. Hey, it's the fifties, right? I used Model Master Blue Angel Blue, a rich dark blue color for the seats, dash and door interiors. Gloss gives a closer approximation of leather than any flat paint, anyway. Gloss black covered the interior trim. Conclusion Other than the points raised above, the fit and quality of the kit are pretty good, considering its age. Highly recommended for any 1957 Cadillac enthusiast, at a fraction of the price they're asking for the Franklin Mint version. You can produce a real gem if you're prepared to tackle the two-piece body, and take the time to do a quality paint job inside and out. If you want it, buy it whenever you see it: It was out of production for years, and the ones still floating around from the 1996 reissue won't last forever.
| 


|