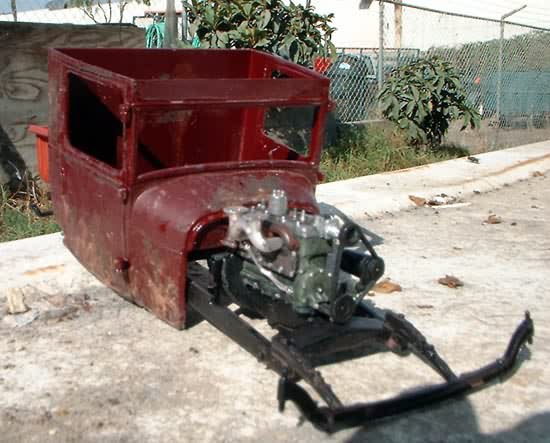
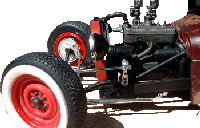
Revisiting the Revell Rat Rod |  | One of the model clubs to which I belong has a yearly "same subject" build, where we all make an effort to build using only what comes in the box. This year's subject matter is the Ford Model "A".  I built mine without the use of putty or outside parts - just a lot of kit plastic, hacked into bits and re-assembled in a form that only vaguely resembles what Revell's kit designers had in mind. I separated the frame into front and rear sections, shortening it by nearly half an inch before flipping the front section and bobbing the frame horns at the front crossmember. Then, the front suspension was converted to a parallel quarter-elliptic type utilizing the dropped axle and trimmed-down leaf springs cut from both kit axles. The engine was built using the speed equipment, stock exhaust manifold and a lot of dry-brushed metallics to add depth. Extended motor mounts were created from small diameter sections of the kit sprue. The rear torque tube was shortened to match the amount taken from the frame and a kit piece was modified to serve as a bracket mounted from a central crossmember to attach the stock rear "wishbone" arms. I built mine without the use of putty or outside parts - just a lot of kit plastic, hacked into bits and re-assembled in a form that only vaguely resembles what Revell's kit designers had in mind. I separated the frame into front and rear sections, shortening it by nearly half an inch before flipping the front section and bobbing the frame horns at the front crossmember. Then, the front suspension was converted to a parallel quarter-elliptic type utilizing the dropped axle and trimmed-down leaf springs cut from both kit axles. The engine was built using the speed equipment, stock exhaust manifold and a lot of dry-brushed metallics to add depth. Extended motor mounts were created from small diameter sections of the kit sprue. The rear torque tube was shortened to match the amount taken from the frame and a kit piece was modified to serve as a bracket mounted from a central crossmember to attach the stock rear "wishbone" arms.
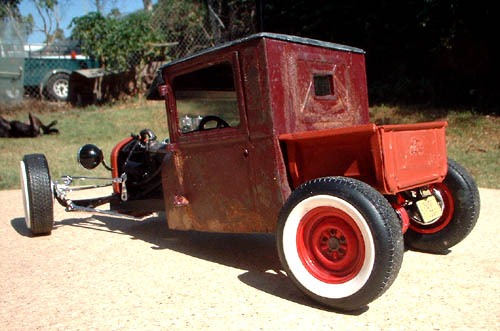
 The stock pickup bed was shortened at its leading edge and a slot cut into the bed to allow it to be channeled over the rear crossmember. The cab was severely channeled over the frame until the cowl nearly sat directly atop the transmission's bellhousing. While the shortened bed and radiator shell were both sprayed with red-oxide primer, I wanted a more "field-fresh" look for the cab. The doors and hinges were assembled to the cab before it was sprayed with Tamiya Light Gunmetal lacquer. After a wash of dark red-brown acrylic, I shot a light coat of Floquil Flat Clear lacquer and began my preparations for weathering. The stock pickup bed was shortened at its leading edge and a slot cut into the bed to allow it to be channeled over the rear crossmember. The cab was severely channeled over the frame until the cowl nearly sat directly atop the transmission's bellhousing. While the shortened bed and radiator shell were both sprayed with red-oxide primer, I wanted a more "field-fresh" look for the cab. The doors and hinges were assembled to the cab before it was sprayed with Tamiya Light Gunmetal lacquer. After a wash of dark red-brown acrylic, I shot a light coat of Floquil Flat Clear lacquer and began my preparations for weathering.
 A piece of an old kitchen sponge was first used to apply blotches of rubber cement to the inside and outside of the body, concentrating it at the bottoms of vertical panels and along the top of the cowl. After giving this a few minutes to set up, I shot three coats of Tamiya Maroon spray lacquer and allowed it to dry for a few hours before I wrapped three fingers in masking tape (sticky side out) and used that to remove the paint from areas where the rubber cement was applied. I began applying washes of acrylic paints and the Rust-All system to the cab until I got the weathered look I was after. Lighter coats of these washes were applied to the frame, engine and bed floor. A piece of an old kitchen sponge was first used to apply blotches of rubber cement to the inside and outside of the body, concentrating it at the bottoms of vertical panels and along the top of the cowl. After giving this a few minutes to set up, I shot three coats of Tamiya Maroon spray lacquer and allowed it to dry for a few hours before I wrapped three fingers in masking tape (sticky side out) and used that to remove the paint from areas where the rubber cement was applied. I began applying washes of acrylic paints and the Rust-All system to the cab until I got the weathered look I was after. Lighter coats of these washes were applied to the frame, engine and bed floor.
 For some interest in the cargo area, and to make use of another kit part, the stock cylinder head was used as ballast over the traction-challenged rear tires. I drilled out the bolt holes, spark plug sockets and water inlet before shooting the part black, dry-brushing it with Gunze burnt iron, and then liberally washing it with my rusting mixtures. It's little things like these that make people hover for a second look. For some interest in the cargo area, and to make use of another kit part, the stock cylinder head was used as ballast over the traction-challenged rear tires. I drilled out the bolt holes, spark plug sockets and water inlet before shooting the part black, dry-brushing it with Gunze burnt iron, and then liberally washing it with my rusting mixtures. It's little things like these that make people hover for a second look.
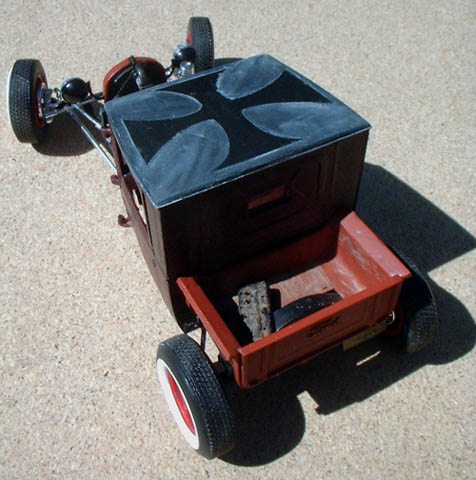
The floorboard was treated to a fresh coat of red oxide primer before the seat, painted in pearl white and red, was installed right down onto the floor. A pearl white dashboard was also installed, but only after I'd applied a couple of the speed part decals from the kit. Finishing touches were limited to light washes of steel over the chrome parts, which toned them down somewhat, and hand-painted the skull on the 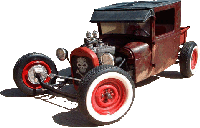 radiator and masked Maltese Cross graphics on the roof. I finished this kit while preparing for my wedding - the same week as our inaugural So-Cal Nats NNL. I sent the model to the show with a friend, went to get married and managed to stop off at the show on our way home the next day. Now I eagerly await December and the build-ups of all my fellow club members. radiator and masked Maltese Cross graphics on the roof. I finished this kit while preparing for my wedding - the same week as our inaugural So-Cal Nats NNL. I sent the model to the show with a friend, went to get married and managed to stop off at the show on our way home the next day. Now I eagerly await December and the build-ups of all my fellow club members. | 


|