Revell 1/25 Rat Rod '29 Ford Model AGreg Plummer |
 |
Overview
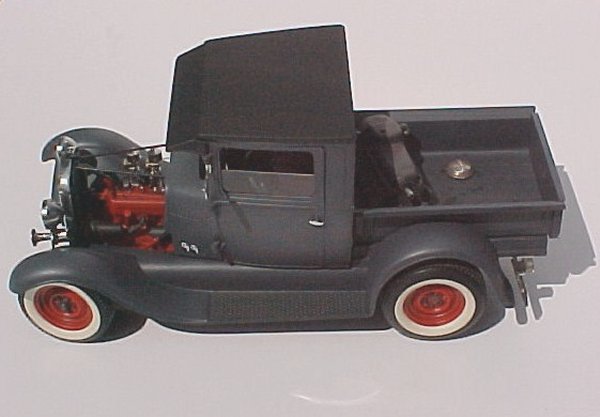
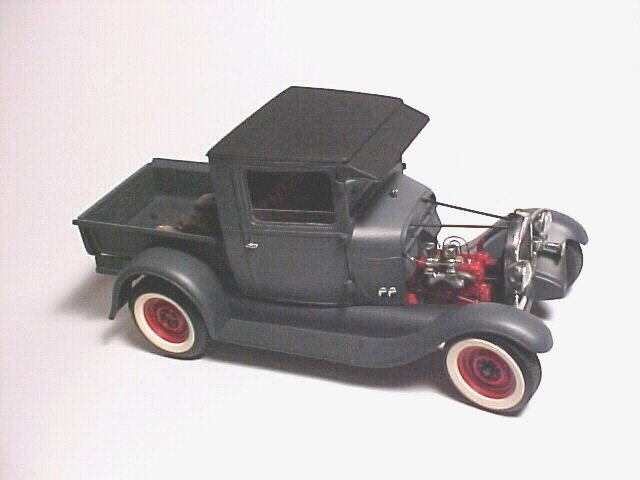
Rat Rods, in short, are a return to hot rodding's roots. As a reaction against the high dollar jewel-like rods of late, Rat Rods use primer paint, cheap swap meet parts, and a lot of "low tech" equipment such as steel wheels and hopped-up antique engines. Unsafe, noisy, and ragged looking, they are quite like the very first hot rods of the late 40's. Ironically they are built and driven not by the older generation that remembered what rodding was like, but mostly by Gen-Xers wanting to recreate the early hot rod culture.
Revell has grasped onto this trend with their '29 Ford "Rat Rod" kit. In a way, this kit is "Retro" also - Revell has dusted off their old Model A molds for this release. The kit's features are classic 60's Revell, such as the opening doors and hood, the delicate chromed parts, and the multiple building options. This particular kit has 3 versions (as shown on the box top), having optional parts for bumpers, seats, engine parts, a rear roll pan, and a convertable body. It also has a large decal sheet to cover those choices. The tires and wheels are definately all new, however, coming in their own bag stamped "made in China."
The Build
Hard core Rat Rods are ususally chopped, channeled, and lowered to an extreme; often they have only a few inches of ground clearance. They rarely have fenders or running boards. They also typically have early V-8 power, such as a flathead Ford or a 50's Olds motor. Sometimes the body panels aren't even primer painted, leaving them to rust. Converting this kit to those "high" standards of Rat Rodding would require extensive work, so in reality the model out of the box builds into a fairly tame example of a Rat Rod.
Nonetheless, I decided to build the "rat" version, even if
it was more of an unrestored Model A rather than a full out Rat Rod. I
thought I'd just paint the thing primer gray and slap it together - sort
of like the real items. However, the assembly proved a bit more challenging
- more on that later. Armed with the vision of how I would build the real
thing, I started construction...
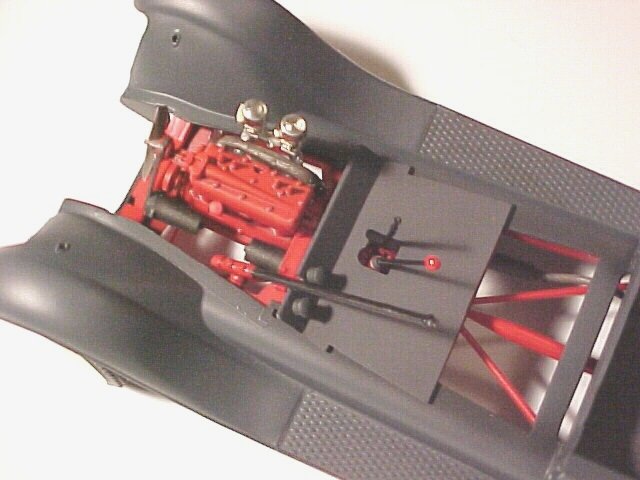
 The
engine came first. The kit provides the basic Model A four banger, with
optional "speed" parts such as a chromed head, headers, and
dual carbs. An optional flathead Ford V-8 or Caddy engine would have been
nice here, but such items are available from other kits should you want
to upgrade your power pack. Just keep in mind it has to look dirty...
The
engine came first. The kit provides the basic Model A four banger, with
optional "speed" parts such as a chromed head, headers, and
dual carbs. An optional flathead Ford V-8 or Caddy engine would have been
nice here, but such items are available from other kits should you want
to upgrade your power pack. Just keep in mind it has to look dirty...
The engine block is made of several pieces and some clean up and careful
alignment is required for assembly. I made the block out of the stock
parts. Taking a hint from the military modelers, I gave it a black wash
before painting it in semi-gloss red (a mix of Testors gloss red, flat
red, and a touch of black to deepen the color). 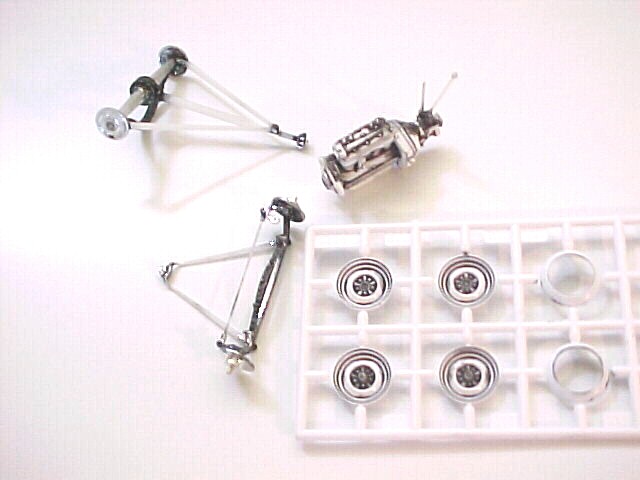 The
semi-gloss paint allowed the black wash to show through. Preshading may
be old hat to aircraft modelers, but its nearly unheard of in car modeling.
The exhaust manifold was painted in a mix of metallic gray and rust and
then glued on, along with the dual carb manifold.
The
semi-gloss paint allowed the black wash to show through. Preshading may
be old hat to aircraft modelers, but its nearly unheard of in car modeling.
The exhaust manifold was painted in a mix of metallic gray and rust and
then glued on, along with the dual carb manifold.
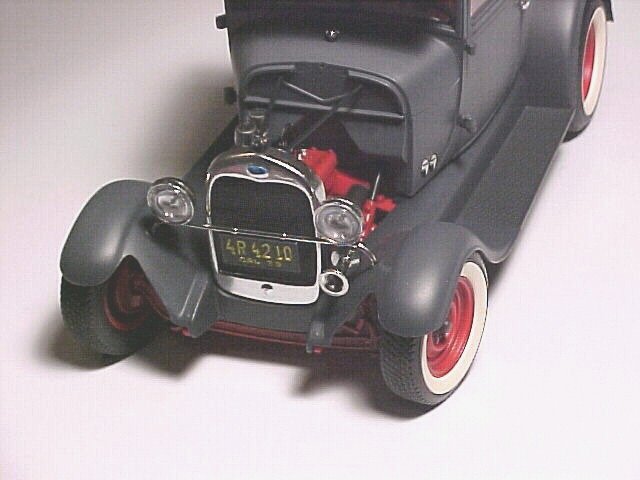
The carbs were on the "chrome" tree, and in my example of the kit the chrome plating was poorly done. I took all the parts that would be chromed on the model, including the carbs, the radiator shell, and the headlight unit, and redid them in Alclad II Chrome. This involved cleaning up the parts, painting them in gloss black enamel, and then airbrushing on a few light coats of Alclad. My method wasn't perfect and it resulted in the chrome looking a little spotty but then I figured that would be ideal for a Rat Rod. I was beginning to appreciate the beauty of these beasts...
The front and rear axles were done next, and all the parts were all on
the chrome tree also. These parts were thin and spindly, making me wonder
if they could hold up the model. Here the chrome was scraped off and the
axle units were treated to the same pre-shading and semigloss red as the
engine was. Unless you want your model to ride high, definately use the
dropped front axle. The front end was also intended to have working steering;
I glued mine in a fixed right hand turn with CA glue for strength. If
you can make the steering work, you're a better modeler than I, Gunga
Din.
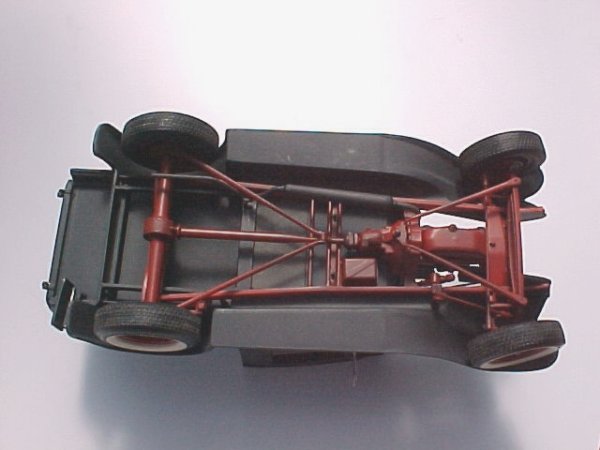 The
rear spring also has to be bent to lower the back end to a Hot Rod hieght.
This means matching it to the rear curved cross-memeber that it attaches
to. This would give almost no suspension travel in real life, but that's
actually quite realistic... I also found that the drive shaft had to be
shortend by 1/8" just behind the transmission attatching point to
keep the rear wheels aligned with the fenders. As you may see, this kit
requires a little tweeking for the right look. (The model still ended
up a little high in back - I recommend glueing the rear axle directly
to the chassis.)
The
rear spring also has to be bent to lower the back end to a Hot Rod hieght.
This means matching it to the rear curved cross-memeber that it attaches
to. This would give almost no suspension travel in real life, but that's
actually quite realistic... I also found that the drive shaft had to be
shortend by 1/8" just behind the transmission attatching point to
keep the rear wheels aligned with the fenders. As you may see, this kit
requires a little tweeking for the right look. (The model still ended
up a little high in back - I recommend glueing the rear axle directly
to the chassis.)
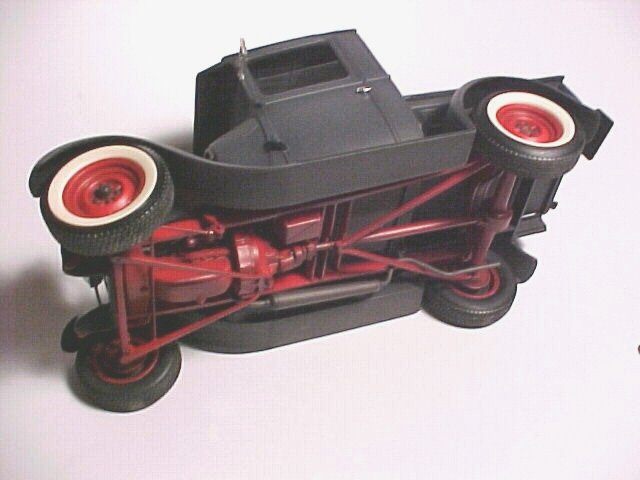 The
chassis itself was cleaned up and the front bumper mounts cut off - real
Rods don't have bumpers. Then the chassis, along with the steel wheels,
were done in red as per the engine and suspension. The kit tires with
their separate whitewalls looked nice; I painted the whitewall inserts
in a mix of flat white and light tan - whitewalls seldom stay white you
know. When it was time to install the wheels into the tires I found nothing
really fit that well. I glued the wheel outers to the whitewall inserts,
carefully aligning them as they wanted to go off center. Then I glued
in the inner wheel rings to the tires as they didn't have a good positive
fit with the outer wheel. Revell does not give brake drum detail with
this kit and it shows if you know to look, but decent brake backing plates
are part of the suspension units.
The
chassis itself was cleaned up and the front bumper mounts cut off - real
Rods don't have bumpers. Then the chassis, along with the steel wheels,
were done in red as per the engine and suspension. The kit tires with
their separate whitewalls looked nice; I painted the whitewall inserts
in a mix of flat white and light tan - whitewalls seldom stay white you
know. When it was time to install the wheels into the tires I found nothing
really fit that well. I glued the wheel outers to the whitewall inserts,
carefully aligning them as they wanted to go off center. Then I glued
in the inner wheel rings to the tires as they didn't have a good positive
fit with the outer wheel. Revell does not give brake drum detail with
this kit and it shows if you know to look, but decent brake backing plates
are part of the suspension units.
By the way, the frame was warped as supplied in the kit - I simply twisted
it back into shape. I also found that nearly every major body part was
warped also, from the fender unit on up to the cab roof. I figured Rat
Rods aren't exactly straight either and I just simply twisted each part
back into alignment as best as possible. At this point I glued the pick
up bed to the fender piece. The fit is vague, but if you line up the back
frame of the bed to the rear edge of the fender unit the result will be
fine. It should also be noted that the engine was glued to the frame at
this time but the axles were still free. The frame would be glued into
the fender unit after it was painted and then the suspension would be
attached.
 The
cab section of the model came up next, sort of following the instructions...
The cab is technically one piece, but the doors, roof, and floor are separate,
making for a very fiddly assembly. The doors themsleves had poor detail
on the inside. I sanded this off and used a piece of 10 thou. styrene
to cover the entire inner door. I cut out the window opening and glued
only on the bottom section of the door - later the upper section of this
inner sheet of plastic would serve as the door glass frame. I did the
same with the cab's inside rear wall, leaving the top half free to insert
the clear sheet later.
The
cab section of the model came up next, sort of following the instructions...
The cab is technically one piece, but the doors, roof, and floor are separate,
making for a very fiddly assembly. The doors themsleves had poor detail
on the inside. I sanded this off and used a piece of 10 thou. styrene
to cover the entire inner door. I cut out the window opening and glued
only on the bottom section of the door - later the upper section of this
inner sheet of plastic would serve as the door glass frame. I did the
same with the cab's inside rear wall, leaving the top half free to insert
the clear sheet later.
The doors were then glued in, along with the small hinge pieces. The hinges are actually a bit too large for this scale as the kit intends to have operating doors - I elected to keep them shut. I had to clamp the front edges of the cab to get the doors to fit, and the upper cab frame sections above the doors had to be cut and bent straight to match the door upper frames. Test fit the roof and you'll see what has to be done here... The dash was also glued in, leaving a slight gap on top for the windshield "glass".
One last body part needed to be assembled before painting. I decided to use the top halves of the hood (no side pieces as on the stock Model A), even though many rods of this type have no hood at all. The operating hinges in the kit are way too large; I glued the hood halves together with a strip of plastic underneath and a piece of thin round rod on top to replicate the center hinge.
 With
all the body parts ready, I painted them with a primer coat - which of
course would also be the final coat. I used a mix of Model Master RAF
Dark Sea Gray and Black Chrome Trim (a semi-gloss black) to replicate
dark gray primer. I actually made several shades - the darker ones (roughly
50/50) went on the lower body and under the fenders, while nearly pure
DSG went on the hood and upper sections of the cab. I mottled the gray
on several sections of the cab and bed to get an old/new primer look.
This was all very much like painting a tank; it was nice to not have to
put down 10 coats of gloss paint and polish them into a mirror shine...
The semigloss black gave the final result a nice faint sheen - old primer
paint in scale should actually not be dead flat.
With
all the body parts ready, I painted them with a primer coat - which of
course would also be the final coat. I used a mix of Model Master RAF
Dark Sea Gray and Black Chrome Trim (a semi-gloss black) to replicate
dark gray primer. I actually made several shades - the darker ones (roughly
50/50) went on the lower body and under the fenders, while nearly pure
DSG went on the hood and upper sections of the cab. I mottled the gray
on several sections of the cab and bed to get an old/new primer look.
This was all very much like painting a tank; it was nice to not have to
put down 10 coats of gloss paint and polish them into a mirror shine...
The semigloss black gave the final result a nice faint sheen - old primer
paint in scale should actually not be dead flat.
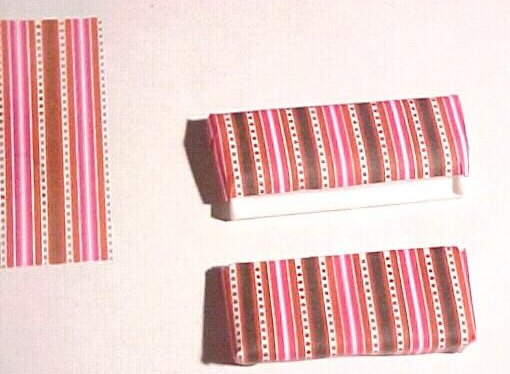 For
the Rat Rod seat option there is a "Mexican blanket" decal provided
in the kit, but this looks bad even by Mexican blanket standards. After
looking at a few examples, I made up my own pattern using good ol' MS
Paint. I printed out the bitmap, cut it into two pieces, and then glued
it onto the upper and lower seat parts using Zap-a-Gap CA. The result
looked like a bad upholstery job - just what I was hoping for.
For
the Rat Rod seat option there is a "Mexican blanket" decal provided
in the kit, but this looks bad even by Mexican blanket standards. After
looking at a few examples, I made up my own pattern using good ol' MS
Paint. I printed out the bitmap, cut it into two pieces, and then glued
it onto the upper and lower seat parts using Zap-a-Gap CA. The result
looked like a bad upholstery job - just what I was hoping for.
The seat was installed into the cab. Revell provides a sheet of acetate in the kit and templates on the instruction sheet for cutting the windows from that sheet. For a better look, one may want to substitute better quality clear plastic; I didn't. In addition to the windshield and backlight, I cut two strips of the clear sheet to replicate partially rolled down side windows. These strips were inserted between the kit door frame and the scratchbuilt inner frame mentioned earlier; they looked good after being tacked in with a little CA glue. Photo-etch window cranks were added from The Model Car Garage's rod interior set. These parts are billet style, which is out of place here, but what's a Gen-X car without a little irony? To add to this, I also substituted a racing steering wheel for the Model A item.
 Construction
really started making progress now that many of the subassemblies were
done. The frame was attached to the fender/bed unit, along with the cab
floor. Revell does not provide foot pedal detail on the floor - scratchbuilt
pedals were added. The front and rear axles (with the wheels installed)
were glued onto the frame with slow setting CA and then the assembly was
immediately placed on a sheet of glass to ensure all four tires would
touch the ground after the glue had set.
Construction
really started making progress now that many of the subassemblies were
done. The frame was attached to the fender/bed unit, along with the cab
floor. Revell does not provide foot pedal detail on the floor - scratchbuilt
pedals were added. The front and rear axles (with the wheels installed)
were glued onto the frame with slow setting CA and then the assembly was
immediately placed on a sheet of glass to ensure all four tires would
touch the ground after the glue had set.
The cab was CA glued on and after that I added a wire fuel line to the carbs. The dashboard on the Model A is also the fuel tank, and it gravity feeds the carbs. I also added ignition wires made from craft wire. The instructions call for gluing the radiator core to the frame and then installing the shell, but I first glued the core to the shell and then installed the unit. Radiator support rods were made from plastic rod and glued in. I test fitted the hood and saw it didn't match up very well; oh well, the model looks better without it. The roof and windshield shade were airbrushed in a very dark gray and then installed.
 The
kit does not have a tree of clear parts, so the headlamp lenses are represented
in engraved chrome. This looks bad. I drilled out the kit parts and installed
silver painted reflectors made from 6mm diameter stuffed animal "goggle"
eyes. Another set of 7mm "eyes" were scribed with lines and
then cut off their bases - these would serve as the actual lenses. The
lenses were installed with white glue. The end result looked a lot more
realistic. The headlamp unit was then installed, along with the rear light/license
plate unit and a rear view mirror.
The
kit does not have a tree of clear parts, so the headlamp lenses are represented
in engraved chrome. This looks bad. I drilled out the kit parts and installed
silver painted reflectors made from 6mm diameter stuffed animal "goggle"
eyes. Another set of 7mm "eyes" were scribed with lines and
then cut off their bases - these would serve as the actual lenses. The
lenses were installed with white glue. The end result looked a lot more
realistic. The headlamp unit was then installed, along with the rear light/license
plate unit and a rear view mirror.
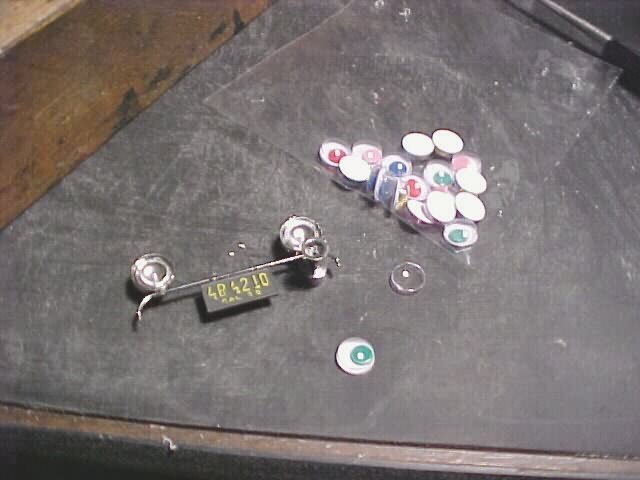
Final touches included a pair of Mooneyes from the kit decal sheet and
some cargo - it is a pick up after all. 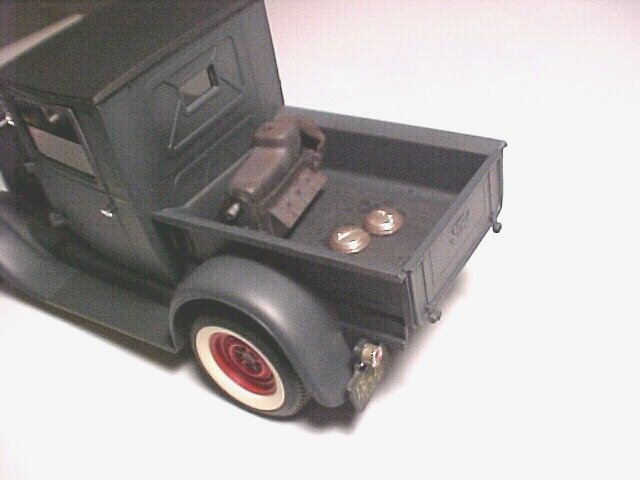 I
used the engine block from AMT's '69 Olds 442 kit and painted it in various
shades of rust and blue. Also thrown in were a pair of hubcaps from the
kit, washed in rust. The bed itself was weathered with some thinned semigloss
black "oil" drops and the metal bed rails were drybrushed in
rust.
I
used the engine block from AMT's '69 Olds 442 kit and painted it in various
shades of rust and blue. Also thrown in were a pair of hubcaps from the
kit, washed in rust. The bed itself was weathered with some thinned semigloss
black "oil" drops and the metal bed rails were drybrushed in
rust.
So there you have it, a model Rat Rod or unrestored Model A depending
on how you look at it. Building this kit was a chore, mainly due to the
poorly fitting multi-piece body. The thin chromed axle parts didn't help
either. As such, this kit is definitely not for the beginner, but it would
be ideal for the experienced military modeler who's always wanted to build
a hot rod model but was deathly afraid of gloss finishes. Don't get me
wrong, though, I did enjoy this kit and I'm glad Revell produced it. In
fact, I was thinking of doing a '32 Rat style, lowered, chopped, and channeled,
with a big V-8, and red primer...

![]()


