Building Alex Vraciu's Hellcat in 1/72
|
 |
Introduction
When people debate then great fighters of World War II, the same names
come up time and again: the P-51 Mustang, the Fw 190, the Spitfire, the
Bf 109, the F4U Corsair, the P-38 Lightning. While each of these aircraft
was a shattering surprise to the enemy when it first appeared, none of
them had the impact of the F6F Hellcat. The Hellcat carried the war to
Japan in 1944 and 1945, and although opposition pilots were sorely lacking
in training, the type's 19-to-1 kill ration is hard to ignore.
The Hellcat
 On
June 19, 1941the same day production orders for the Corsair were issuedthe
Navy contracted with Grumman for two prototype Hellcats. One of the secrets
of the Hellcat's success was its ease of manufacture. Grumman used techniques
similar to those used for the Wildcat and the TBF Avenger, avoiding any
compound curves and minimizing the use of flush-riveting. By 1944, after
Wildcat and Avenger production had been transferred to General Motors,
Grumman was cranking out 500 Hellcats a month. In just two and a half
years, Grumman built 12,274 Hellcats, the epitome of America's ability
to win the war through her industry at home. In the meantime, the Hellcat
ran up an astonishing total of kills. By war's end, F6Fs had downed 4,947
enemy aircraft in the Pacific; all other Navy and Marine types accounted
for 1,530. On
June 19, 1941the same day production orders for the Corsair were issuedthe
Navy contracted with Grumman for two prototype Hellcats. One of the secrets
of the Hellcat's success was its ease of manufacture. Grumman used techniques
similar to those used for the Wildcat and the TBF Avenger, avoiding any
compound curves and minimizing the use of flush-riveting. By 1944, after
Wildcat and Avenger production had been transferred to General Motors,
Grumman was cranking out 500 Hellcats a month. In just two and a half
years, Grumman built 12,274 Hellcats, the epitome of America's ability
to win the war through her industry at home. In the meantime, the Hellcat
ran up an astonishing total of kills. By war's end, F6Fs had downed 4,947
enemy aircraft in the Pacific; all other Navy and Marine types accounted
for 1,530.
The Hellcat's record was enhanced by some huge totals in key battles.
Chief among these was the Battle of the Philippine Sea, better known as
the Marianas Turkey Shoot. Hellcats decimated Japanese aircraft, knocking
down 371.5 in the two-day battle. (In the battle, FM-2s claimed four,
TBFs two and SB2Cs two and a half.) The battle made Alex Vraciu the Navy's
leading ace, a position he would hold for four months.
Alex Vraciu
Vraciu came to VF-19 aboard U.S.S. Lexington after a successful tour
with Butch O'Hare's VF-6, where he'd bagged nine enemy planes. His first
kill, a Zero, fell to his guns during a raid on Wake Island on October
10, 1943. On Nov. 25, he destroyed a G4M "Betty" over Tarawa, and on Jan.
29, 1944, he became an ace by flaming three more "Bettys" in a strike
against Kwajalein. It was the first indication of his predilection for
multiple-kill days.
 On
Feb. 16, Vraciu tagged three Zeroes and a "Rufe" floatplane on a fighter
sweep against Truk, but VF-6's carrier, the U.S.S. Intrepid, was torpedoed
that night and forced to retire to Funafuti for repairs. On
Feb. 16, Vraciu tagged three Zeroes and a "Rufe" floatplane on a fighter
sweep against Truk, but VF-6's carrier, the U.S.S. Intrepid, was torpedoed
that night and forced to retire to Funafuti for repairs.
Showing an inability to stay away from action, Vraciu requested another
combat assignment when VF-6 was sent back to the U.S. He was sent to VF-16,
commanded by 9-kill ace Paul Buie, aboard the U.S.S. Lexington, as assignment
that gave him ample opportunity to visit the Japanese fortress at Truk
again. On April 29, 1944, he knocked down two more Zeroes over the island,
and on June 12, he picked off another "Betty" while it attempted to shadow
the fleet. Two days later, he skip-bombed a Japanese freighter, sinking
it with a direct hit to its stern.
Five days later came Vraciu's most famous mission. Task Force 58, which
included the Lexington eight other fleet carriers, plus five light carriers,
and Task Force 52, an escort carrier force with 11 more flight decks,
struck the Bonin Islands, then turned southeast as part of Operation Forager.
The mission was to gain air superiority over the Marianas, a group of
islands that included Guam, Saipan and Tinian. If these islands were taken,
Army Air Force B-29s could strike the enemy homeland and destroy his ability
to manufacture the weapons of war.
The Japanese counter to this operation was A-Go, a plan to use both
carrier- and land-based aircraft to stop the American fleet. The Japanese
First Task Fleet included nine carriers and 439 aircraft, while Marianas
land bases housed 630 more planes.
On June 19, Japanese commander VADM Jisaburo Ozawa launched four waves
of planes at the American fleet, starting with a 64-plane strike launched
at 0830.
Nearly 200 Hellcats met the strike, hacking down 42 of them at a cost
of three of their own number. By this time, Vraciu was airborne in his
aircraft, and was struggling to keep up with Buie. Buie's own wingman,
LTJG W.C.B. Birkholm, suffered a malfunctioning propeller, forcing him
to ditch and spend the next 14 hours adrift in his dinghy.
 Meanwhile,
Vraciu's own engine was having problems. It was throwing oil on the windscreen,
and worse yet, it wouldn't go into high blower, limiting his altitude
to 20,000 feet. He had another problem he was unaware of. His wingman,
ENS Homer Brockmeyer, frantically gestured at his wings, but Vraciu thought
he had spotted the enemy and tried to turn the lead over to Brockmeyer
with no success. What Brockmeyer was trying to tell Vraciu was that the
red safety barrels on the folding wings, which indicated whether the wings
were locked in place, were still up! Meanwhile,
Vraciu's own engine was having problems. It was throwing oil on the windscreen,
and worse yet, it wouldn't go into high blower, limiting his altitude
to 20,000 feet. He had another problem he was unaware of. His wingman,
ENS Homer Brockmeyer, frantically gestured at his wings, but Vraciu thought
he had spotted the enemy and tried to turn the lead over to Brockmeyer
with no success. What Brockmeyer was trying to tell Vraciu was that the
red safety barrels on the folding wings, which indicated whether the wings
were locked in place, were still up!
The incoming aircraft the VF-16 elements had been directed toward were
gone by the time Vraciu and his squadronmates arrived, so they turned
to orbit the task force. Just after they'd reached this position, they
were vectored to a new groupeither the last bits of the first strike,
or the beginning of the second strike of 109 planes.
Vraciu spotted about 50 planes 2000 feet below him, with a disorganized
fighter cover. He started a high-side run on a D4Y1 "Judy" dive
bomber, but another Hellcat started after the same plane. Sensing the
other pilot didn't see him, Vraciu broke off his attack and shot below
the enemy formation, then pulled back up near the edge of the formation.
He picked out another D4Y1 and moved in close in spite of the rear
gunner's best efforts to deter him. The plane quickly caught fire and
slanted out of formation, trailing smoke. Two more "Judys" were flying
a loose wing and Vraciu quickly set both of these afire. A fourth "Judy"
was hit "right in the sweet spot," and it caught fire and twisted crazily
out of control.
 By
now the action was getting close to the U.S. fleet. Trying to ignore the
anti-aircraft bursts, Vraciu spotted three D4Y1s flying in a row, about
to start their dives on a battleship. A short burst took apart the engine
of the closest "Judy," and Vraciu caught the next plane in its
dive and detonated its bomb, causing the plane to vanish in a huge blast.
The last plane was beyond his reach, but just as Vraciu radioed that he
didn't think this plane would make it, a direct hit from the battleship's
five-inch battery disintegrated the diving D4Y1. In destroying these six
"Judys," Vraciu used just 360 rounds of ammunition. By
now the action was getting close to the U.S. fleet. Trying to ignore the
anti-aircraft bursts, Vraciu spotted three D4Y1s flying in a row, about
to start their dives on a battleship. A short burst took apart the engine
of the closest "Judy," and Vraciu caught the next plane in its
dive and detonated its bomb, causing the plane to vanish in a huge blast.
The last plane was beyond his reach, but just as Vraciu radioed that he
didn't think this plane would make it, a direct hit from the battleship's
five-inch battery disintegrated the diving D4Y1. In destroying these six
"Judys," Vraciu used just 360 rounds of ammunition.
The next day, Vraciu claimed his 19th kill, a Zero, while escorting
a strike against the Japanese fleet on the epic "Mission Beyond Darkness."
Over the course of the battle, VF-16 rang up 46 kills.
After he got word that he was soon to be stuck on a War Bond tour,
Vraciu talked himself into another combat assignment, with VF-20. But
on his second mission with the squadron, Vraciu was shot down while strafing
Clark Field. He spent the next five weeks fighting with Philippine guerrillas,
and returned to the U.S., where he served as a test pilot at Patuxent
River. After the war, following assignments at the Navy Department, the
Pentagon, the Naval Postgraduate School and aboard the U.S.S. Hornet,
Vraciu was given command of VF-51, a squadron flying FJ-3 Fury fighters.
In 1957, Vraciu won the individual Air-to-Air competition in the Naval
Air Weapons Meet by doing two thingsboresighting his own guns and getting
in close to the banner before firing. Even 13 years after his last kill,
Vraciu still knew how to gain an aerial victory.
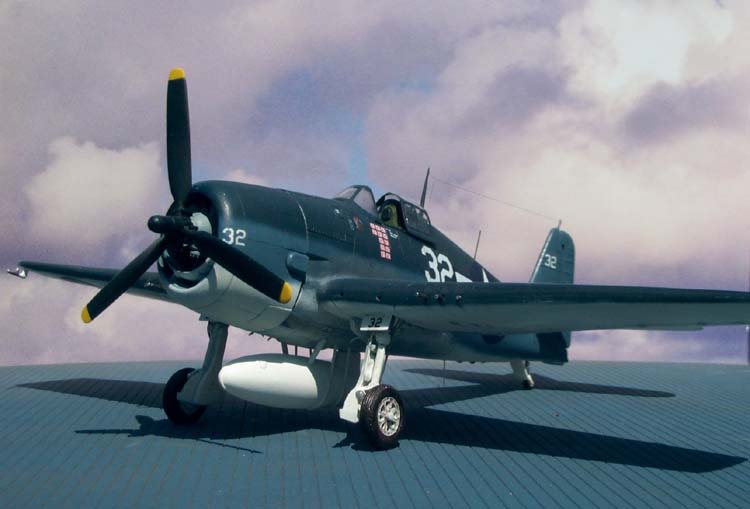
The Model
I first met Alex Vraciu in 1999 at the "Celebrate History" event in
South San Francisco, and at that point I decided to build his Hellcat,
when the time rolled around for me to build a Hellcat. The war in the
Pacific is the portion of World War II that interests me the most, but
even two years later, I still had no representative of this most important
aircraft in my collection. When I decided it was time to build a Hellcat,
I found that modeling clubs and contests have been kind to me; I had three
Academy Hellcats, a Hasegawa Hellcat, brass from Eduard and Airwaves and
two Verlinden sets, all of which I either won at raffles or picked up
for next to nothing in auctions!
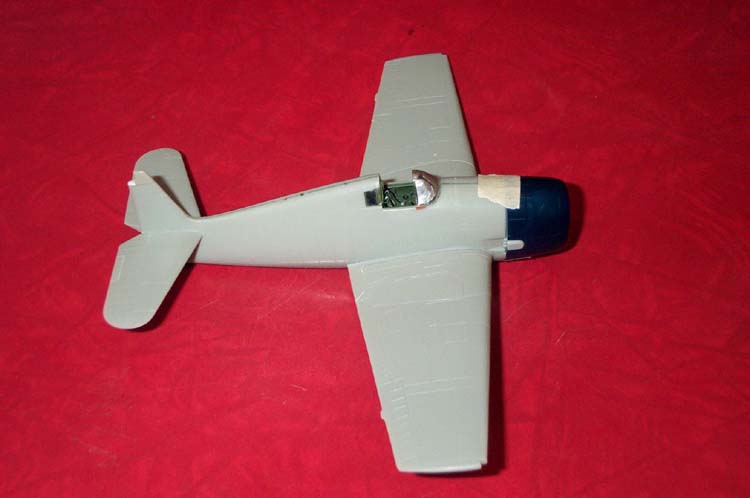
The Academy kit, since it had recessed panel lines, was a good starting
point, but I found a few things that were dismaying. The trailing edge
of the rudder was very thick, and thinning it would endanger the raised
rib detail present on the kit. This was because the rudder is provided
as halves, and the point where they join at the trailing edge is not very
good. I broke out the Hasegawa kit and found my solutions by sawing off
the rudders from each kit, then substituting the single-piece Hasegawa
rudder for the two-piece Academy rudder. The Hasegawa kit would also provide
a donor cowling; having championed the Obscureco 1:48 Hellcat cowling
for four years, I couldn't allow the Academy cowling on my model. The
two support vanes in the intake below the engine are too close together.
Although Hasegawa messed up their big Hellcat's grin, they got it right
in 1:72. Other bits that were better the first time: the landing gear
struts and the tailwheel.
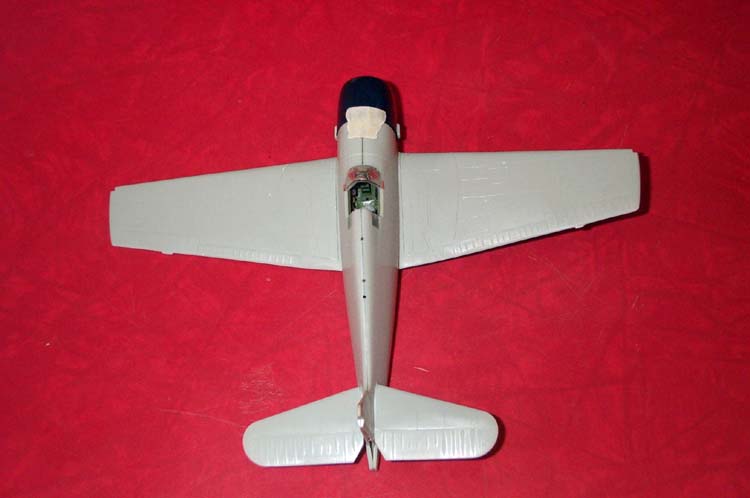
The very first thing I did was to make sure I was building an F6F-3.
The major identifying feature of the -3 was the windows behind the pilot's
sliding canopy. I carefully opened the flashed-over positions for these
windows and cemented the clear pieces in place with superglue, then made
sure the outer seams were sealed by adding even more superglue. These
were sanded flush, then polished back to clarity with successive grits
of sanding sticks and an application of Blue Magic auto body polish. I
did this early on, because such polishing can create a static charge that
draws all the dust collected in the fuselage to the area being polished.
Since I had yet to add any of the cockpit pieces, let alone join the fuselage
halves, this was the ideal time to put in the windows and eliminate their
seams and the resulting dust.
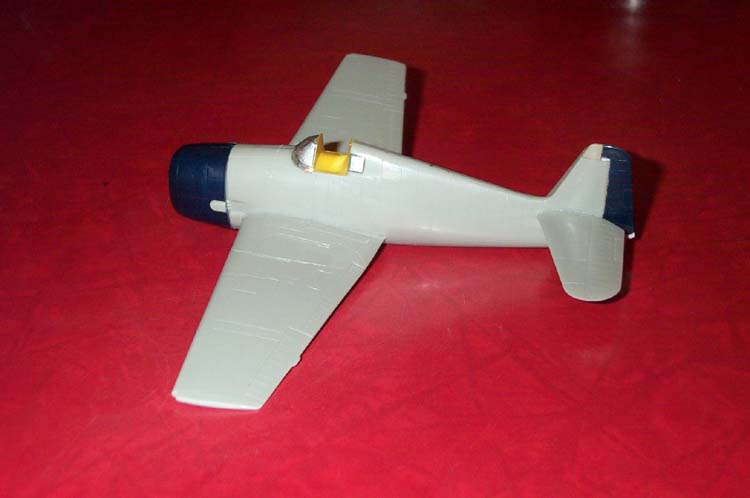
I masked the newly-installed windows and set about building the interior.
I used many of the brass features from the Verlinden kit, including the
kickboards, the sidewalls and the throttle quadrant, trim wheel, map case
and other details. I painted these first with a coat of Model Master interior
flat black, which is really a dark gray; this was airbrushed at a bottom-to-top
angle on the sidewalls. Then, using a top-to-bottom angle, I sprayed a
coat of bronze green over this. The result was a shadow effect that showed
off the structural detail present in the set.
After the basic structure had been drybrushed with a lightened shade
of green, various details were picked out in gloss and semi-gloss black,
red and white. Then, I used Model Master steel to weather the cockpit,
paying attention to the edges a pilot might scuff with his elbows and
the kickboards where his feet often came to rest.
 The
rear bulkhead was taken from the kit, and was installed unmodified except
for one major modification. I used a round file to create the cutouts
present in the F6F-3 rear head armor; these were needed so the pilot could
use those rear windows. The
rear bulkhead was taken from the kit, and was installed unmodified except
for one major modification. I used a round file to create the cutouts
present in the F6F-3 rear head armor; these were needed so the pilot could
use those rear windows.
The resin seat from Verlinden was painted bronze green, then "scuffed"
with steel before the brass seat belts were added. The fit of the seat
was rather snug, to the point of endangering the other cockpit components!
The control panel came from Verlinden, whose photo-negative approach
to the instruments themselves I really like. I painted the back of the
film white; next, I painted the rear part of the panel bronze green and
the instrument cluster black. After I drybrushed the panel lightly, I
coated the front of the instrument transparency with Future floor polish
and lined the panel up with the instruments, then set it aside to dry.
This approach lets the Future work as both an adhesive and as "glass"
instrument faces when dry.
The Eduard center pedestal was also used; the Verlinden part is simply
incorrect in that it connects to the panel. In reality, the two are not
connected. The rudder pedals wen in next; I offset one, anticipating a
slight offset of the Hasegawa rudder later on.
 Joining
the fuselage was fairly easy; the fit of the Academy parts was, in general,
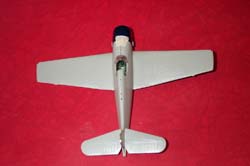
very good. Next came the lower wing, followed by the upper wing halves.
At this point, the shortcomings of the kit's wheel wells are obvious.
There is very little detail on the top of the wells, no sides to them,
and no representation of the leading edge of the flaps, which make up
the rear of the main gear bays. Joining
the fuselage was fairly easy; the fit of the Academy parts was, in general,
very good. Next came the lower wing, followed by the upper wing halves.
At this point, the shortcomings of the kit's wheel wells are obvious.
There is very little detail on the top of the wells, no sides to them,
and no representation of the leading edge of the flaps, which make up
the rear of the main gear bays.
I went at this problem using a solution I learned about while building
another R-2800-powered machine, the P-47. I made rounded sections for
the flaps from lead foil, cemented them in place and sanded them out.
Next, I carefully lined each side of the wells with another piece of lead
foil. The foil is flexible enough to allow you to mold it to the curves
of the wheel wells, yet structurally sound enough to maintain its shape.
I superglued the lead foil in place, trimmed it off with small scissors,
then filed the remainder away and polished the surface plastic. I also
made sure that I washed my hands after each use of lead foil; I like building
models, but I'm not willing to set myself up for any form of chemical
poisoning in the process!
 The
tops of the wells were detailed with styrene strip, rod and a little wire.
The Verlinden set provided two catapult hooks in photoetched brass; this
was all the detail needed to replicate the Hellcat's gear bays. The
tops of the wells were detailed with styrene strip, rod and a little wire.
The Verlinden set provided two catapult hooks in photoetched brass; this
was all the detail needed to replicate the Hellcat's gear bays.
The horizontal tail went on easily, with only a trace of a gap on the
right side, which was quickly eliminated with a little superglue and sanding.
The very tip of the vertical tail was cut out with a Dremel tool; no kit
has quite captured this squared-off shape. Verlinden provides a replacement
fin tip; this was superglued in place and blended into the vertical tail.
In sanding out some of the seams, some areas on the top and bottom
of the fuselage needed to be rescribed. I did this by lining up a number
11 X-Acto blade along the panel lines, then carefully sliding it over
until I connected the line. A little sanding took the sharp edge off these
new lines. I also used a Bare-Metal scriber and some Dymo tape to sharpen
up a few lines on the wings where they joined the fuselage.
Next, I built an Aires R-2800 engine to power my mode. The Aires engine
is a kit in and of itself: 18 cylinders in a crank case, with separate
dual magnetos, distributors and front-section oil scavenge pump, plus
a photo-etched wiring loom and a rear accessories section. Detail is so
perfect that there's even a tiny disk on the lower reduction gear cover;
that's the Pratt & Whitney logo plate! The only thing not provided are
the push rod tubes. I made 18 of these from stretched black sprue and
carefully installed them after the engine was mostly assembled.
I recommend painting the cylinders and crank case first, then assembling
the engine. I painted the cylinders grimy black, then drybrushed them
with chrome silver; the crank case was neutral gray and the magnetos were
black. I put the cylinders in place first, followed by the 18 pushrods,
the wiring loom and then the magnetos, distributors and scavenge pump.
Having built five of these engines now, I've found this is the only way
to get all these parts in place without having to modify them.
 The
Hasegawa cowling was given the exhaust blisters from the Academy kit,
and the engine was put in place, braced by a sturdy length of styrene
strip. The rudder was installed at a very slight angle, and the Verlinden
bomb racks were put in place under the wings. The Verlinden gunsight was
installed and given a reflector made from a bit of cellophane from a decal
sheet envelope. I masked the canopy using Bare Metal foil, then glued
it into place on the fuselage and cleaned up the resulting seam. I modified
the brass parts in the Verlinden set for the small fairings at the lower
edges of the windscreen and superglued them in place. I also drilled the
openings for the machine gun tubes, expecting to add stainless steel tubing
later, and filed open the wing-tip formation lights. The
Hasegawa cowling was given the exhaust blisters from the Academy kit,
and the engine was put in place, braced by a sturdy length of styrene
strip. The rudder was installed at a very slight angle, and the Verlinden
bomb racks were put in place under the wings. The Verlinden gunsight was
installed and given a reflector made from a bit of cellophane from a decal
sheet envelope. I masked the canopy using Bare Metal foil, then glued
it into place on the fuselage and cleaned up the resulting seam. I modified
the brass parts in the Verlinden set for the small fairings at the lower
edges of the windscreen and superglued them in place. I also drilled the
openings for the machine gun tubes, expecting to add stainless steel tubing
later, and filed open the wing-tip formation lights.
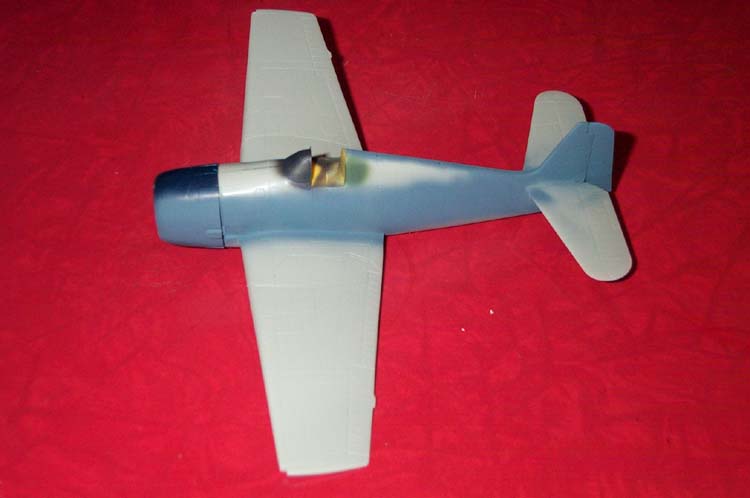
 With
the model ready for paint, I chose Model Master colors for the intermediate
blue and dark sea blue upper camouflage and Humbrol matte white for the
lower colors. The cockpit was masked, and I sprayed the intermediate blue
first, followed by the white lower camouflage and the dark sea blue upper
colors. I spent considerable time going over these lines free-hand, trying
to get the borders just right according to the photos I used as a reference.
I began to obsess a great deal over the demarcation line on the fuselage,
until I realized that the enormous star-and-bar marking would cover this
entire area! With
the model ready for paint, I chose Model Master colors for the intermediate
blue and dark sea blue upper camouflage and Humbrol matte white for the
lower colors. The cockpit was masked, and I sprayed the intermediate blue
first, followed by the white lower camouflage and the dark sea blue upper
colors. I spent considerable time going over these lines free-hand, trying
to get the borders just right according to the photos I used as a reference.
I began to obsess a great deal over the demarcation line on the fuselage,
until I realized that the enormous star-and-bar marking would cover this
entire area!
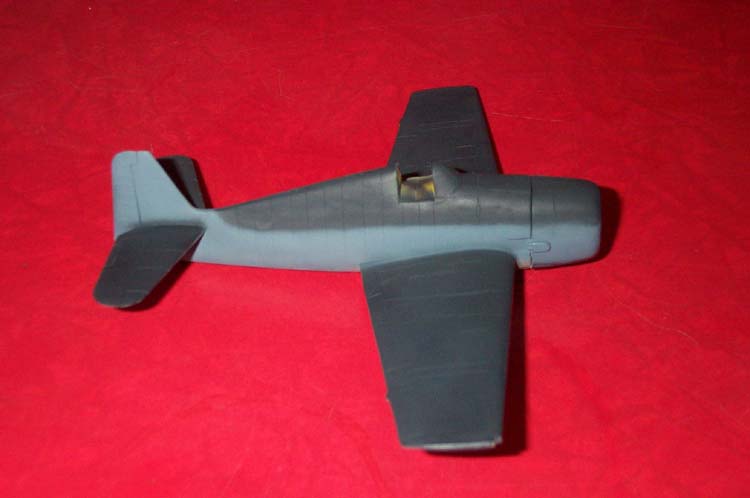
 The
model was given a coat of water-based Varathane, thinned with water and
a drop of Windex, to prepare it for decals. This was perhaps the most
challenging part of the model, because Vraciu's Turkey Shoot aircraft
has never been provided on a decal sheet. His VF-6 aircraft, "Gadget,"
which wore a number 19, is probably the second-best known single Hellcat
(second only to David McCampbell's "Minsi III"), but VF-16's Hellcats
have never been on a sheet in 1:72. The
model was given a coat of water-based Varathane, thinned with water and
a drop of Windex, to prepare it for decals. This was perhaps the most
challenging part of the model, because Vraciu's Turkey Shoot aircraft
has never been provided on a decal sheet. His VF-6 aircraft, "Gadget,"
which wore a number 19, is probably the second-best known single Hellcat
(second only to David McCampbell's "Minsi III"), but VF-16's Hellcats
have never been on a sheet in 1:72.
 My
friend Suzi Racho had given me a book of aviation art for my birthday
two years ago; two paintings depicted this aircraft. One, by Robert Taylor,
shows this plane taking off with the dawn sun behind it; Vraciu says this
is inaccurate, because of the time of day, the fact that he was deck launched
and not catapulted, and several other details. Roy Grinnell's painting
however, was done with Vraciu's assistance. In any event, both paintings
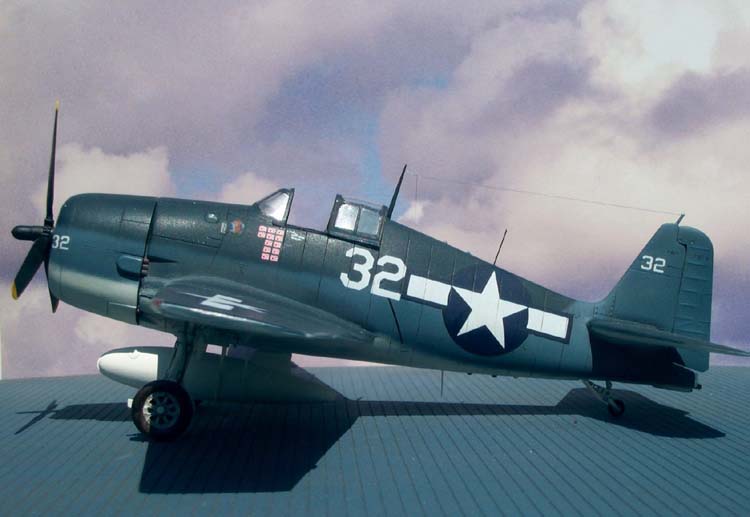
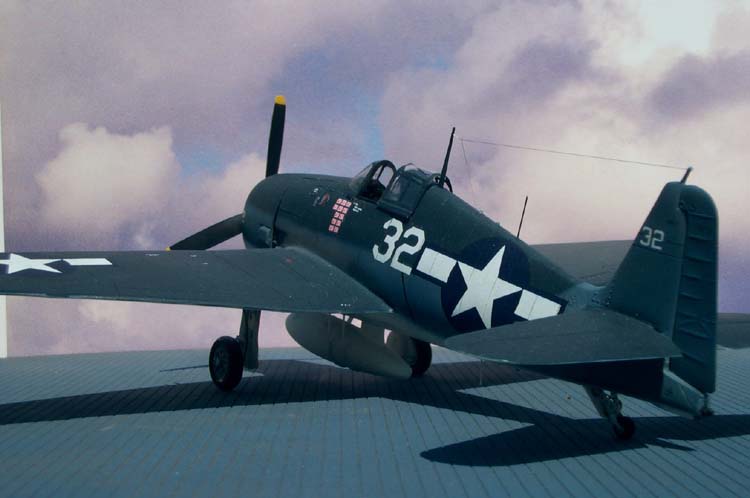
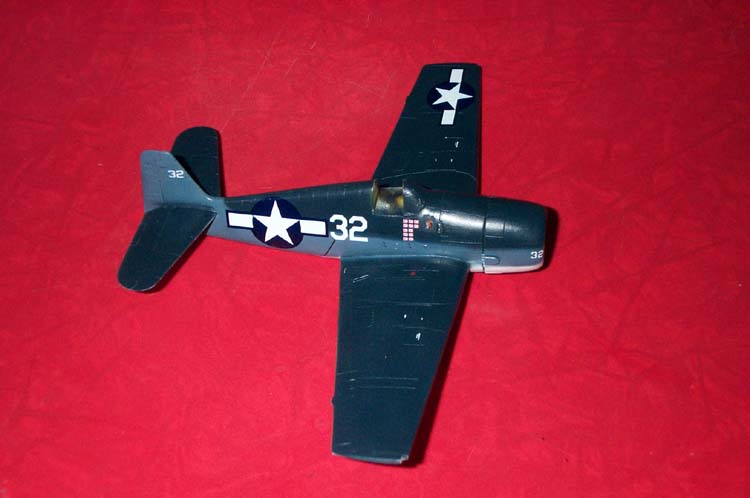
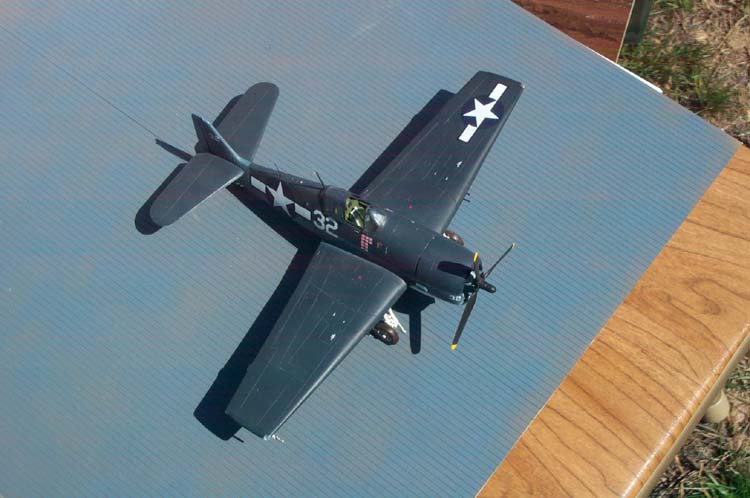
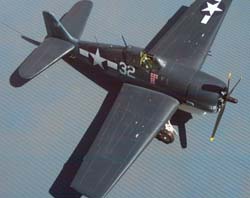
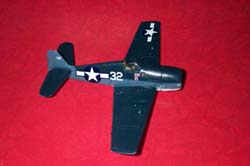
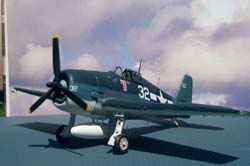
agree on the markings of this aircraft on June 19: number 32 on the sides
of the cockpit, and in smaller numbers on the tail and front of the cowling;
12 kill markings; the VF-16 logo, and the standard national markings.
I wrote a letter to Vraciu and asked whether the squadron and personal
markings were on both sides of the plane; he responded that they were,
so I could proceed with confidence that I was getting the markings right.
I bought AeroMaster sheet 72-111, "Fighting Hellcats," for the correct
size national insignia; naturally, Vraciu's VF-6 number 19 was also on
this sheet! The kill markings came from AeroMaster 72-177, "Southeast
Asia Mustangs;" one scheme had two sets of kill markings, which were cut
out and rearranged to represent Vraciu's 12 kills. The large number 32s
came from a generic sheet of white 45-degree letters, while the cowling
32s came from the AeroMaster Hellcat sheet (one of the schemes happens
to be a number 32 from VF-12), while the tail 32 came from a SuperScale
sheet for Bearcats. The various stencils came from SuperScale 72-737,
another Hellcat sheet. The marking on the gear door was snipped from a
serial for a 1:144 F-100. Projects like this prove the value of a big
decal collection! My
friend Suzi Racho had given me a book of aviation art for my birthday
two years ago; two paintings depicted this aircraft. One, by Robert Taylor,
shows this plane taking off with the dawn sun behind it; Vraciu says this
is inaccurate, because of the time of day, the fact that he was deck launched
and not catapulted, and several other details. Roy Grinnell's painting
however, was done with Vraciu's assistance. In any event, both paintings
agree on the markings of this aircraft on June 19: number 32 on the sides
of the cockpit, and in smaller numbers on the tail and front of the cowling;
12 kill markings; the VF-16 logo, and the standard national markings.
I wrote a letter to Vraciu and asked whether the squadron and personal
markings were on both sides of the plane; he responded that they were,
so I could proceed with confidence that I was getting the markings right.
I bought AeroMaster sheet 72-111, "Fighting Hellcats," for the correct
size national insignia; naturally, Vraciu's VF-6 number 19 was also on
this sheet! The kill markings came from AeroMaster 72-177, "Southeast
Asia Mustangs;" one scheme had two sets of kill markings, which were cut
out and rearranged to represent Vraciu's 12 kills. The large number 32s
came from a generic sheet of white 45-degree letters, while the cowling
32s came from the AeroMaster Hellcat sheet (one of the schemes happens
to be a number 32 from VF-12), while the tail 32 came from a SuperScale
sheet for Bearcats. The various stencils came from SuperScale 72-737,
another Hellcat sheet. The marking on the gear door was snipped from a
serial for a 1:144 F-100. Projects like this prove the value of a big
decal collection!
 The
one marking I didn't haveand could not buywas the VF-16 "Airedales"
logo. Luckily, my friend Robin Powell is adept at printing decals with
his inkjet printer. He scanned an image of the logo from a book, reduced
it to a mere .018", gave it a dark blue background, and printed several
copies for me. These worked perfectly, requiring only a bit of touch up
with sea blue paint to blend in. The
one marking I didn't haveand could not buywas the VF-16 "Airedales"
logo. Luckily, my friend Robin Powell is adept at printing decals with
his inkjet printer. He scanned an image of the logo from a book, reduced
it to a mere .018", gave it a dark blue background, and printed several
copies for me. These worked perfectly, requiring only a bit of touch up
with sea blue paint to blend in.
With the decals in place, I gave the model another coat of Varathane
and washed the entire model with dark gray watercolor paint. When the
wash was dry and to my liking, I added a flat coat made up of Testors
Dullcote thinned heavily with lacquer thinner. Then, I added exhaust streaks
in pastel, starting with light gray and graduating through black, dark
brown and white. I also added some black exhaust on the lower fuselage
and some gun residue around the machine gun ports.
The wheels in both the Hasegawa and Academy kits were sub-par, so I
grabbed a set of wheels from Hi-Tech's set for the F4U-5 Corsair. The
struts from the Hasegawa kit needed a little trimming to sit right in
the Academy bays, but they looked very good once installed. I added anti-torque
links from Eduard and brake lines made from fine solder to the struts
before adding the wheels. The Academy gear doors had nasty knock-out pin
marks in them that needed to be drilled away with a fine bit in a Dremel
tool; once they were cleaned up, they were painted white and put in place.
When this was accomplished the entire landing gear and wheel well area
was given a heavy wash with thinner and black paint.
 The
tail wheel came from the Hasegawa kit, although I cut most of it away.
I used brass pieces to make the tailwheel mounting arms, which have lightening
holes drilled in them, and made my own door fairings from styrene. When
these parts were assembled, I had a detailed but still sturdy tailwheel. The
tail wheel came from the Hasegawa kit, although I cut most of it away.
I used brass pieces to make the tailwheel mounting arms, which have lightening
holes drilled in them, and made my own door fairings from styrene. When
these parts were assembled, I had a detailed but still sturdy tailwheel.
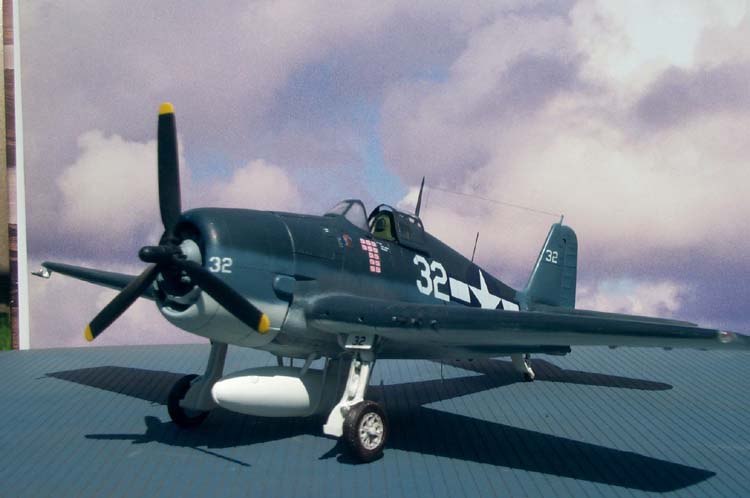
The drop tank had to come next. The kits provided the tank with the
lateral reinforcement rib, which was the later style of tank. The Verlinden
kit provided the vertically-reinforced tank, but it took considerable
work to correct flaws including air bubbles, out-of-round portions of
the tank and a misshapen pylon. Styrene strip was used to create the mounting
braces and attachment arms.
I'd painted the propeller some time before in my usual wayyellow first,
then, after the tips had been masked, semi-gloss black. The shaft on my
Aires R-2800 was cut back and the prop was mounted in place, followed
in quick succession by the tail and fuselage antenna masts, the pitot
head, clear and blue lights on the aircraft's spine, and a clear light
in the tail. The tailhook point was mad by cutting part-way through .030
styrene rod, then sanding and cutting the rod to the shape of the protruding
hook point.
The Squadron vacuform canopy was cut from the carrier, masked and airbrushed,
then put in place with a little superglue. I also added brass shim to
the cockpit sill to provide a track for the canopy to slide over.
I drilled three holes in a row (not as easy a trick as you might think!)
and added red, green and amber MV lenses to simulate the signal lights.
Next came the machine guns. In most references on the Hellcat, the guns
have solid outer jackets, but in a photo Vraciu had sent, the guns clearly
have perforated barrels. I dug out some Aires .50-caliber machine guns,
which have amazing barrels whose perforations are visible, even in 1:72,
and cut four sections of barrel (the outermost guns have only the ends
of the tubes visible, and I made these from stainless steel tubing). The
resin barrels were painted, then superglued into the wings. Then, I added
photoetched sway braces to the bomb racks from the Verlinden set, and
painted them in place. The same process was used to add the forward gear
doors.
 The
aerial was made with a few strands of nylon from a smoke-colored pair
of panty hose. The tail-to mast length came first, followed by the lead-in,
which went to an insulator in the side of the fuselage made by inserting
a wire into a very fine hole carefully drilled with a pin vise. The final
detail was the wingtip lights. I painted the notches I had filed earlier
chrome silver, then drilled small holes and inserted bits of wire painted
red and green into the appropriate wingtip. These were covered with three
successive layers of Krystal Kleer, giving me a clear cover with a colored
bulb inside. The
aerial was made with a few strands of nylon from a smoke-colored pair
of panty hose. The tail-to mast length came first, followed by the lead-in,
which went to an insulator in the side of the fuselage made by inserting
a wire into a very fine hole carefully drilled with a pin vise. The final
detail was the wingtip lights. I painted the notches I had filed earlier
chrome silver, then drilled small holes and inserted bits of wire painted
red and green into the appropriate wingtip. These were covered with three
successive layers of Krystal Kleer, giving me a clear cover with a colored
bulb inside.
And, just like that, I had a historic Hellcat! I want to thank my friend
Suzi Racho for providing the inspiration to get this project off the ground,
Robin Powell for his help in making the crucial VF-16 logo, and especially
Alex Vraciu for graciously providing his time and advice to get this model's
details right!
| 


|