Scratchbuilt 1/72 Tupolev TB-3
|
 |
Introduction
My interest in the Tupolev TB-3 began with seeing an old Soviet film
showing paratroopers sliding off the corrugated wings of a huge airplane
in the 1930s. Then I was given a set of 1/72 plans of that same aircraft
and the gears started in motion and I decided I had to have a model of
the beast! But how? Not only was it huge, having a 132 foot wingspan,
but because very few kits had ever been made of aircraft of that era,
everything would have to be scratch built.
Now I had done scratch building before but mostly in the form of World
War One types. The TB-3 was more of a World War Two aircraft in that it
was metal skinned and had huge cantilevered wings. Well, I had the most
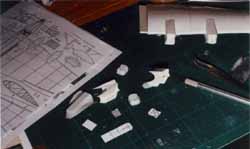
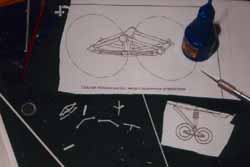
essential part of scratch building and that was the plans. I had them
photocopied in order to have one set that I could cut up for patterns.
Next I informed Harry Woodman, an expert in Soviet aircraft, what I was
up to and he sent me an East German publication on the TB-3 that was absolutely
superb, even though it was in German. Then I had to figure out what I
was going to use to build it.
 Since
it was covered with a corrugated alloy I had to find a source for corrugated
plastic card. I found one A4 piece at my local model railway shop but
the corrugations appeared too large. When I mentioned this at my IPMS
Club one member who was a truck driver said he'd seen very fine 10 thou
corrugated sheets at a shop in Sheffield and he'd pick some up for me.
Great, I was now on my way and my blood was up. What follows is a step
by step procedure in which I built the TB-3 in less than a month! Since
it was covered with a corrugated alloy I had to find a source for corrugated
plastic card. I found one A4 piece at my local model railway shop but
the corrugations appeared too large. When I mentioned this at my IPMS
Club one member who was a truck driver said he'd seen very fine 10 thou
corrugated sheets at a shop in Sheffield and he'd pick some up for me.
Great, I was now on my way and my blood was up. What follows is a step
by step procedure in which I built the TB-3 in less than a month!
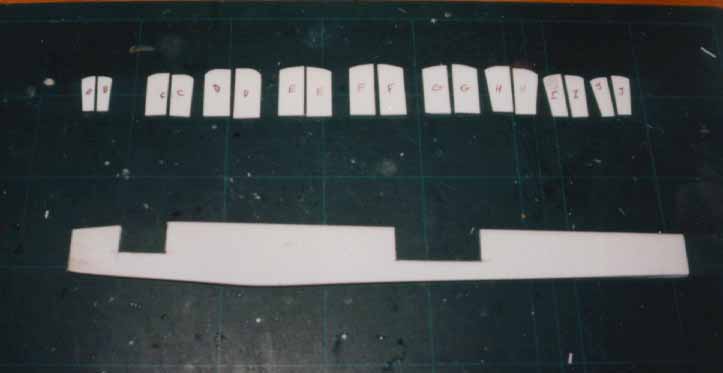
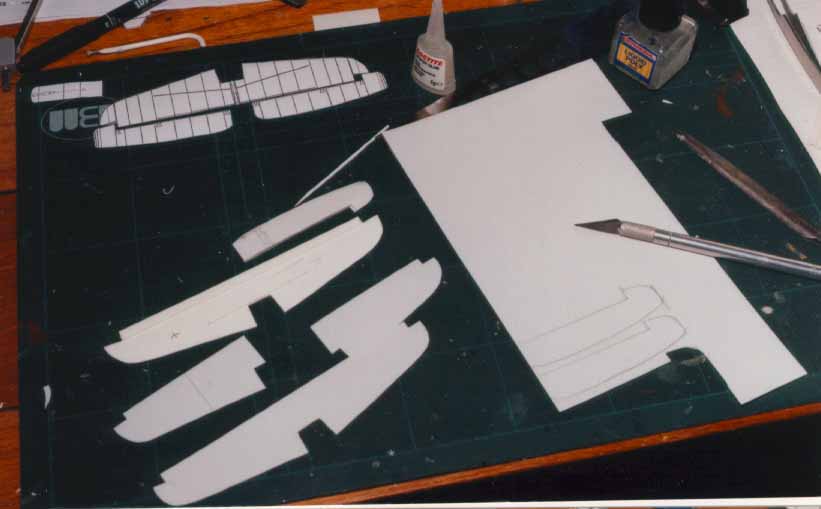
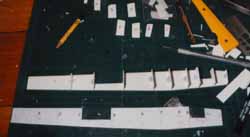
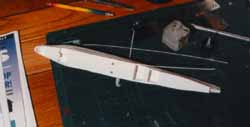
 I
figured that because the TB-3 was such a big aircraft it needed to be
built in a way that the main parts would be structural. So I decided that
the fuselage would have a central spine made of 40 thou plastic sheet
and everything would be built around it. The first photo shows the spine
and the formers ready to glue into position. The two large cut outs are
for the front and rear cockpits. I
figured that because the TB-3 was such a big aircraft it needed to be
built in a way that the main parts would be structural. So I decided that
the fuselage would have a central spine made of 40 thou plastic sheet
and everything would be built around it. The first photo shows the spine
and the formers ready to glue into position. The two large cut outs are
for the front and rear cockpits.
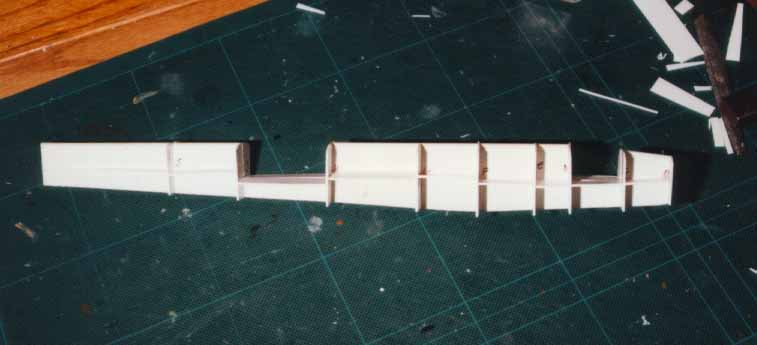
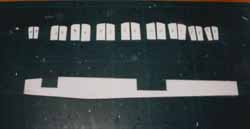
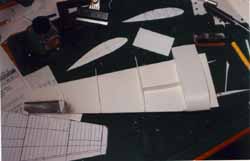
 The
next two shots show the formers being fitted, the floors and extra reinforcing
spine running through the fuselage. At this point I also cut slits in
the formers that would hold the wings in place. When thoroughly dry the
corrugated sheet was attached using liquid poly throughout. At the corners
one strip of the corrugations made perfect beading for all the joins.
The nose was built up of 30 thou card and covered with 10 thou plastic
sheet. That was the basic fuselage. It was time to start on the wings. The
next two shots show the formers being fitted, the floors and extra reinforcing
spine running through the fuselage. At this point I also cut slits in
the formers that would hold the wings in place. When thoroughly dry the
corrugated sheet was attached using liquid poly throughout. At the corners
one strip of the corrugations made perfect beading for all the joins.
The nose was built up of 30 thou card and covered with 10 thou plastic
sheet. That was the basic fuselage. It was time to start on the wings.
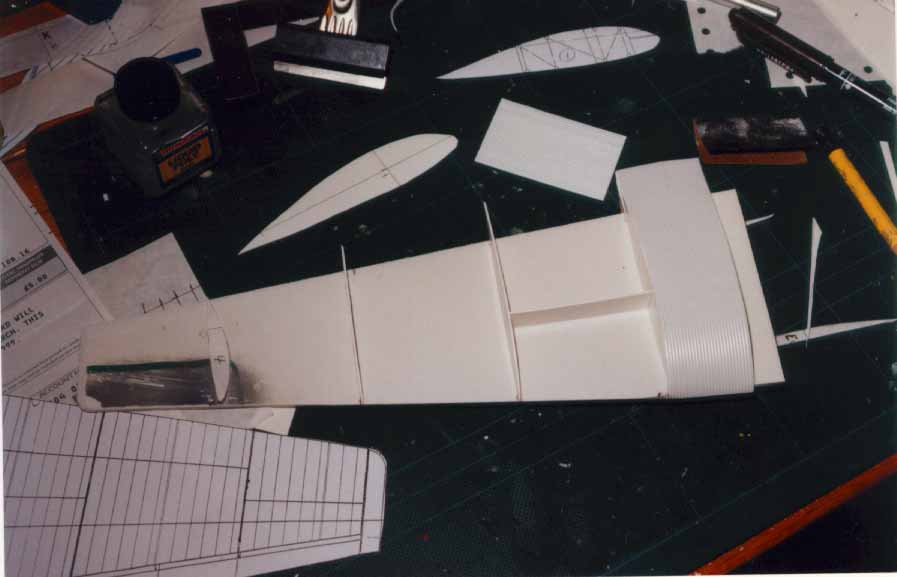
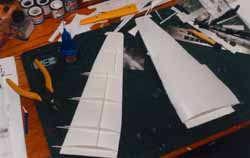
 Like
the fuselage the wings had to be structural and because they were so thick
I decided to go for the same method and use a central spine and build
around that. First I cut out the basic shape of the spine from 40 thou
plastic sheet. Then using the rib pattern on the plan I cut five ribs
corresponding to the tapering pattern of the wing from 20 thou plastic. Like
the fuselage the wings had to be structural and because they were so thick
I decided to go for the same method and use a central spine and build
around that. First I cut out the basic shape of the spine from 40 thou
plastic sheet. Then using the rib pattern on the plan I cut five ribs
corresponding to the tapering pattern of the wing from 20 thou plastic.
 These
were split through the middle and a 40 thou section taken out to compensate
for the thickness of the spine. As can be seen these split ribs were glued
to both sides of the spine and reinforced with strips of plastic between
each set of ribs. A large tab was left at the wing root which would slot
into the fuselage. Once all the ribs were in place and thoroughly dry
I started to apply the 10 thou corrugated sheet to the wings. Each section
was attached using liquid poly, gluing from the leading edge back to the
trailing edge. The wing tips are actually the central spine left uncovered
and rounded off. I left the ailerons as separate items to be made once
the wings were completed. Where the top and bottom corrugated sheets met
at the leading edge I attached a tapered strip of curved 20 thou sheet
to form the leading edge. These
were split through the middle and a 40 thou section taken out to compensate
for the thickness of the spine. As can be seen these split ribs were glued
to both sides of the spine and reinforced with strips of plastic between
each set of ribs. A large tab was left at the wing root which would slot
into the fuselage. Once all the ribs were in place and thoroughly dry
I started to apply the 10 thou corrugated sheet to the wings. Each section
was attached using liquid poly, gluing from the leading edge back to the
trailing edge. The wing tips are actually the central spine left uncovered
and rounded off. I left the ailerons as separate items to be made once
the wings were completed. Where the top and bottom corrugated sheets met
at the leading edge I attached a tapered strip of curved 20 thou sheet
to form the leading edge.
 All
this gluing was done with liquid poly since anything stronger would have
blemished the thin plastic. At each joint of the wing covering I applied
a strip of corrugated sheet as indicated on the plan. That basically completed
the wings. All
this gluing was done with liquid poly since anything stronger would have
blemished the thin plastic. At each joint of the wing covering I applied
a strip of corrugated sheet as indicated on the plan. That basically completed
the wings.
Next I turned to the tail surfaces. Starting with the horizontal parts,
a spine was made of plastic sheet but this time with a thickness of 30
thou. 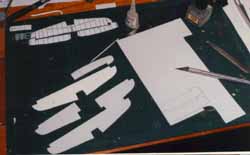 This
was then sandwiched between the corrugated plastic. All the edges were
then sanded to form an airfoil section. The rudder/fin was constructed
in the same fashion. Thin strips of plastic were used to simulate the
tail surface ribs. This
was then sandwiched between the corrugated plastic. All the edges were
then sanded to form an airfoil section. The rudder/fin was constructed
in the same fashion. Thin strips of plastic were used to simulate the
tail surface ribs.
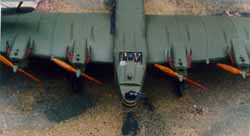
The four engines on the TB-3 were fortunately all the same so when
it came to fabricating them I simply quadrupled the parts. Each engine
had two sides, therefore I made eight and so on. I carved the complex
front shape out of hardwood and then plunge formed the four parts with
20 thou plastic softened over a candle. The four engine top covers were
made in the same way.
 The
radiators were simply made of the same corrugated plastic with vertical
strips for the shutter control rods. Once completed the four engines were
attached to their positions on the wing leading edge. Using an Aeroclub
white metal exhaust pipe as a pattern, I formed eight manifolds from 30
thou sheet as seen in the photo. The roughed out shape was filed down
with various needle files and then bent to shape over a candle flame. The
radiators were simply made of the same corrugated plastic with vertical
strips for the shutter control rods. Once completed the four engines were
attached to their positions on the wing leading edge. Using an Aeroclub
white metal exhaust pipe as a pattern, I formed eight manifolds from 30
thou sheet as seen in the photo. The roughed out shape was filed down
with various needle files and then bent to shape over a candle flame.
 As
can be seen in the photo, the wheels and bogies look pretty complex but
again once they were broken down into components it was easy to construct
them out of plastic rod and tubing. For the wheels I simple plunge formed
the eight wheel halves over a mould made from a 1/48 World War One model
wheel a'la Harry Woodman. As
can be seen in the photo, the wheels and bogies look pretty complex but
again once they were broken down into components it was easy to construct
them out of plastic rod and tubing. For the wheels I simple plunge formed
the eight wheel halves over a mould made from a 1/48 World War One model
wheel a'la Harry Woodman.
The main assembly was pretty straight forward as the wings simply slotted
into the fuselage and the horizontal tail surface was butt jointed on
the fuselage rear. The fin/rudder had two brass pins to attach it as there
is a gap between the horizontal and vertical stabilizers.
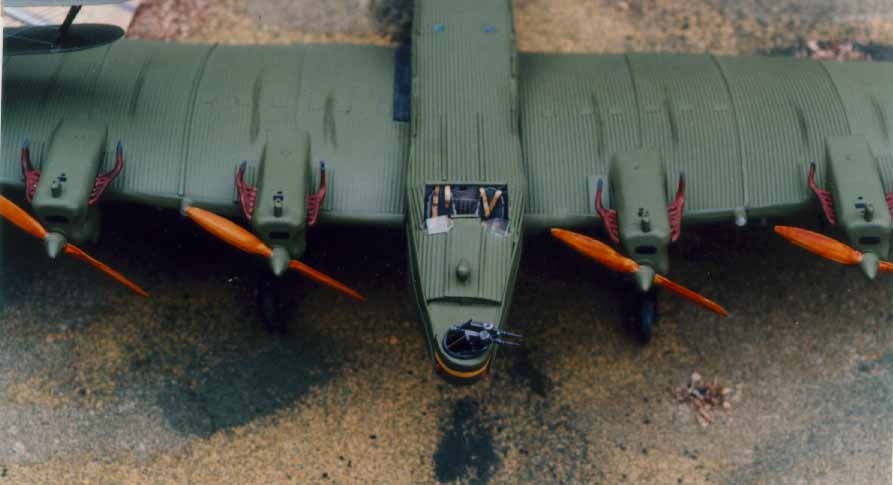
 Once
the main assembly was complete the painting was next. From what I could
deduce from the book Harry Woodman lent me, the TB-3 was painted in an
overall olive green, so I used Humbrol number 117 matt US light green
and number 47 sea blue for the under surfaces. About two coats sufficed
but it took a lot of paint to cover such a large surface. The TB-3 is
one of largest plastic models I have ever built. I painted the insides
of the cockpits light grey as I reckoned that the Russians had probably
used a neutral color. Once
the main assembly was complete the painting was next. From what I could
deduce from the book Harry Woodman lent me, the TB-3 was painted in an
overall olive green, so I used Humbrol number 117 matt US light green
and number 47 sea blue for the under surfaces. About two coats sufficed
but it took a lot of paint to cover such a large surface. The TB-3 is
one of largest plastic models I have ever built. I painted the insides
of the cockpits light grey as I reckoned that the Russians had probably
used a neutral color.
 With
the main paint scheme finished I turned next to the details of the monster.
There were a myriad of details to add to the TB-3 airframe and here are
a few of them; cockpit seats and belts, two control wheels, instrument
panel, two compasses, windscreens, three gun rings, six 7.62mm machine
guns, two underling turrets, four water reservoirs for the engines, four
radiators, four propeller spinners, two landing gear struts, four wheels,
one directional finder housing, four landing lights, hand rails of brass
wire and finally a tail skid. With
the main paint scheme finished I turned next to the details of the monster.
There were a myriad of details to add to the TB-3 airframe and here are
a few of them; cockpit seats and belts, two control wheels, instrument
panel, two compasses, windscreens, three gun rings, six 7.62mm machine
guns, two underling turrets, four water reservoirs for the engines, four
radiators, four propeller spinners, two landing gear struts, four wheels,
one directional finder housing, four landing lights, hand rails of brass
wire and finally a tail skid.
All of these items had to be scratch built and in fact the only items
on the entire model not made by me were the propellers that came from
an old Contrail model of the Staaken R VI. The landing gear had to be
very robust to hold the huge airframe so I used heavy piano wire surrounded
by a cover made from a piece of drilled out sprue. The remainder of the
undercarriage was made up of Contrail strut material with brass pins inserted
in the ends to give them extra strength. The wheel bogie assembly was
articulated in order to get all four wheels to set properly and also to
give the model the right look when holding it. The wheels drooped on the
real aircraft when it was in flight. One of the last things I did on the
models after applying a coat of clear matt varnish was the glazing. I
used clear packaging material for the bomb aimer's position and plain
white glue for the various small windows.
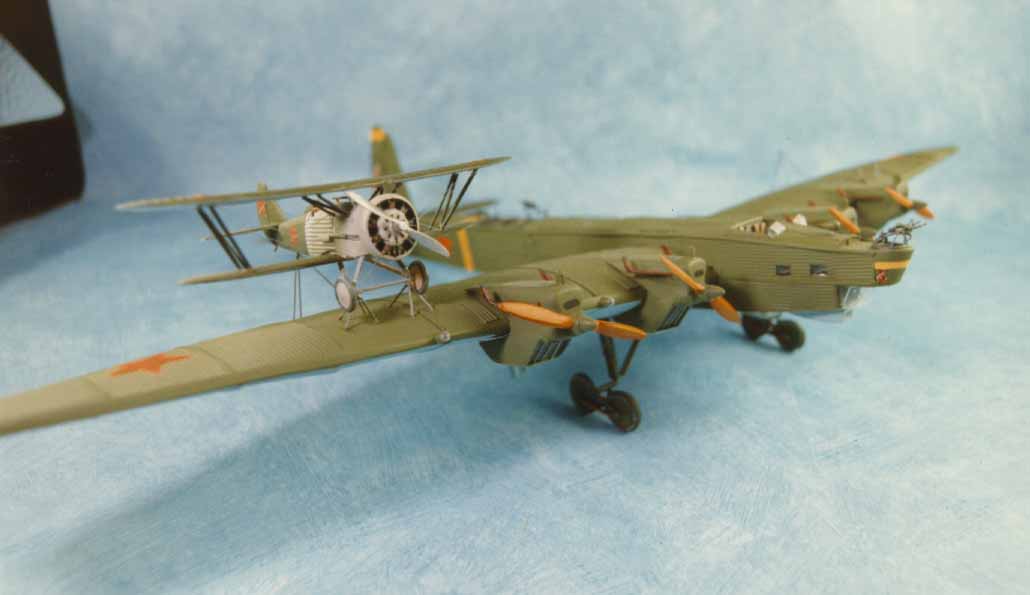
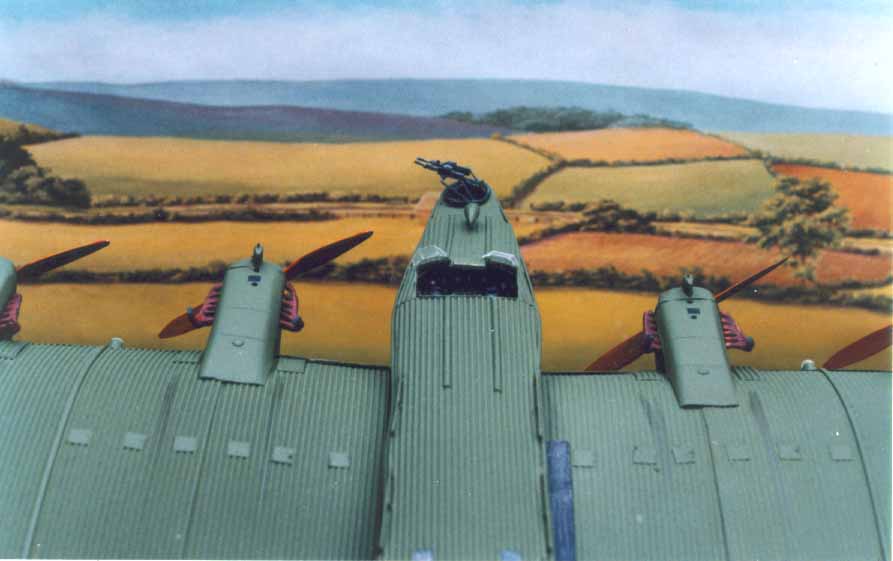
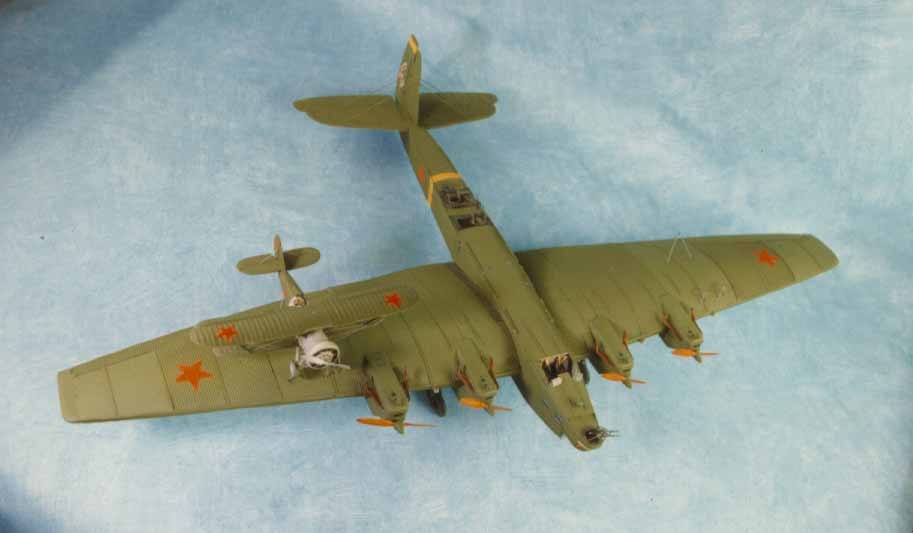
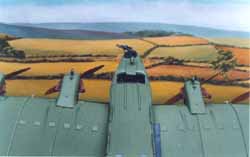 Well
that pretty well entails the scratch building of the giant Soviet Tupolov
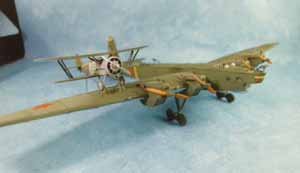
TB-3 (ANT 6) bomber. As can be seen in the photos I also added a Polikarpov
I-5 pursuit plane to the starboard wing and mountings to both wings. This
was one of several combinations that were used on these giant aircraft.
Up to six pursuit planes could be carried by one TB-3! But on the version
I have built only the I-5 was used and models showing I-16s etc. are wrong,
i.e. the ICM model. The I-5 I used is a converted Matchbox Boeing P-12
with a remodelled fuselage and tail. But that's another story!.. I had
a lot of fun doing this project and it shows what can be done using plastic
card. As I said at the beginning, the TB-3 was a modern aircraft and many
other types would lend themselves to the techniques described above Well
that pretty well entails the scratch building of the giant Soviet Tupolov
TB-3 (ANT 6) bomber. As can be seen in the photos I also added a Polikarpov
I-5 pursuit plane to the starboard wing and mountings to both wings. This
was one of several combinations that were used on these giant aircraft.
Up to six pursuit planes could be carried by one TB-3! But on the version
I have built only the I-5 was used and models showing I-16s etc. are wrong,
i.e. the ICM model. The I-5 I used is a converted Matchbox Boeing P-12
with a remodelled fuselage and tail. But that's another story!.. I had
a lot of fun doing this project and it shows what can be done using plastic
card. As I said at the beginning, the TB-3 was a modern aircraft and many
other types would lend themselves to the techniques described above
 So,
would I do it again? Probably not, since the ICM kit has come out, but
if another giant aircraft inspires me I wouldn't hesitate. The experience
of building the TB-3 has given me the confidence to try and tackle any
subject that falls into the category of building with plastic card. Maybe
the giant Kalinin K-7; it had a wingspan of 173 feet! So,
would I do it again? Probably not, since the ICM kit has come out, but
if another giant aircraft inspires me I wouldn't hesitate. The experience
of building the TB-3 has given me the confidence to try and tackle any
subject that falls into the category of building with plastic card. Maybe
the giant Kalinin K-7; it had a wingspan of 173 feet!
| 


|