TAURO MODEL'S 1/35TH SCALE FIAT 3000 mod. 21 Ia serie tank Kit no. 104
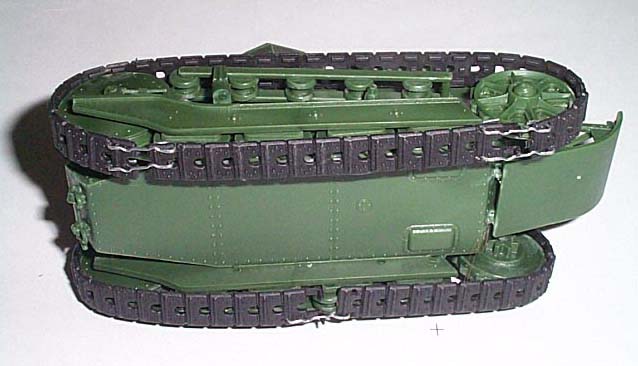
MSRP: $17.95 | 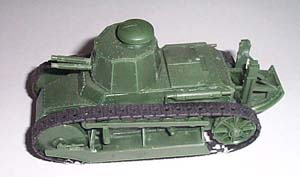 | HISTORY The FIAT 3000 was of paramount importance in the history of the Italian Army. Born from experiences in WWI, it entered service only after the end of that war and was the first tank produced in quantity for the newly formed tank corps. Following the use of tanks on the Western Front, the Italian headquarters decided to test this new and interesting means of war. Italy purchased - from France - two Schneider tanks and three Renault FT-17s. After a series of trials, it was decided to produce the Renault FT-17, because of its good cross-country features. Fiat modified the original project, placing the engine crosswise in the hull and augmenting the armor and the armourment. This first series, representing the actual model, entered service in 1921 and was followed in 1930 by a second series with some improvements and armed with a 37mm gun. In the second half of the 30s the remaining tanks were improved and modernised. The last operational FIAT 3000's were used at the beginning of WWII. These last few were destroyed in fighting on Sicily during 1943. THE KIT: The kit comes in a sturdy lid and tray type box. It contains three trees of dark green plastic parts and black vinyl rubber band type treads. A small decal sheet and instructions finishes out the contents. BUILDING THE TANK: This is a fast build. There are only six assembly steps on the instruction sheet and the kit can easily be done as a week-end project. The steps are called out alphabetically, instead of numerically...with steps A through F. The first page of the instructions begins with a black and white photo of an actual FIAT 3000. This is followed by the vehicle's history, in Italian, English, French, and German. The second page has the parts drawings and a numbered list of what those parts are. All assembly steps have text next to them, telling the modeler what the sequence should be for assembling the parts in that step. Letter A step is the assembly of the bogies and running gear. The external mudguards that have the running gear sandwiched between them have some deep sinks on top...which will have to be puttied. I made an effort to leave the forward mounted large idler wheel and the road wheels free to turn, so as to make the mounting of the rubber band type treads easier later. Step B is the assembly of the unditching skid, that mounts on the back of the tank. Parts no. 24 (which are the hand cranks for raising and lowering this skid) are not called out on the parts tree drawings, but they are next to the machine gun barrels. On parts 16 & 17 there are some round knobs, on top of the triangular shaped girder work. These may look like excess plastic but BELONG there...so do not remove them. I almost did, before I studied the drawings.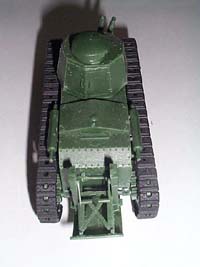 Step C is the turret assembly. I drilled out the two machine-gun barrels with a pin vice (parts no. 23) There are part numbers on the back of the panels that make up this multi-sided turret. The same numbers are molded into the base, so to ease the modeler in getting the panels in the right places and in the right sequence. Nice touch Tauro...because I could readily see how you could go wrong without this. Step D is the assembly of the main body of the tank. This step consists of two side pieces per side, the top, bottom, and rear of the body. You also add the rear axle at this time also and what I think are track mud cleaners. These cleaners go into external holes, at the front of the rearmost side panels (parts 12 & 13). Part nos 26 go into the "U" shapes on part no. 34 and then 34 glues to the bottom of the nose plate. Step E brings the running gear, main body, turret and anti-ditching skid all together. At this point they also want you to add the exhaust pipe/muffler parts and the shields that go over them. I only glued on the exhaust pipes and left the shields off until the tank is painted and the exhaust is first painted with rust colors. I made the drive sprockets so that they would turn and did not glue them solidly, to again ease the addition of the vinyl tracks. Inside the inner half of the drive sprockets (part no. 40) are three large mold pins...which should not be there and need to be removed so that things fit together with the outer part of the sprockets (part no. 41) The little end cap (part no. 52) if glued on the end of the sprocket axles carefully will allow these to turn. Letter F step is the assembly of the return rollers, which are sandwiched between some girder pieces. Do not glue these...as they can then turn freely...again aiding the addition of the track runs. You also melt the ends of the vinyl tracks together, with a hot screwdriver blade, and add those. 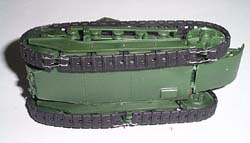 I followed the instructions, to the letter, except for leaving the muffler guards off until after painting. However, something went seriously wrong. When all the glue was dry and hard I went to put on the vinyl tracks and....horror or horrors...they did not go the distance. I wound up with at least a 1/4" gap!! I know that I put the suspension on right, because there are raised lines, molded into parts to guide placement of these parts. I talked to two other modelers who had the same experience with the tracks not going the distance. My solution (albeit maybe not the best) was to bridge the gaps with some staples. I then put the model on a wood base, with some gravel on it, and intend to hide these gaps with the gravel and ground cover to disguise or hide the gaps. I followed the instructions, to the letter, except for leaving the muffler guards off until after painting. However, something went seriously wrong. When all the glue was dry and hard I went to put on the vinyl tracks and....horror or horrors...they did not go the distance. I wound up with at least a 1/4" gap!! I know that I put the suspension on right, because there are raised lines, molded into parts to guide placement of these parts. I talked to two other modelers who had the same experience with the tracks not going the distance. My solution (albeit maybe not the best) was to bridge the gaps with some staples. I then put the model on a wood base, with some gravel on it, and intend to hide these gaps with the gravel and ground cover to disguise or hide the gaps. The decal sheet comes with a lot of numbers and division markings (in the form of vertical stripes) some of the numbers are in Roman numerals. There are also some white circles and triangles. The instruction sheet does not tell you what outfits to use these for... so you will have to go to other references. Colors are called out ...but not the time, place etc. This is rather annoying. I painted my model with a dark green paint and used markings for what I thought MIGHT have been on the ones used on Sicily, late in the war. Conclusion I enjoyed building this kit and the price is very fair. My only gripe was the too short treads. This kit was purchased at the local hobby shop, but is generally available at any well stocked shop. | 


|