Roden 1/72 Albatros D.II (Oeffag) Series 53 | 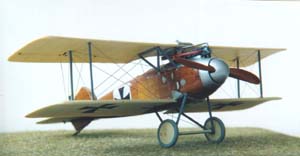 | Introduction  The Oesterreichische Flugzeugfabrik AG (OEFFAG) was founded on March 3, 1915 by Dr. Karl Freiherr von Skoda and Ferdinand Porsche. On December 4, 1916 the Oeffag company obtained the rights to produce the Albatros D.II and D.III. The company received an order for twenty Albatros D.II aeroplanes: sixteen were produced, numbered 53.01 to 53.16. The Oeffag version of the Albatros D.II was powered by an 185hp engine compared to the 160hp engine in its German counterpart. The new engine required changes in the area surrounding the engine as well as the cooling and exhaust systems. There were also modifications to the flying surfaces, and the Oeffag version initially used a single synchronized Schwarzlose mounted on the starboard interior of the fuselage. Prototype testing began in January 1917 and the first models were delivered to the Austro-Hungarian army in June of the same year, where they were used in action against the Imperial Russian Air Service and the Italian Air Service. The Oesterreichische Flugzeugfabrik AG (OEFFAG) was founded on March 3, 1915 by Dr. Karl Freiherr von Skoda and Ferdinand Porsche. On December 4, 1916 the Oeffag company obtained the rights to produce the Albatros D.II and D.III. The company received an order for twenty Albatros D.II aeroplanes: sixteen were produced, numbered 53.01 to 53.16. The Oeffag version of the Albatros D.II was powered by an 185hp engine compared to the 160hp engine in its German counterpart. The new engine required changes in the area surrounding the engine as well as the cooling and exhaust systems. There were also modifications to the flying surfaces, and the Oeffag version initially used a single synchronized Schwarzlose mounted on the starboard interior of the fuselage. Prototype testing began in January 1917 and the first models were delivered to the Austro-Hungarian army in June of the same year, where they were used in action against the Imperial Russian Air Service and the Italian Air Service.
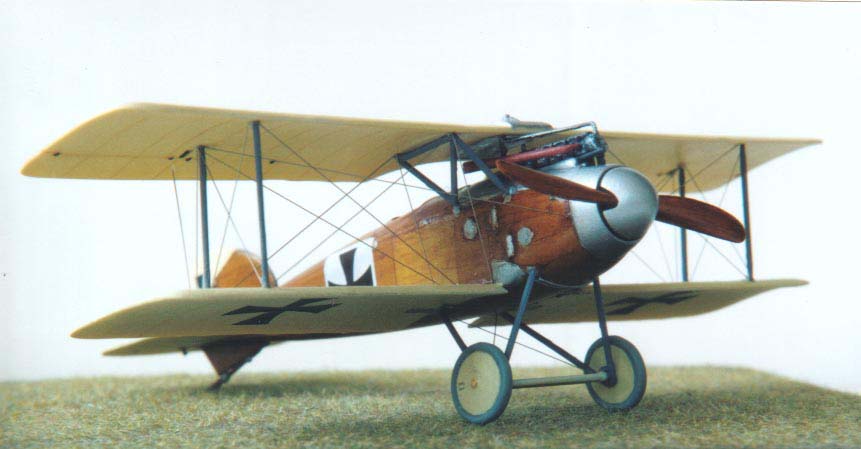
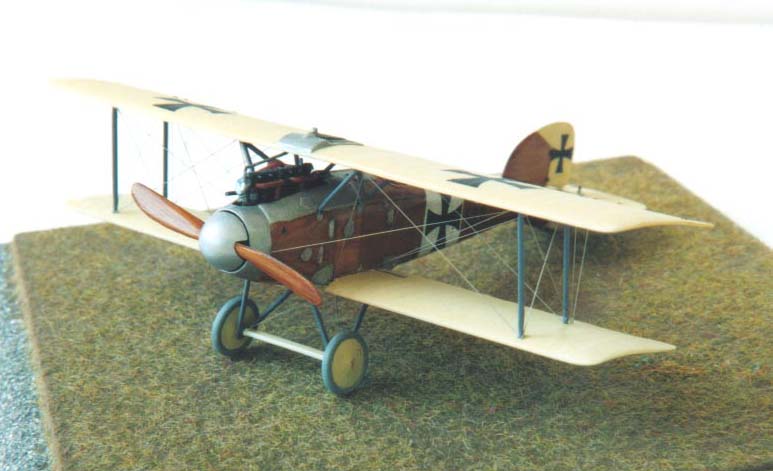
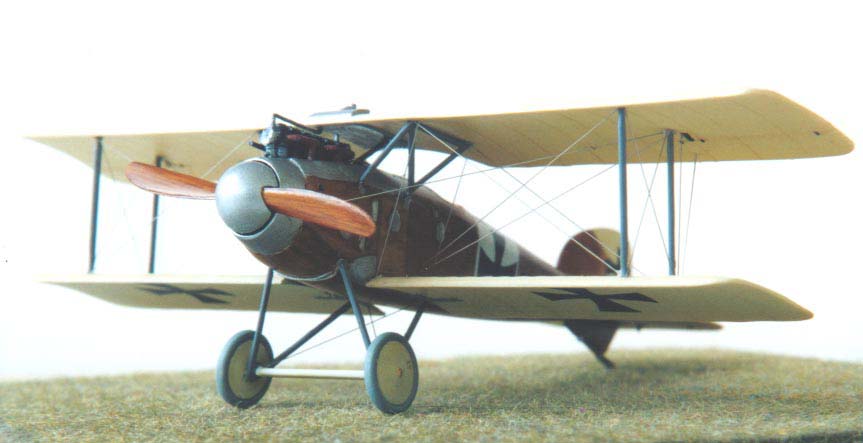
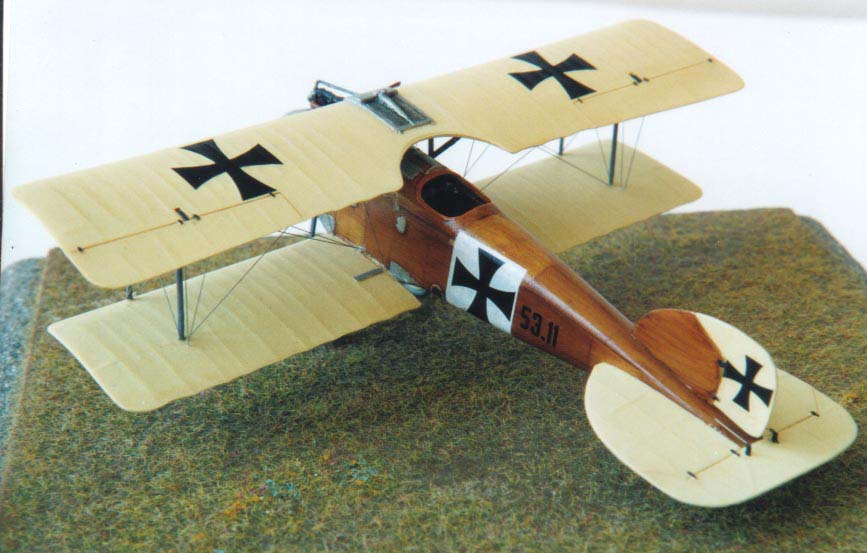
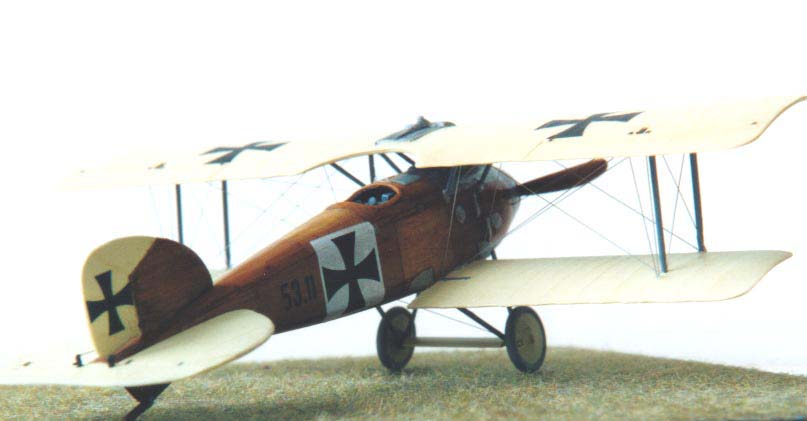
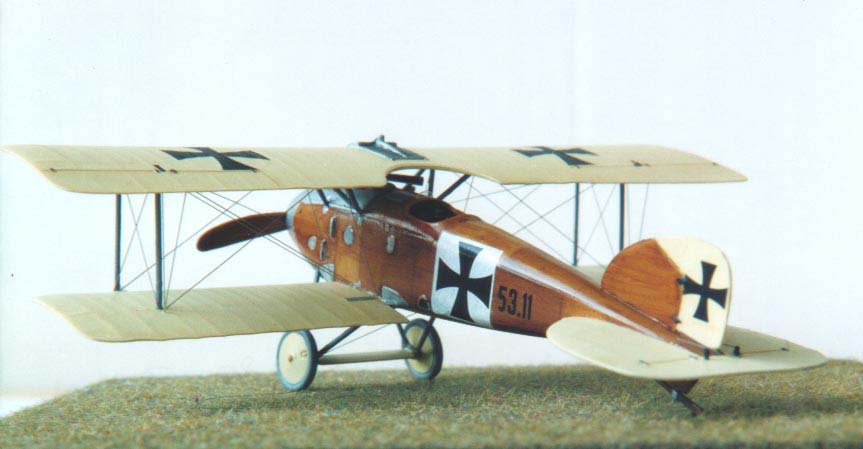
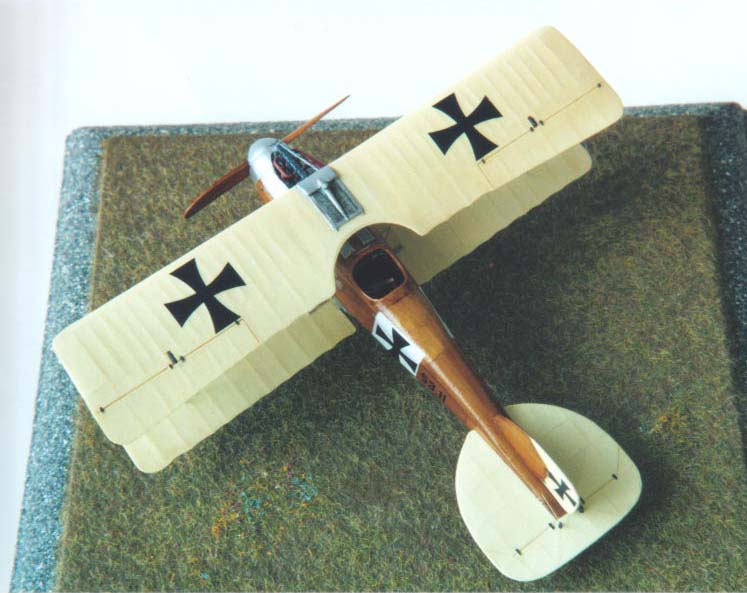
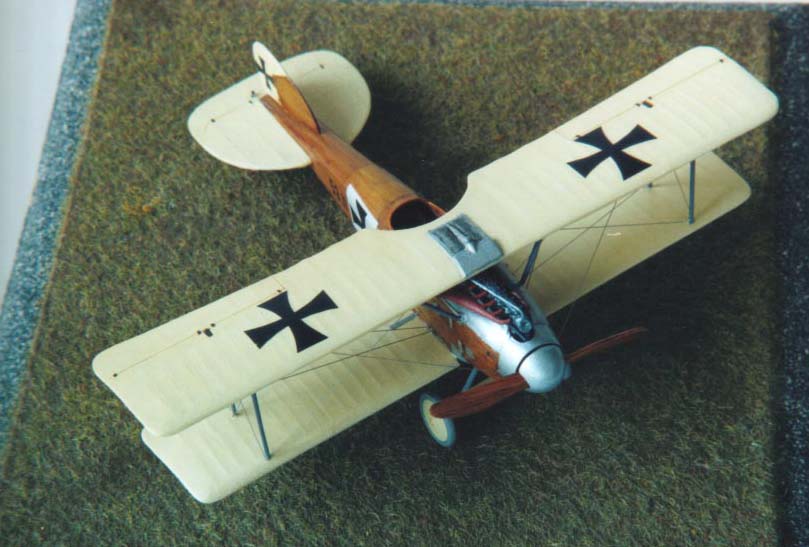
The Kit A complete view of the kit's contents can be found on Roden's own website. The box contains five sprues of nicely molded soft grey plastic with little flash: only the molding seams need to be sanded off. Some detail needs to be added (see below) or is a little soft. For example, the detail on the radiator atop the upper wing is a little murky, with a slight molding flaw that needs to be sanded out. Also, the fuselage does not contain all the panel lines: some are present but most are not. I presume this allows the manufacturer to use the same fuselage mold to represent slightly different aeroplanes. In a similar vein, the kit contains a number of pieces that are not used in this version but will presumably be used in other Albatros Oeffag kits. The top wing is split into three pieces so that the manufacturer simply replaces the centre section or the wings in order to produce a different version. The kit's instructions block out those parts that are not required for the kit you are building. There are decals to make seven versions, though only one set of wing crosses. 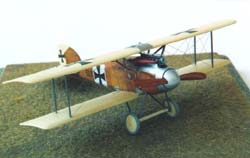 In summary, the kit looks good in the box. It contains enough to make an attractive model and it is possible to add to the kit if you want, either by simply scratch building a few extra components or purchasing the Part photoetch set designed specifically for this kit. I did not purchase the photoetch set and, while it might have helped with the radiator and possibly a few other thing, I went with the scratch building mode. In summary, the kit looks good in the box. It contains enough to make an attractive model and it is possible to add to the kit if you want, either by simply scratch building a few extra components or purchasing the Part photoetch set designed specifically for this kit. I did not purchase the photoetch set and, while it might have helped with the radiator and possibly a few other thing, I went with the scratch building mode. Cockpit Interior and Engine The kit provides a seat, a control stick in two pieces and a foot rudder. I lost the control stick, so I had to make my own. I thought the foot rudder looked a little crude, so I replaced it with photoetch from a Tom's Modelworks fret. I used the seat. The 'Albatros D.II & D.III Oeffag' book published by JaPo, gave me a reasonable idea of what might go in the cockpit. 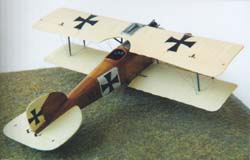 The first thing I did was to make a cockpit floor from plastic card: the kit's fuselage is in two halves and if you simply glued the seat in as shown in the instructions, you would be able to see the inside seam down the centre of the fuselage. I also used plastic card to make a rear and forward bulkhead. These items and the fuselage interior walls were all made to look like wood. First, I sprayed them with Model Master Wood. Second, I used gouache watercolour paints - burnt umber, black, burnt sienna and yellow ochre - applied with a wet Q-tip. Third, I sprayed that with Tamiya Clear Yellow paint and finally I brushed on a coat of Future floor polish. The first thing I did was to make a cockpit floor from plastic card: the kit's fuselage is in two halves and if you simply glued the seat in as shown in the instructions, you would be able to see the inside seam down the centre of the fuselage. I also used plastic card to make a rear and forward bulkhead. These items and the fuselage interior walls were all made to look like wood. First, I sprayed them with Model Master Wood. Second, I used gouache watercolour paints - burnt umber, black, burnt sienna and yellow ochre - applied with a wet Q-tip. Third, I sprayed that with Tamiya Clear Yellow paint and finally I brushed on a coat of Future floor polish. I painted the kit's interior bracing in a medium brown and added a few instruments to the cockpit sides, a couple of instrument panels and two Schwarzlose machine gun butts, one of which had to be ripped out when I realized that this aeroplane had only one machine gun. Some Oeffag D.II aeroplanes had two machine guns: those are listed in the JaPo publication, so you have to check. Of the kit options, only 53.08 has two guns. I also added a couple of seat belts from the spares tin. 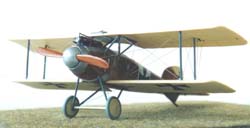 Before closing the fuselage, I had to make the engine, which was straightforward, though I had to sand off some of it so the fuselage halves would close properly. I painted the engine block Engine Grey (What else!) and dry-brushed it with silver and burnt aluminium. I painted the pipes and the exhaust "horn" in rust; however, I left the latter off until I had assembled almost the entire kit. I find that things like the exhaust piece and the propeller tend to get knocked off during assembly otherwise. Before closing the fuselage, I had to make the engine, which was straightforward, though I had to sand off some of it so the fuselage halves would close properly. I painted the engine block Engine Grey (What else!) and dry-brushed it with silver and burnt aluminium. I painted the pipes and the exhaust "horn" in rust; however, I left the latter off until I had assembled almost the entire kit. I find that things like the exhaust piece and the propeller tend to get knocked off during assembly otherwise. Fuselage I glued the fuselage halves together with Pro Weld and left it to dry then I glued in the cockpit deck piece. Once dry, I glued in the control stick and the seat. I left these out because having made my own cockpit floor, I wanted to be sure they were centred in the cockpit opening.  I then started work on the fuselage. First, I hacked off the top forward-most panel on either side of the fuselage and the rearmost footstep, as per the instructions. The fuselage had a couple of molding dimples that I filled with super glue and then sanded flush. Next, using the diagrams in the JaPo book as a guide, I scribed the panel lines. I cut the head off a straight pin put it in my pin vice drill and I stuck Dymo labeling tape along the lines to use as a straight edge guide for the panel lines. I then started work on the fuselage. First, I hacked off the top forward-most panel on either side of the fuselage and the rearmost footstep, as per the instructions. The fuselage had a couple of molding dimples that I filled with super glue and then sanded flush. Next, using the diagrams in the JaPo book as a guide, I scribed the panel lines. I cut the head off a straight pin put it in my pin vice drill and I stuck Dymo labeling tape along the lines to use as a straight edge guide for the panel lines. Now I was ready to paint the fuselage. The initial spraying with the Wood paint revealed a few unfilled seams that I re-filled with super glue and sanded. Once all was smooth, I had to re-scribe a few parts of the panel lines and then re-spray. I hand painted a few individual panels with a slightly lightened shade of the base Wood colour and then continued with the same steps I used for the interior wood surfaces; that is, gouache watercolour paints, clear yellow and Future. The gouache watercolour paints run into the panel lines, and help to accentuate the paneling effect. The wooden surfaces on the tailskid and tail fin received the same treatment.  I usually leave a 24-hour period between each stage of the wood surface painting, which is not a problem because there are usually plenty of other small bits that need attention during each drying time interval. Once dry, I masked off the engine and all but the front sections of the fuselage, and sprayed it with aluminium. I attempted to reproduce the turned effect seen on the metal parts of the fuselage but this did not work out so I left it. I used enamel aluminium paints to detail all the panels and other small metal items on the fuselage. I find the leveling properties and slower drying time of enamels makes hand painting these smaller parts a lot easier. I usually leave a 24-hour period between each stage of the wood surface painting, which is not a problem because there are usually plenty of other small bits that need attention during each drying time interval. Once dry, I masked off the engine and all but the front sections of the fuselage, and sprayed it with aluminium. I attempted to reproduce the turned effect seen on the metal parts of the fuselage but this did not work out so I left it. I used enamel aluminium paints to detail all the panels and other small metal items on the fuselage. I find the leveling properties and slower drying time of enamels makes hand painting these smaller parts a lot easier. Flying surfaces 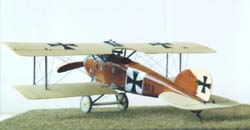 The top wing comes in three pieces. I used Testors orange tube glue to glue the pieces together and added Pro Weld to the bond with the Touch 'n' Flow, a valuable though fragile tool, in my opinion. I thought it was important to ensure there was no evidence of the seam between these pieces, so I used super glue and sanded it flush. I probably lost some rib height in the process but this was not noticeable. The port and starboard sides of the lower wing attaches to the fuselage using small dimples that go into little holes in the fuselage sides. One of these broke off during assembly so I re-glued both sides, this time using two short lengths 28 gauge copper wire inserted into the edge of each join, which went into small holes that I drilled in the side of the fuselage. The top wing comes in three pieces. I used Testors orange tube glue to glue the pieces together and added Pro Weld to the bond with the Touch 'n' Flow, a valuable though fragile tool, in my opinion. I thought it was important to ensure there was no evidence of the seam between these pieces, so I used super glue and sanded it flush. I probably lost some rib height in the process but this was not noticeable. The port and starboard sides of the lower wing attaches to the fuselage using small dimples that go into little holes in the fuselage sides. One of these broke off during assembly so I re-glued both sides, this time using two short lengths 28 gauge copper wire inserted into the edge of each join, which went into small holes that I drilled in the side of the fuselage. I masked off the fuselage and sprayed the flying surfaces with Polyscale's 'Aged White', which is fairly robust for an acrylic paint and goes on quite well. I used a brown watercolour pencil to highlight the underside of the rib stations on each wing and a light off-white to highlight the upper sides' ribs, sealing it in with a brushed coat of Future. I again used enamel aluminium to paint the radiator on the top wing, using a black watercolour wash to bring out the mesh effect on the radiator. The tailpieces fit well and I glued them on without any difficulty. I cut off the kit's tail control horns because a couple of them were broken off slightly, drilled small holes through the tail at their location, and glued plastic rod into the holes. Struts  I painted all the struts dark grey and set about mounting the top wing - always the most challenging part of biplane construction, in my view. Using Testors' orange tube glue, I attached the interplane and cabane struts to the top wing then turned that the right way up and glued the interplane struts to the lower wing. I waited for that to set up and then carefully push the cabane struts into place and to my utter amazement they all fit, although I did detect a slight skewing of the top wing when I looked down over the top of the assembly. I then glued the undercarriage struts into place and added the wheels once that had set up a little. I painted all the struts dark grey and set about mounting the top wing - always the most challenging part of biplane construction, in my view. Using Testors' orange tube glue, I attached the interplane and cabane struts to the top wing then turned that the right way up and glued the interplane struts to the lower wing. I waited for that to set up and then carefully push the cabane struts into place and to my utter amazement they all fit, although I did detect a slight skewing of the top wing when I looked down over the top of the assembly. I then glued the undercarriage struts into place and added the wheels once that had set up a little. Final details At that point, I used two strips of .01-inch plastic rod to replace the chinstraps that go between the two front legs of the undercarriage. I had to sand off the front of the engine so that the spinner and propeller fit. All the decals can be added when the model is fully assembled. I brushed on a couple of coats of Future to make sure the decals did not silver. The decals are slightly thick but when trimmed, they looked acceptable.  I chose 53.11 because I liked the white cross background. 53.11 flew with Flik 25 in Galicia during the summer of 1917 and later the white background was added to the fuselage cross. In its later scheme, 53.11 was flown by Oblt. Rudolf Frhr von Szepessy-Sokol. The rigging is made from 0.005-inch straight stainless steel wire from Small Parts Inc. Once the rigging was completed I gave the entire model a coat of Model Master's Clear Flat. Once that dried, I brushed the wood areas a final coat of Future. Finally, I made a small windscreen from clear plastic. I chose 53.11 because I liked the white cross background. 53.11 flew with Flik 25 in Galicia during the summer of 1917 and later the white background was added to the fuselage cross. In its later scheme, 53.11 was flown by Oblt. Rudolf Frhr von Szepessy-Sokol. The rigging is made from 0.005-inch straight stainless steel wire from Small Parts Inc. Once the rigging was completed I gave the entire model a coat of Model Master's Clear Flat. Once that dried, I brushed the wood areas a final coat of Future. Finally, I made a small windscreen from clear plastic. In conclusion, this is an excellent kit. The parts fit, it is inexpensive and with a little effort builds into a really decent model: I recommended it highly. Acknowledgements I would like to thank Larry Marshall who built this kit before I did and provided helpful advice. I also received help from the members of the World War One Modeling list forum run by Allan Wright and hosted by the University of New Hampshire. References Petr A. Tesar: Albatros D.II & D.III Oeffag: JaPo 1998 | 


|