Building Toko's Hansa-Brandenburg W.29 in 1/72nd Scale
|
 |
Background
According to the Windsock Datafile, encouraged by the success of the
W.12 floatplane, Brandenburg progressed through the well-known W.18 flying
boat and W.19 biplane. The W.29's monoplane design was an attempt to improve
speed, manoeuvrabilty and firepower - it was successful in all three,
rated highly by Axis and Allies alike with the latter referring to its
"…formidable qualities…' (Windsock Datafile 55, page 7).
It was a late war craft, first seeing action on July 4, 1918. The W.29
also enjoyed a post-war career in various countries outside Germany, including
Denmark (one of the kit's decal choices) and Japan.
In the Box
 This
is one of Toko's early kits, released about 1998: mine was purchased shortly
thereafter and sat upon the shelf for five years at which point, I decided
that I should try to finish my stack of Toko kits and pulled out the W.29.
In the box are two sprues of well-molded, light grey plastic parts. There
is some flash but clean-up duty is very light. As with many World War
One subjects, there are numerous small and delicate pieces, especially
struts, which will have to be cut carefully from the sprue tree. There
are three decal sheets. One containing Danish markings, a second with
the navy hexagons and a third with the crosses and serial numbers for
German aircraft 2521 and 2607: grey and pale green schemes, respectively.
According to the Brandenburg W.29 Windosck Datafile, the kit's hexagons
are too large and I was fortunate to acquire a set of hand-printed hexagons
from a friend of mine. This
is one of Toko's early kits, released about 1998: mine was purchased shortly
thereafter and sat upon the shelf for five years at which point, I decided
that I should try to finish my stack of Toko kits and pulled out the W.29.
In the box are two sprues of well-molded, light grey plastic parts. There
is some flash but clean-up duty is very light. As with many World War
One subjects, there are numerous small and delicate pieces, especially
struts, which will have to be cut carefully from the sprue tree. There
are three decal sheets. One containing Danish markings, a second with
the navy hexagons and a third with the crosses and serial numbers for
German aircraft 2521 and 2607: grey and pale green schemes, respectively.
According to the Brandenburg W.29 Windosck Datafile, the kit's hexagons
are too large and I was fortunate to acquire a set of hand-printed hexagons
from a friend of mine.
Problems and Solutions
 Although
the molding on this kit is fine, there are certain accuracy issues; in
particular, Toko have created a confused mix of prototype and later model
features in this kit. The instructions show the possibility of an engine
with its exhaust pointing either starboard (maybe a 160hp Mercedes D.IIIa)
or port (one of the Benz engines). As far as I could tell, only the starboard-pointing
version is possible for this kit, unless you perform major surgery on
the engine and on the asymmetrically shaped fuselage opening in which
the engine sits. Next, the kit's louver-vents on the sides where the engine
sits are in a four-two formation, which can be seen on the prototype,
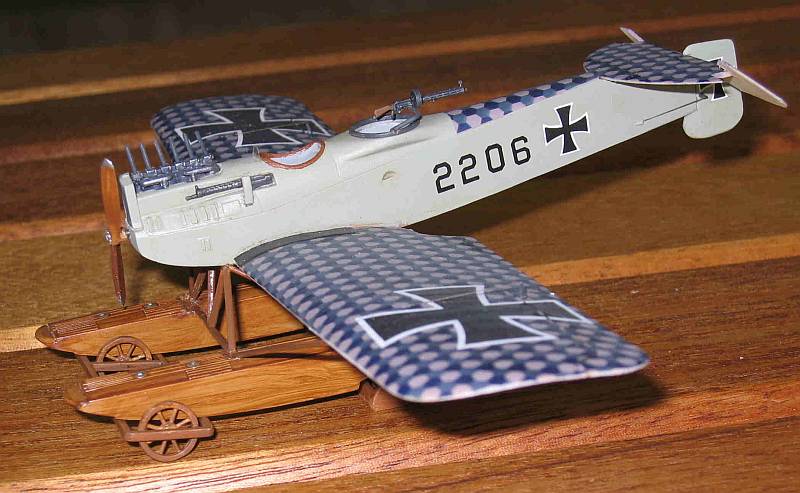
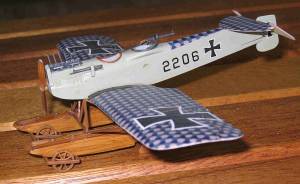
rather than the later six-together formation. My solution, albeit imperfect,
was to build prototype 2206, which according to the Datafile had a 160hp
Mercedes D.IIIa engine. I did not modify the engine even though the kit's
part does not exactly replicate the Mercedes. Although
the molding on this kit is fine, there are certain accuracy issues; in
particular, Toko have created a confused mix of prototype and later model
features in this kit. The instructions show the possibility of an engine
with its exhaust pointing either starboard (maybe a 160hp Mercedes D.IIIa)
or port (one of the Benz engines). As far as I could tell, only the starboard-pointing
version is possible for this kit, unless you perform major surgery on
the engine and on the asymmetrically shaped fuselage opening in which
the engine sits. Next, the kit's louver-vents on the sides where the engine
sits are in a four-two formation, which can be seen on the prototype,
rather than the later six-together formation. My solution, albeit imperfect,
was to build prototype 2206, which according to the Datafile had a 160hp
Mercedes D.IIIa engine. I did not modify the engine even though the kit's
part does not exactly replicate the Mercedes.
Construction
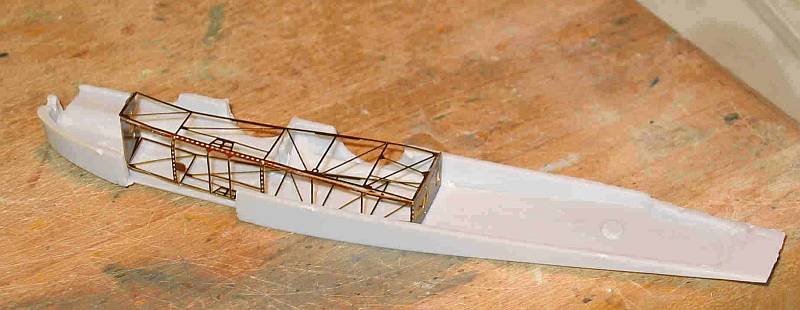
 The
kit's fuselage and cockpit interior is sparse, providing thick sidewall
detail, a pilot seat, control column, foot rudder, instrument panel and
a gunner's seat. Further, there is no attempt to hide the fuselage seam
that will run along the center of the floor. I used the Part photoetch
set for the interior. The Part set is decent but you have to thin the
fuselage walls before it will fit and then I chopped off the front section
of the photoetch interior so it would not interfere with the engine's
fit. I also glued some thin plastic card along the fuselage floor to hide
the seam. One difficulty I experienced was getting the photoetch to stick
to the side of the fuselage once the fuselage was closed. I sort of had
to push a little glue underneath it and press it down against the fuselage
sides, which did not produce an entirely satisfactory result. Eventually,
I crammed the photoetch bits and the engine into the fuselage and glued
the fuselage halves together, leaving off the engine exhausts until the
end. The
kit's fuselage and cockpit interior is sparse, providing thick sidewall
detail, a pilot seat, control column, foot rudder, instrument panel and
a gunner's seat. Further, there is no attempt to hide the fuselage seam
that will run along the center of the floor. I used the Part photoetch
set for the interior. The Part set is decent but you have to thin the
fuselage walls before it will fit and then I chopped off the front section
of the photoetch interior so it would not interfere with the engine's
fit. I also glued some thin plastic card along the fuselage floor to hide
the seam. One difficulty I experienced was getting the photoetch to stick
to the side of the fuselage once the fuselage was closed. I sort of had
to push a little glue underneath it and press it down against the fuselage
sides, which did not produce an entirely satisfactory result. Eventually,
I crammed the photoetch bits and the engine into the fuselage and glued
the fuselage halves together, leaving off the engine exhausts until the
end.
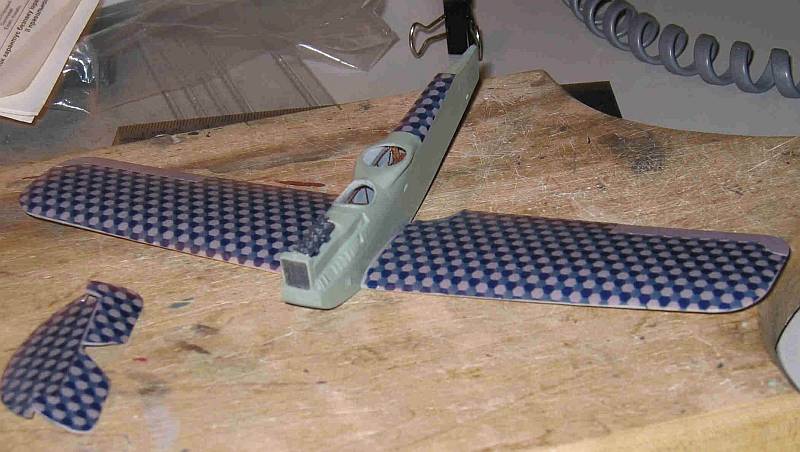
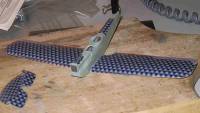
 I
glued the single piece wing onto the underside of the fuselage and sanded
down the top of the center portion so that the interior pieces would not
be squashed. I used a fair amount of putty to obscure the fuselage seam
and the wing-to-fuselage join. At this point I painted the fuselage and
wing sub-assembly. I used Humbrol 103, "Cream" for the underside
of the flying surfaces and Model Master's RAF Interior Green lightened
up with some pale grey for the fuselage. The lozenge decals contain only
two of the three colours for the naval hexagons so I masked off and sprayed
the upper surfaces with a mix of Model Master's Grauviolett mixed with
red. In retrospect, I think this mixture came out a little too violet
but the Grauviolett definitely needed to be moved away from the grey end
of the spectrum. The only tricky bit was spraying the top part of the
fuselage, which I did using the kit's decal as a template to cut out the
correct shaped mask. My friend's homemade lozenge decals went on without
any problems. I
glued the single piece wing onto the underside of the fuselage and sanded
down the top of the center portion so that the interior pieces would not
be squashed. I used a fair amount of putty to obscure the fuselage seam
and the wing-to-fuselage join. At this point I painted the fuselage and
wing sub-assembly. I used Humbrol 103, "Cream" for the underside
of the flying surfaces and Model Master's RAF Interior Green lightened
up with some pale grey for the fuselage. The lozenge decals contain only
two of the three colours for the naval hexagons so I masked off and sprayed
the upper surfaces with a mix of Model Master's Grauviolett mixed with
red. In retrospect, I think this mixture came out a little too violet
but the Grauviolett definitely needed to be moved away from the grey end
of the spectrum. The only tricky bit was spraying the top part of the
fuselage, which I did using the kit's decal as a template to cut out the
correct shaped mask. My friend's homemade lozenge decals went on without
any problems. 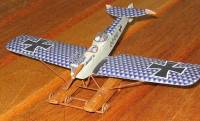 At
this point I completed the markings. The prototype used the earlier type
"Eisern Kreuz" crosses but the kit contains only the later Balken
Kreuz (straight edged) crosses. Fortunately, Lance "Felixstowe"
Krieg came to my rescue and supplied me with the requisite "Family-sized"
crosses made by Americal/Gryphon for the wing markings. I used dry-transfers
for the serial numbers, although I think they are a little too big: fortunately
or not, no pictures of 2206 exist, as far as I am aware. At
this point I completed the markings. The prototype used the earlier type
"Eisern Kreuz" crosses but the kit contains only the later Balken
Kreuz (straight edged) crosses. Fortunately, Lance "Felixstowe"
Krieg came to my rescue and supplied me with the requisite "Family-sized"
crosses made by Americal/Gryphon for the wing markings. I used dry-transfers
for the serial numbers, although I think they are a little too big: fortunately
or not, no pictures of 2206 exist, as far as I am aware.
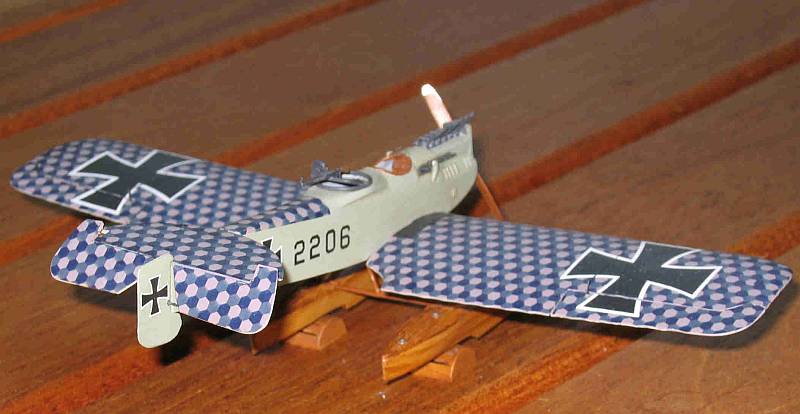
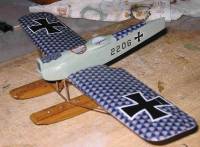
Next came the most difficult part - the struts for the floats. Assembling
the two floats was 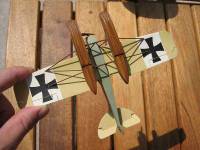 straightforward:
a little putty applied filled the seams. I used a base of Testor's "Wood",
followed by smearing Gouache watercolor paints (burnt umber, yellow ochre
and dark brown) and a coat of Future, to give the wood grain effect. I
glued the M-shaped struts to connect the two floats but the Z-shaped struts
did not fit and I had to make my own from plastic rod. Not a disaster
by any means but they did not look as good as the kit's parts. Once that
was finished, I attached the various appendages, including the propeller,
guns, aileron control horns (from the Part photoetch set) and engine exhaust. straightforward:
a little putty applied filled the seams. I used a base of Testor's "Wood",
followed by smearing Gouache watercolor paints (burnt umber, yellow ochre
and dark brown) and a coat of Future, to give the wood grain effect. I
glued the M-shaped struts to connect the two floats but the Z-shaped struts
did not fit and I had to make my own from plastic rod. Not a disaster
by any means but they did not look as good as the kit's parts. Once that
was finished, I attached the various appendages, including the propeller,
guns, aileron control horns (from the Part photoetch set) and engine exhaust.
Conclusion
In general, aside from the strut-fitting issue, this is an excellent
kit. Those who are heavily accuracy-oriented may find this kit a 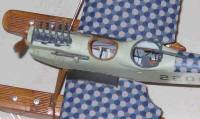 little
frustrating but it builds into an attractive model and is fairly inexpensive:
having been re-released under the Eastern Express label, it can be procured
for about US$10. Recommended. little
frustrating but it builds into an attractive model and is fairly inexpensive:
having been re-released under the Eastern Express label, it can be procured
for about US$10. Recommended.
Acknowledgments
My thanks to Lance Krieg for his advice and decals. Also, thanks to
various members of the World War One Modeling list who helped with various
bits of advice and information.
References
Peter M. Grosz. "Brandenburg W.29: Windsock Datafile 55,"
Berkhamsted, Hertfordshire, Great Britain. 1996.
|
|