ICM 1/72nd Polikarpov I-5 "Late"
|
 |
History
The I-5 biplane was the result of considerable work on several contemporary
designs, including
Tupolev's ANT-12 and Polikarpov's all-wooden I-6. This project fell to
Polikarpov to complete at a time that he was under detention for alleged
"sabotage"-- having been accused, essentially, of being lazy
and careless in his work. Working within the 'detainee Bureau' offices
housed at Zavod 39 (which was, itself, a normal factory), the I-5 no.1
prototype (the project was known as VT-12) was completed at the end of
April 1930.
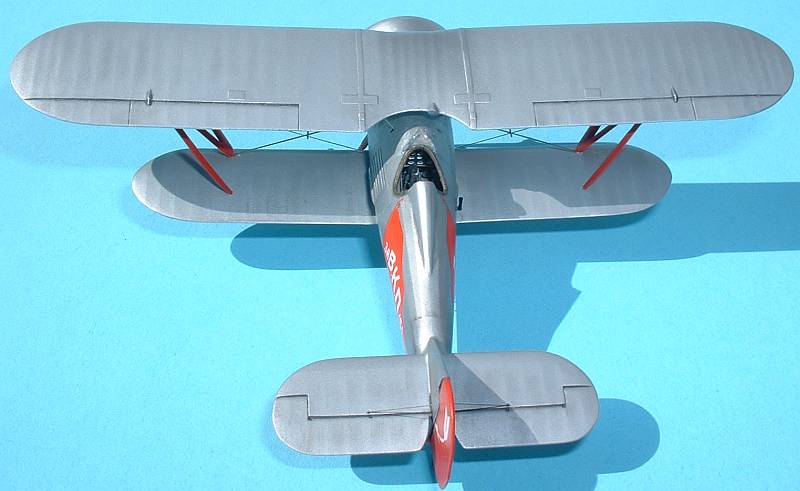
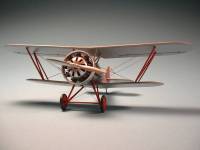
The I-5 was a neat single-bay biplane of classic configuration. The
wings were braced by N type
struts in addition to cabanes, and the upper wing featured a significant
dihedral. The fuselage
structure was welded steel tube and stringers, covered with fabric, while
the wings were wooden with ply sheet leading edges. Power was provided
by the license-built Jupiter VI, the M-22, of 425 hp. Early examples featured
a streamlined cowling with 'helmeted' cylinder covers, but later a more
conventional Townsend type cowl was installed, which became standard.
Armament included two
PV-1 guns mounted below the cockpit on either side of the fuselage.
Performance in the I-5 was good for the day; 280 km/h could be reached,
and 1000m attained in the impressive time of 1.3 mins. Handling and maneuverability
were exceptional under all conditions, and the flight behavior was safe
for pilots of any ability. In all, 803 examples were built of this classic
fighter, and many development schemes were mooted during its long and
successful career.
Construction
You can see just how the kit looks in the box by my First
Look in the January 2004 issue.
 Naturally
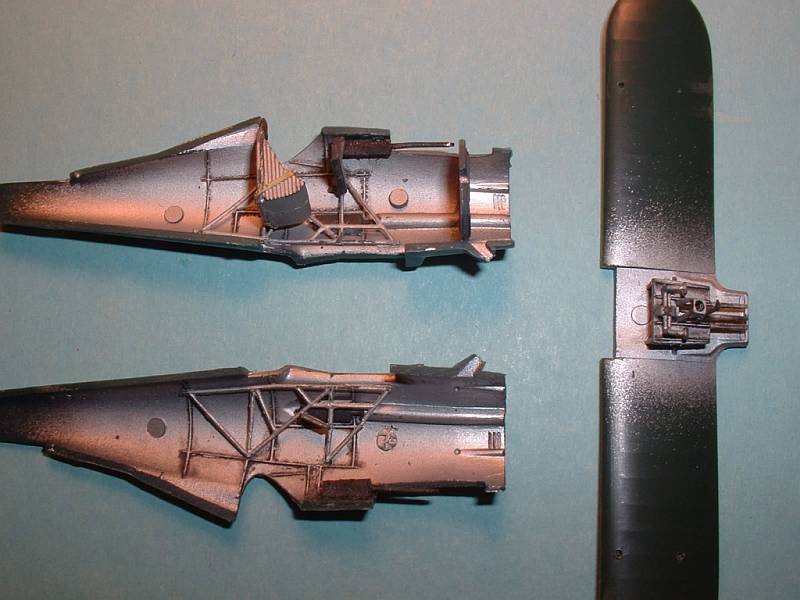
construction starts with the cockpit. I decided to build this as close
to out-of-the-box as possible so only added seat belts to the seat - plus,
the stock cockpit is pretty complete as it is. Determining the position
of the upper guns is difficult - I'm sure I don't have them in the correct
place, but it's extremely difficult to see them when the fuselage is all
together. I painted the interior using Polly Scale's Flat Aluminum, which
can be found in their model railroad colors. (Thankfully. When Testor's
bought out Polly Scale they cut the production of the Polly Scale "Metalline"
series found in the plastic modeling paints, forcing modeler's to use
their Model Master metallic acrylics. An error on Testor's part as the
MM metallics are far worse than the Polly Scale ones.) Both an oil-wash
and a drybrush with Polly Scale's aluminum complete the cockpit. Naturally
construction starts with the cockpit. I decided to build this as close
to out-of-the-box as possible so only added seat belts to the seat - plus,
the stock cockpit is pretty complete as it is. Determining the position
of the upper guns is difficult - I'm sure I don't have them in the correct
place, but it's extremely difficult to see them when the fuselage is all
together. I painted the interior using Polly Scale's Flat Aluminum, which
can be found in their model railroad colors. (Thankfully. When Testor's
bought out Polly Scale they cut the production of the Polly Scale "Metalline"
series found in the plastic modeling paints, forcing modeler's to use
their Model Master metallic acrylics. An error on Testor's part as the
MM metallics are far worse than the Polly Scale ones.) Both an oil-wash
and a drybrush with Polly Scale's aluminum complete the cockpit.
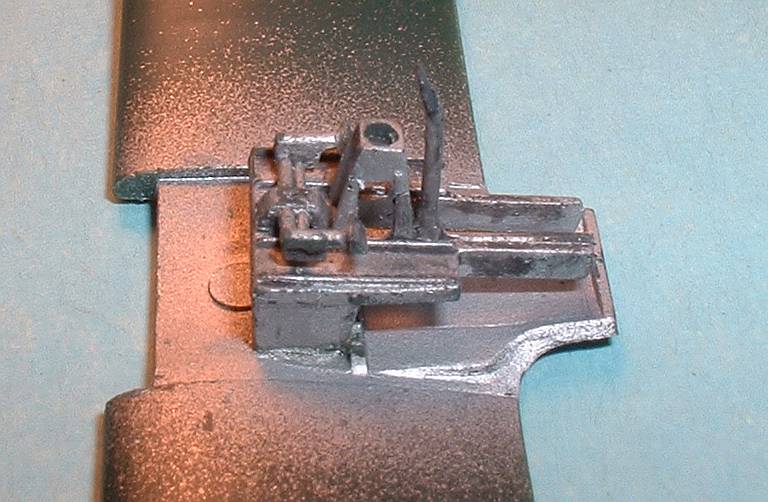
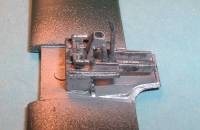 While
all four are difficult to see, adding the guns - especially the lower
guns - are a must because all the barrels protrude. Unfortunately I couldn't
get the upper gun barrels to "work", sticking out of the separate
upper fuselage panel, so I cut the barrels from the gun stocks and glued
those on as one of the last steps of construction. For the lower guns
I opened up the holes, the barrels protrude through just a little more
so they would slide in with no worries. While
all four are difficult to see, adding the guns - especially the lower
guns - are a must because all the barrels protrude. Unfortunately I couldn't
get the upper gun barrels to "work", sticking out of the separate
upper fuselage panel, so I cut the barrels from the gun stocks and glued
those on as one of the last steps of construction. For the lower guns
I opened up the holes, the barrels protrude through just a little more
so they would slide in with no worries.
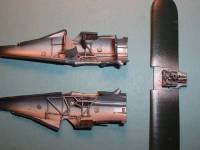
 Now
that the cockpit is finished the fuselage can be closed up. Little to
no putty was needed on the fuselage seams. However, the same can't be
said when I added the separate, upper fuselage panel as its fit was a
tad difficult. After dry fitting and all, it still needed a little bit
of CA and sanding to blend it into the fuselage. I left the engine, cowl,
cowl-face and prop off until very last. That way I could paint the cowl
and cowl-face separately from the rest of the model, since it was going
to receive a different color. Now
that the cockpit is finished the fuselage can be closed up. Little to
no putty was needed on the fuselage seams. However, the same can't be
said when I added the separate, upper fuselage panel as its fit was a
tad difficult. After dry fitting and all, it still needed a little bit
of CA and sanding to blend it into the fuselage. I left the engine, cowl,
cowl-face and prop off until very last. That way I could paint the cowl
and cowl-face separately from the rest of the model, since it was going
to receive a different color.
 Once
the fuselage was closed up and all seams deal with I added the lower wing.
There was some dry-fit to get it to fit as snug as possible, and the majority
of the seam work was on the underside, where the wing met the fuselage,
both fore and aft. After that was glued on then the horizontal tail was
glued on. This was, in fact, the worst fitting part of the model, taking
some putty to get it to blend into the fuselage. Once that was taken care
of the rudder/tail-skid assembly was fit to its area. This took a lot
of dry-fit and sanding to get it to sit correctly, but thankfully little
seam work was involved. Once
the fuselage was closed up and all seams deal with I added the lower wing.
There was some dry-fit to get it to fit as snug as possible, and the majority
of the seam work was on the underside, where the wing met the fuselage,
both fore and aft. After that was glued on then the horizontal tail was
glued on. This was, in fact, the worst fitting part of the model, taking
some putty to get it to blend into the fuselage. Once that was taken care
of the rudder/tail-skid assembly was fit to its area. This took a lot
of dry-fit and sanding to get it to sit correctly, but thankfully little
seam work was involved.
 There
are areas on the kit that the instructions show where you need to create
scratch-build parts for. These are the pilot's step, small "hand-holds"
(at least that's what I think they are) on the rear of the fuselage-underside,
and the struts going from the fuselage to the leading-edge area of the
horizontal tail. I ended up going further on these by drilling out the
"dimples" where each go to thread them through the fuselage.
I felt this would give these smaller parts a lot of strength for those
judges who don't pay attention when they handle models. In fact I was
able to glue all of these on prior to painting, and didn't knock any off. There
are areas on the kit that the instructions show where you need to create
scratch-build parts for. These are the pilot's step, small "hand-holds"
(at least that's what I think they are) on the rear of the fuselage-underside,
and the struts going from the fuselage to the leading-edge area of the
horizontal tail. I ended up going further on these by drilling out the
"dimples" where each go to thread them through the fuselage.
I felt this would give these smaller parts a lot of strength for those
judges who don't pay attention when they handle models. In fact I was
able to glue all of these on prior to painting, and didn't knock any off.
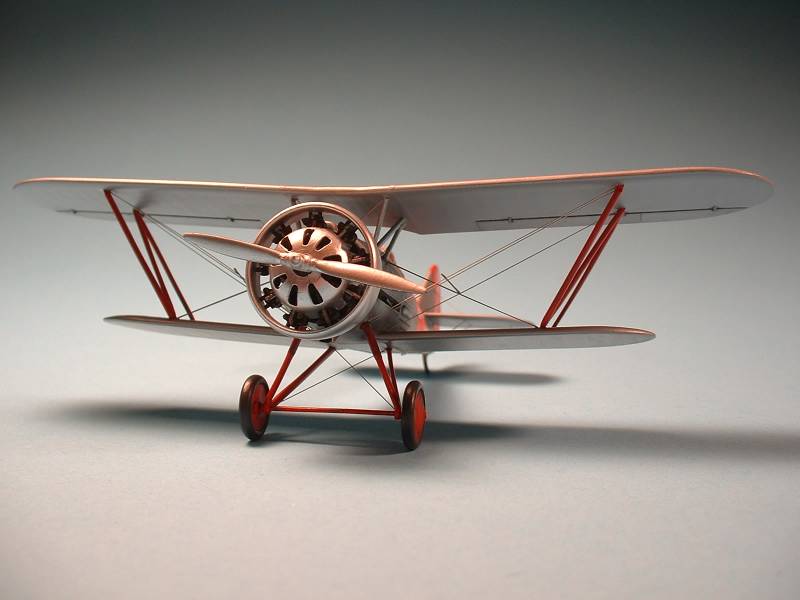
Now it was time for painting.
Painting and Final Finishing
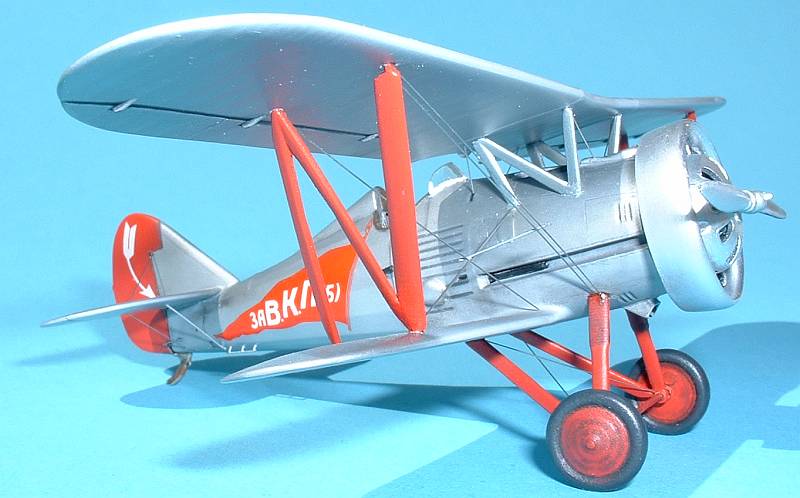
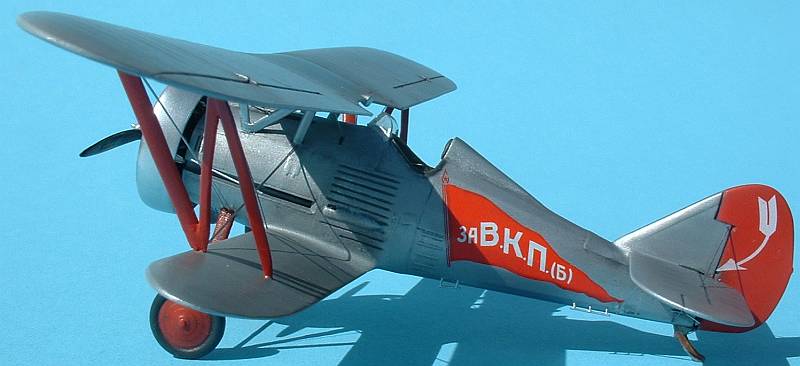
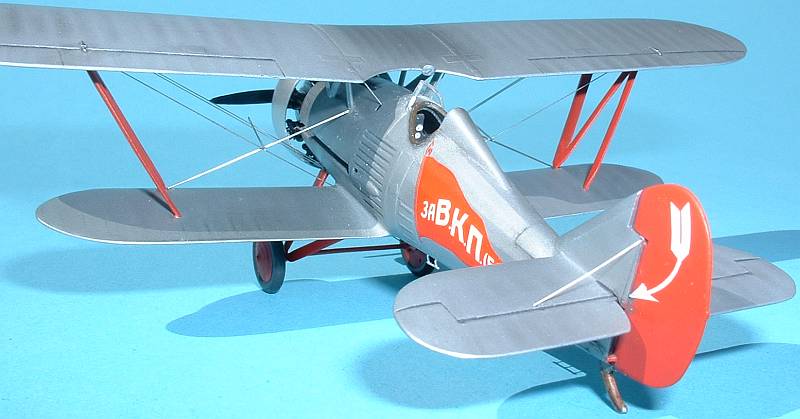
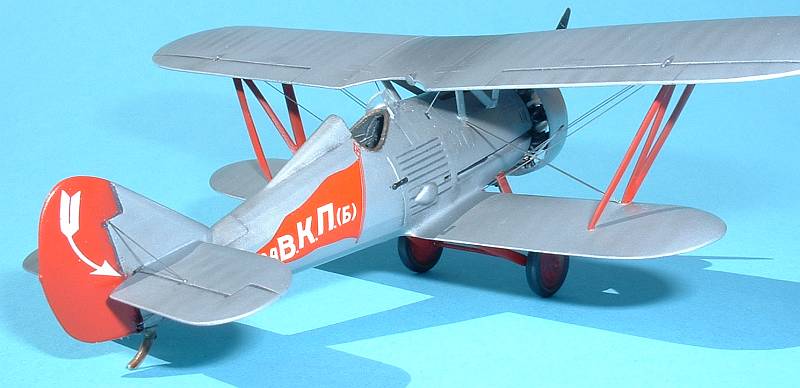
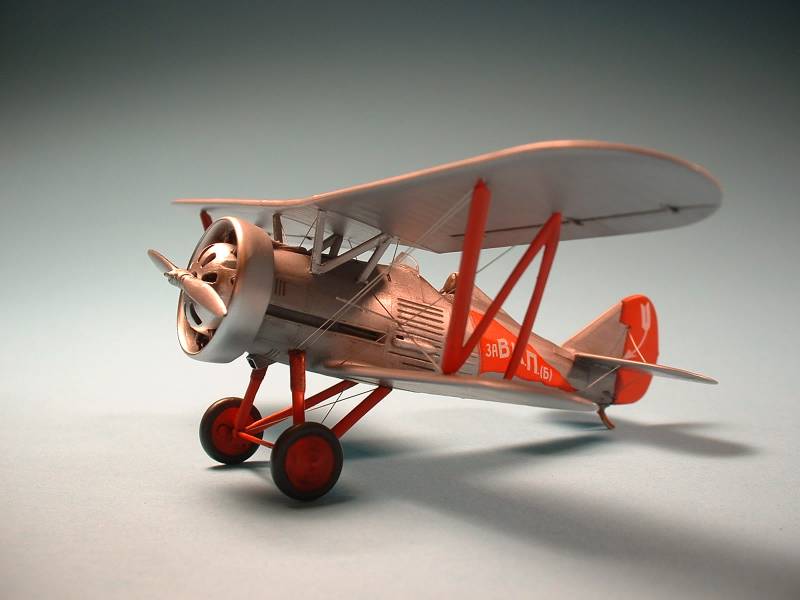
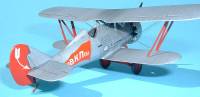
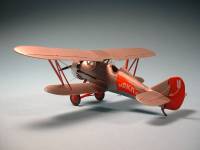
 Since
Pavlov's aircraft was finished in what could have been AII Aluminum I
decided to take my first steps into using Alclad II paints. Prior to using
them I gave all model parts an primer coat of Mr. Surfacer 1000. I used
it from a spray can, and now wish I wouldn't have. The spray can coats
the model too thickly resulting in loss of some of the finer detail. Next
time I will definitely thin Mr. Surfacer out of the bottle and spray it
with an airbrush. After letting the Mr. Surfacer dry for a few days I
sprayed "Semi-Matte Aluminum" Alclad over the main aircraft
parts. It went on like a dream and I'm glad I "took the plunge"
to use Alclad (this coming from a tried and true acrylics painter). The
Alclad dried quickly and I was able to spray missed areas again within
minutes. The cowl, cowl-face and propellor were sprayed with "Polished
Aluminum" to give it the look that the natural metal areas were left
unpainted versus the AII Aluminum. Personally I think it looks best this
way. Since
Pavlov's aircraft was finished in what could have been AII Aluminum I
decided to take my first steps into using Alclad II paints. Prior to using
them I gave all model parts an primer coat of Mr. Surfacer 1000. I used
it from a spray can, and now wish I wouldn't have. The spray can coats
the model too thickly resulting in loss of some of the finer detail. Next
time I will definitely thin Mr. Surfacer out of the bottle and spray it
with an airbrush. After letting the Mr. Surfacer dry for a few days I
sprayed "Semi-Matte Aluminum" Alclad over the main aircraft
parts. It went on like a dream and I'm glad I "took the plunge"
to use Alclad (this coming from a tried and true acrylics painter). The
Alclad dried quickly and I was able to spray missed areas again within
minutes. The cowl, cowl-face and propellor were sprayed with "Polished
Aluminum" to give it the look that the natural metal areas were left
unpainted versus the AII Aluminum. Personally I think it looks best this
way.
 After
a few days of drying the Alclad was masked and the red areas were sprayed
with an acrylic red. (One thing I should have done and will with my next
Alclad application - I didn't overcoat the Alclad with anything, and now
wish I would have used Testor's Metallizer Sealer as I rubbed the Alclad
off a few places like wing tips, etc.) After the red dried for a few days
then I could move on to the decals. I had a little trouble with the decals
initially, but after painting on Liquid Decal the decals went on with
no hassles. On the rudder I brushed on some Future prior to decaling and
once dry laid on the decal with more Future. I didn't feel the need to
use Future on the fuselage decals and they went down with no silvering
- again, testimony to the greatness of the Alclad. After
a few days of drying the Alclad was masked and the red areas were sprayed
with an acrylic red. (One thing I should have done and will with my next
Alclad application - I didn't overcoat the Alclad with anything, and now
wish I would have used Testor's Metallizer Sealer as I rubbed the Alclad
off a few places like wing tips, etc.) After the red dried for a few days
then I could move on to the decals. I had a little trouble with the decals
initially, but after painting on Liquid Decal the decals went on with
no hassles. On the rudder I brushed on some Future prior to decaling and
once dry laid on the decal with more Future. I didn't feel the need to
use Future on the fuselage decals and they went down with no silvering
- again, testimony to the greatness of the Alclad.
 Now
that the decals were on and set I moved on to final construction. I was
able to glue the upper wing onto the center struts directly (which could
be added prior to painting) and then glued on the interplane struts. ICM
has you build-up the interplane struts using two parts - if you build
a "true" operational machine (Pavlov's was actually one of the
last prototypes) then you'll need to replace the straight, front parts
of the interplane struts (parts A17 and A20) with narrower stock. Pavlov's
machine had wider struts here while the production machines used a narrower
strut. (In actuality you can see that in the painting instructions included
on the instruction sheet.) There was some gap filling to do when the two
strut sections were mated as the gap was too great between these two areas.
Something you might want to do prior to gluing the struts onto the final
airframe. Now
that the decals were on and set I moved on to final construction. I was
able to glue the upper wing onto the center struts directly (which could
be added prior to painting) and then glued on the interplane struts. ICM
has you build-up the interplane struts using two parts - if you build
a "true" operational machine (Pavlov's was actually one of the
last prototypes) then you'll need to replace the straight, front parts
of the interplane struts (parts A17 and A20) with narrower stock. Pavlov's
machine had wider struts here while the production machines used a narrower
strut. (In actuality you can see that in the painting instructions included
on the instruction sheet.) There was some gap filling to do when the two
strut sections were mated as the gap was too great between these two areas.
Something you might want to do prior to gluing the struts onto the final
airframe.
 The
landing gear went together without a hitch, although the holes in the
wheels to insert the axle part of the struts should be drilled out a little.
While I added the windscreen as the last thing (typical) you may want
to glue the windscreen halves together early and test fit this to the
fuselage prior to painting. Mine needed some adjustment and didn't come
out very well. The
landing gear went together without a hitch, although the holes in the
wheels to insert the axle part of the struts should be drilled out a little.
While I added the windscreen as the last thing (typical) you may want
to glue the windscreen halves together early and test fit this to the
fuselage prior to painting. Mine needed some adjustment and didn't come
out very well.
Rigging was accomplished using .005" stainless steel wire, and
here is the biggest fault with the instruction sheet. ICM does not include
a rigging diagram to go with the model, so references in this area are
a must. Even with my references I felt like I had to fudge a bit of the
rigging to get it to where I thought it should go.
 I
oversprayed the main airframe with Polly Scale Satin to give it an overall
sheen, as well as to help hide the CA glue spots (since I use CA to glue
on my rigging). Once this was accomlished the engine/cowl/cowl-face assembly
was glued to the airframe, followed by the prop (which was able to be
kept free-spinning). ICM include clear lights for the top of the upper
wing, but these were not found on Pavlov's machine (but were found on
most production models otherwise). In addition, ICM includes a windscreen
with a "hole" cut-out for the gun sight (again, not used on
Pavlov's machine). I
oversprayed the main airframe with Polly Scale Satin to give it an overall
sheen, as well as to help hide the CA glue spots (since I use CA to glue
on my rigging). Once this was accomlished the engine/cowl/cowl-face assembly
was glued to the airframe, followed by the prop (which was able to be
kept free-spinning). ICM include clear lights for the top of the upper
wing, but these were not found on Pavlov's machine (but were found on
most production models otherwise). In addition, ICM includes a windscreen
with a "hole" cut-out for the gun sight (again, not used on
Pavlov's machine).
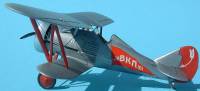
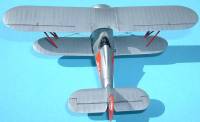
Conclusion
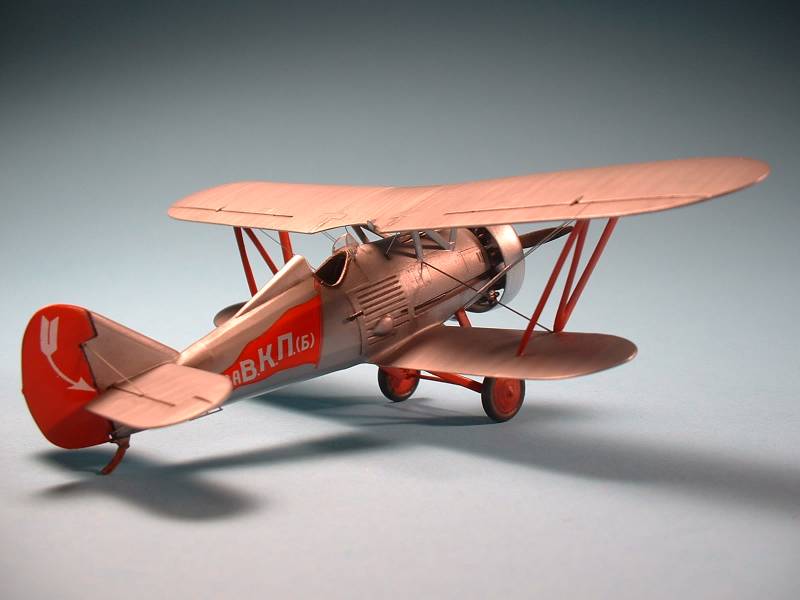
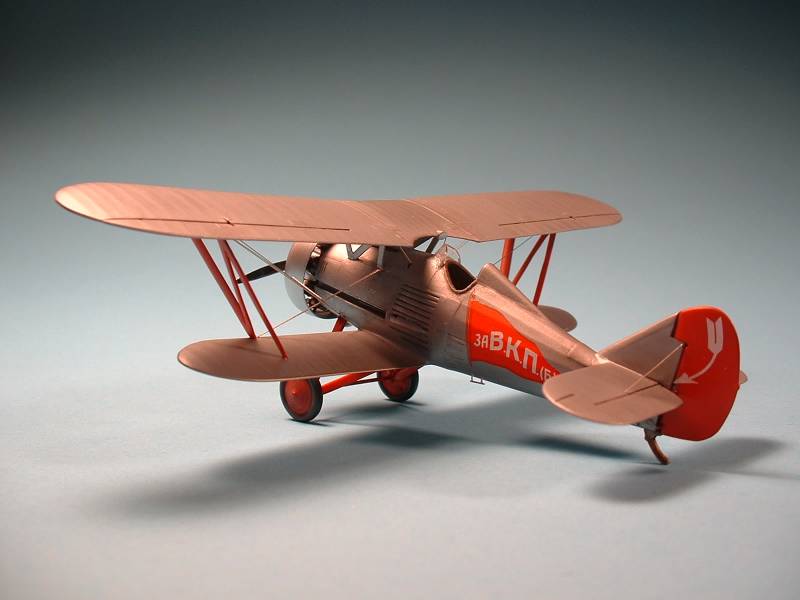
 This
is an excellent model of an generally unknown and unusual biplane. It
was the first biplane model I have built where I need to do *no adjustment*
on the struts to get the upper wing to sit correctly. Sure, I had to sand
some flash away, but the fit was perfect with the struts out of the box.
Completely unusual (and to be truthful I have yet to finish any of the
"new" 1/72nd Eduard WW1 biplanes). The I-5 I consider very "handsome"
and the AII Aluminum and red scheme of Pavlov's machine is really striking
and makes the model stand out. I highly recommend this model, and everyone
should buy at least one. (ICM also released this kit as an "Early"
version with a different fuselage and nose.) This
is an excellent model of an generally unknown and unusual biplane. It
was the first biplane model I have built where I need to do *no adjustment*
on the struts to get the upper wing to sit correctly. Sure, I had to sand
some flash away, but the fit was perfect with the struts out of the box.
Completely unusual (and to be truthful I have yet to finish any of the
"new" 1/72nd Eduard WW1 biplanes). The I-5 I consider very "handsome"
and the AII Aluminum and red scheme of Pavlov's machine is really striking
and makes the model stand out. I highly recommend this model, and everyone
should buy at least one. (ICM also released this kit as an "Early"
version with a different fuselage and nose.)
 References References
Polikarpov Fighters in Action Pt. 1, Hans-Heiri Stapfer, Squadron Signal,
1995 (Photos only)
I-5, I-15, I-15 bis, Warbirds No. 1, Polygon, 1992
|
|