
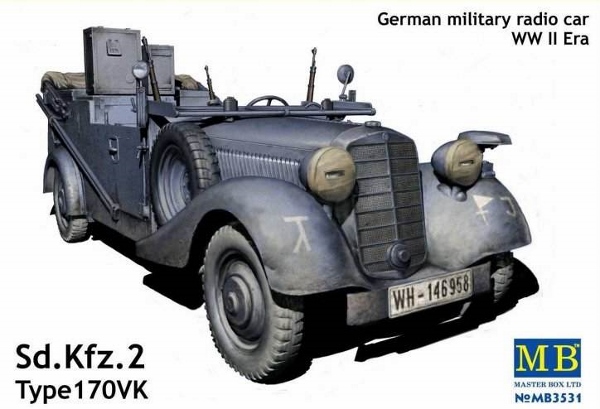
MasterBox 1/35 Sd.Kfz. 2 Type 170VK German Military Radio Car: WW II era
By Don Barry
Kit # MB3531
MSRP: $49.95 USD
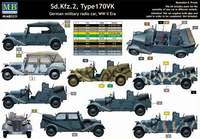 This latest offering from Master Box is a diminutive Mercedes 4 passenger touring car, converted to military use, in this case, a 3-seat car. Do not let its small size mislead you; this is a complex little model. Almost every aspect of this vehicle is represented; full engine, cooling system, full suspension (you’re gonna love that double leaf spring front end), canvas top (folded or up), radio and battery case, and much more. For some reason, one sprue is a different color of plastic, maybe another source? At least it is so in my review kit. The castings were clean and flash free, except on the ends of the door interior pull handles, which I replaced with wire. A 12 page set of instructions includes a parts map, which I found expedient to remove and set up for easier reference. Drawings are of the exploded view type, with some illustrations much sharper and finer than others. Several different paint schemes are illustrated in color on the back of the box, with paint codes given for Vallejo and Lifecolor products. A small decal sheet of registration numbers, tactical symbols, and tire pressure warnings was perfectly in register and printed on very thin carrier film, and responded well to Solvaset, laying down flawlessly(except where I tore them through my own carelessness!) No photo-etched parts are included.
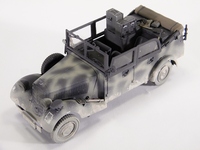 Assembly begins with a 9-step engine. I found it necessary throughout this build, to refer a step or two ahead to see the exact placement of parts, location being somewhat vague in the drawing where the part is used. Building of the frame, suspension, engine installation, and running gear take up the next 23 steps. Work carefully here and insure all four wheels are on the ground; it’s easy to get a tripod if not. The soft vinyl tires slip on easily, but need a spot of superglue to ensure they stay in place. Bodywork, interior, and radios make up the remaining 51 steps. There are multiple ways to configure the radios, windows, and top, as well as the trunk. Several very dainty (read “fragile”) parts make up the turn signal/side mirror/windshield fold brackets; use extra care here, especially in parts removal. The clear windows fit into their respective frames perfectly, with no filing or trimming needed. Fitting body to frame is shown in the last step; I did it quite a bit earlier, before all those “fiddly bits” went on. The locator pegs and holes on the body and frame lined up perfectly, giving a tight, square fit with no drama.
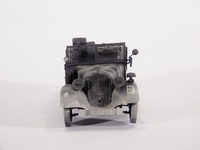
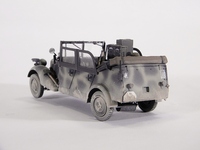 I chose the 2 color panzer grey/dark yellow overspray color scheme, using Floquil Weathered Black for the dark grey, and a mix of Tamiya colors for the yellow, followed by a coat of Future floor wax when dry. I like to finish my vehicles with Waffen SS markings. For this car, I chose the early style Leibstandarte script emblem, from my own collection, with appropriate registration plates. The tactical symbol provided is correct for the 1st platoon of the Signals Company, and so was used as is. I did add a bit of personal gear to give the car a bit of the lived in look, but this is entirely up to the builder. An overspray of road dust and some dried mud splatters down low on the sides, front and rear finished the weathering.
 Despite, or perhaps because of, it’s complexity and size, this model was really fun to build, and that’s really why we do this. The fit was very good, aside from my mistakes, and I’m happy with how it turned out. It may seem a bit pricey for it’s size, but the builder will be rewarded with a good looking replica. I’d say a “Highly Recommended” rating for this one. Thank you so much to Stevens International for supplying this review sample. Have fun and keep building.